Manage Batch Data with a Custom Dialog Screen
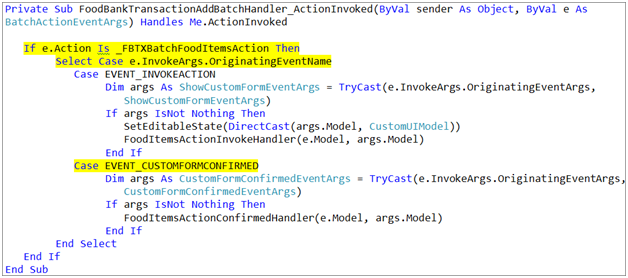
When a user clicks the action, the Custom UI Model defined by the action is displayed. In addition, the ActionInvoked event is fired. Below, we handle this event and inspect the originating event name to see if the action is being invoked (opening the Custom UI Model data form) or if the Custom UI Model is being confirmed (OK was selected on the dialog screen and the form was closed).

Now we must populate the dialog screen with the food item data from the batch row. The data within the batch row is represented by a UI Model object. The UI Model for the batch row is represented by the batch action event argument's e.Model object. If the action is invoked, we pass a reference to this batch row to a sub routine named FoodItemsActionInvokeHandler.
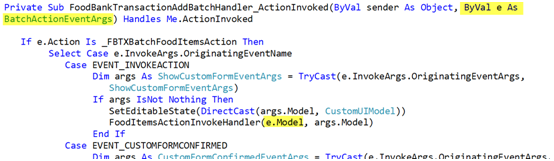
We also pass a reference to the Custom UI Model data form (args.Model) using the action's event arguments.
Since our batch event handler code inherits from Blackbaud.AppFx.BatchUI.BatchEntryHandler, we have access to various helper routines such as TrySetValueForFieldID and GetValueFromFieldID. The GetValueFromFieldID routine is used to retrieve the food items from the batch row's UI Model. The TrySetValueForFieldID helper procedure is used to copy the food item data from the batch row to the Custom UI Model dialog screen. Here is the one line of code to move the data, pretty elegant.

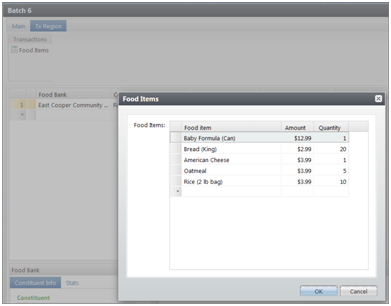
As a result, food items in the batch row …
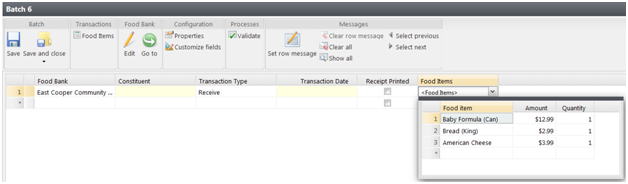
… are copied to the custom UI model dialog screen when the batch action is clicked.
Since the data within the batch row and the dialog screen (Custom UI Model data form) is represented by their respective UI Model objects and since both UI models contain the same name and structure for the food items, we can copy the values from the batch UI Model to the dialog screen (Custom UI Model data form) UI Model. As a result, the food items from the batch row will be displayed within the Custom UI Model data form.
Move Data from the Dialog Screen Back to the Batch Row
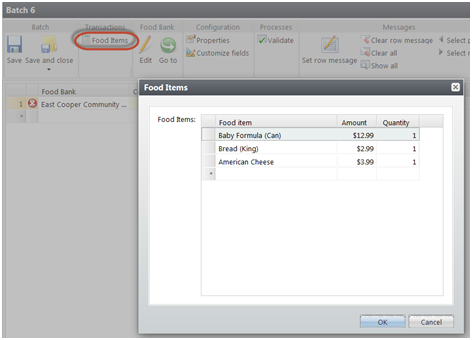
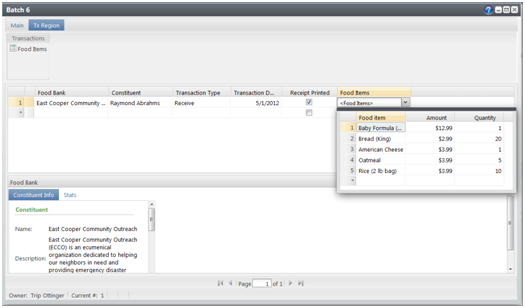
We can add, edit, and remove food items from the Custom UI Model dialog screen. In the screen shot below, you can see the Bread row quantity was edited and Oatmeal and Rice food items were added to the food items collection.
When the user clicks the OK button on the dialog screen, we need to move the modified data from the dialog screen back into the batch. Clicking OK confirms the dialog screen. After the screen is confirmed, we can capture the event within our ActionInvoked handler and move the data back to the batch row.
After we establish that the custom dialog screen was confirmed, we can extract the CustomFormConfirmedEventArgs from the BatchActionEventArgs which get passed to the ActionInvoked event by the "e" argument variable. CustomFormConfirmedEventArgs contains a reference to the custom dialog screen's UI model that contains the edited data. The batch row's UI model is represented by e.Model. We make a call to FoodItemsActionConfirmedHandler to copy the data back to the batch row UI model.
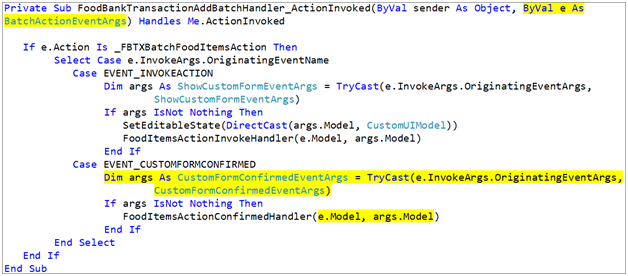
Placing the data back into the batch row uses the same technique as before. Set the food items field (FOODITEMS_FIELDID) value on the batch row (batchModel) to the value of the food items field within the Custom UI Model dialog screen (FoodItemsCustomUIModelDialogFormModel).

Note: For educational purposes, this sample displays both the child grid and the dialog screen to manage the collection of food items. However, if you choose to use a custom dialog screen to manage child data, you probably want to hide the child column within the batch to provide just one mechanism to manage the child records.