Set Up Visual Studio for JavaScript Development
Validate JavaScript and HTML with Blackbaud.AppFx.HTMLLINT.exe
Note: Download the Blackbaud.AppFx.HTMLLINT.ZIP file at Blackbaud.AppFx.UIModeling.HtmlLint.
Note: To learn more about "Linting" your JavaScript code, check out the following website: http://www.jslint.com/lint.html.
With JavaScript being what it is, a scripting language with no compilation step on the part of the developer, it's easy for bugs to sneak in during development that would typically only be found at runtime. It is imperative that you have Blackbaud.AppFx.HTMLLINT.exe set up properly and that you run it on any JavaScript or HTML file before you check in to source control or compile and deploy. This utility analyzes and validates JavaScript before runtime, much like a compiler does.
This utility is based upon Douglas Crockford's JSLint utility, which is one of the best and most popular JavaScript verifiers. JSLint is a JavaScript syntax checker and validator. JSLint is available on his web site and allows you to paste in JavaScript code and specify certain optional rules, and then displays any errors it finds in your code.
Check the HTML and CSS
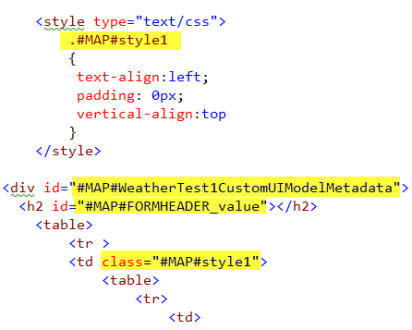
Besides validating the JavaScript, the Blackbaud.AppFx.HTMLLINT.exe utility also validates the HTML file used to layout the controls in the user interface. For example, it ensures that every CSS class or style name is qualified with an element with the #MAP# prefix. Before the HTML page is sent to the web browser, the platform will replaces "#MAP#" with a unique string so that the IDs and CSS classes in the layout won't clash with IDs and CSS classes of other elements on the page. All CSS rules should either point to an element with a unique ID or scoped to a parent element with a unique ID (example: "##MAP#myMainDivId .className"). Below is an example of a typical HTML file used to layout user interface controls for a data form. Note the usage of the #MAP# prefix (yellow highlights) within the CSS and HTML.

Figure: The utility validates the HTML file used to lay out the controls within a UI model-based data form such as an Edit Data Form or Custom UI Model.
It also validates closing tags for items such as input, img, link, table, div, span, style, etc. It ensures that self-closing tags such as input and img are self-closed (using the "/>" technique) instead of having an end tag. Meanwhile, nonself-closing tags such as table, div, span, and style must have corresponding end tags and cannot be self-closed.
Using Visual Studio's External Tools, it's quite easy to integrate Blackbaud.AppFx.HTMLLINT.exe into Visual Studio itself, letting you write, lint your JavaScript code, and validate your HTML all in one place.
Here's how to get Blackbaud.AppFx.HTMLLINT.exe set up on your instance of Visual Studio:
-
Download the Blackbaud.AppFx.HTMLLINT.ZIP file here and extract the executable to a folder on your hard drive.
-
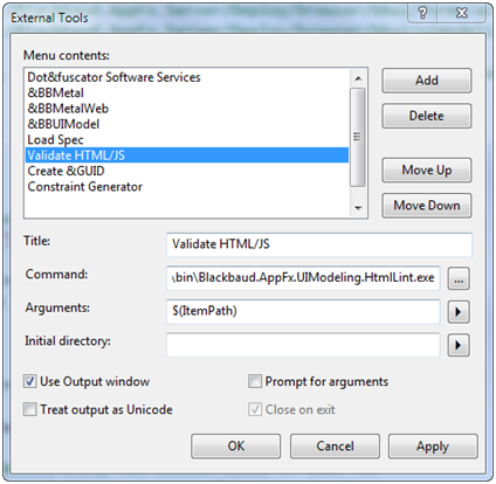
Open Visual Studio and in the Tools menu, click External Tools.... Click Add, fill out the relevant fields and then click Apply. A sample screen shot can be found below.

Figure: Add HTMLLint to the Visual Studio Tools menu
The Tools menu in Visual Studio should now include a Validate HTML/JS option. Open a JS file or HTML file and select this menu item. The Output window should present itself with the results of the validation:

Figure: Within Visual Studio, the Output Window displays the results of the HTMLLint Validation.
Examine the JSLint Options
When you look near the top of JavaScript files we author, you will usually see these two lines of JavaScript code:
//use the latest version of jsLint with stricter rule checks
/*lintversion 2*/
/*jslint bitwise: true, browser: true, eqeqeq: true, undef: true, white: true, indent: 4*/
/*global BBUI, Ext, $ */
/*JSLint documentation: http://www.jslint.com/lint.html */
The jslint line indicates to JSLint the various options to turn on when validating the JavaScript (all possible options are documented here). In the sample above, these options depict the following:
| Option Sample | Description |
| bitwise: true | Tolerate bitwise operators. True = bitwise operators allowed |
| browser: true | Tell JSLint to assume the code runs in a web browser (and therefore globals like “document” and “window” are valid) |
| eqeqeq: true | triple-equals should always be used for comparison instead of double-equals (since double-equals causes type coersion and can lead to false positives) |
| undef: true | All variables should be defined with a “var“ statement |
| white: true | Tolerate messy white space. true if strict whitespace rules should be ignored. |
| indent: 4 | The number of spaces used for indentation. Four is indicated in the sample. The default value is also 4. |
The second line (/*global BBUI, Ext, $ */) indicates global variables that are defined outside of this particular JavaScript file so the "undef" rule doesn’t fail when it encounters these variables in use. If a variable is not explicitly declared, then JavaScript assumes that the variable was global. A good discussion on the evils of Global variables in JavaScript can be found here.
Turn Off JavaScript Formatting Options
If you do not follow this step, you will more than likely get barked at the next time you run Blackbaud.AppFx.HTMLLINT.exe on a JavaScript file that you edit. This is because JSLint's whitespace rules differ from the ones Visual Studio imposes when it automatically formats your code. Since JSLint enforces a well-documented whitespace standard and Visual Studio does not, JSLint wins.
-
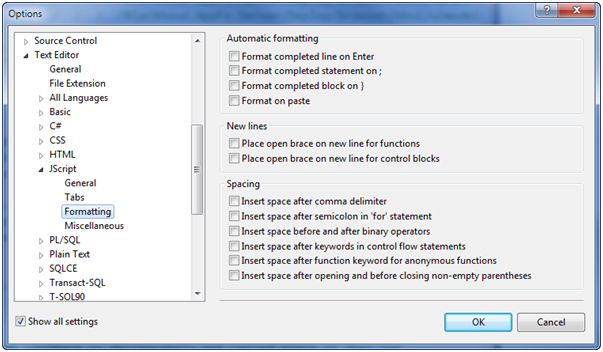
To turn off the formatting options, open Visual Studio, go to Tools > Options, and select Text Editor > JScript > Formatting. (Note that this feature is new to Visual Studio 2008 Service Pack 1. If you have not installed SP 1, do that first. If you are developing with the Blackbaud CRM 2.91 version of the SDK, you should use Visual Studio 2010 with .NET 4.0.) Clear all the boxes, then click OK. If you have other instances of Visual Studio open, close those instances first, then close the instance where you saved the formatting options. This keeps other instances of Visual Studio from overwriting your new settings if they are closed after the one you used to change the settings.
Your formatting options should now look like this:

Figure: JavaScript formatting options
Optimize Visual Studio for JavaScript IntelliSense
Visual Studio 2008 SP1 and Visual Studio 2010 provides pretty good (though not perfect) support for JavaScript IntelliSense. Follow these tips:
-
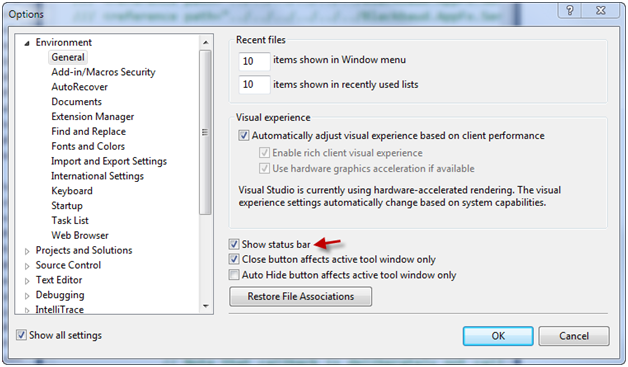
Turn on the status bar in Visual Studio. When JavaScript IntelliSense is updated for a file, the status bar shows the status of the update and will notify you if there was a problem generating the IntelliSense. To turn on the status bar, go to Tools > Options, and under the Environment > General section, check on the "Show status bar" option. This will show the status bar at the bottom of the Visual Studio window. Here is an example dialog window for Visual Studio 2010:

Figure: Figure 27: The Show status bar checkbox should be selected.
Visual Studio updates JavaScript IntelliSense when Visual Studio is idle. If you need to force Visual Studio to update the IntelliSense immediately, for instance after you updated the XML comments in your file, press Ctrl-Shift-J or select the "Update JScript IntelliSense" menu item from the Edit > IntelliSense menu.
Visual Studio only provides IntelliSense from XML comments when the function or field is referenced from another file, meaning if you mark up a function or field in a JavaScript file, you will not see IntelliSense from those XML comments elsewhere in the same document.
Warning: As of the writing of this content, IntelliSense for JavaScript within Visual Studio 2010 does not work property.