Exercise: Add the Flowchart
Now we will add a Flowchart activity to the workflow designer. The flowchart models workflows using the familiar flowchart paradigm. The Flowchart activity is used to create workflows that define and manage complex flow controls. The Flowchart specifies a unique StartNode that is executed when the workflow starts and uses a network of linked Nodes to create arbitrary loops or to divert the flow of execution to anywhere else in the workflow at any given time.
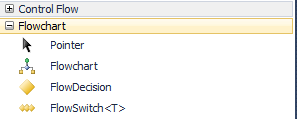
The Flowchart activity designer can be found in the Flowchart category of the Toolbox, which you access by clicking the Toolbox tab on the Workflow Designer.
The Flowchart activity designer can be dragged from the Toolbox and dropped on to the Workflow Designer surface wherever activity designers are normally placed, either as a root activity or as the child of another control flow activity. If the Flowchart activity designer is dropped onto a blank Workflow Designer surface, it creates a Flowchart activity, which by default presents itself in an expanded view in which the start node that initiates execution is represented as a green ball. If the Flowchart activity designer is dropped into another control flow activity, it presents itself in a minimized view that can be expanded by double-clicking the Flowchart activity designer. Any activity in the Toolbox can be dragged directly onto the Flowchart activity designer, including other control flow activities.
After dragging various activity designers onto the Workflow Designer canvas, the Activity objects they represent can be linked together to specify the order of execution. To create a link between a source activity and a destination activity, mouse over the designer of the source activity and square handles appear on each side of it. Click one of the square handles and drag it by holding down the mouse button to one of the handles that appears in a similar manner around the destination activity when hovering over it with the mouse. Release the mouse button and a link is created between these two activities that is represented as an arrow from the source designer to the destination designer. 3
Instructions
Step 1 - Add the flowchart to the designer.
-
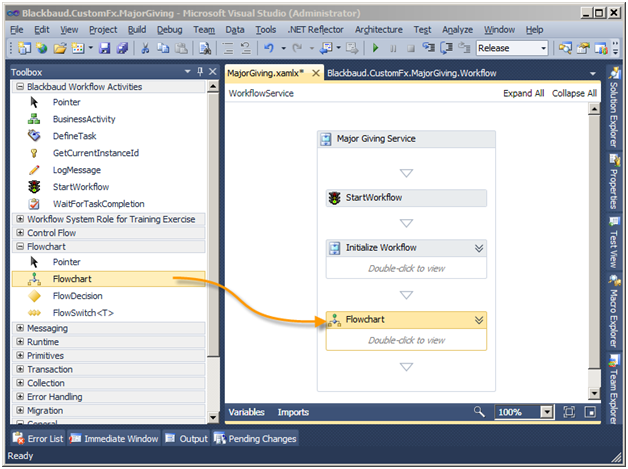
Drag a Flowchart activity from the Toolbox and drop the flowchart within the Major Giving Service sequence activity below the Initialize Workflow sequence activity.
-
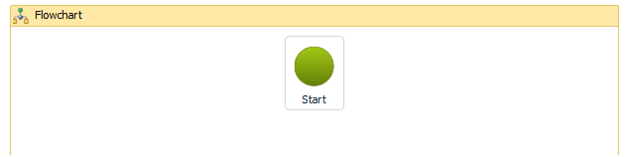
Double-click the Flowchart activity to view the start node that initiates execution which is represented as a green ball.
Step 2 - Drag a FlowDecision activity onto the flowchart.
The FlowDecision designer can be dragged from the Toolbox and dropped on to the Workflow Designer surface within a Flowchart activity designer. This creates a FlowDecision labeled Decision within the Flowchart activity. Mouse over the designer and the True and False square handles for the two branches appear.
Use FlowDecision when the flow can be branched into two paths. A FlowDecision node has a Condition and a FlowNode associated with each of two possible outcomes: True or False. The Condition is evaluated and the value of this evaluation determines the next FlowNode to be processed within the Flowchart. The FlowDecision node is a conditional node that provides a branch for the flow of control into one of two alternatives based on whether a specified condition is satisfied. If the flow requires more than two branches, use FlowSwitch instead. 4
-
Drag the FlowDecision activity from the toolbox onto the Flowchart activity.
-
Connect the Start activity to the Decision activity by connecting the nodes from each activity.
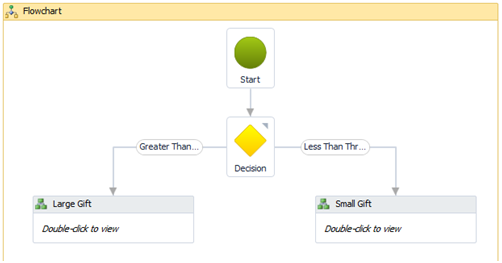
Your flowchart should now look like this:

Note the red exclamation point. Hovering over the icon reveals that we are not through with our FlowDecision. It states "Condition must be set before the FlowDecision in Flowchart 'Flowchart' can be used."
Step 3 - Set the condition for the FlowDecision.
-
Right-click the FlowDecision and view the properties.
-
Enter the following expression for the Condition that will evaluate the amount of the revenue transaction against the threshold.
-
Enter a description for both the FalseLabel and TrueLabel properties.
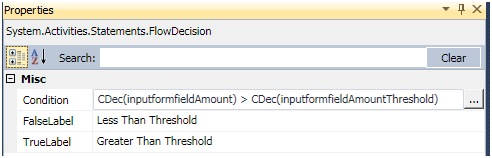
-
Hover your mouse over the FlowDecision. Note how the activity reflects the changes to the properties.
Step 4 - Add Blackbaud business activities to the flowchart.
Our next order of business is to add two business activities to the flowchart, one for each of the possible outcomes of the FlowDecision. We will then connect the false outcome (Less Than Threshold) to the "Small Gift" Business Activity and the true outcome (Greater Than Threshold) to the "Large Gift" Business Activity.
There are two kinds of activities in a workflow – those that represent low level plumbing details (like the LogMessage activity) and those that represent higher level logical steps that are more meaningful to an end user who cares about the progress of this workflow. The Infinity Workflow Activity Library contains a special activity to allow a workflow author to distinguish application level logical "Business Activities" from the lower level component building block activities. This activity is the BusinessActivity which is part of the Blackbaud Workflow Activities toolbox set:
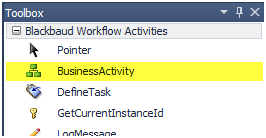
A workflow author will use a BusinessActivity in a workflow as a container to represent a logical business step in the workflow. A BusinessActivity is a container that can have a single child activity. Usually the child will be a SequenceActivity that will contain a set of lower level activities to carry out the steps required to implement that logical step.
A BusinessActivity will surface information about its status in the application on the Workflow Instance page. Here is a view of workflow instance page for an instance of the completed major giving workflow that is in progress:
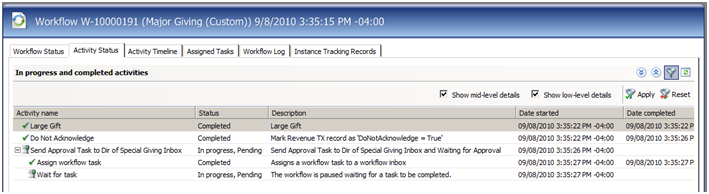
Looking at the Activity Status tab above, you can see the workflow is still in progress. The BusinessActivities are represented within the Activity name column. As you can see, several business activities are completed while one other is in progress. Business activities provide a high-level view of the steps and their status to the end user.
-
Open the Blackbaud Workflow Activities tab within the Toolbox and drag two BusinessActivity activities onto the flowchart.
-
Connect the "Less Than Threshold" to one BusinessActivity and the "Greater Than Threshold" to the other.
-
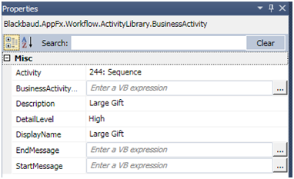
Provide the following properties for each BusinessActivity:
-
Large Gift
-
Small Gift

-
When you are done your flowchart should look like this: