Service Pack 14
Tip: Want to review this offline? Use your internet browser's print function to save this topic as PDF file.
We have made some enhancements to our Fundraiser on the Go mobile application.
Changes to the Prospect Screen
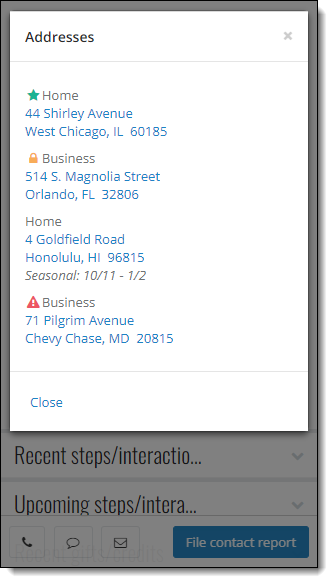
The prospect screen now shows the prospect's picture.
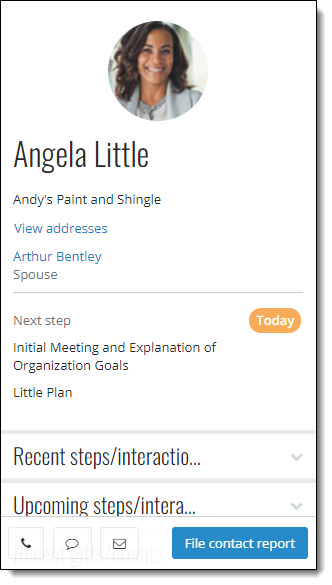
You can also see a prospect's addresses. Tap the new View addresses option to display all available addresses.
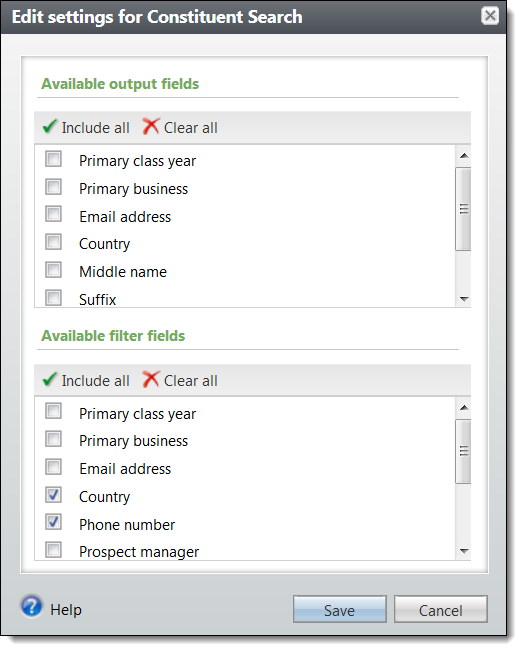
Enable Country and Phone Number Search
To search by country or phone number in Fundraiser on the Go, you must enable these searches in Blackbaud CRM.
-
Toggle to Design Mode.
-
From Prospects, right select Search constituents and select Go to search list. The Search List: Constituent Search page appears.
-
Select Settings under Tasks. The Edit settings for Constituent Search screen appears.
-
Select "Country" and "Phone number" under Available filter fields and select Save.
Show Smart Fields
You can now designate up to five smart fields to see on the application. You can select any smart field that reports a revenue amount.
From an add or edit screen for a smart field, select the "Show this smart field in Fundraiser on the Go" checkbox.
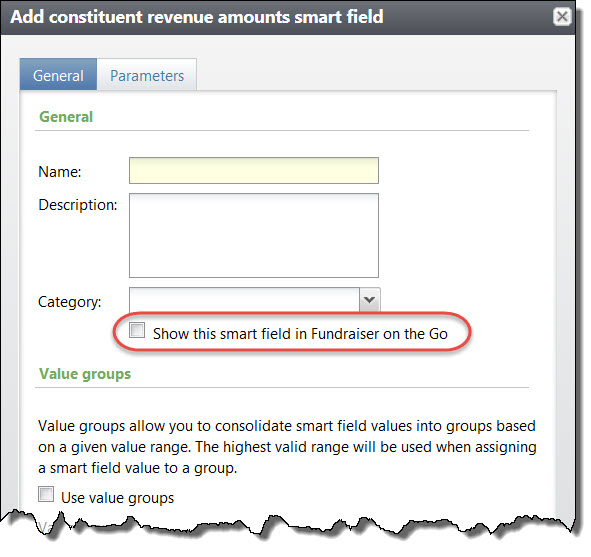
Selected smart fields appear on the prospect screen on Fundraiser on the Go, under the new Summary information section. To add or edit smart fields, from Administration, select Smart fields under Data.
The General Data Protection Regulation (GDPR) is a new regulation that governs the way you manage data from constituents in the European Union. To support compliance with these regulations, we have made several enhancements to Blackbaud CRM. These enhancements allow you to track consent given by your constituents. In future releases, we will include new functionality to include or exclude these constituents in your mailings.
Use Solicit Codes to Track Consent
You can now use solicit codes to track GDPR consent. When you add or edit a solicit code, you can use the new Consent field to identify solicit codes you want to use for this purpose. From the drop-down menu, select "EU Consent."
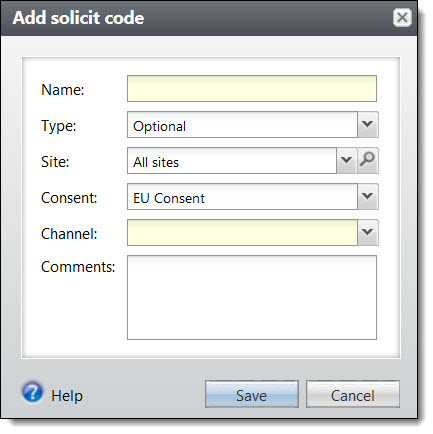
When you select "EU Consent" in the Consent field, the new Channel field appears. Create a solicit code for each channel you want to track. If you use sites and want to track consent independently for each site, you must create a separate solicit code for each channel for each site.
To access solicit codes, from Marketing and Communications, select Solicit codes under Configuration.
Solicit Codes on Constituent Records
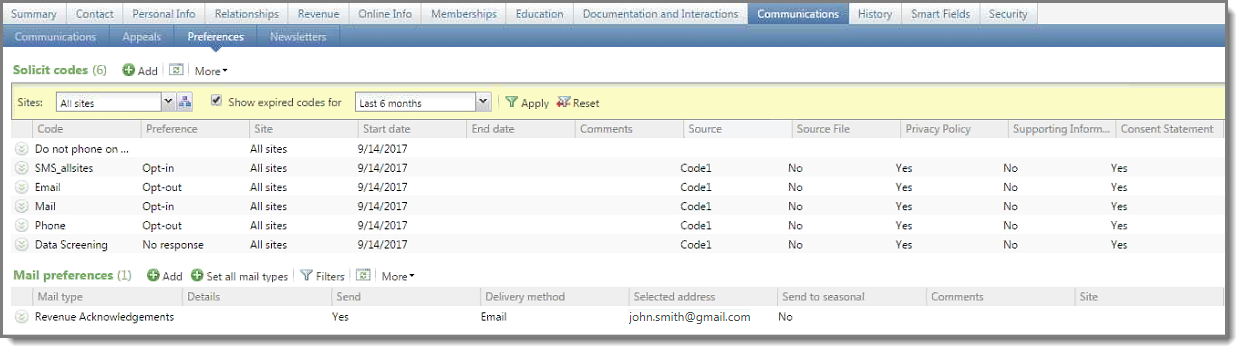
On constituent records, solicit codes appear under Communications, Preferences. When you add a solicit code that carries consent information, the Assign solicit code screen now includes additional fields.

-
The new Preference field tracks the status of the consent: No response, Opt-out, or Opt-in.
-
Under the new Source evidence section, you can indicate how you captured consent, link to a file (such as a scanned consent form that the constituent signed), and indicate what version of your privacy policy was used. You can also enter additional details in text form in the Supporting information field.
-
In the new Consent statement section, you can enter the specific consent statement you used for this constituent.
If you enter a new solicit code for a constituent who already has a solicit code of that type with an open date range, the program automatically puts an end date on the existing solicit code and the new solicit code becomes the active one. This preserves the history of opt-in/opt-out options for the constituent and prevents conflicting consent options on the same record.
Solicit Codes in Batches and Queries
Solicit codes are available in Constituent batches, Constituent Update batches, queries, and in the Blackbaud Data Warehouse.
Constituent batches already had a Solicit codes option during batch entry; we now display this same option for Constituent Update batches as well.
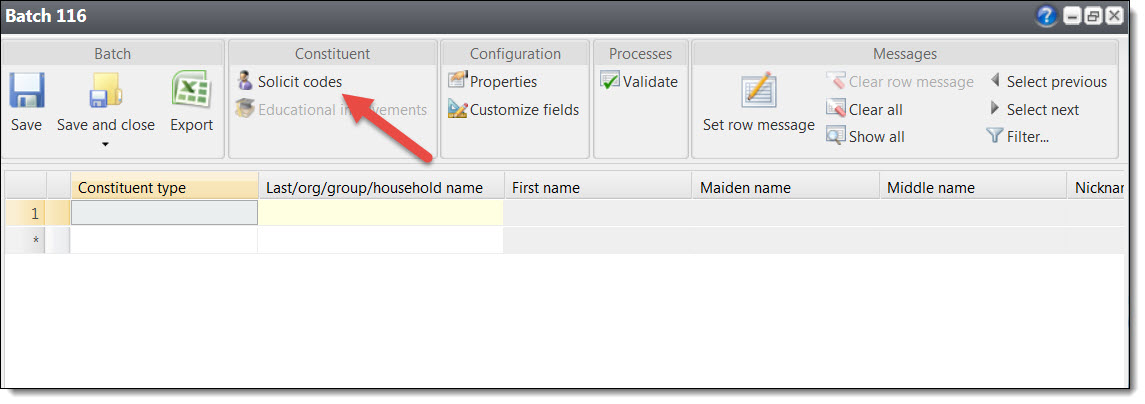
When you include solicit codes in either of these batch types, you can use this option to enter details. The fields have been updated to reflect the new options available for GDPR-related solicit codes.
Integration
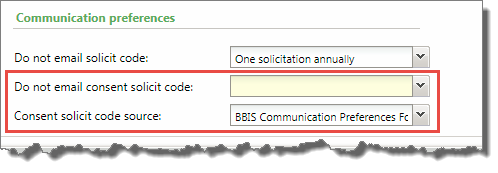
Under Manage web transactions, Configure integration, two new communication preference settings were added to support GDPR data integration from the Blackbaud Internet Solutions (BBIS) Communication Preferences form into Blackbaud CRM.
Similar to the Do not email solicit code setting, the new Do not email consent solicit codeconfiguration setting enables you to identify one of your consent solicit codes to use as your global email opt-out value. A global email opt-out value is required by Blackbaud to comply with international email compliance, including CAN-SPAM, CASL, and GDPR.
The Consent solicit code source setting is written to the solicit code record when new values are added from the Blackbaud Internet Solutions (BBIS) Communication Preferences form.
This service pack includes a redesigned Event Registration Form part that supports complex events — such as multi-day events or when there are multiple events on the registration form. The Event Registration form has a new user interface and a streamlined workflow to make the registration process easier especially when registering multiple attendees for multiple events.
Note: One major workflow change is that the attendee registration page displays before the list of events is shown. It is assumed that users will have already seen the list of events before they access the Event Registration Form. When creating an event, our recommendation is that you link users to the registration form at the point that you want users to start their registration.
Note: We've used new CSS classes to support the user interface redesign. If your organization currently uses a custom CSS on your event registration forms, you should plan for additional design work in order to incorporate our new form design into your existing site style.
Event Registration Form: Website
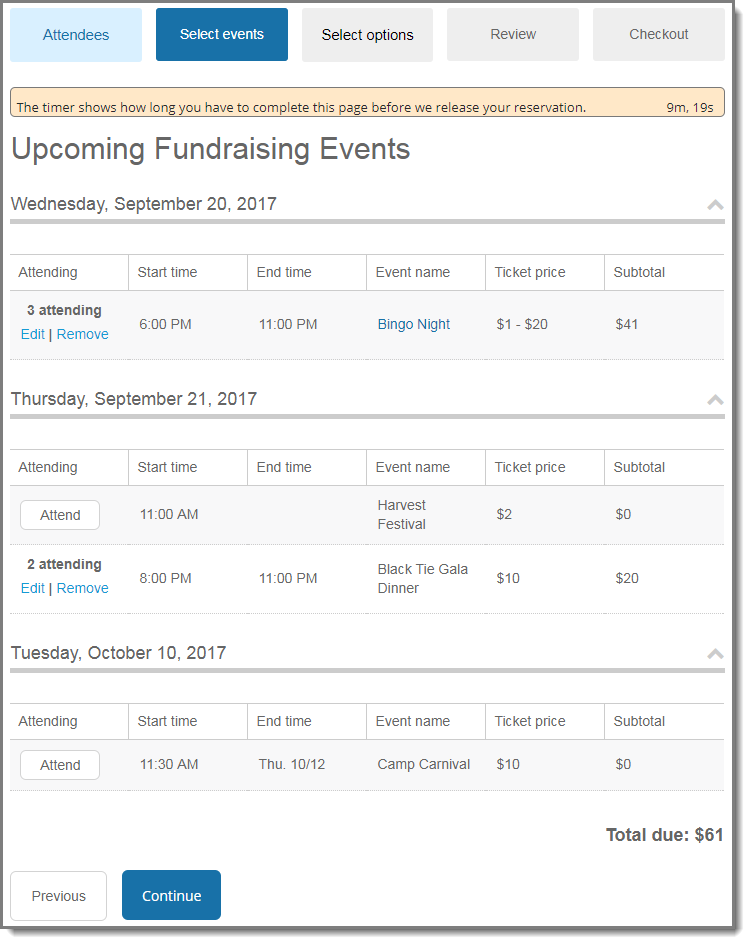
When you include the Event Registration Form part on your website, users can now register multiple attendees for multiple events using the streamlined workflow steps:
Step 1: Attendees — Website users can enter details for all registrants, including themselves, multiple guests, and unnamed guests, who will be attending any of the events. When configuring the form, you can specify which fields to display — and which fields are required — on the Attendees page.
Step 2: Select events — Shows a list of all events that are available to register for. When selecting an event to attend, website users can select attendees from a drop-down list populated with all attendees that were added in Step 1. As attendees are registered for events, the page is automatically updated with event attendee information and subtotal amounts.
Step 3: Select options — Website users can choose options (where applicable) for events, such as preferences and restrictions, for each registrant for each event. Note that event options cannot be selected for unnamed guests.
Note: The Select options page doesn't display if there are no options available for the selected events.
Step 4: Review — Displays details for the selected events, such as who is registered for each event and what their preferences are. Modifications can be made to any event registration by selecting the event's link. When designing the form, you can configure whether this page displays to the website user.
Step 5: Checkout — Website users can specify the billing information, additional donations, and the payment method, then make a payment using Blackbaud Checkout.
Once the registration is complete, the transaction data in Blackbaud CRM includes information for each registrant, including event details and options, and payment information.
Event Registration Form: Edit Part
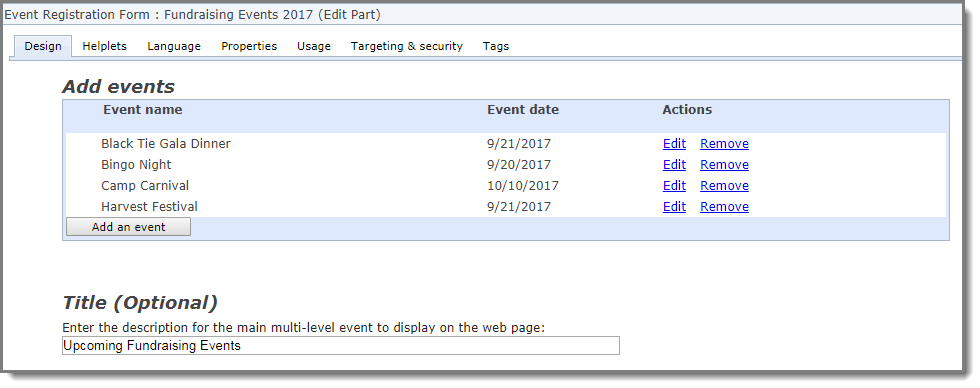
When you design the new Event Registration Form part, you select multiple events to include on a single form. Select Add an event to choose an event from Blackbaud CRM and specify the event's configuration options. All events listed under Add events display on the Select events page of the Event Registration Form in chronological order. The events are automatically ordered on the form based on their start date and time, so you no longer have the ability to manually reorder events.
Under Actions, you can edit or remove events as needed. Optionally, you can also enter text in Title if you want to include an event description on the form for the main multi-level event.
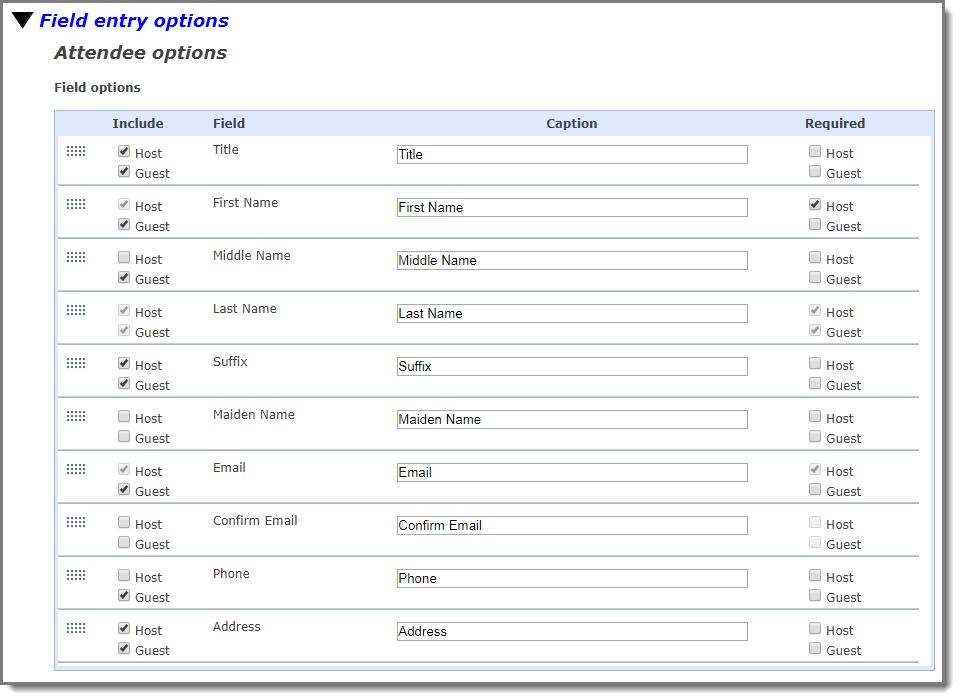
The registrant biographical fields that display on the Attendees page are now configured using the new Field entry options section under Attendee options. In the Include and Required columns, select which fields to display and which fields are required for hosts (primary registrants) and their guests. You can also modify the text that displays in the Caption field and change the order that the fields will display on the form. Under Organization options, you can select whether to allow users to register as an organization; if selected, the option displays on the Billing Information page prior to payment.
Under Options, a new Include review step option enables you to configure whether the review page is displayed to website users during the registration process.
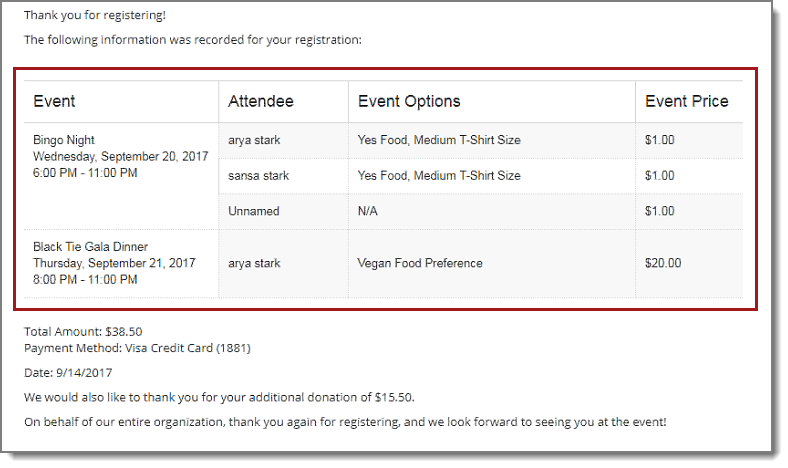
To provide more summary information to users after they've registered for events, we've added a new Event merge field called Full Event Details that you can use when customizing the acknowledgment page. When you include this merge field, all the information from the registration form's Review page displays on the acknowledgment page when registration is completed.
To support our redesigned Event Registration Form part, we've also redesigned the batch processing to better accommodate multiple event registration results. Now, when you review the downloaded event registration batch details in Blackbaud CRM, the information for registrants and events is organized more efficiently.
We removed the Guest tab, and now all registered attendees — host, guests, and unnamed guests — display on the Registrants tab. The Registrations tab shows details for all events that have been registered for. The Payment tab shows all payment information that was entered on the payment page during registration. The donation amount and designation are shown on the Additional donation tab if an additional donation was made during the checkout process.
![]()
When you select an attendee on the Registrants tab and then select View details, all corresponding event information is displayed. The Events tab lists all the events that the attendee was registered for, the Options tab shows the preferences selected for each event for the attendee, and the Biographical and Address tabs show the registrant's personal information.
![]()
In order to support the upcoming enactment of the European Union's General Data Protection Regulation (GDPR), functionality was added in this release to ensure organizations capture explicit consent from their constituents before communicating with those constituents by any channel, such as mail, email, or phone.
To support GDPR, a new consent solicit code type was added in Blackbaud CRM. When a constituent's consent is received, preference information and related details for the consent solicit codes are included on the constituent's record on the Communication > Preferences tab. In Blackbaud Internet Solutions (BBIS), several changes were made to the Communication Preferences form to support the new consent solicit codes.
Email Opt-out
In this release, we've renamed the previous the Global opt-out option to Email opt-outto more accurately reflect the functionality and meet global email opt-out regulations for those customers who continue to use solicit codes.
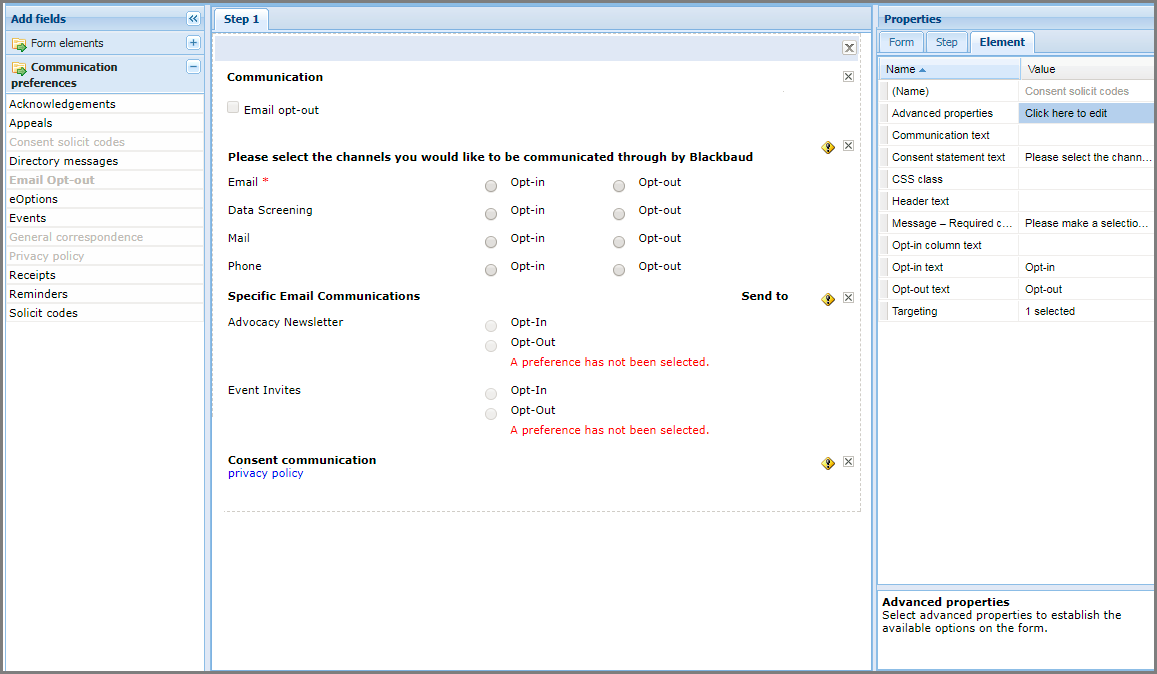
Consent Solicit Codes
The new Consent solicit codes element lists consent solicit code options, enabling constituents to explicitly opt-in or opt-out of a specific communication channel. You can configure which consent solicit codes to include on the form by using the Element tab in the Properties pane. Select Advanced properties, then specify the consent solicit codes from Blackbaud CRM you want to include on the form, the text to display for each code, and which codes require a consent selection.
General Correspondence
On the General correspondence element, the No preference option has been removed. Previously, constituents who did not have a previously set choice in Blackbaud CRM had their email preference options set to No preference by default. Now, if constituents do not specify a preference to opt-in or opt-out, the message "A preference has not been selected" displays on the form. To change the message, modify the text in the No preference text row on the Elements tab.
Privacy Policy
The new Privacy policy element enables constituents to review your organization's privacy policy from the Communication Preferences form. You can select the privacy policy to include by using the Element tab in the Properties pane. Select Advanced properties, then either select the Blackbaud Internet Solutions (BBIS) web page or enter the URL where the privacy policy is located. On the Elements tab, you can also modify the text in the Header text row to change the header caption, and in the Privacy policy text row to change the link display text.
Blackbaud CRM Integration
When constituents submit their consent preferences via the Communication Preferences form, those preferences are written to their Blackbaud CRM constituent record and display on the Communications > Preferences tab under Solicit codes. Consent solicit codes, consent statement, privacy policy, and more consent details are included on the record.
Two new options — Do not email consent solicit code and Consent solicit code source— were added in Blackbaud CRM under Manage web transactions, Configure integration.
Similar to the Do not email solicit code option, the new Do not email consent solicit codeconfiguration option allows you to identify one of your consent solicit codes to use as your global email opt-out value. A global email opt-out value is required by Blackbaud to comply with international email compliance, including CAN-SPAM, CASL, and GDPR.
The Consent solicit code source is written to the solicit code record when new values are added from the Blackbaud Internet Solutions (BBIS) Communication Preferences form.
In Blackbaud Internet Solutions (BBIS) SP13, we provided three generic responsive email templates that you could download from the Blackbaud Community, and then use in Blackbaud Internet Solutions (BBIS) as default templates. For this release, we've made these email templates available on the Blackbaud Internet Solutions (BBIS) Developer site, and included a link to them from within Email Templates.
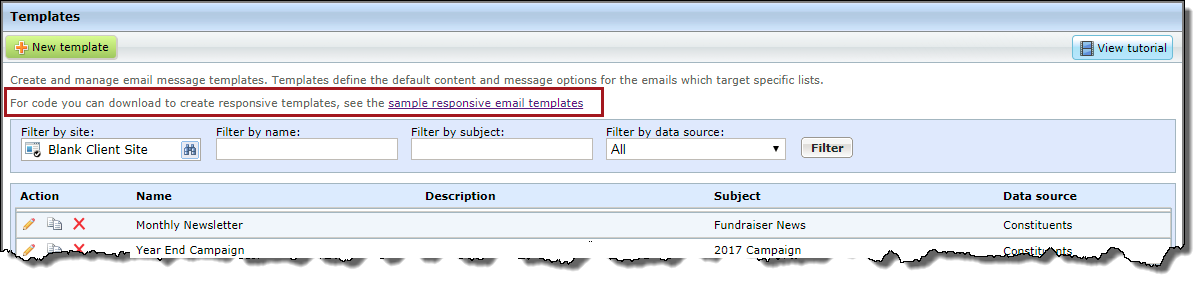
There are currently three sample responsive email templates available for download. You can use these sample templates to create your own responsive email messages for acknowledgments, appeals, and newsletters. To use these templates, go to the BBIS developer site under Responsive Email Templates to download the source code and review the instructions for creating a new email template in Blackbaud Internet Solutions (BBIS).
Also in this release, we've removed the outdated placeholder, mobile-friendly templates from Email Templates.
You can now specify a revenue category when you add a new membership. This option is available in Membership Dues Batch and when you add a membership to an individual constituent record, but it is not available in the hybrid form view.
This update fixes multiple defects and issues. For details, review the patch notes for service pack 14.