Service Pack 16
Tip: Want to review this offline? Use your internet browser's print function to save this topic as PDF file.
You can now schedule recurring gifts with the new Every 4 weeks frequency. When you add or edit a recurring gift, you can choose this frequency and the gift will be processed every 4 weeks exactly, which allows you to collect a 13th installment. This new frequency option is supported on the following parts:
-
Donation Form
-
Advanced Donation Form
-
Transaction Manager
One benefit of the new frequency is that it enables donors to schedule an additional installment per year. Previously, donors could select the Monthly option, which allowed for a maximum of 12 gift installments per year. The new Every 4 weeks frequency option enables users to schedule another installment — for a maximum of 13 — per year.
As with other recurring gift frequencies, the Every 4 weeks installment frequency information from donation transactions on these forms in Blackbaud Internet Solutions (BBIS) is downloaded and written to Blackbaud CRM through the Enhanced Revenue Batch.
Configure the Donation Form
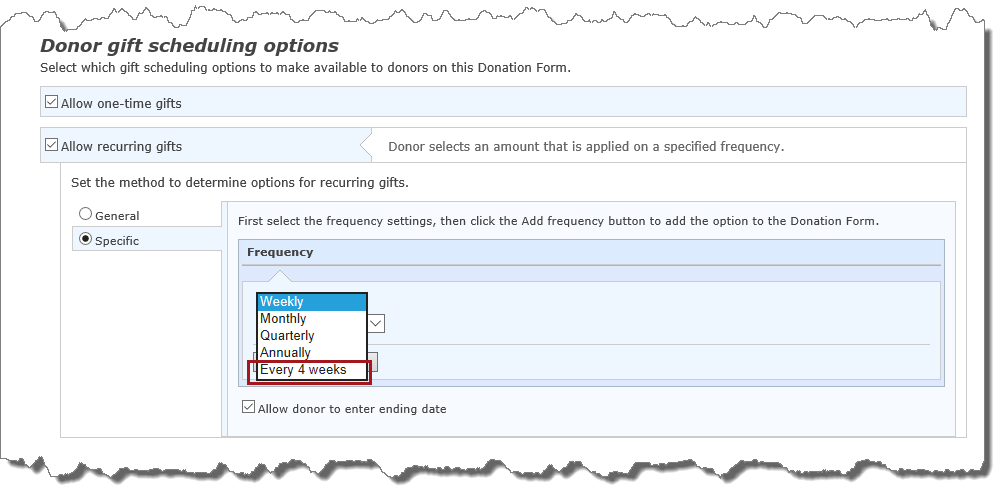
On the Design tab under Donor gift scheduling options, select Allow recurring gifts to display the recurring gift options.
-
When you select General, donors can determine the frequency of the recurring gift. On the Donation Form, they'll now be able to select a giving frequency of Every 4 weeks. When they choose this option, donors are required to enter a start date for the recurring gift.
-
When you select Specific, you define the recurring gift schedules donors can choose. You can now select to include Every 4 weeks as the frequency.
Note: You can modify the Every 4 weeks caption text on the Language tab under the Recurrence Frequency category.
Configure the Advanced Donation Form
When creating your custom donation experience using the Advanced Donation Form part, you can now include HTML for a frequency option value of Every 4 weeks for recurring gifts. For more information about designing the form, see the Advanced Donation Form Developer Guide.
Configure the Transaction Manager
On the Design tab under Recurring gift updates, select Allow frequency updates to display the recurring gift options.
![]()
-
When you select General, donors can determine the schedule for their recurring gift payment. On the Transaction Manager, donors can now select a giving frequency of Every 4 weeks when making changes to their recurring gift. When they choose this option, donors are required to enter a start date for the recurring gift.
-
When you select Specific, you define recurring gift schedules for donors to select from. You can now select to include Every 4 weeks as the frequency.
Note: You can modify the Every 4 weeks caption text on the Language tab under the Recurrence Frequency category.
To help you troubleshoot Gift Aid R68 process exceptions, we have added a new option to review commit exceptions. On the Recent Status tab of the R68 screen, you can access the new 'View commit exception' option.
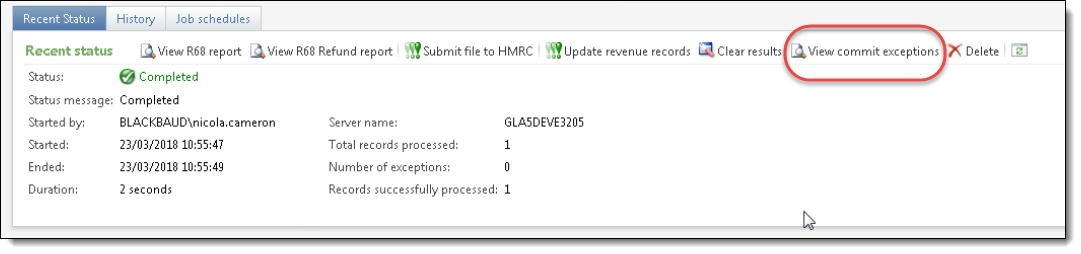
When you select this option, you see a new screen where you can see the Revenue ID affected by the exceptions and drill into details about the reasons for the exceptions.
We have added a new global change to help you honor constituent requests to remove their history from your database. As part of the General Data Protection Regulation (GDPR) that affects constituents in the United Kingdom, constituents can request to have their entire history removed from your database. After you remove their record, you can run this global change to purge any data related to the constituent from your audit tables.
The new global change is called Right to be forgotten.
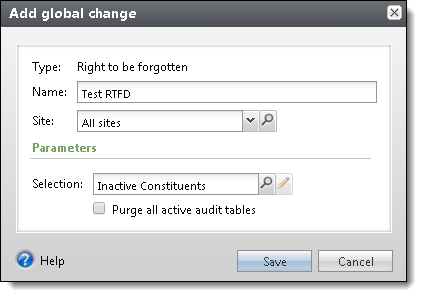
Use a selection to purge audit data from any constituents who have requested to be removed from your database. To also purge active audit tables for those constituents, select the "Purge all active audit tables" checkbox.
The new Acquisition Form part in BBIS enables your organization to collect constituent information — personal data, constituent attribute information, and communication consent preferences — without requiring constituents to register or log in to your site. You can then download the data to your constituent database in Blackbaud CRM via the Constituent Update Batch process.
Note: Consider using the new Acquisition Form part — instead of the Email Signup Form — to capture email signups going forward. The Email Signup Form will be deprecated in a future release.
Use the Design tab to configure the form and customize it for your organization. Under General Properties, enter a Form Title that will display to web site users — for example, Join Our Mailing List. You can also add a Form Description that displays below the form title to provide more information.
Under Fields, enter a Title for the fields section that displays on the form, and then select which fields to include and whether they are required. The minimum required fields — Last Name and Email Address — are selected by default and cannot be modified.

You can change the order in which the fields display on the form by selecting the field's row and dragging up or down in the list.
Under Attributes, enter a Title for the constituent attributes section that displays on the form. Then, select which constituent attributes from Blackbaud CRM to Include on the form and whether they are Required fields. Typically, you display attributes when you have multiple options and you want users to subscribe to emails that match their preferences. Constituent attributes are not required to configure the form, but is recommended to comply with email opt-in best practices.
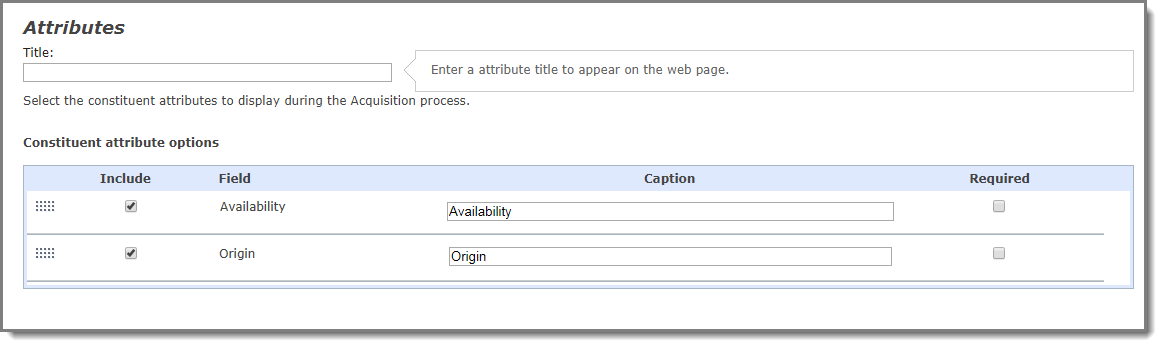
Note: Only constituent attributes you enabled in Sites & settings that have a type of Yes/No, Table, Text and are also marked as Allow only one per record in Blackbaud CRM to enable it to appear in Blackbaud Internet Solutions for display on the form.
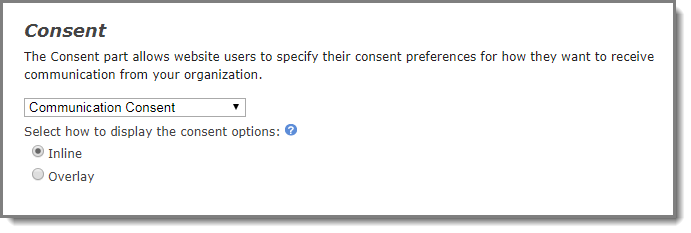
Under Consent, to enable users to specify their consent preferences for how they want to receive communication from your organization, choose an existing Consent part to include on the form. You can specify how you want the consent preference options to display — choose Inline to embed the options directly in the form itself or choose Overlay to display a pop-up window with the consent options when the form is submitted.
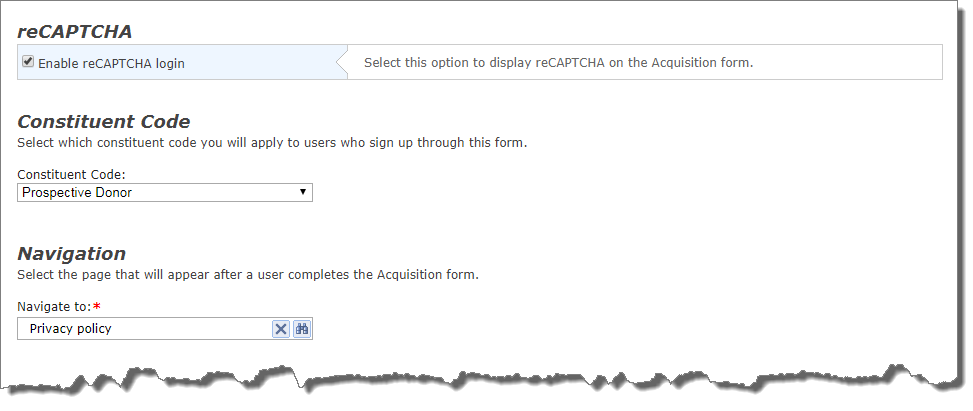
To ensure users are not automated programs to generate spam or phish for information, select Enable reCAPTCHA login to display reCAPTCHA on the Acquisition Form. You can also optionally specify a Constituent Code from Blackbaud CRM to apply to users who sign up using the form.
Under Navigation, select the web page to display to users when the form is completed. Select the binoculars to display the list of pages on your site to choose from. This field is required.
As a last step, select Acknowledgment Email to configure the confirmation email to display after users submit the form. The Name of email, Subject, From address, and From name fields are required. You can edit the default text for the email message.
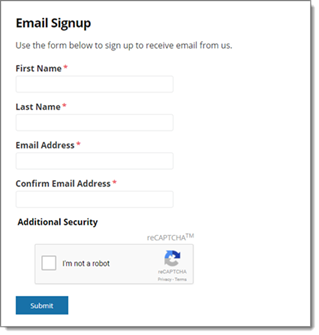
Here's an example of how the Acquisition Form displays on your website:
To enable you to download transactions from the new Acquisition Form, we've made some enhancements in Blackbaud CRM for batch assignments. The Signup transaction type is now called Signup/Acquisition, and there is a new Acquisition transaction type. So, you can choose which transactions — either Signup, Acquisition, or both — to include in the batch assignment.
Transactions from the Acquisition Form are downloaded to the Constituent Update Batch. When you commit the batch, data captured on the Acquisition Form is written to the constituent's record — the record is created for new constituents and updated for existing constituents.
Note: Any existing Signup batch will have its Transaction type automatically changed to Signup/Acquisition and its Include transaction type option set to Signup by default. You can edit any of these batch assignments to also include the Acquisition transaction type.
This update fixes multiple defects and issues. For details, review the patch notes for service pack 16.