Open topic with navigation
Add a new shared document
|
1.
|
On the Home page, in the My Classes grid, click Settings to select the academic year and session to which you want to add shared documents. |
|
2.
|
Select the academic year and session. |
|
3.
|
Click OK. You return to the Home page. |
|
4.
|
From the navigation bar, under Gradebook, click Add shared documents. The Shared documents page appears. |
|
5.
|
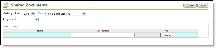
Select the marking column and class. |
|
6.
|
Click Add New Document. The Shared documents grid appears. |
|
7.
|
To associate documents with a specific assignment, select the assignment. |
If you do not select an assignment, the documents associate with the class and NetClassroom users can access the document when they view class information.
|
8.
|
Enter the name of the document. This name appears in NetClassroom. |
|
9.
|
Enter more information about the document, such as instructions on how to complete the assignment document. This description appears in NetClassroom. |
|
10.
|
To search for and select your document for upload, click Browse. The File Upload screen appears. |
Tip: You can upload files of any type, such as Microsoft Word, Microsoft Excel, Microsoft PowerPoint files, Adobe Acrobat PDF files, and image files.
|
11.
|
Click Open to add the file. |
|
12.
|
Add as many documents as you need for the class. |
|
13.
|
To upload the shared documents to the web server and return to the Shared documents page, click Save. |
Open topic with navigation