Pushpage (Newsletters) Guide
Use Pushpage to send newsletters by email to stay in touch with your school community and share important information. For example:
-
Monthly updates or highlights of key recent school news and events
-
Call to action such as volunteering, donating, or registering for an event
-
Summary and plans for a recent, future, or ongoing emergency
Tip: Remember to update your school's "policies and procedures" whenever your communication strategy changes.
Initial settings
Before you create and send newsletters, consider your school's communication plan and who handles various types of communication.
Determine who should create and send messages
A platform manager should grant these users security access via their user profile in Core.
-
Pushpage (2010) manager - creates distribution groups, creates templates, sends issues, reviews reports and bounces
-
Pushpage (2010) editor - updates content for issues
You'll probably have more editors than managers, since multiple people may collaborate on a newsletter while the manager coordinates the communication plan and controls the timing of bulk emails.
Customize opt-out language
Since newsletters are bulk emails, each issue automatically includes a hyperlink at the bottom of the email so recipients can unsubscribe to avoid future messages. The option to unsubscribe ensures your newsletters comply with CAN-SPAM regulations.
-
If the distribution list used to send the issue was marked as Public, then link automatically removes the recipient from that distribution list. They may remain subscribed to other lists.
-
However, if the distribution list was marked as Private the recipient should contact your school's communications manager to ask the school to stop sending those emails.
When a recipient selects to unsubscribe, they'll see a default message and can confirm whether they want to opt-out of messages from that list.
Pushpage managers customize the message.
Step 1: Select Core.
Step 2: Select Communication.
Step 3: Select Pushpage.
Step 4: Select Opt Out Settings.
Step 5: Enter your message and format it.

Step 6: Select Save & Exit.
Determine how to handle bounced messages
Emails don't always reach all of their intended recipients. Perhaps their inbox is full, the address is invalid or no longer in use, their service provider had technical difficulties, or the email was accidentally flagged as spam.
A platform manager or Pushpage manager should determine how to handle emails that "bounce" back as undelivered.
Step 1: Select Core.
Step 2: Select Communication.
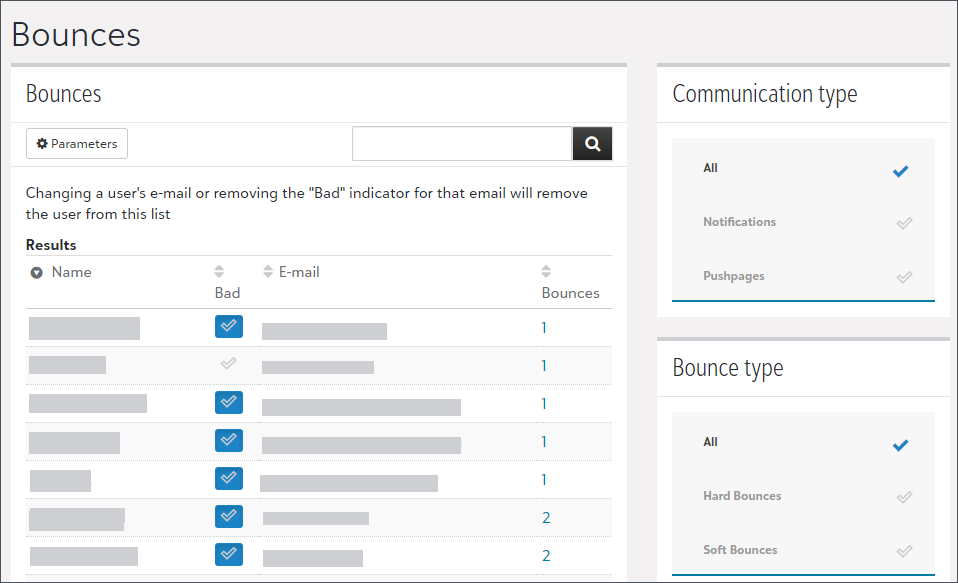
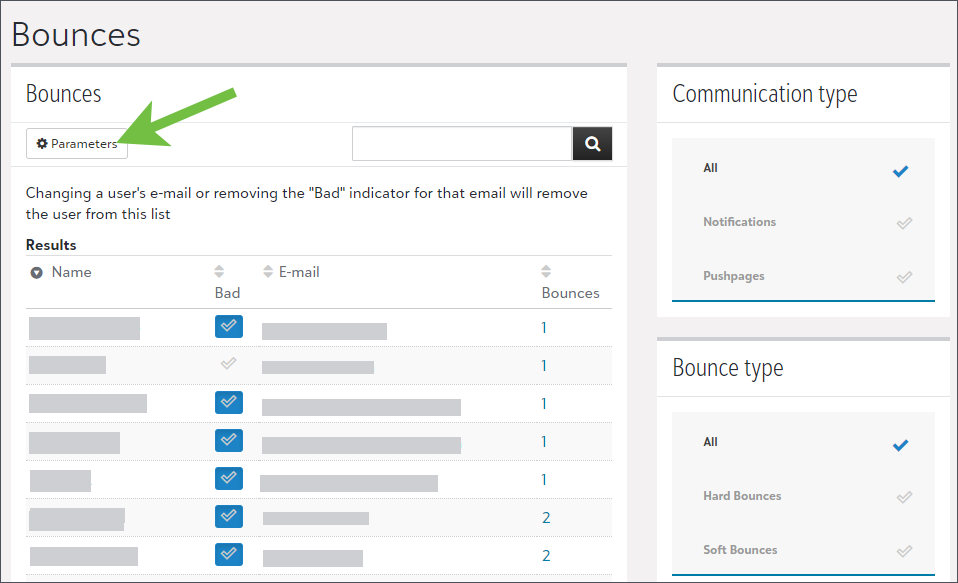
Step 3: Select Bounces.
You'll return to this page any time you want to troubleshoot why recipients didn't receive messages or notifications due to bad email addresses.
|
Step 4: Select Parameters. |
|
|
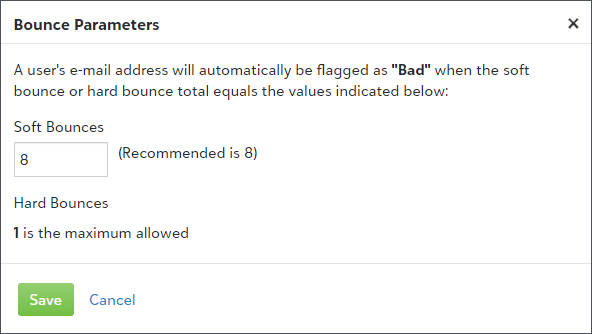
Step 5: Enter the maximum number of soft bounces. |
|
-
Soft bounce failures occur when email messages are processed by recipient mailbox providers but are returned as undeliverable before they reach their recipients. They occur for multiple reasons, including because the user's inbox is full. Messages to these recipients might be successfully delivered on future attempts.
Determine how many times emails can soft bounce. When the maximum is reached, the email address is marked as Bad and Blackbaud will no longer send emails to that address.
-
Hard bounce failures occur when mailbox providers reject email messages. They can occur for multiples reasons, including because the email account is closed or the email domain is invalid. These email address are automatically marked as Bad and Blackbaud will no longer send emails to that address.
Step 5: Select Save.
Configure settings for sending as HTML or as a link
Recipients don't always read newsletters within their email provider's inbox reader interface. Pushpage managers should therefore consider the other ways people view newsletters.
Step 1: Select Core.
Step 2: Select Communication.
Step 3: Select Pushpage.
Step 4: Select Pushpage email settings.
Step 5: Allow issues to be sent as HTML.

Although most email providers can show emails written in HTML, some recipient are unable to view HTML emails in their inbox reading area due to their security settings or their email provider's settings.
When you send emails as HTML, the Alternative text and link replaces HTML content when HTML is blocked.
Clear this checkbox if you want all recipients to have the same reading experience. Then they'll all see the Send as link text and link instead of HTML.
Alternative text:
The following text fields will be combined to appear as a single sentence to recipients whose can't view HTML in their inbox.

Step 6 (optional) : Enter the alternative text.
This replaces the default of "If you are having trouble viewing this email,".
Step 7 (optional) : Enter the text of the alternative link.
This replaces the default of "click here."
Send as link:
The following text field appears, followed by a hyperlink, if you decided to now all HTML emails at all.

Step 8 (optional) : Enter the Send as link text.
This replaces "To view the contents of this message, click on the following link or copy everything between the parentheses to the address line of your web browser:" and is followed by a link to the newsletter. Recipients open the link in a browser window or tab.
Step 9: Select Save & Exit.
Set up distribution groups
Distribution groups are mailing lists. Pushpage managers create groups which are later used to control who receives various newsletters.
As you create each group, consider
-
the purpose of the group, including what they have in common or what they do together,
-
how often will the members of the group change,
-
who will create or edit newsletters for them,
-
how often they'll receive new issues of newsletters,
-
your plan for keeping content engaging and for avoiding "email fatigue" due to too many messages.
Some of these considerations affect how you build distribution groups, such as the group's name and type.
Schools often include these parts of their communication strategy in their "policies and procedure" guide.
Create a distribution group
Step 1: Select Core.
Step 2: Select Communication.
Step 3: Select Pushpage.
Step 4: Select Distribution groups.
You'll likely return to this page any time you want to create another group, modify a group, make a group inactive, delete a group, review jobs previously sent to groups, or create a new job to send to a group.
Step 5: Select Create distribution group.

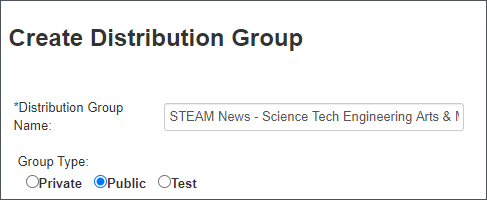
Step 6: Enter a Distribution group name.
Use a descriptive name that clearly indicates the purpose or audience, such as "STEAM News - Science Tech Engineering Arts & Math".
Step 7: Select a group type.
|
|
Consider including a variety of recipients in a test group for troubleshooting purposes. These recipients can then inform you if their specific email domains, internet service providers, privacy settings, or role in your school have difficulty viewing newsletter content. You may even create accounts to use specifically for testing purposes.
Step 8: Select up to five Basic or Advanced lists.
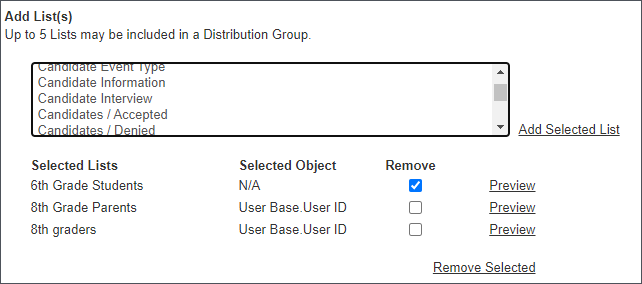
From the scrolling menu, choose a list and then select Add selected. For some lists, you may be prompted to clarify which version of the list to use.
These are "dynamic." When a list is updated, the distribution group is also updated. For example, include a list of all students in a specific grade and their parents.
To confirm the list includes the users you expect, select Preview.
To undo a choice, check Remove and then select Remove selected.
Step 9: Select static users.

Search for users to include or exclude from the list. For example search for all users with the last name "Smith."
Choose users from the results to add to the group and then select Add to recipient list.
To undo a choice, choose them on the right and then select Remove from recipient list.
These recipients aren't affected by changes to basic or advanced lists; they're "static." For example, you might want specific members of your school staff to always receive a copy of newsletters sent to this group even if the rest of the group changes yearly.
Step 10: Select Save & Exit.
Set up templates
Pushpage managers create and edit templates which are later used to create issues. Templates predetermine the layout, style, and content for various newsletters, while remaining both responsive and mobile-friendly.
Think of templates as guidelines for future newsletters and remember that the final appearance of issues can be customized before they're sent.
Blackbaud may have created templates for your school. If you need to edit those templates, please copy them and make edits to the copy so the original template maintains its integrity.
Create a template
Step 1: Select Core.
Step 2: Select Communication.
Step 3: Select Pushpage.
Step 4: Select Pushpage templates.
You'll likely return to this page any time you want to create another template, modify a template, make a template inactive, delete a template, copy a template, create an issue based on a template, change whether page or group content can be used in issues based on the template, review issues previously sent for a template, or review jobs associated with the template.
|
Step 5: Select Create template. |

|
|
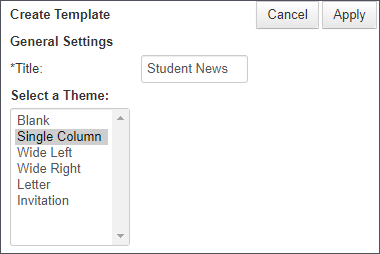
Step 6: Enter a Title. Use a name that clearly describes the appearance of issues that use this template, the type of content it is used for, or who its target audience is. Step 7: Select a theme or layout. You can change the layout in a later step. |
|
Step 8: Select Apply.
A template with some placeholder text, headings, and images appears.
Edit the new template
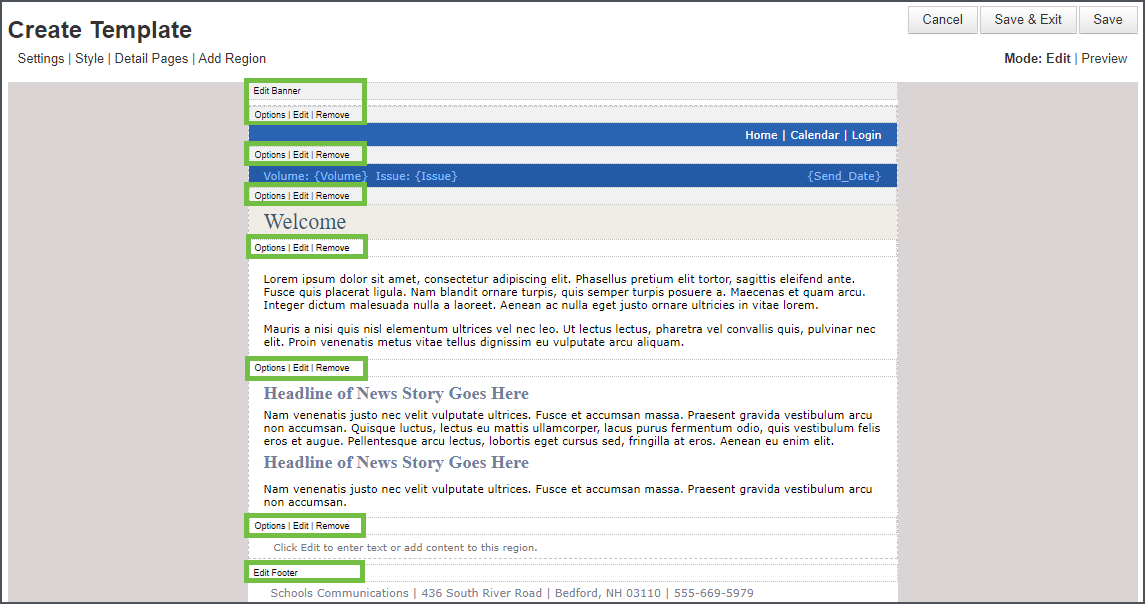
The template is divided into regions, including:
|
|
For each region, you can set option, edit the types of content it should include, or remove the region.
Let's take a closer look at what you can do with those configuration options.
Options
|
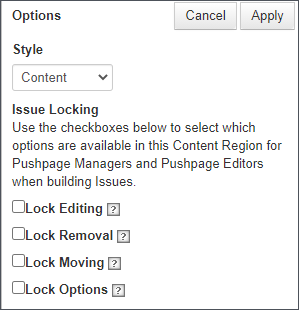
Step 1: Select which type of information appears in this region, so it is appropriately styled. For example, is the region for news, other content, a welcome message, a top navigation menu, or volume and issue information. Step 2: Choose whether to prevent editors from making certain updates via Locks:
Step 3: Select Apply to save the settings. |
Edit

|
Step 1: Enter text for the region. Step 2: Use the tools to format the text. Select the ellipsis (...) to access additional tools, such as to insert a hyperlink, format paragraphs, and add a bullet or numbered list. Step 3: To add other types of content, select it from the Insert menu. For example, add images from your local computer, photos from existing content categories, file attachments, events, and more. For some types of content, you may be prompted to configure additional details. Step 4: Select Apply changes. |
Delete or Move
|
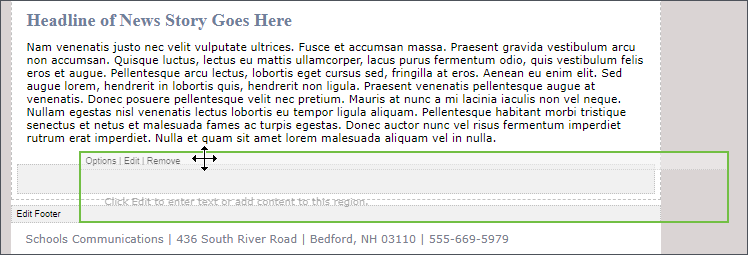
To delete a region, select Remove. To move a region, drag and drop it to a new location. Grab the region by the row that says "Options Edit Remove." As you drag the region, a the places you can drop it are indicated by a gray rectangle. |
Customize the template with more regions
Step 1: Select Add region, a new region appears at the bottom of the template right before the footer.

Step 2: Edit the new region using the same tools previously described.
Step 3: Select Apply changes.
Customize the template with alternative layouts.
You can refine or change some of the settings you configured earlier.
Step 1: Select Settings.

|
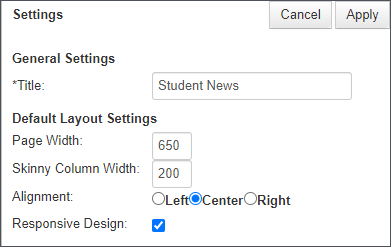
Step 2: Enter a new Title to rename the template. Step 3: Adjust the width of the page or columns. Step 4: Select how to justify or align content. Step 5: Select Responsive design to make the template easier to read on mobile devices. |
|
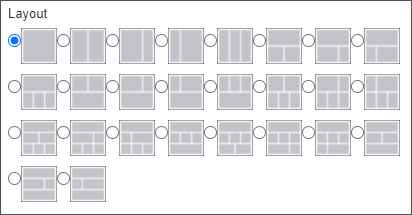
Step 6: Select a layout with additional columns.
|
Tip: For the best results regardless of what email clients your recipients use, we recommend you use single column or two column templates. Some email clients render responsive content better than others. For less modern email clients, recipients may still want to view the newsletter as a browser page. |
|
Step 7: Select locks to prevent editors from making specific changes.

Step 8: Select Apply changes.
Customize styles for the template or its regions.
Step 1: Select Style.

Four tabs of style options appear.
Step 2: Select Colors and fonts.
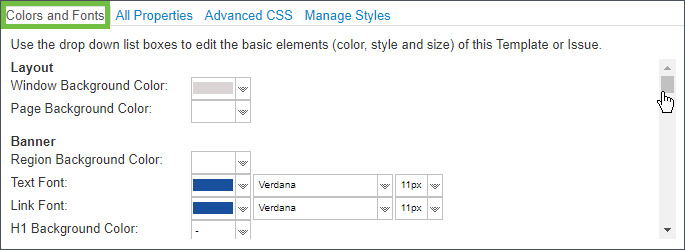
Use this tab to customize text, background colors, and links.
Step 3: Select All properties.
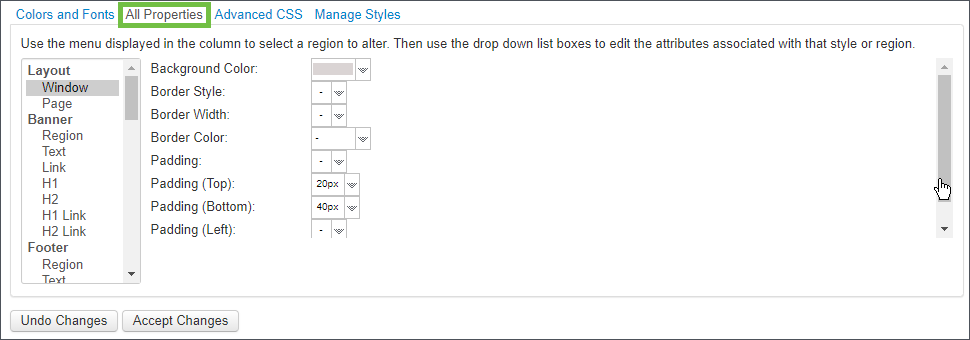
Use this tab to customize borders, padding, headings, and more.
Step 4: Select Advanced CSS.

If you have an in-depth knowledge and experience with cascading style sheets, you can use this tab to customize regions by directly editing the CSS for that region.
Step 5: Select Manage Styles.

Use this tab to create and then customize additional styles.
Step 6: Select Accept Changes.
Add detail pages to the template.
Step 1: Select Detail pages.

These use the same layout and style of the main page of a newsletter, but show different content or link to extra pages.
Use these to keep the main page more concise for recipient who scan more than read.
Each newsletter can include many detail pages.
|
Step 2: Select Add detail page to the right of Back to template. |

|
Step 3: Enter a Title.
Step 4: Enter text for the region.
Step 5: Use the tools to format the text.
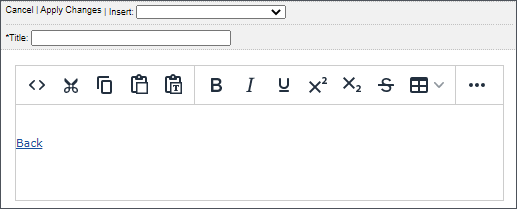
Select the ellipsis (...) to access additional tools.
Step 6: To add other types of content, select it from the Insert menu.
You may be prompted to configure additional details for inserted content.
Step 7: Select Apply changes (which is between Cancel and Insert).
Preview and then save the new template.
Step 1: Select Preview.

Scroll down and review the types of content and samples included, the layout, styles, and other aspects of the template.
If the template needs more adjustments, select Save and then keep editing.
Step 2: Select Save & exit.
Tip: Inform Pushpage editors of the new template and when to use it. If this is a new part of your communication strategies, remember to update your school's "policies and procedures."
Create newsletter issues
Pushpage managers and editors can create issues which they can then send to constituents.
Step 1: Select Core.
Step 2: Select Communication.
Step 3: Select Pushpage.
Step 4: Select Pushpage issues.
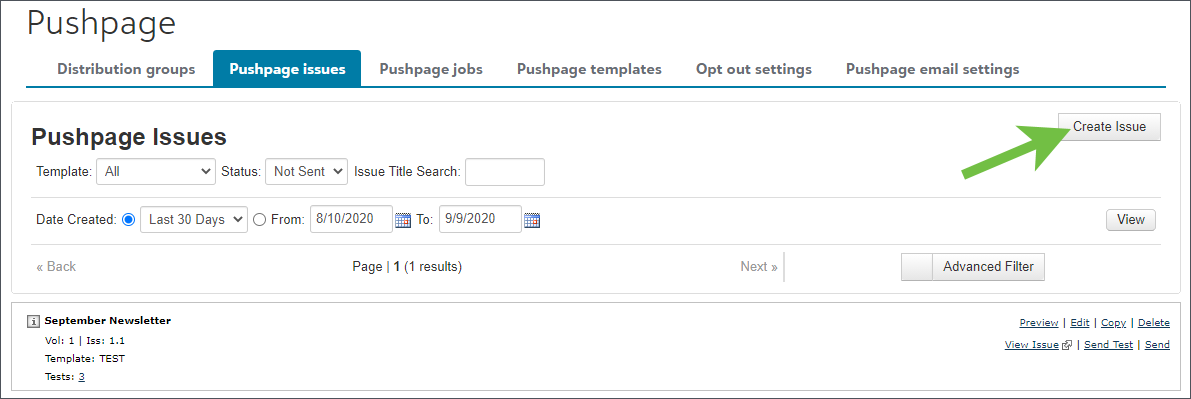
Step 5: Select Create issue.
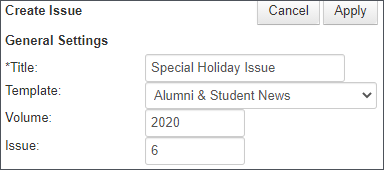
Step 6: Complete the information about the issue.
|
Step 7: Enter the Title of the issue, such as "Alum Newsletter for Winter." Step 8: Select a Template . This determines which parts of the issue can be customized. Step 9 (optional) : Enter the Volume number. Step 10 (optional) : Enter the Issue number. |
|
|
Step 11 (optional) : Enter the dates for publishing to the archive of newsletters and when the entry should expire (if ever) from the archive. This is only affects the archive in Blackbaud Education Management. These do not affect the date when the newsletter is sent directly to recipients nor when recipients can view newsletters in their email. |

|
Step 12: Select Apply.
Step 13: Add content to an issue.
The exact nature of what you can add to an issue, remove from an issue, or edit about issue will vary based on the template you selected to use to create the issue.
Generally, the process of adding content is similar to the process you followed when you created the template.
You might add regions, add detail pages, edit regions, and insert content into regions. You may be prompted to select more specific details that vary based on the nature of the content you insert.
|
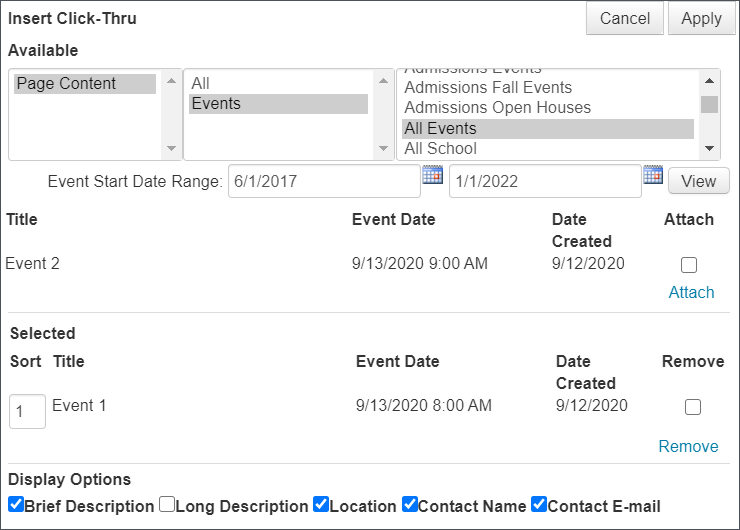
For example, you might select to insert an existing event that was previously created by a an event manager. The HTML content from the event is added to your issue, and you can then edit it within your issue (such as to highlight why students should attend) without impacting the original event. |
|
Step 14: Select Apply changes.
Step 15: Select Preview.
Review the issue, its layout, and its content.
If the template needs more adjustments, select Save and Edit to keep working.
Step 16: Select Save & exit.
Manage "jobs" to send issues.
Pushpage managers and editors creators can issues to a group of test recipients and determine when issues that are ready should be sent to distribution lists.
Send a test issue to reviewers
Step 1: Select Core.
Step 2: Select Communication.
Step 3: Select Pushpage.
Step 4: Select Pushpage issues.
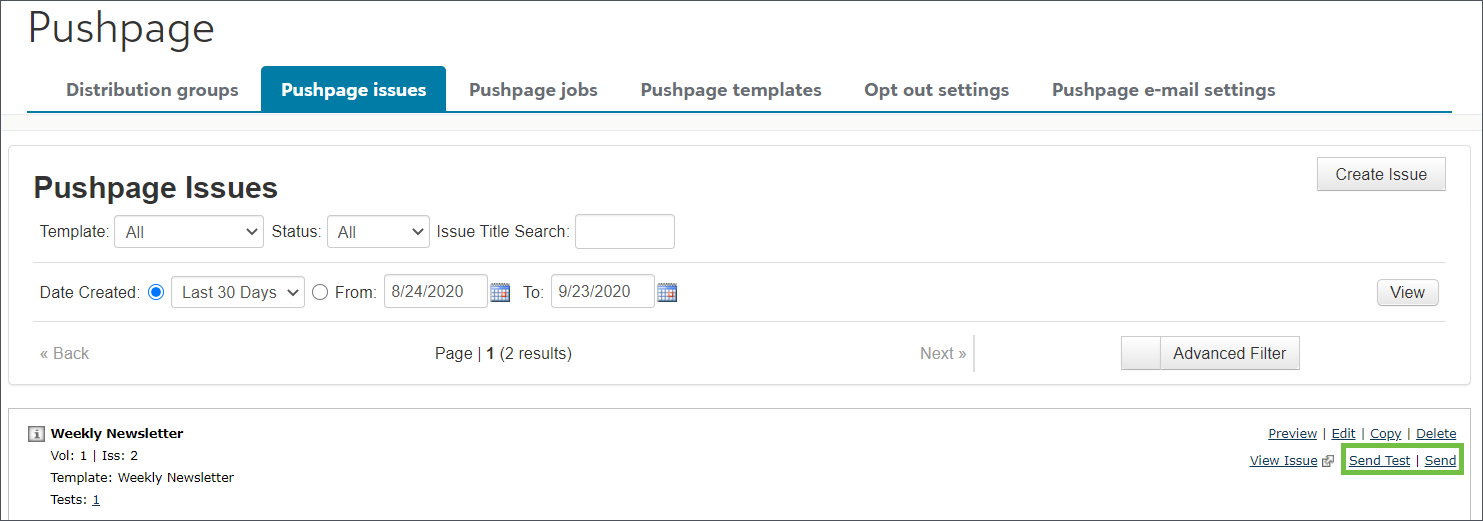
Step 5: Find the issue you want to send and select Send test.
Step 6: Choose a Distribution group who will review the test and then select Add selected distribution group
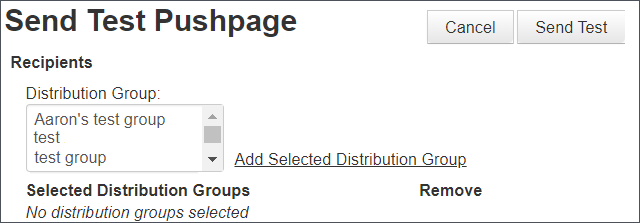
Step 7: Enter the emails of any additional recipients for the test.

|
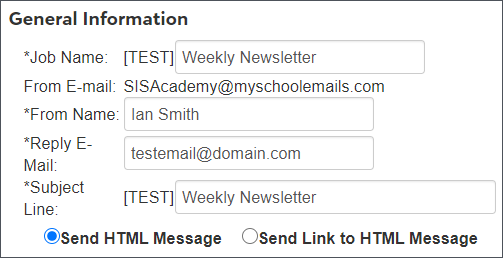
Step 8: Enter a descriptive name for the job, such as "Internal test." Step 9: Enter your name or that of the person who will manage the issue as the who the email is From. Step 10: Enter your email or that of the person who will manage the issue for recipients who may Reply. Step 11: Enter a Subject line. Consider indicating what the real subject will be and then add "TEST" to the beginning or end of the line. Step 12: Select whether the test job should be sent as an HTML or link. |
|
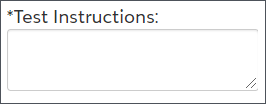
Step 13: Enter any additional instructions for recipients to follow when they receive the test.
|
For example, remind them to try hyperlinks or to confirm that content is correct. |
|
Step 14: In the top right corner, select Send test.
Send an issue to recipients at a scheduled time
To send an issue to multiple distribution groups, repeat these steps to create a "job" for each group.
Alternatively, create a larger distribution group that includes the people who would otherwise be multiple groups.
Step 1: Select Core.
Step 2: Select Communication.
Step 3: Select Pushpage.
Step 4: Select Pushpage issues.
Step 5: Find the issue you want to send and select Send.

Step 6: Choose a Distribution group then select Add selected distribution group
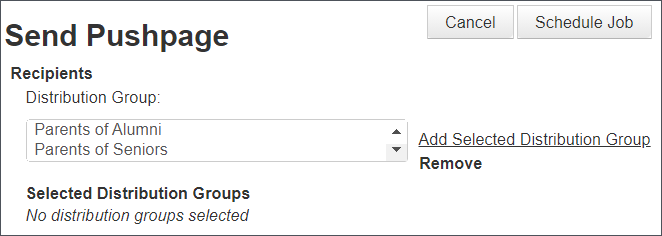
Step 7: Select the date and time when the issue should be emailed to recipients.

|
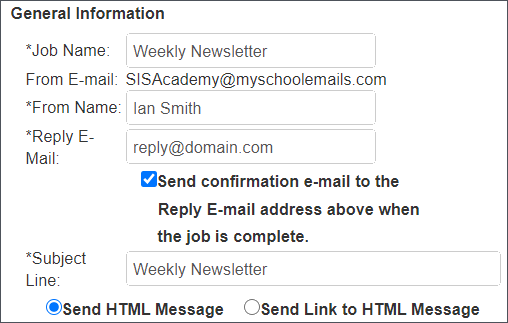
Step 8: Enter a descriptive name for the job, such as "Weekly job for group 1 of 2." Step 9: Enter the name of the person or group who is responsible for the email as the who the email is From. Step 10: Enter the email which should respond to recipients who may Reply. Step 11: Select to receive a confirmation email when the issue is sent. Step 12: Enter an attention grabbing Subject line to encourage recipients to read the issue. Step 13: Select whether the test job should be sent as an HTML or link. |
|
Step 14: In the top right corner, select Schedule job.
View any jobs for past issues
Step 1: Select Core.
Step 2: Select Communication.
Step 3: Select Pushpage.
Step 4: Select Pushpage Jobs.

View jobs that were sent to specific recipients
|
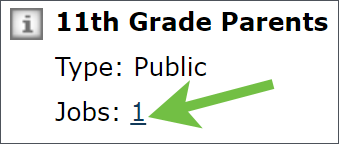
Step 1: Select Core. Step 2: Select Communication. Step 3: Select Pushpage. Step 4: Select Distribution group. Step 5: Find the group and select the number of jobs. |
|
Follow up
Review reports.
Step 1: Select Core.
Step 2: Select Reporting.
Step 3: Select Reports.
Step 4: Choose a category.
|
Pushpage 2010 - details about jobs, opt outs, readership trends, and click rates |

|
|
User Management: Email Management - bad or missing emails, bounces |
|
Step 5: Select Run to generate a report.
Troubleshoot bounces
Step 1: Select Core.
Step 2: Select Communication.
Step 3: Select Bounces.
