Video
Use the video content type, to video files.
-
Select Core or School website.
-
Select, Content.
-
Select Media.
-
Select Video.
Video categories (also known as "albums") are used to store and organize video files for use within the Media Gallery and webpages. First create categories, then Add content to the category.
Note: Video is not included in basic School Website System. For a quote about purchasing Audio/Video functionality, please contact your school's account manager.
Refer to Error Messages Using Bulk Upload Tool
After you upload a video, select Save, and view the album list for a Category, it may take a moment to process the video. This process status will appear in the list of videos for your Content video album.
Tip: If you plan to share videos outside of the 'Blackbaud's Education Management' products, create a video category for public videos and be sure to include any videos in it. You can also include the video in other non-public categories, but it should be in at least one public category for to share with the general/
When adding a video, you also have the option to allow transcrips to be added. When you Add New Category, make sure to enable the Allow transcriptions for videos. After uploading a video and then editing it, the +Add Transcription option appears. You can then browse and select the transcript file from your computer to add to the video.
Note: Only accepts transcripts with a .vtt extension and has to be less than 1GB in size.
After a video is in a Category, you can lock the Album (which may include other videos).
Videos are removed when you delete them.
You can edit the thumbnail when you upload a video, before you select Save.
If no thumbnail is provided for a video, a default one will appear.
As of June 28, 2016, videos rendered on your public School Website System website
-
on a page
-
in the lightbox
are updated to use a new hosting method "under the hood." Pages rendered by Podium are not yet affected by this update (including front end, secured, and media gallery pages).
For user's logged into the 'Blackbaud's Education Management' products, all pages that use a lightbox to play a video use the new hosting method, including:
-
bulletin boards
-
featured content
-
archived content
When users interact with videos (such as to download a video) the functionally is the same as before the update.
We recommend schools contact X (formerly known as Twitter) and request that their school’s videos be white listed. It may take a few days for X to handle your request, so we encourage you to contact X before your next social media campaign. After your videos are white listed, when you share a video to your social media feed on X, the video will appear an aesthetically pleasing “Card” instead of as merely a click-able URL. The card shows a thumbnail of the video, which your followers can select to view the video without navigating to another site. Cards increase the chances of followers engaging with your video content.
To ask X to white list your school’s videos, login to the “Blackbaud's Education Management” products and X at the same time on the same device. For X, you’ll need to be the account owner.
In “Blackbaud's Education Management,” access the detail page for a video you’ve recently uploaded. Then copy the video’s URL from the detail page.
In X access this URL https://cards-dev.twitter.com/validator to use the video Card validator.
-
In the XCard validator, paste the video URL from the “Blackbaud's Education Management” detail page into the Card URL field.
-
Select Preview card.
-
If your videos are not yet white listed, X will be unable to render a preview of the card. In this situation, select Request approval.
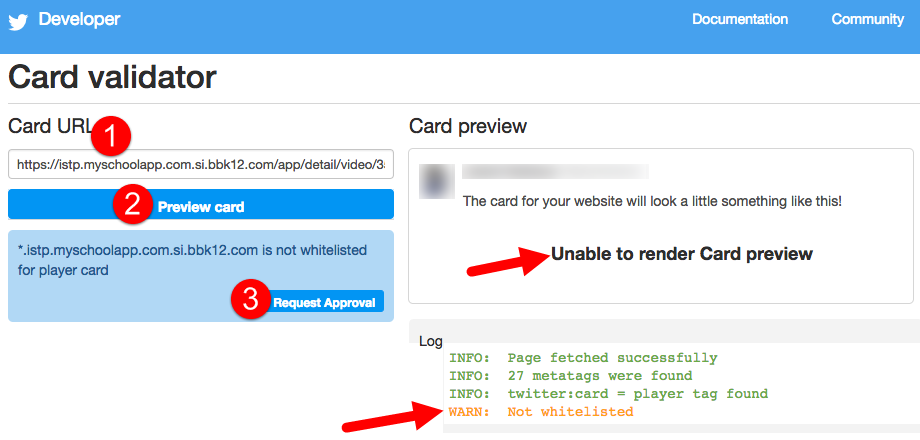
Tip: X may need 3-4 days to process your request. In the meantime, you can still share videos; they will appear as click-able URLs instead of in “Cards.” After your videos are white listed, videos you share will appear as “Cards” in X so you can better engage with your followers on social media.
Tip: If you plan to share videos outside of the 'Blackbaud's Education Management' products, create a video category for public videos and be sure to include any videos in it. You can also include the video in other non-public categories, but it should be in at least one public category for to share with the general/
-
Include long description for video items -This setting enables you to enter a long description when creating a video album. If this option is not checked, any video album created within this category will not have a long description text box. Descriptions enable you to enter more text and can be viewed on a detail page.
-
Allow titles on videos - Select this to enable content managers to edit the title of videos. If not selected, titles are automatically entered based on the video file name.
-
Allow captions on videos - Select this to enable content editors to enter captions for videos. Captions are limited to 1600 characters and can't be formatted with the HTML editor. However HTML tags are allowed in the caption box.
-
Allow descriptions on videos - Select this to enable content editors to enter descriptions for videos. Descriptions do not have a character limit and you can format them with the HTML editor.
Tip: See content type.
You can add videos or other content to your website pages from third-party sources, such as from YouTube or Google Videos. For more information on supported code, make sure to visit this page.
-
Select School website.
-
Select Website .
-
Select your Site name.
-
Next, select the page that you want to add video to.
-
Select Edit page content.
-
From Content Types, choose Embed.
-
Inside the widget settings, add a Header text and Embed code.
-
When you're finished, select Apply changes.
Note: If your video obstructs fly-out navigation, you can make an adjustment to the embed code to prevent this. Simply add the code: wmode = "transparent" to the end of the embed code before the closing bracket (>).
-
Title - This is the title of the album. The title may or may not appear depending on the channel and display options you set.
-
Allow users to download videos - If checked, users will the have the ability to download videos from the album. The download option may or may not appear depending on the channel and display options you set.
-
Featured - If checked, this album will have a "featured" label in the Media Gallery and on pages. The featured label may or may not appear depending on the channel and display options you set.
-
Long Description - Use this field to describe all the videos in the album. The long description may or may not appear depending on the channel and display options you set.
-
Basic Upload - Use this if you have fewer than 5 videos. After you choose the videos to upload, you must select the upload button located under the video selections.
-
Bulk Upload - This feature opens a java box allowing you to upload multiple videos, up to 1 gb, at once.
-
Organize - When you have videos in the album, you can drag and drop them to resort them.
-
Batch edit - Enables you to bulk tag videos, edit the sort order, change titles, enter captions, tags, and descriptions. You can also set one video as the album cover and mark videos to be deleted upon save.
-
Bulk Tag: Tags entered here will be attached to all photos for search purposes.
-
Edit Sort Order: The sort order determines the order in which photos are displayed.
-
Titles: If you do not want to use the file name as the photo title, you can enter a new title. The title will display depending on your display and channel options.
-
Captions: Captions will display with the photo depending on the display and channel options.
-
Tags: Tags entered here will be attached to the individual photo for search purposes.
-
Descriptions: Descriptions will display with the photo depending on the display and channel options.
-
Album Cover: Using certain display formats, a thumb image of one photo will display as the album cover. By default the first photo is the album cover, but you can select any photo using the radio button.
-
Delete on Save: This option allows you to remove individual photos from the album.
-
To edit the display options, edit the channel options.
-
Number of items to show
Use this option to determine how many albums you want to appear in a channel. -
Archive/More Link- Allow users to view all albums in the category.
-
Archive/More Link Text - Use this option if you want to customize the text for the archive/more link. By default it displays as "More Albums."
-
Display format -There are five options for displaying videos:
-
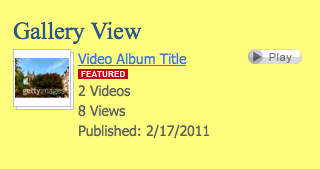
The Gallery View format is ideal for showing mulitple videos on a page. Users can click on the individual video link or select Play to view the video.
-
List view is ideal for showing multiple albums on a page. Users can select through the individual videos or select Play to view the video.

-
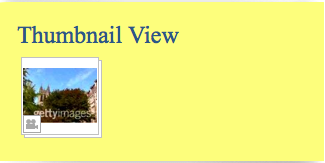
Thumbnail view is ideal for displaying multiple albums on a page. Users can click through the individual album or click play to view the video.
-
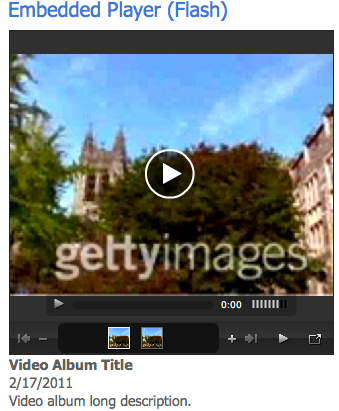
The Embedded Flash Player enables you to show videos in a click-through or rotating gallery. This format is useful for showcase videos, such as for a campus tour. When you add the Embedded Flash Player to a page, it will automatically resize itself to fit in the page column (or you can enter a custom width and height under Channel Options > Embedded Players). The videos will also automatically be centered in the player.
-
Player Appearance: Border - select visible to include a black border around the player or hidden to not include a border.
-
Captions: Position- choose the caption position, either bottom or top
-
Captions: Appearance- choose from the list
-
Overlay on Rollover - captions will only appear when a user rolls over the image
-
Hidden - captions will be permanently hidden
-
Fixed - captions will appear visible at all times
-
Overlay Auto - captions will appear after a few moments and be visible the rest of the video
-
-
Navigation: Position- choose either top or bottom, this is where the navigation buttons will display
-
Navigation: Appearance- choose from the list
-
Hidden- the navigation bar is removed from the slideshow
-
Always visible - the navigation bar is visible when the gallery is both open and closed
-
Visible on rollover -the navigation will only appear when a user rolls over the image
-
-
Navigation: Link Appearance
-
Thumbnails- all videos in the album will appear as thumbnails in the navigation
-
Numbers- all videos will show as a number in the navigation
-
-
Navigation: Link Preview Appearance- If visible, the player will display a link for other videos in the album, if hidden they will not display
-
Slideshow: Display Mode
-
Manual- use this option to show the play icon, that will have to be clicked inorder to start playing the video
-
Auto -use this option to have the video automatically start when the page is accessed
-
-
Slideshow: Display Order
-
- using this option will show the items based on their sort order
-
Random - using this option will change the order of the items each time the page is accessed
-
-
Slideshow: Transition Style - use this option to show a specific effect (such as None, Dissolve, Fade to Background, or Photo Flash) for when items changes
-
Slideshow: Transition Length - use this option to choose length of time between 1 - 10 to transition between items
-
Slideshow: Transition Pause -use this option to choose length of time to pause between 1 - 20 transition between items
-
Sizing: Content Scale
-
None- content is loaded as-is, no adjustments or scaling is done
-
Crop to fit - content is proportionally scaled to completely fill the area
-
Downscale only - content will be proportionally downscaled if larger than the component area
-
Proportional - content will be proportionally downscaled or upscaled to fit the dimensions of the component
-
-
Video Autostart - use this option have the video automatically start or not
-
Video Controls Appearance - use this option to have the controls be visible or hidden
-
-
-
HTML5 Player
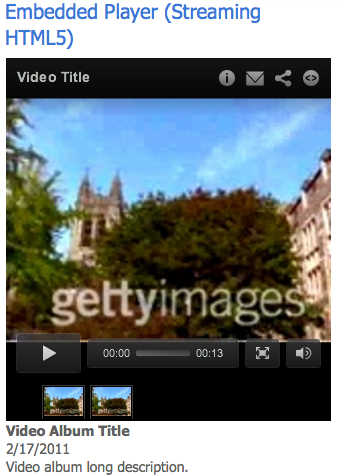
Both the flash and HTML player share the same set of basic settings for sharing videos. To edit these settings, go to the Embedded Players tab in the channel options.
-
Embedded player appearance - Use this option to set a custom width and height of the player.
-
Show album date - Use this option to show the album publish date.
-
Show album title - Use this option to show the album title.
-
Show long description - Use this option to show the long description.
-
Alignment - Controls the alignment of the Audio files within the player.
-
Multiple item selector type - You can choose to show multiple albums either as links or as a dropdown box.
If you're confused about whether you should use the HTML5 player or the Flash player here are some of the differences between the two:
|
Flash Player |
HTML5 Player |
|---|---|
|
Progressive video |
Streaming video |
|
Will only play on Flash-enabled devices |
Smart player - detects device and plays accordingly |
|
No option for sharing |
Built in option for sharing |
|
Several customized display options |
No customized display options |
|
Ability for auto-play |
No auto-play option |
|
Will not display video title |
Displays video title |