Open Database Connectivity (ODBC)
To create a connection to your school's Blackbaud database, you must make a Open Database Connectivity (ODBC) Data Source Name (DSN) connection from within your school. To do this, you'll first use a Virtual Private Network (VPN) to connect to Blackbaud's school network.
-
Follow the instructions to use the VPN.
-
The ODBC DSN must use Microsoft SQL Server 2008 ODBC driver or a more recent version. We recommend you use the latest version (Microsoft ODBC Driver 11 for SQL).
-
Your contact at Blackbaud will provide a database login and password.
-
Follow the instructions to create the ODBC DSN.
Ready only data views - dictionary and diagram
This connection provides read-only data views. The views you access are the same as the objects used in advanced list manager.
-
To view the data dictionary and data diagram, log in to your school's solution for Blackbaud Education Management and go to advanced lists.
-
Select to create an advanced list.
-
You'll find links to view the the data dictionary and data diagram near the options to Cancel or Save.
Enroll in FortiToken VPN
-
Open the email from Blackbaud Education Management K-12 Hosting operations which includes the VPN username you'll register.
-
Select the link from the email to register your VPN user.
-
Enter the required information.
-
Username
-
Password
-
Confirm password
-
First name
-
Last name
-
Email address
-
Confirm email address
-
-
Select Submit.
-
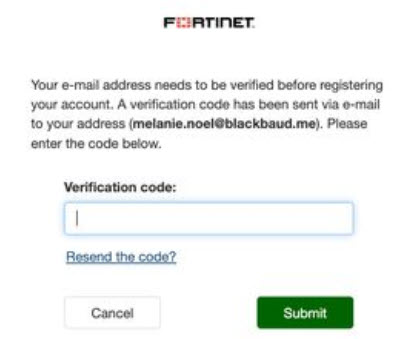
A prompt will ask you to verify your email address. Open your email, copy the verification code, and paste the code into the verification prompt.
-
Select Submit. A message will appear with a confirmation message indicating your registration was successful.
-
After registering, you'll receive an email which asks for a verification code to ensure the email address is valid.
-
Validate the email address.
-
After the email address is validated, Blackbaud's Education Management Operations team will review your submission and approve your enrollment.
-
After Blackbaud approves your enrollment, you'll receive an confirmation notification by email.
-
After you have confirmation from Blackbaud, you can continue the connection process.
Don't proceed without this confirmation.
Data security for PCI
Multi Factor Authentication (MFA) increases security by requiring you to login with "something you know" (a password) with "something you have" (a token). This is required for compliance with data security standards for the Payment Card Industry (PCI).
This VPN implements the follow additional requirements for PCI.
-
Passwords expire every 90 days. Watch your email for messages notices from hostingmfa@bbk12.com. If you don't reset your password promptly when emailed, you must create a ticket with customer support for help getting your access restored.
-
Sessions will timeout when idle, possible as quickly as 30 minutes.
-
You must have a smart phone with the FortiToken Mobile app installed. You'll use this for your MFA token.
Enroll in FortiToken Mobile
-
Log into FortiAuthenticator at http://kpe1-fgt-auth.bbk12.com
-
Select Register Token (left side).
-
Select FortiToken Mobile.
-
For the delivery method, select your email address (not SMS).
-
Select OK
-
Open your email. Ensure you receive a message confirming your enrollment.
-
After you have confirmation, you can continue the connection process. Don't proceed without this confirmation.
Install FortiToken Mobile on your mobile device
-
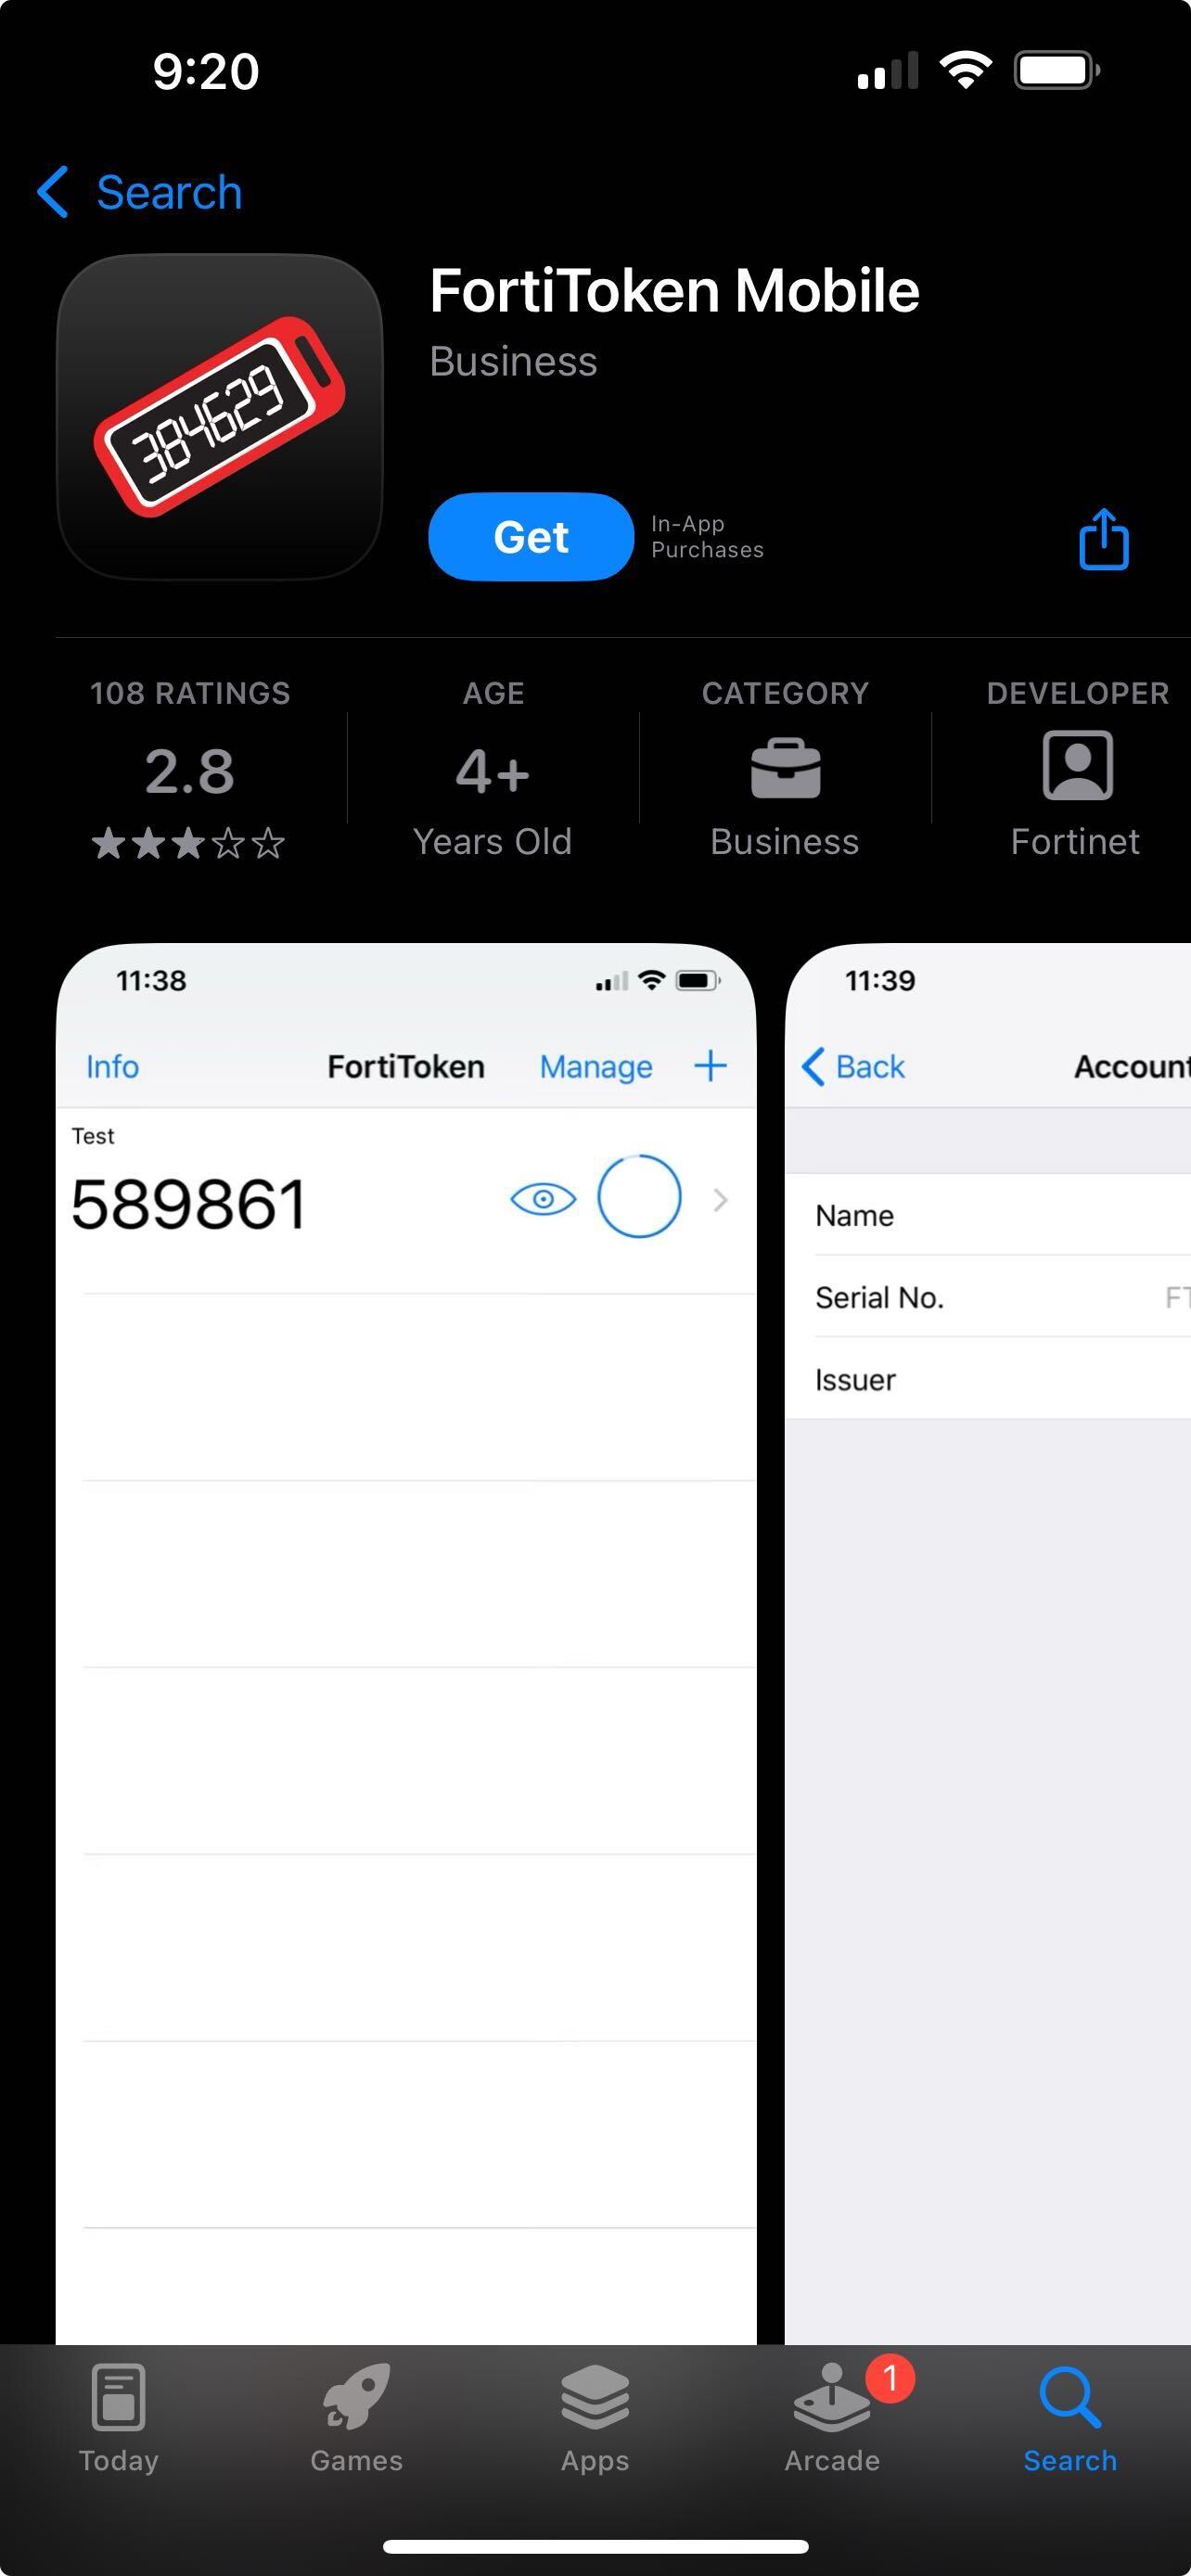
Using your smart phone, navigate to the app store on your mobile device.
-
Search for and install FortiToken.
-
After the app is installed, open it.
-
Select +Add (top right).
-
If prompted, select Allow access to your camera.
-
Active the app.
-
We recommend scanning the bar code from the email attachment.
-
Alternatively, you can manually enter the code.
-
-
Your FortiToken is activated.
The token code may be hidden by default. Tap the "eye" icon to show the code.

Install FortiClient VPN on your computer
-
Using your computer's internet browser, go to http://forticlient.com/
-
You'll be automatically redirected to http://fortinet.com/endpoint-security/forticlient
-
Select Product Download.
-
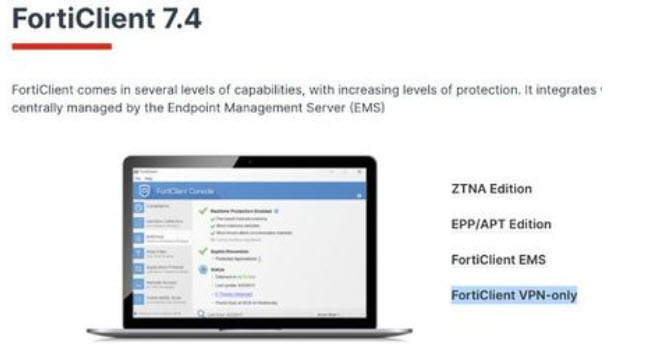
Choose the current version of FortiClient - VPN ONLY.
-
Choose your operating system from the list of available. Download the installer file to your local device.
-
Open the downloaded installer file. This prompts the FortiClient download. Continue to Install FortiClient.

-
For each of the remaining prompts, accept the default settings and select .
-
When the installation is complete, open FortiClient. A prompt will ask you to agree to their terms of use. Accept the agreement.
XML Settings
Configure FortiClient with IPSecVPN
Warning: If SSL-VPN connection already exists, don't edit the existing connection. You must make a new connection.
Tip: Download the .XML settings and import via CommandLine or Terminal. Edit the file to update the Preshared key, Username, and Phase 1 Local ID.
-
Add a new connection.
-
For Windows, select the gear icon (top right)
-
For Mac OS, select the "hamburger" icon (three lines) beside the connection name.
-
-
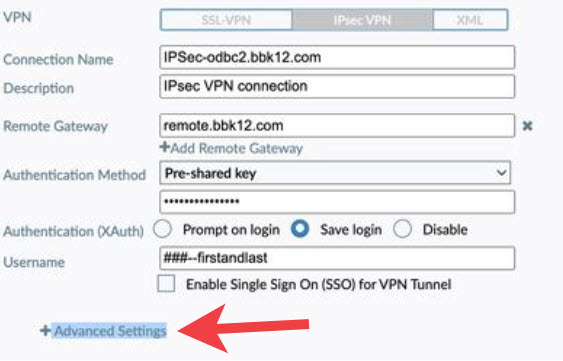
For VPM choose IPSEC VPN.

-
Enter a unique connection name.
-
Enter an optional description.
-
For Remote Gateway, enter
remote.bbk12.com. -
For Authentication Method, select Pre-Shared Key.
-
Enter the Domain Name System (DNS) value for your database For example odbc#.bbk12.com
-
For Authentication (XAuth), you can choose to save the login. Otherwise, retain the default.
-
You should have the username and password from previous setup steps.
-
For Advanced settings, select + Advanced Settings.
-
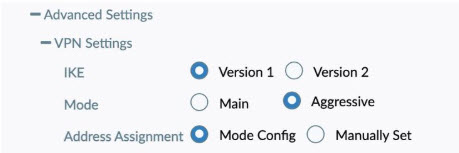
Choose these VPN Settings.
-
For IKE, select Version 1.
-
For Mode, select Aggressive.
-
For Address Assignment, select Mode config.
-
-
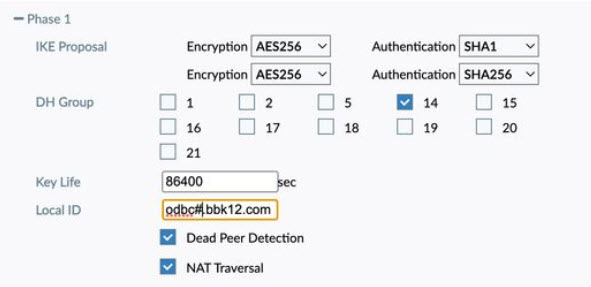
Choose these settings for Phase 1.
-
For IKE Proposal, choose Encryption AES256 Authentication SHA1 and Encryption AES256 Authentication SHA256.
-
For DH Group, select 14. Don't select additional options.
-
For Key Life, use the default value of 86400.
-
For Local ID, enter the Domain Name System (DNS) value based on your database. For example odbc#.bbk12.com
-
Enable the Dead Peer Detection.
-
Enable Network Address Translation (NAT) Traversal.
-
-
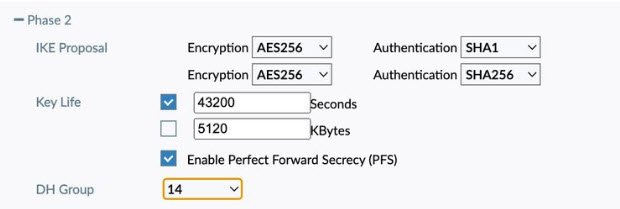
Choose these settings for Phase 2.
-
For IKE Proposal, choose Encryption AES256 Authentication SHA1 and Encryption AES256 Authentication SHA256.
-
For Key Life, choose 43200 seconds.
Don't select 5120 KBytes.
-
For DH Group, select 14.
-
-
Save the settings.
Connect to FortiVPN
-
Use your computer to open the FortiClient application.
-
Verify your VPN usernamen is correct.
-
Select Connect.
-
A prompt for MFA will appear. Enter the code from your mobile device's FortiToken Mobile app.
-
Select OK.
-
You should now be connected to VPN.
If you aren't connected, review the configuration steps. If the issue continues, contact Blackbaud customer support.
-
When the FortiVPN is connected, continue to SDK/ODBC configuration.
Creating the ODBC DSN
-
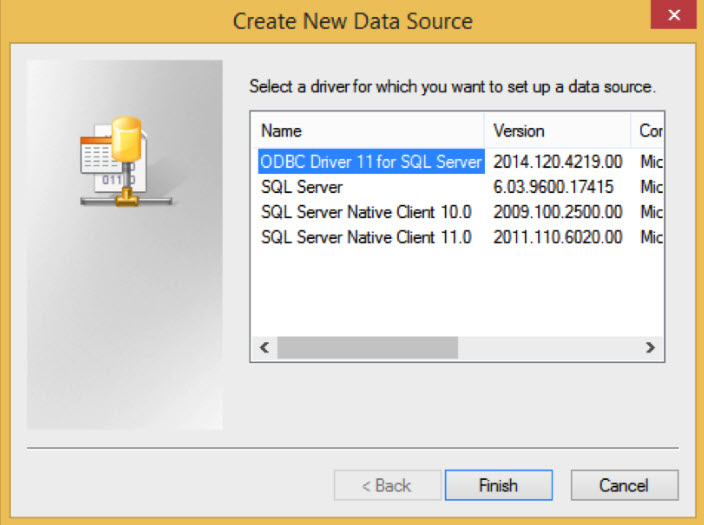
Go to https://www.microsoft.com/en-us/download/details.aspx?id=36434 and download Microsoft ODBC Driver 11 for SQL Server Setup.
-
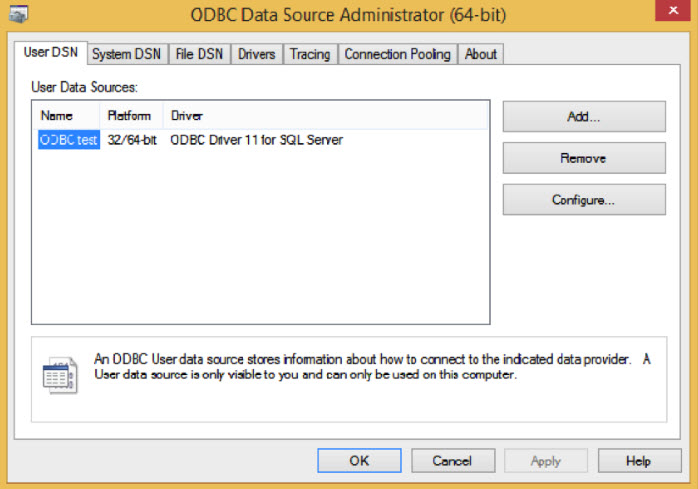
The following screenshots detail the creation of the ODBC DSN required to access to the Blackbaud school database. These steps are specific to Windows XP, and may vary in other Windows environments.
-
Select User DSN.
-
Add a User Data Source.
-
- ODBC test
-
Platform - 32/64-bit
-
Driver - ODBC Driver 11 for SQL Server
-
-
-
Select Finish.
Crystal Reports
If you plan to use Crystal Reports and run them in the app, configure the following.
-
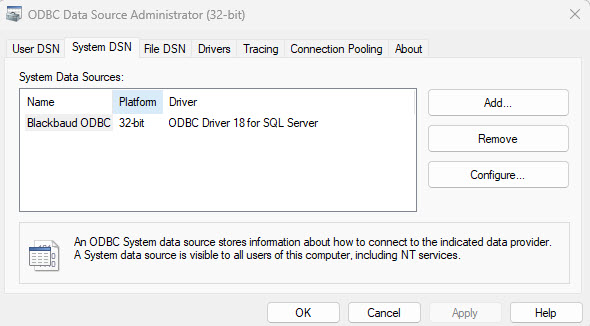
From Control Panel, go to Administrative Tools, and open the OCBC Data Source Administrator.
-
Select System DSN.
-
Select Add.
-
Select ODBC Driver 11 for SQL Server, based on your needs.
-
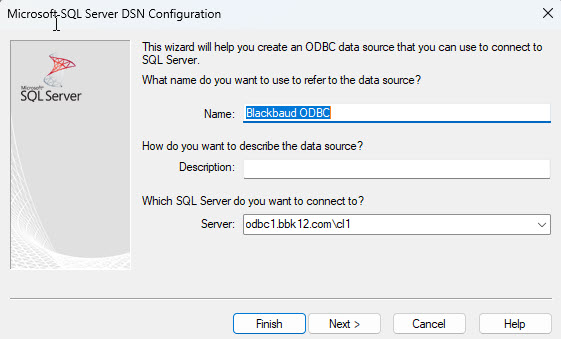
For Name, enter "Blackbaud K-12 - Access".
-
Enter a description to help you identify this DSN.
-
Enter the Server, based on the information previously provided by Blackbaud.
-
Select Next.
-
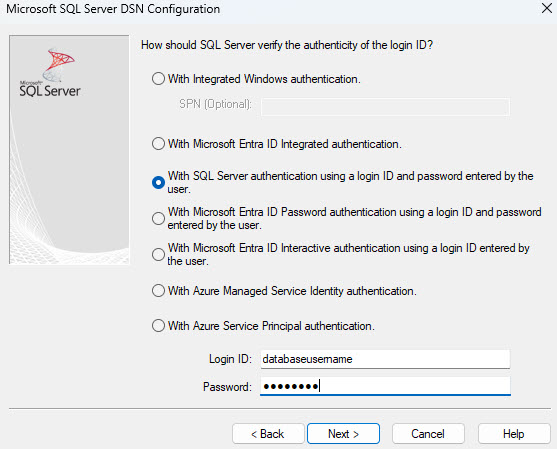
Select With SQL Server authentication....
-
Login using the database Login ID and Password provided by hosting.
-
Select Client Configuration.
-
Review the settings and ensure TCP/IP is enabled for Network libraries.Then select Next.
-
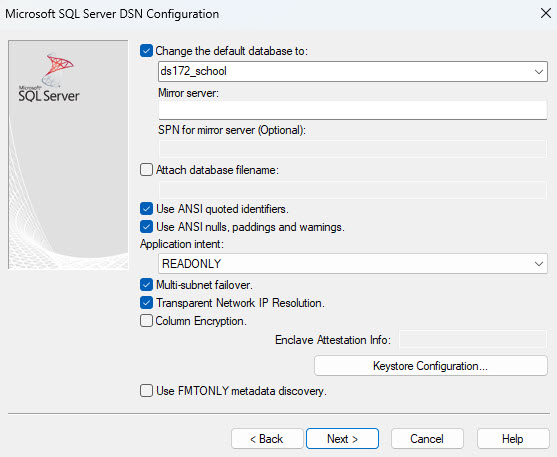
Ensure Multi-subnet failover is enabled. Then select Next.
-
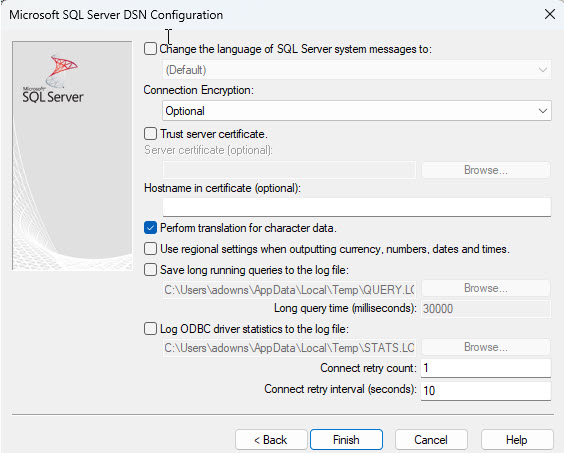
Use the default selections (Perform translation for character data should be the only option enabled) and select Finish.
-
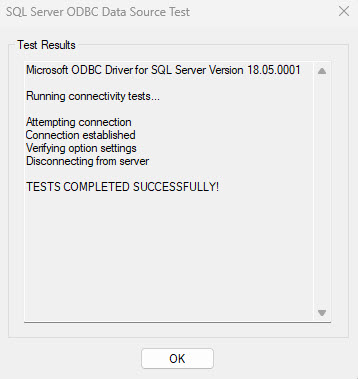
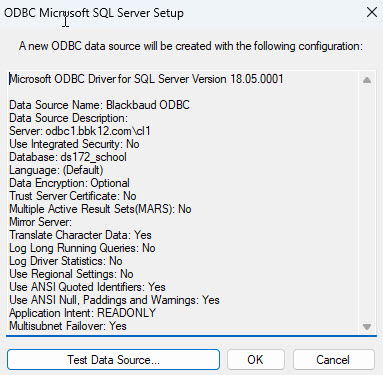
Select Test data source.
-
When finished, select OK.
