We got it! Thanks!
Our products influence lives, and your feedback serves to make our products better. Every submission helps us better cultivate our products around what matters most - you.
The Guide to Grading Setup
Manager Edition
-
Introduction
This guide explores the steps required to prepare grades for an upcoming school year.
Schools may not follow every single step in this guide as strictly as others depending on their grading structures. For example, if a school does not use numeric, percent-based grades, and instead opts for a more skill-focused system, then they will need only part of this guide. It is still suggested you read through each piece in a linear manner to ensure the relationship between each area is understood.
Upon this guide's completion, the user should be equipped to establish grades and confidently make decisions regarding that process going forward.
Note: Always work alongside your Blackbaud Software Consultant before making drastic changes to your grading setup if you are unsure of the results.
-
Establishing a Grading Foundation
Grade Translations
Academics > Grades > Grading setup > Grade translations
Grade Translationsare grades (A+, B+, C, D, etc.) and the criteria associated with each grade for use in GPA calculations.If your school does not use GPA calculations or a numeric grading schema, then Grade Translations can be used to describe skills (e.g., Exemplary, Satisfactory, Improving).
Courses rely on
Grade Translationsto determine what grade options are available and what those grade options equate to.Grade Translationsare tied toGrade Categoriesand allow grading managers to determine whether a teacher records a raw score or sees aGrade label. They also determine whether the raw score or grade label appears on the report card and transcripts.Grade Translationsare largely comprised of the following parts: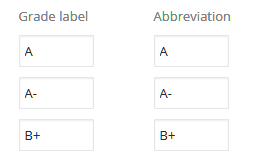
Grade Labelsassociate grade values with a letter or abbreviation.Grade LabelsorAbbreviationscan appear on report cards and transcripts in place of a numeric grade.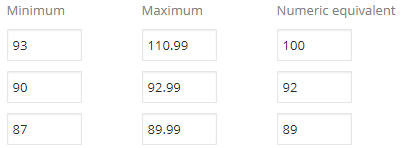
When a student's grade average for a course falls within a specified range, then they can be awarded the respective grade. Otherwise, a teacher must select the
Grade Label.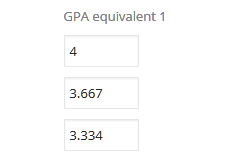
When a grade is awarded, both
GPA Equivalentvalues can be used in a GPA calculation formula.Standard Translations
Standard Grade Translations define the scores achieved by your students for use in GPA calculations, whether credit is awarded, and visually represent them on report cards and transcripts.
If your school offers courses that require different grading scales (e.g., Honors, AP), then you only need one Grade Translation table if the
GPA Equivalenttrend is consistent between grades.If your school weights certain classes when calculating the GPA, the weight can either be applied at the course level if it's consistent across the board (e.g., AP classes get a GPA bump of 1 point and honors classes get a bump of .5 points) or at the translation level if it is not consistent (I.e. AP classes get a bump of 1.0 as long as a student earns a C or above). In the latter scenario, create a
Grade Translationfor each scaling difference.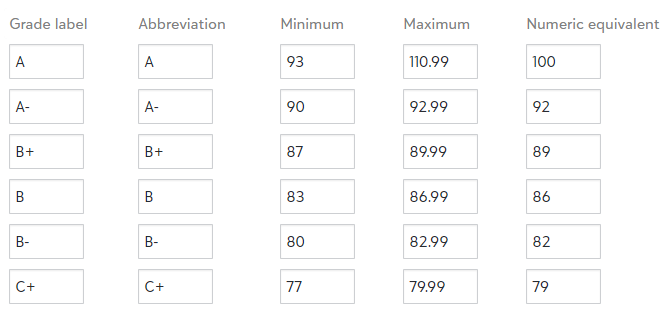
Assessment Translations
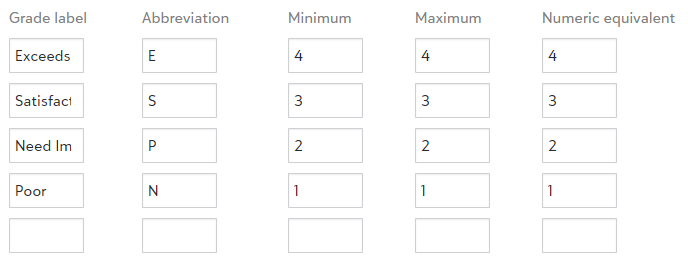
Grade Translationsapply to non-numeric grades and accommodate for skill-focused grading needs typical of Lower or Elementary school levels.Grade Labels, in this instance, are phrases that can be associated with skills to define student performance.Create an Assessment Grade Translation table for each unique instance of grading requirements. If different Assessment courses require different sets of
Grade Labelsto describe the grade, then create aGrade Translationtable for each instance.Alternate Grades
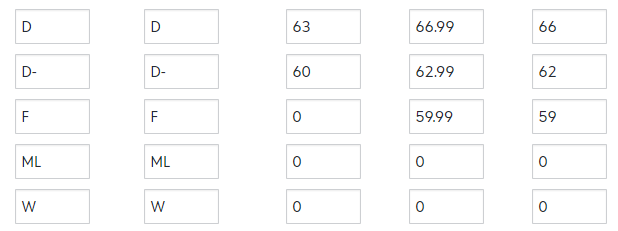
Read More about Grade TranslationsThere may be instances where a student withdraws from a course and is unable to complete it. In these instances, your school may deem it inappropriate to assign a grade point calculation value to a grade.
Add Alternate Grades to existing Standard or Assessment-focused Grade Translation tables. By doing so, a teacher will be able to easily select W (for Withdraw) or ML (for Medical Leave) when recording grades.
Alternate Grades are best used if teachers record letter grades and display letter grades on report cards.
Grade Categories
Academics > Grades > Grading setup > Grade categories
Grade Categoriesdetermine howGrade Translationsappear on report cards. In addition, they allow teachers to add comments to a progress report or report card.Grade Categoriesare linked to courses through Grade Plans, and thus the Grade Plan Group containing the Grade Plan.Create a
Grade Categoryfor eachGrade Translationtable. There should be a 1:1 relationship between Grade Translation tables and Grade Categories.For Grades
-
To display a letter grade (e.g., A, B, C) or assessment grade label (e.g., +, -) on the report card:
Enable
Translate Score on Output. Otherwise, theNumeric Equivalent(orMaxif there is noNumeric Equivalent) appears. If BOTH Input and Output options are off, then the raw grade appears on report cards. -
To have teachers access a drop-down consisting of
Grade Labelswhen recording grades:
Enable
Translate Score on Input. Otherwise, they will enter a numeric grade.Selecting this option will allow teachers to select Alternate Grades for students when they submit recorded grades at the end of a grading period.
For Assessment Grading, the
Abbrevationwill appear instead of theGrade label.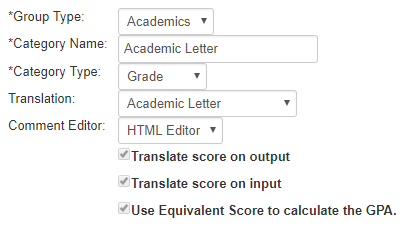
For Comments
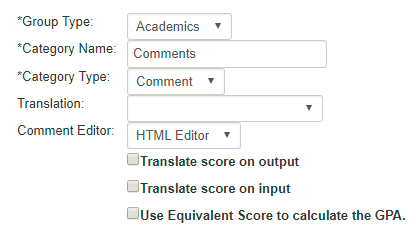
Grade Categoriescollect comments from teachers. Comments can appear on report cards. Comment Grade Categories do not need a translation table associated with them.Create one
Grade Categorycalled Comments if you record comments; the Comments Grade Category can be used across multiple Grade Plans.If your teachers copy and paste comments, then ensure
Read More about Grade CategoriesPlain Textis selected forComment Editor.Transcript Categories
Academics > Grades > Transcripts setup > Transcript categories
Transcript Categoriestake courses grouped by a common factor, and then use those categories to determine how they are arranged on a transcript.Visual Arts, World Languages, English, and History are examples of categories you will place courses in.
Transcript Categoriesalso allow for credit calculation for a certain subject (e.g., how many English credits does a student have?). 9 total categories can fit on a transcript.Create a
Transcript Categoryfor each course category.
Read More about Transcript CategoriesTranscript Categoriesalso determine the order in which courses appear on transcripts, and on hybrid and standard report cards.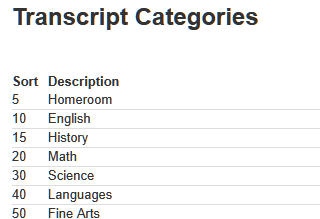
-
To display a letter grade (e.g., A, B, C) or assessment grade label (e.g., +, -) on the report card:
-
Assessment Setup
Assessment Grading Periods
Academics > Grades > Grading setup > Assessment grading periods
The
Assessment Grading Periodis the link between the grades you record in courses and the report card itself. When creating an Assessment Report Card, you will specify anAssessment Grading Periodto draw data from.Create an
Assessment Grading Periodfor each instance during the semester where Assessment report cards are issued; if you issue Assessment Report Cards once a quarter, and you have four quarters in a school year, then create fourAssessment Grading Periods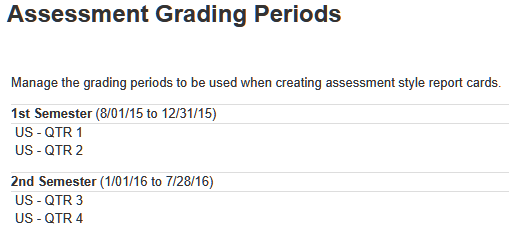
However, if you have Assessment Report Cards with different header and footer text (for example, if Grade 1 and Grade 2 use different
Grade Translations, resulting in different headers), then you will need an Assessment Grading Period for each instance.Additionally, if your school wants to include Q1 grades, but not Q1 comments on their Q2 report cards, then you will need to create both a Q1 and Q1 comment
Assessment Grading Period.Assessment Report Cards contrast with Standard Report Cards in that they are used to display skill-focused grades, and not numeric-focused grades.
Read More about Assessment Grading PeriodsAssessment Grading Periodsare tied toGrade Plans, which are explored in a later step.Grade Plansallow you to determine the periods when grades are recorded and the specific grades you are capturing.Assessment Skills
Academics > Grades > Grading setup > Assessment skills
Assessment Skillsare qualitative methods of assessing a student. EachAssessment Skillis a phrase to describe an area of potential growth.Consider the following examples of
Assessment Skills:Social Skills
- Abides by classroom rules
- Collaborates with students on group projects
- Considerate of others
Literature Skills
- Identifies critical themes
- Articulates thoughts coherently
- Clearly reads aloud in class
Fitness/PE Skills
- Cardiovascular Endurance
- Cooperates in team activities
- Reached Fitness Goals
Assessment Skillscan be used on multipleGrade Plans;Grading setup>Assessment skillsis a master list of all of the skills for all grade plans at the school (regardless of school level/grade).Create
Read More about Assessment SkillsAssessment Skillsto describe every skill-based metric required from your courses. -
Setting up Your School Year
Now we need to set up the periods throughout your school year where grading takes place. By this point you must consider the following organizational questions:
-
How many times per year do teachers grade?
-
During each grading period, will I need progress reports? A report card?
-
At what point in the semester will grades be used to award credit?
-
What types of information should I be collecting for each grading period? Do I collect only grades, or do I want teacher comments, too?
These questions are explored across the following areas:
Grade Plan Groups
Grade Plan Groupsare used to link courses with grade plans. A grade plan group can contain several grade plans. Grade plan groups must either be defined as standard (typically used for letter/effort grades and comments) or assessment (typically used for skill-based grading and comments). Each class can be attached to one standard grade plan and one assessment grade plan if your school uses a hybrid report card.Create
Create Grade Plan GroupsGrade Plan Groupsbased on the needs of courses. For example, if a set of courses requires a different grading scale than a standard set (e.g. AP/Honors), you will need to createGrade Plan Groupsto accommodate each course type.Grade Plans
Grade Plansare the periods during a school year where grading takes place. They are effectively time-sensitive buckets that teachers drop grades into.Create a Grade Plan for each period when you want teachers to record grades specific to a term. Examples of grading periods could be Q1 Report Card, Q1 Progress Report, Tri 2 Report Card, and so forth.
Create Grade PlansGrade Plan Grades
Grade Plan Gradesare what you allow teachers to record for that period, whether that be a comment or a standard grade. IfGrade Plansare akin to buckets, thenGrade Plan Gradesare the contents of those buckets.
Create Grade Plan GradesGrade Plan Gradesare linked to yourGrade Categoriesand, therefore, your Grade Translations are added to report cards and transcripts.Grade Plan Groups: Assessment vs Standard
Academics > Grades > Grading setup > Grade plan groups
There are two categories of
Grade Plan Groups: Assessment and Standard. Each type has a different purpose for associating a different set of information with a course.Grade Plan Groupsare unique to School Level; you cannot associate a Middle School Grade Plan Group with Upper School courses.Standard
Used to associate letter, numeric-based grades with a course. Only Standard
Grade Plan Groupswill contribute to GPA calculation. Linked with standard, AP, and honors courses.Assessment
Used to associate
Assessment Skills(i.e. Working with others) withGrade Translations. Does not contribute to GPA calculation. Linked, often, with Lower School courses.Creating Grade Plan Groups (Standard)
Create a
Grade Plan Groupfor each instance where a course requires unique grading parameters. For example, if all your Upper School courses use the same Grade Translation table for determining letter grades, then create one Grade Plan Group.-
If you have Elementary or Middle School level courses, then create Grade Plan Groups for each School Level.
-
If you offer courses that operate on a different grading scale (AP, Honors, University of California GPA calculations), then create a Grade Plan Group to accommodate for these types.
-
If your school records Final Grades, and offers both single-term and multi-term courses, then create Grade Plan Groups for both Multi-term and Single Term courses.
For example, if you offered Honors and Standard courses, and each of those course types use a different Grade Translation table, and are segmented into Multi-term and Single-term courses, then you would need 4 Standard Grade Plan Groups: Single-term Honors, Single-Term Standard, Multi-term Honors, Multi-term Standard.
Read More about Grade Plan Groups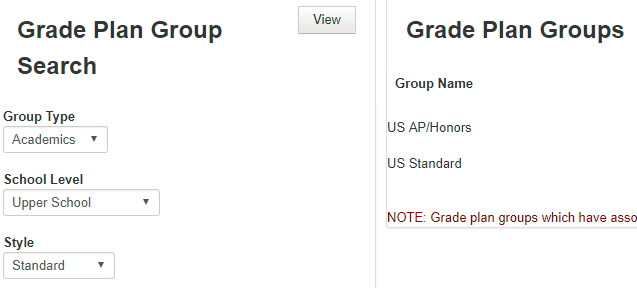
Creating Grade Plan Groups (Assessment)
Create a
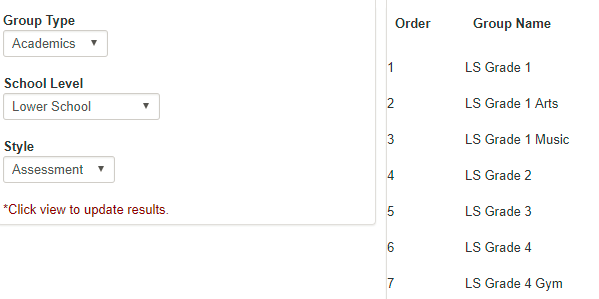
Grade Plan Groupfor each instance where a course requires unique grading parameters.For example, Grades 1, 2, 3, and 4 in your Elementary School may be graded on a different set of skills than one another. As such, you would create four Assessment Grade Plan Groups (one for each grade level).
-
In addition, you may create Grade Plan Groups for each subject area within a grade. If Grade 1 has different types of courses that require different sets of skills, then create a
Grade Plan Groupfor each of these areas. For example, Grade 1 Visual Arts might differ from Grade 1 Music and require Grade Plan Groups with Assessment Skills matched with each of those areas.
Grade Plans: Your Grading Periods
Academics > Grades > Grading setup > Grade plans
Academics > Grades > Grading setup > School year setup
Create a
Grade Planfor each period when grading occurs.For example, assume you have two semesters throughout your school year. During those two semesters, you may have four quarters. Within those four quarters, you may record grades for a progress report and then a report card.
To follow the above example, we would need 8
Grade Plansadded to theGrade Plan Groupwhere grades are collected.The
Read More about Grade PlansGrade Plansfor Semester Term 1 and 2 can be created to calculate the End of Term grade, which is the appropriation of credits and the calculation of GPAs based on grades within that term.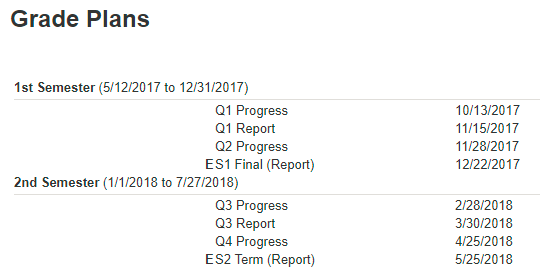
Grade Plan Grades: The Information You Collect
Academics > Grades > Grading setup > Grade plan grades
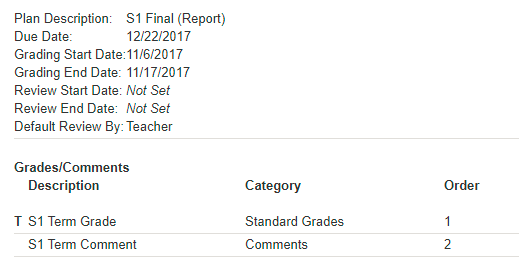
Grade Plan Gradesare the links to the Grade Categories/Translation you created.Grade Plan Gradesare what teachers record – both grades and comments.Grade Plan Gradesare tied back to theGrade Categoriescreated earlier in the setup.
Read More about Grade Plan GradesGrade Plan Gradesare added directly intoGrade Plans. TheGrade Plandetermines when a teacher has access to recording grades, and theGrade Plan Gradedetermines what exactly is being recorded.
Grade Plan Grade Formulas
Grade Plan Gradescan pull from otherGrade Plan Gradeswhen calculating a grade. For example, if a teacher records a numeric final exam grade in theGrade Plan, that grade can be factored into the final grade calculation.Additionally,
Grade Plan Gradescan draw from theGrade Book Cumulativeof each course. This allows teachers to neatly and uniformly apply grades based on a formula determined by the Grading Manager.For example, if final exams count as 20% of the semester grade, you can add the final exam as a numeric
Create Grade Plan Grade FormulasGrade Plan Gradeand create a formula which pulls 80% from the grade book cumulative and 20% from the exam grade. If some teachers do not give a final exam, you can make the exam grade optional in theGrade Planand the formula will ignore the grade if it is blank — leaving 100% of the semester grade pulling from the grade book. If some departments or teachers use different formulas when calculating the semester exam, you can add multiple formulas to account for those differences. You might end up with a formula that factors in the exam grade as 15% or 25%. If a Grading Manager does not enter a formula, teachers will be able to create their own formulas. If a Grading Manager does enter a formula, teachers will not be able to create their own formulas.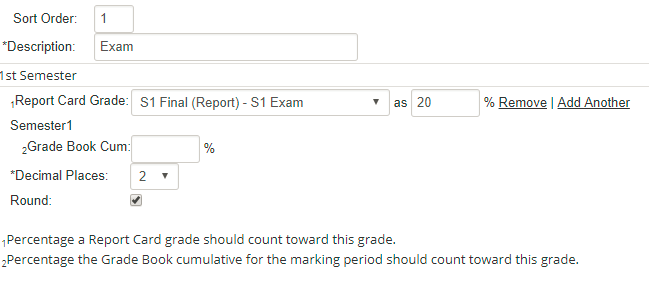
End of Term and Final Grades
Grade Plan Gradescan either be marked as End of Term or Final inGrade Plansthat have End of Term enabled. All schools will use Term Grades if credit is awarded.For schools that record Final Grades:
-
Single-term course credits are calculated using term grades.
-
Multi-term course credits are calculated using term grades.
-
The credit for term grades can be used to calculate a GPA using the final grade instead of term grades.
-
Credits will not display on a transcript until the Final grade is recorded
For schools that do not record Final Grades, the End of Term grade is still when both single and multi-term courses calculate and award credits.
Assessment Skills
Assessment Skillsare whatAssessment Grade Plansrely on to determine what skills are associated with courses. They are structured in the same manner asGrade Plan Gradesin that they rely onGrade Categoriesto determine what grading scale is associated with each skill, and that Comment Grade Categories are also required to add comments.However, when you add an
Assessment Skillto aGrade Plan, you assign it to a category; an assessment category contains a similar set of skills for organization purposes when recording grades and when added to report cards. If you create report cards that draw from two grade plans — effectively two grading periods — then the Sort Order of each skill determines how it will appear on the report card.You can add an Assessment Category for comments and allow teachers to record comments for the marking period. Add a Comment Grade Category to each
Learn More about Assessment SkillsAssessment Skillgroup as needed.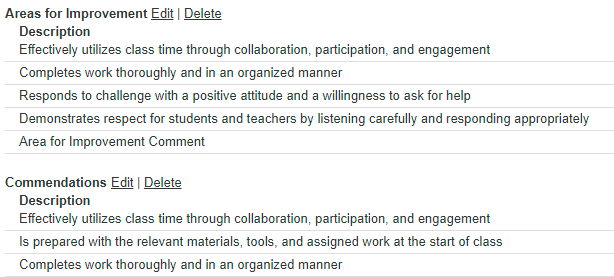
-
-
GPAs, Ranks, and Academic Performance
Creating Grade Averages
Academics > Grades > Grading setup > Calculations > Grade averages
Creating GPAs is a multistep process.
Think of the process as revolving around these three components:
Create Your GPA Formulas
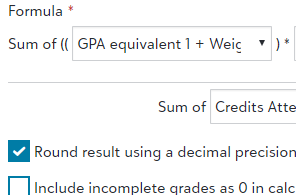
A formula is an equation used to calculate grade point averages. The formula draws data from several different areas to perform this calculation.
Pull From Grade Plans
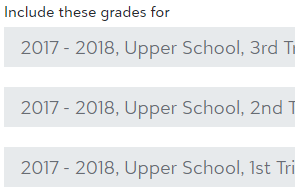
Courses that are placed within the Grade Plans that you associate your GPA calculation with will follow that formula.
Determine GPA Types
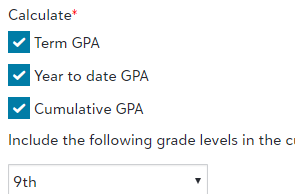
Select which GPAs you wish to calculate. These options can appear on report cards and transcripts.
Note: A formula can be reused each academic year; this is accomplished by associating the new school year's
Grade Plansin the formula.Step 1: Formula
The Formula is the equation used to calculate students' grade point averages.
Create a formula that follows your criteria for calculating grade averages, noting the following:
-
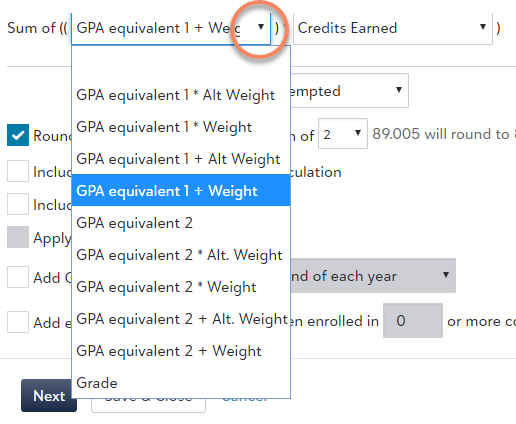
GPA Equivalent 1 & 2
relate to the value of the fields belonging to theGrade Translationtable of the recordedGrade Plan Grade. -
Weight & Alt Weight
set at the course level provide an overall bump to the GPA Equivalent. -
Gradedraws from theNumeric Equivalentof a grade in a correspondingGrade Translationtable.
Create as many formulas as needed to match your school's needs, such as having them for Quarters, Mid-Year Cumulative, Final GPAs, and so forth. You may also need separate formulas for weighted and unweighted calculations, and term and final. Additional formulas might be needed for academic performance and honor rolls.
Step 2: School Years
Select the School Years you want to include in the GPA calculation. If you want final transfer grades to be included, check the
include transfer gradescheckbox.
Step 3: Grade Plans
If your
Grade Plan Groupsare not differentiated by term (for example, multi-term and single-termGrade Plan Groups), then simply select theGrade Planto be used in determining the GPA for both the Multi-term courses and single-term courses columns. If you'd like to include term transfer grades check the box forInclude term transfer grades.
If you follow a Final Grade setup and have courses that are segmented into Multi-term and Single-term
Grade Plan Groups, then you must ensure that you only select aGrade Planwithin the corresponding column.For example, in the row containing your Multi-term Grade Plan Group, under the Multi-term courses column, select the
Read More about GPA Calculation FormulasGrade Planthat contains your Final Grades. Repeat the same steps, but for your Single-termGrade Plan Groupnext.
Step 4: Types
Each
Typeselection will determine what calculates from your formula.Term GPAandYear to Date GPAcan both appear on a report card.Cumulative(GPAs across multiple years) andTerm GPAscan appear on transcripts.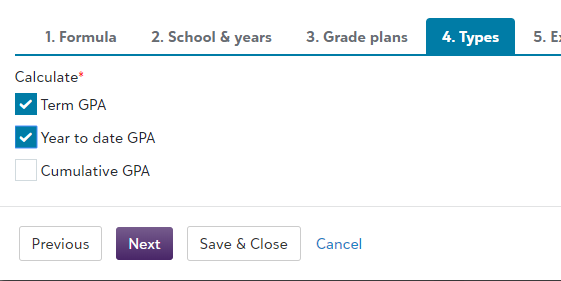
Step 5: Excluded Courses
Excluded Coursesare courses that are not included in GPA calculations. Study halls and Homerooms, for example, might fit into this category.Courses do not need to be excluded if they are not in a Grade Plan selected in the previous step.

Ranks & Academic Performance
Ranks&Academic Performancerely on the formulas that you have established to determine how students rank against one another and if a student is deserving of additional accolades due to excellent performance.Note:
Rankscan appear on transcripts, andAcademic Performance(ex. Honor Roll) can appear on report cards and transcripts.Ranks
Academics > Grades > Grading setup > Calculations > Rank
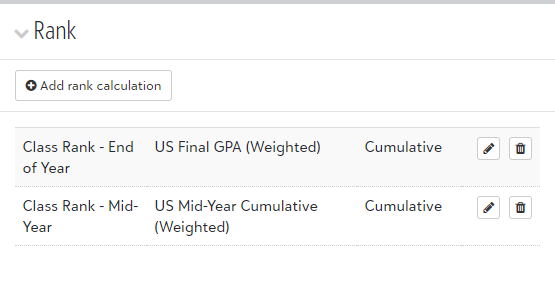
Ranks use either the Cumulative, Term, or Year to Date value calculated using a specified GPA calculation formula to display information on a transcript.
Final grade schools need different grade average formulas for mid-year versus end-of-year, often because the Semester 1 grade for year-long courses should be counted in the cumulative grade at the mid-year, but only the final at the end of the year.
Academic Performance
Academics > Grades > Grading setup > Calculations > Academic performance
Step 1:
Academic Performancecan be used to compare students' grade averages against a metric you define. The outcome can range anywhere from a list of Probation-ranked students to assessing Honor Roll worthiness.You can associate similar
Academic Performancemeasurements with one another. For example, President's List and Honor Roll can be subcategories within the same category because they similarly reward success.The priority will determine which
Academic Performancemeasurement is used if a student meets more than one requirement. In this example, a student would receive the Principal’s List designation if they met that requirement because of its higher priority.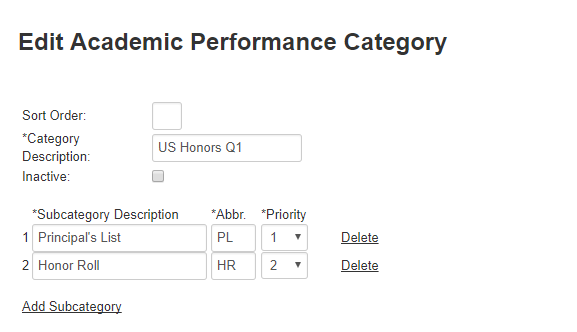 Read More about Academic Performance
Step 2:
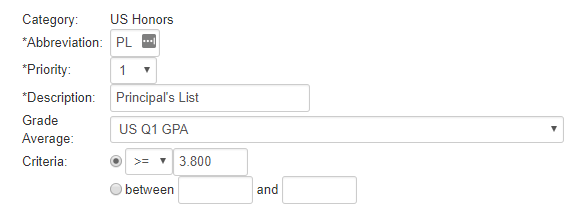
Each subcategory must be assigned a means for comparing the GPA with a standard. Select the threshold that should be reached by the student to achieve the academic performance designation.
In this example, Principal's List is set to a higher threshold requirement. If a student meets that threshold, and because Principal's list has the higher priority, the student will appear on the Principal's List and not the Honor Roll.
-
-
Linking Courses to Grades
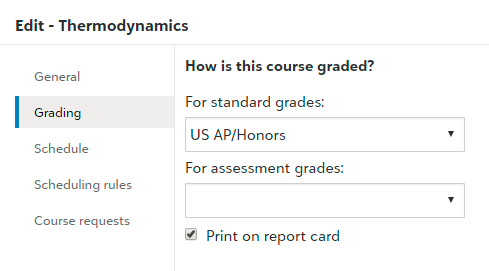
Academics > Scheduling > Requests and schedules > Departments & courses > Edit course > Grading
Linking courses involves associating the
Grade Plan Groupcontaining yourSchool Year Setupwith a course. Once a course is linked to aGrade Plan Group, teachers will be able to record what has been specified in theGrade Planthat is currently active.Step 1: Link Grade Plan Group
Begin by selecting the
Grade Plan Groupthat contains theGrade Plans, and thereforeGrade Plan Grades, that are specific to this course.You can associate a course with one Standard and one Assessment Grade Plan Group, allowing for two unique report card representations of performance.
Step 2: Credit Worth
Determine how many credits should be awarded for completion of a course.
If a course is year-long, and therefore spans more than one term, toggle
Specify Credit Awarded per Termto award partial credit only if a different credit amount should be awarded each term. Credits must be specified every year in the Offer Courses task.
Step 3: GPA Weight Determination
Weight influences GPA calculation. If you offer AP/Honors courses that are graded on the same scale as standard courses (4.0, for example), then give standard courses a weight of 1 and AP/Honors an appropriate bump.
For example, students might get a .5 bump for AP courses and a .3 for Honors; this can be indicated in the
GPA Weight/Alt Weightfields in the Course.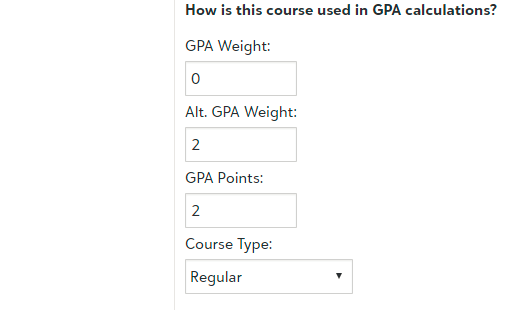 Read More about Course Grade Settings
Step 4: Transcript Organization
Enter an
Abbreviationif theAbbreviationof the course should take the place of the course name on the transcript. Enter theTranscript Categoryto determine how the course is organized on the transcript.An
Abbreviationis best used if the course title is too long and does not appear on transcripts fully.
-
Report Cards
Academics > Grades > Report card setup
Report Card Builder is a drag-and-drop interface designed to streamline the visual construction of report cards and progress reports.
Report Card Builder allows you to put grade, attendance, GPA information, and more on a report card that can be communicated to students, parents, and faculty.
To begin, navigate to
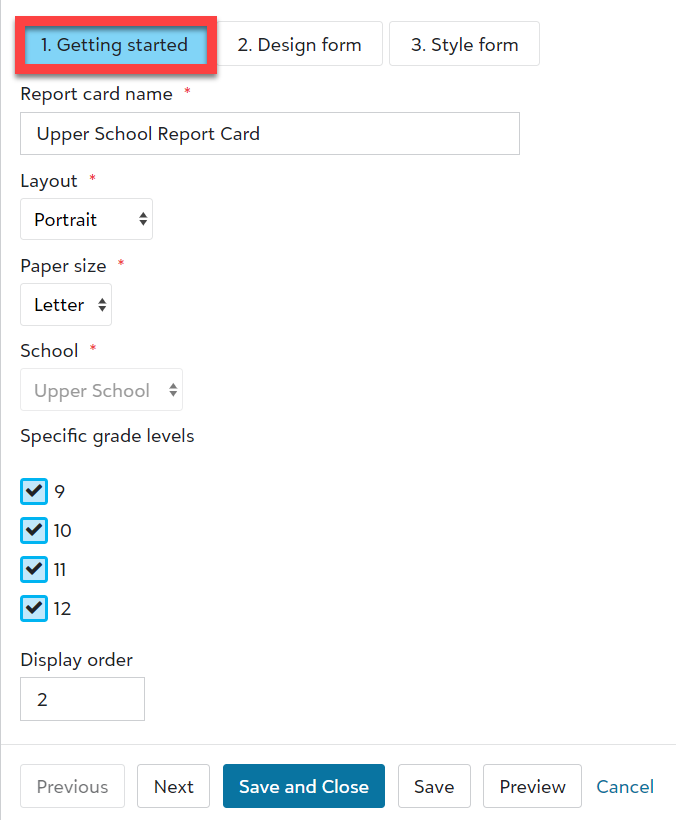
Academics, then chooseGradesfollowed byReport card setup.Step 1: Getting started
-
Select
+ Build a new report card. -
Type in a
Report card nameto identify your report card. An example might be US Letter to indicate a report card designed for all upper school courses that use standard letter grades. -
Select a
Layoutto determine the orientation of your report card. There are two options:-
Portrait -
Landscape
-
-
Select a
Paper sizeto determine the dimensions of your report card for printing. There are two options:-
Letter(8.5in x 11in) -
Legal(8.5in x 14in)
-
-
Select a
School level. The grade levels associated within a school level will appear below; selectspecific grade levels to includeon the report card. -
Select a
Sort order, which determines where in the list the report cardappears. Lower numbers (ex. 1) will appear higher in the list. -
Select
Nextto advance to the Design form.
Step 2: Design form
The
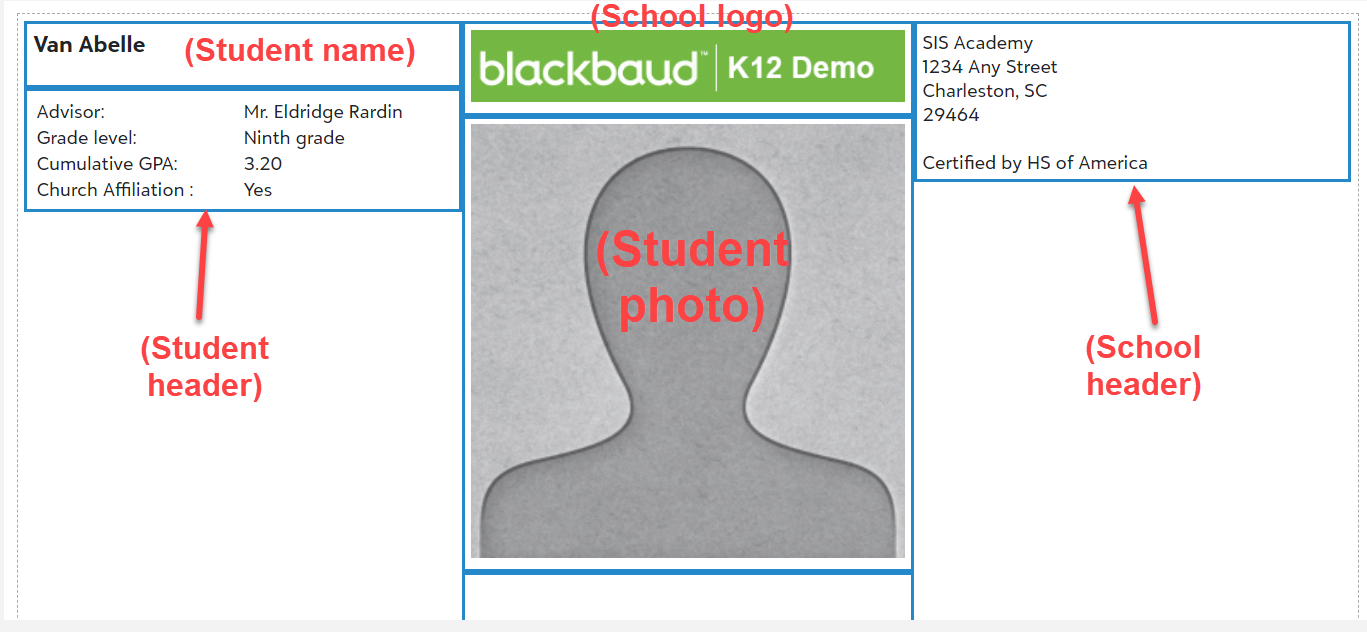
Design formholdsrowsthat containsectionsof data. Sections can havewidthsdetermined either bypercentage,inches, or proportion to other sections in a row. Width determines how many sections can reside by one another, and thus can help emphasize certain sections over others.For example, a row dedicated as the report card’s header can contain the
student header,school header, andschool logosections. Each section would need to have a maximum width of about 33% in order to comfortably fit in the row. Some elements can be longer than others if desired.When you have filled a row, expand
Page elementsand drag a new row into the report card template to add additional data sections. You can also use theHorizontal spacewidget to create space between different sections on your report card.Dragged sections, when dropped, will produce a prompt where you can customize the specifics of the dropped element, such as column width.
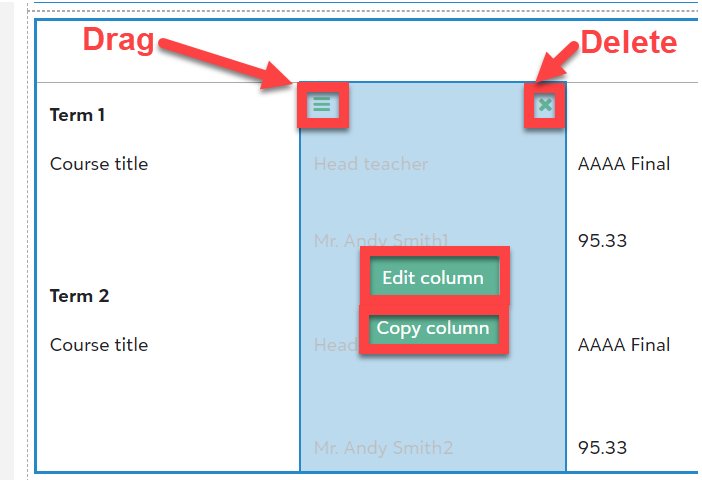
Hover over placed elements to reveal four possible actions:
-
Drag(triple-line icon): Select and hold the drag icon and then drag the element to a new position in a row. -
Edit section: Modify the dimensions and other details of the hovered element. -
Copy column: Add another related element into the hovered element. -
Delete (X)Delete the element and the elements contained with it. Be careful as this action is irreversible.
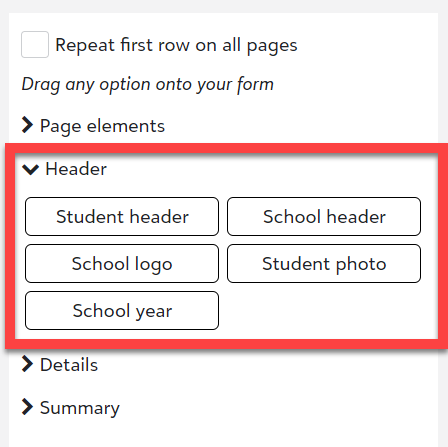
1. Add a header (Student, School information, Logo)
The header appears at the top of the report card and contains the student information, school information, and logo.
-
Student header:
The student header communicates who the report card is addressed to and key information about that student.
There are two parts to the student header:
-
By default, a new report card template will start with part of the student header. That part communicates the student name, preferred address, date of birth, date entered (labeled Enroll date), and graduation date. Hover over it and select
Edit sectionto find options for the format.Note: These default fields can be deleted as needed when editing the section. The only field that cannot be removed is
Student name. -
Drag the
student headerinto report card builder to add additional student information. Under edit student header, you can:-
Add one or more columns to express more data or group it accordingly. Columns appear beside one another in the row. If a column appears outside the section, then expand the section width.
-
Determine if you include labels for fields to help students and parents identify what data is being communicated.
-
Select student data fields from the drop-downs. These fields populate with data from the student profile. Some fields can have varying formats to display the text differently.
-
-
-
School header:
The school header communicates school address information. Under
Edit school header, fill out the school name and address fields, formatting the address field as necessary with line breaks. -
School logo:
The logo field lets you place an image on your report card. Under
Logo to use, selectBrowse the image galleryto pull from existing logos and seals. SelectActual sizeto use the dimensions of the image in the column. Alternatively, selectFit in sectionto cause the image to stretch to fill the section width.Note: By default, the transcript template will start with your school's selected default logo.
-
Student photo:
The student photo allows you to add student user profile photos to the report card. You can set the
Section widthas well as set theStudent photo size.
2. Add Details (Grades, Academic Performance)
There are three types of grades that can be put on a report card: Standard, Skill-based, and Comments. Comments, while not traditional grades, add detail to standard and skills-based grades.
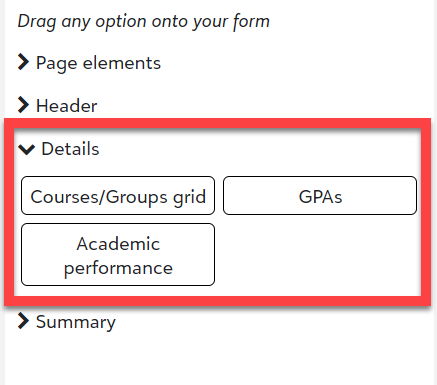
The primary section under
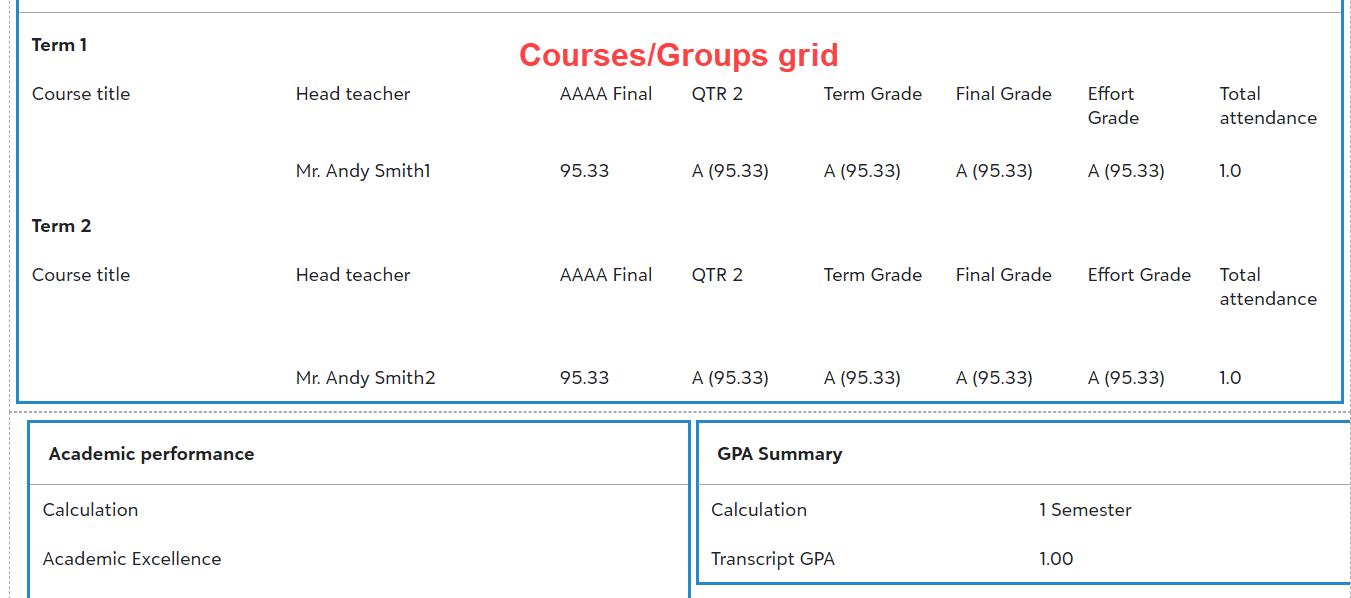
Detailsis theCourses/Groups grid, which displays selected term-specific grades and comments.The Courses/Groups grid is unique in that, when dragged to the report card, it occupies the full width of the row, and contains within it columns used to communicate grades and comments.
Under
Edit course section, follow this procedure:-
Enter a
Section header. This is the header to communicate what grades are illustrated below. -
Format either:
-
All on one page:Each grade will appear vertically in the leftmost side of the grid. The corresponding grade for selected terms will appear.
OR
-
Separate page for each course:Each course appears on its own page on the report card. This format may be ideal for Lower School or Assessment report cards that make heavy use of comments.Rows added before or after the
Course/Groups gridwill still appear before the grid begins or on the last page that contains room for the information to display.
-
-
Select as many
Group typesas you want to include on your report card. These selections will filter down into the terms in which grades/comments for the selected group types are available. Schools can add grades/comments for Academic, Activity, Advisory, Athletic, and Dorm groups. -
Use
Display courses in the following orderto set a sort order for courses. -
Include skill assessment ratings for each courseif your school uses assessment, skill-based grades.If selected, enter a
Section headerto communicate that assessment grades are being displayed (ex. Assessment Performance), and determine whether theGrade value(ex. Exemplary) orAbbreviation(ex. E) displays in the section for each grade.In order for assessment grades to appear on a printed report card,
Print on report cardmust be selected under the Grading tab for each respective course's settings. -
Include comments below each course:If you select this option, enter a
Section headerto convey that the section communicates comments (ex. Comments).Label comments with grade plan grade labeluses the label associated with the Grade Plan Grade containing the Comments. Otherwise, you can specify a custom name to describe the comment below. -
Select
Save.
3. Add Grades:
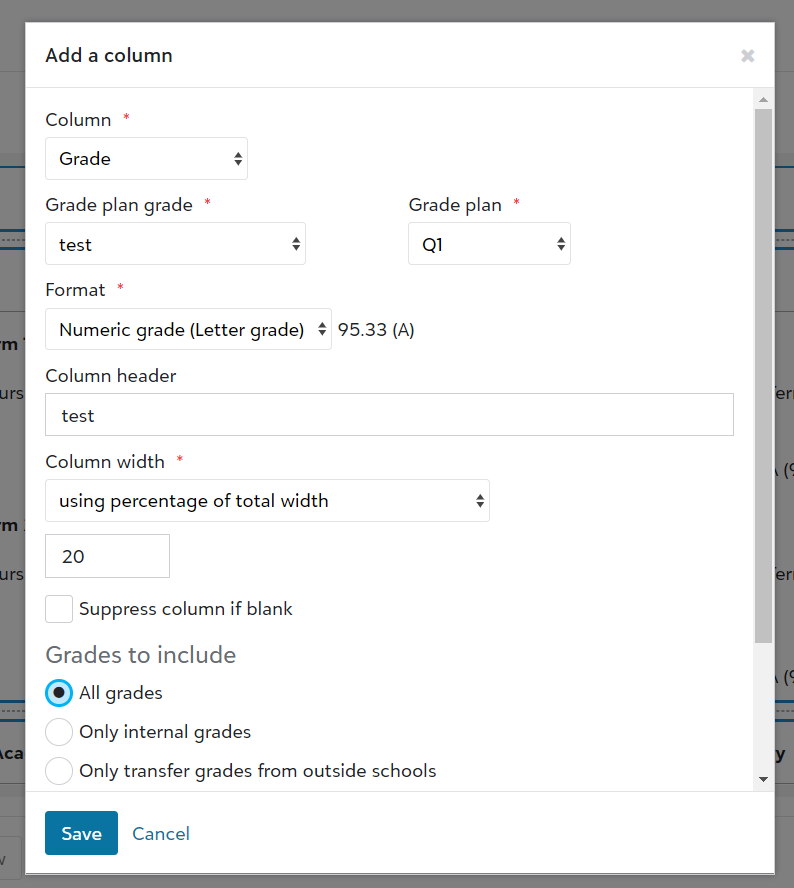
-
Hover over the top of the
Courses/Groups gridand selectAdd column. -
Under the Column dropdown menu, select
Grade. That data will appear in theCourse/Groups grid. -
In
Grade plan grade, select the grade plan grade that contains the term grade that you wish to convey on the report card. For more information about Grade Plan Grades, click here.Note: if you select a grade plan grade that is attached to multiple grade plans, you will need to select the grade plan you wish to pull the grade from.
-
If Assessment grading is selected, select the Assessment grading period that contains the skill-based evaluation you wish to communicate.
-
Determine the
Format. Use the example to the right of the drop-down to visualize what each option looks like. -
Type in a
Column header. For example, if the Quarter 1 or Trimester 1 Grade plan grade is selected, you might type Q1 or Tri 1, respectively. -
The
Column widthcan be used to enforce uniformity or emphasize uniqueness.Equal to other designated columnscauses the column to be proportionate to other columns with the same setting in the grid. If this column should be longer or shorter than others, then specify the width in percentage or inches. -
Suppress column if blankwill hide the column if the student does not have a grade recorded for that column. For example, some classes may need a column for a term paper grade, it will only display for students that have a grade recorded for their term paper. -
Include incomplete gradeswill display an I on the report card if a teacher selects Incomplete when recording a Grade plan grade. -
Select a
decimal precisionoption from the drop-down. Opt for 0 for a whole number. -
Select
Save. -
Optional: Select
Copy columnto create another column. Use different variables to illustrate different data, and repeat steps 1-10.
4. Add GPAs:
Grade point averages (GPAs) can be communicated to parents and students for a specific term or across multiple terms. This includes the term GPA, cumulative GPA, and the year-to-date GPA.
To get started with GPAs, drag
GPAsfrom the leftmost pane into an open row.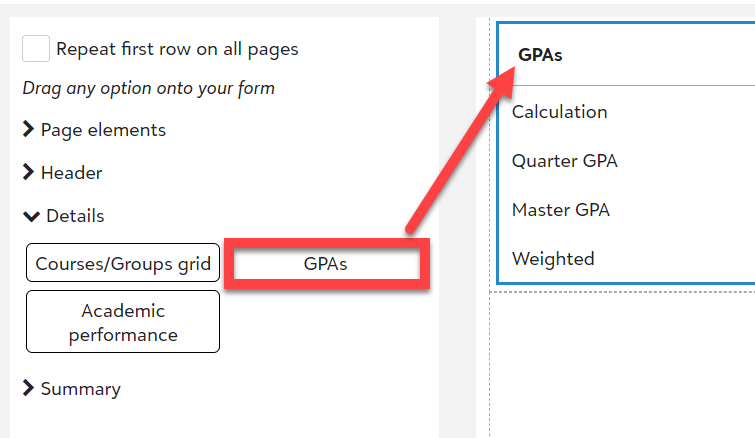
-
Determine the
Section width. -
Add a
Section header(ex. Grade point averages). -
Under
GPAs to include, select aCategoryandTypefrom the dropdown menus. Edit theLabelif needed. -
Optional: Select
+ Add a calculationto add another GPA. -
Select
Suppress blank GPAsto hide blank GPAs. -
Select
Save.
To learn more about GPAs, see Create Grade Calculations & Rank.
5. Add Academic Performance:
Academic Performance allows schools to calculate honor roll for their students. To learn more about setting up Academic Performance, see here.
Drag the
Academic performanceselector from the left pane into an open row.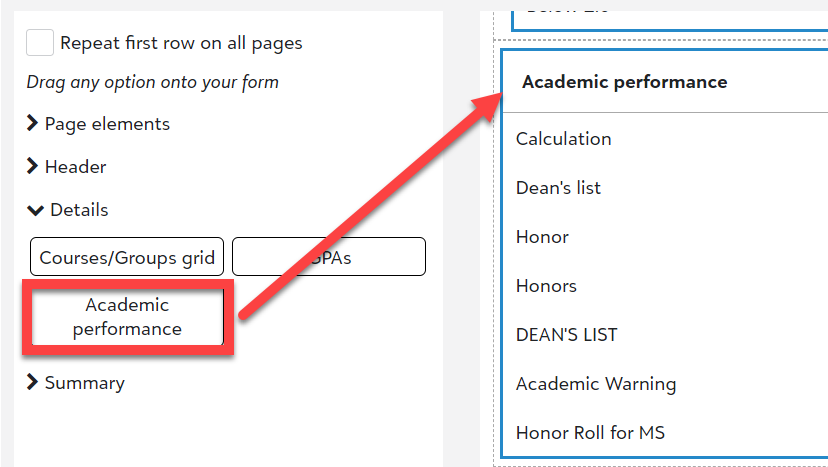
-
Determine the
Section width. -
Add a
Section header. -
Use
Select calculationsto choose which calculations to include on the report card.Note: To remove a calculation, select the
X. -
Select
Suppress blank calculationsto hide blank Academic Performance -
Select
Save.
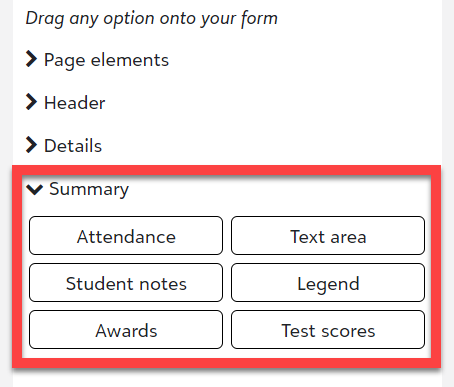
6. Add Summaries (Attendance, text area, student notes, legend, awards, test scores):
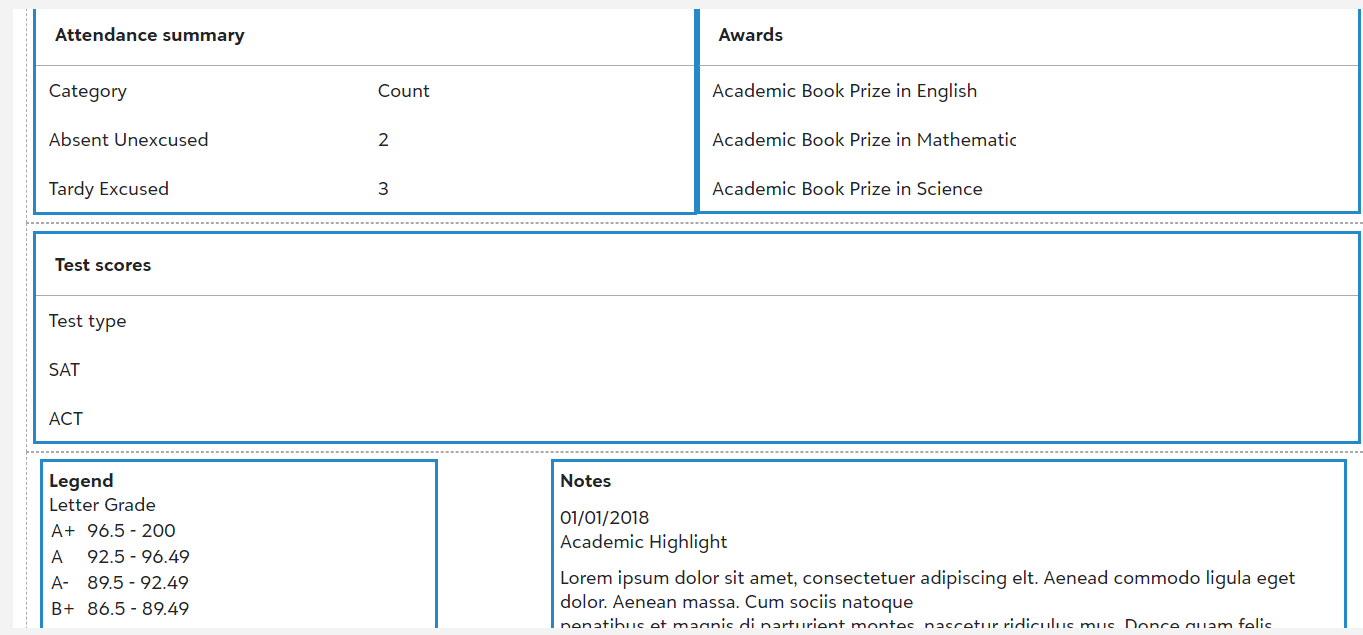
-
Attendance:
An attendance summary can be added to communicate tardiness and absences accumulated over the course of a term.
Schools can add a Days present category to their report card. This is calculated based on the school level's selected Attendance Record Method:
-
Daily: The system uses the days the school is considered in session and will subtract a day each time there is an attendance entry. -
Per period: The system will use the days the school is considered in session and will subtract a day each time there is a day with attendance in all class periods.
To get started, drag the
Attendanceselector from the left pane into an open row.-
Select which
Group types to include. -
Under
Attendance categories to include, select which attendance reasons are tallied and communicated in the summary. -
Select
Suppress blank/zero count categoriesif a category should not appear if a student has no attendance reasons associated with their profile. -
Select
Save. -
Hover over the attendance summary header and select
Add column. -
Add one of the three columns:
-
CategoryThe attendance reason to display.
-
Number of occurrencesThe number of times an adjacent attendance reason has been logged across the selected group types.
-
Sum of unitsThe portion of a school day that a student missed due to an attendance reason. If a student missed an entire course one day, then the Sum of Units would be proportionate to the number of classes missed in a day. For example, when recording attendance Per Section and attendance is calculated using the number of classes in a student's day, if one class out of 4 the student was absent, then the amount of the school day missed is 0.25. Every whole number equates to a completely missed day of school for the recorded attendance reason. Only attendance reasons that are set to Use in Calculations will contribute to this count.
Note: Tardy excuse types will not contribute to the Sum of Units column. The number of tardies recorded under selected group types appears in the Count column.
For more information on attendance excuse types, click here.
-
-
-
Text Area:
Text areas are designed to communicate non-data information to parents and students. Examples of text areas could be a message communicating school policies, the means to contact the administrative office, or a grading scale.
To get started, drag the
Text areaselector from the leftmost pane into an open row.-
Determine the
Section width. -
Enter your desired text, using the included formatting options to style it as desired.
-
Optional: Under Insert,
Date/Timewill populate with the date that you inserted the text. -
Optional: The link icon can be used to direct students and parents to external resources when viewing the report card from a student profile or downloaded PDF. Ensure the URL you add begins with http:// or https://.
-
Select a format option under
If the content doesn't fit. -
Select
Save.
-
-
Student Notes:
The student notes section allows schools to include specific official note types on the report card. To learn more about official note types, view Official Note Types.
To get started, drag the
Student notesselector from the left pane into an open row.-
Determine the
section width. -
Select the official note fields to display.
-
Select the official note types to include.
-
Select
Save.
-
-
Legend:
The legend section allows schools to show information about the grade translation(s) on the report card.
To get started, drag the
Legendselector from the left pane into an open row.-
Determine the
section width. -
Select the grade translations to include.
-
Select to display abbreviation, grade label, range, numeric equivalent, GPA equivalent 1, or GPA equivalent 2 for each grade translation.
-
Select
Save.
-
-
Awards:
The awards section allows schools to include school created Awards on the report card.
To get started, drag the
Awardselector from the left pane into an open row.-
Determine the
section width. -
Select the awards calculations to include.
Note: Once an Award is added, you can remove it by selecting the
X. -
Select
Save.
-
-
Test Scores:
The test scores section allows schools to include school-created test scores on the report card.
To get started, drag the
test scoresselector from the left pane into an open row.-
Determine the
section width. -
Select the test scores to include.
Note: Once a test score is added, you can remove it by selecting the
X. -
Select
Save.
-
Step 3: Style form
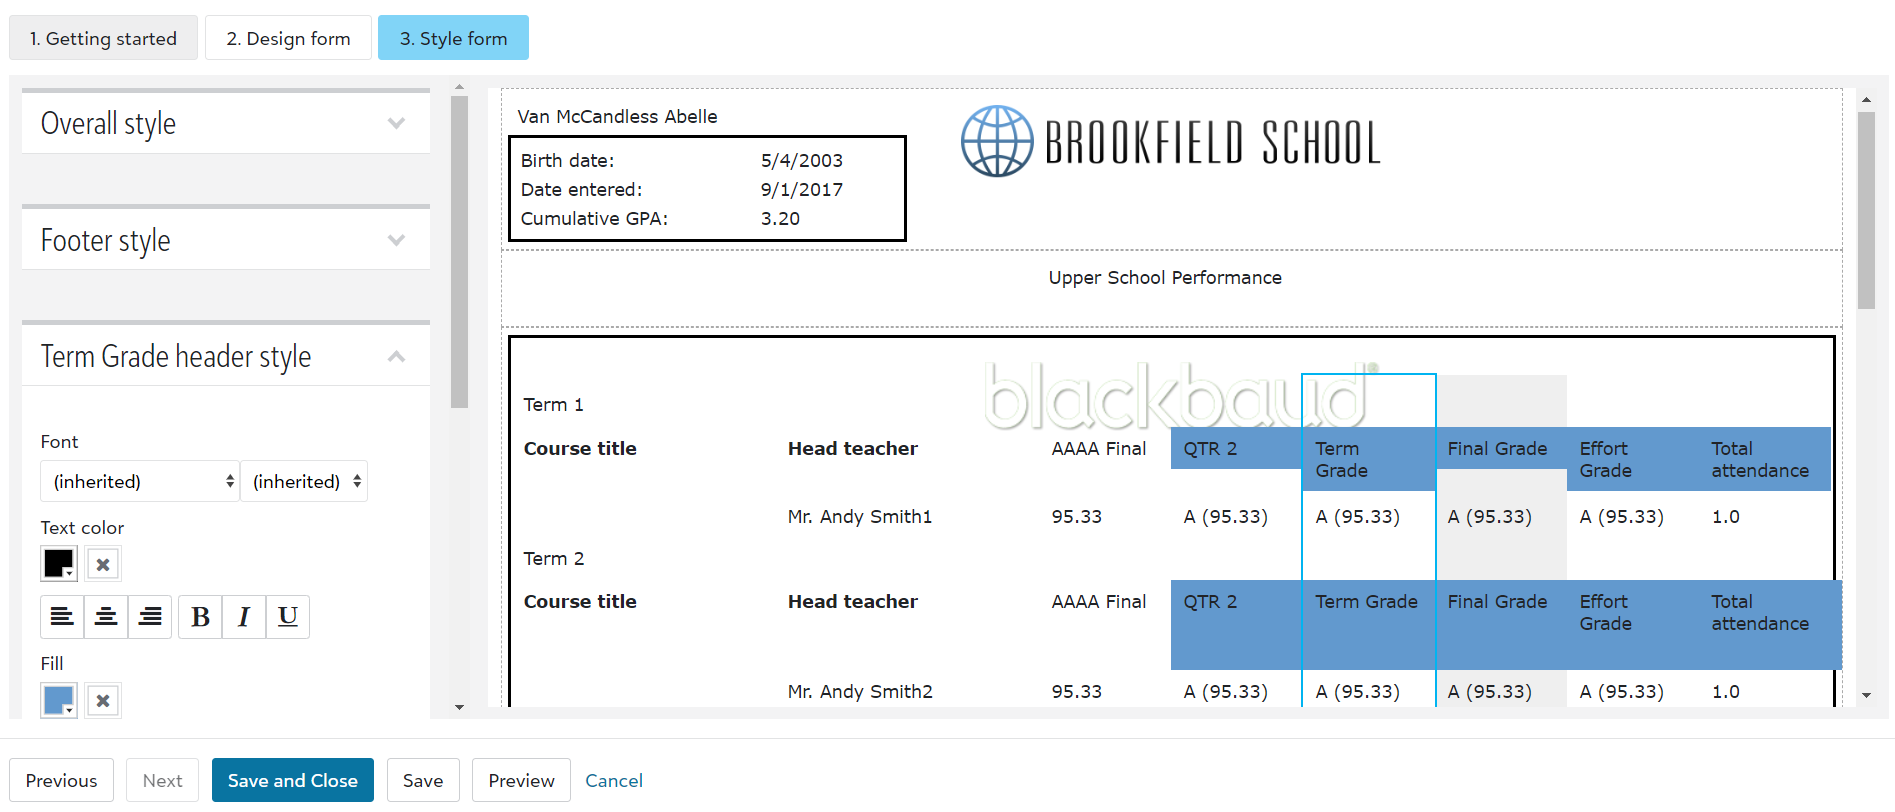
The Style form allows you to customize the font style and formatting of each section in the report card.
Select an area in the report card view, and modify the font style in the pane on the left. Select each area, modifying the font as needed, until the report card is formatted as desired.
In some sections that contain an HTML text field, you can override previously established text color settings by selecting the checkbox
Apply to HTML fields.Note: "Inherited" means that the element section is using the same font under Overall style. Consider keeping the font face unedited to enforce uniformity.
-