Getting Teachers Started with Online Classrooms
How to organize your online class
There are three general ways to approach your online class:
- Topic based
Makes it easy for students to find what they need
Takes the least amount of time, so it's a good place to start with longer term plans of moving to chronological or self-paced organization
Does not allow much control over how and when students access the information
- Chronologically
Most common
- Steps include:
Create folders containing the information for each lesson
Decide on how many weeks to include in each folder for each class
For example, if you are working with a 15 week semester, you could create a folder for each week and add assignments for that week in each folder, entering due dates for each assignment.
Easily able to communicate to students where they can find the information they need for each class.
Allows students to easily click backward to any lessons that they'd like to review.
If you don't want to allow your students to work ahead, you can hide folders and control how quickly information is released.
- Self-paced
Good if you offer rolling admission to your classes
Allows you to organize your content so that students can progress through each topic or lesson at their own pace
Allows you to set up your content so that students can only move on after they have completed certain assignments or passed certain checkpoints
Creating an online class takes a good deal of time and planning, and if you try to include everything available, you may be overwhelmed.
The best approach is to start small, get your class up and running, and build from there. The recommendations included in this document attempt to do just that: help you to get your classroom in place quickly. Once you have the basics in place, you can start exploring other features and options available and continue building the class.
 Access your online class
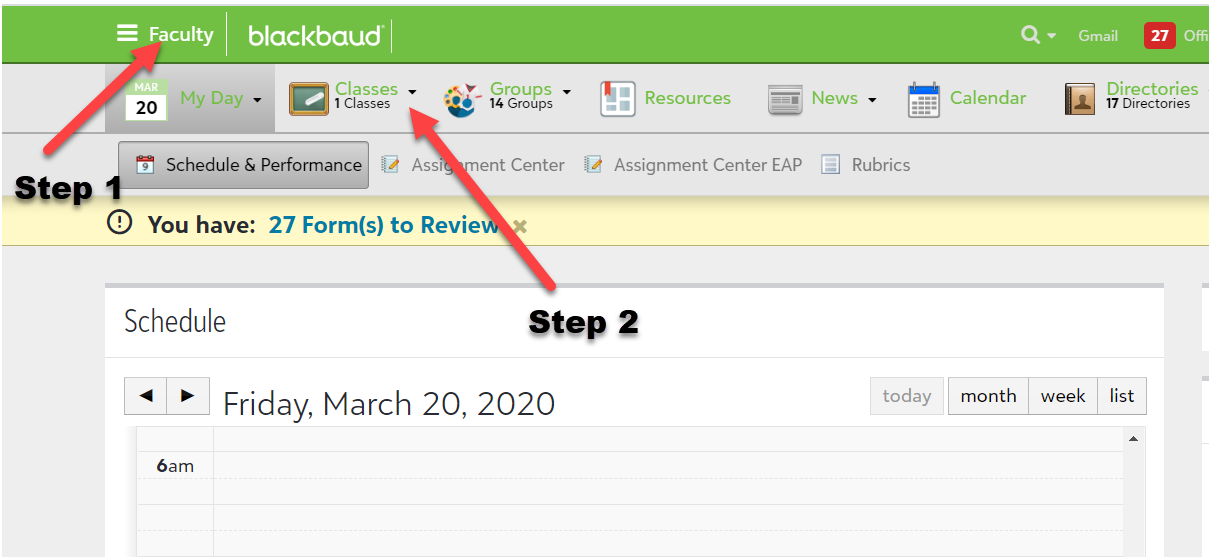
Once your system administrators set up and assign you classes, you access your classes from the Faculty page.
-
From the Education Management application, in the upper left corner, select Faculty.
-
Under Faculty, locate the Classes option, and click the drop-down arrow to view all classes to which you are assigned.
-
Select the class you want to set up.
-
Follow the procedures below to set up each section recommended for the basic configuration to get your online class up and running quickly.
Add Topics to your class
Once you open your class, you'll see the Topics tab under the class title. Select this tab to start working with topics.
Topics can include downloads, links, and other items. From here, you can present a unit of study to your students. For example, if this is a biology class, you may have topics such as Cellular Division or Plant Cells. If this is an English literature class, you may have topics based on the authors you're reading.
In Topics you can
-
Add discussions to encourage students to access each topic, review the topic, and add comments.
-
Share existing topics with other teachers. This feature allows teachers with more experience in the online classroom to share their resources with other teachers. For example, a teacher with experience in online learning can create a "seed" topic that includes general requirements and best practices established by the school for online learning and share this topic with other teachers, who can then go in and make simple edits to customize it for their classes.
-
Include external tools, such as Webex or Zoom for video conferencing.
Want to learn more on how to work with Topic? Detailed instructions are available for all of the recommended tasks.
-
Create topics and topic sharing: This link also includes instructions on adding content to a topic and prioritizing topics
Add Assignments, Discussions, and Assessments to your class
Once you open your class, you'll see the Assignments tab under the class title. Select this tab to start working with assignments, discussions, and assessments. Select +Add, then choose Assignment, Assessment, or Discussion.
In Assignments, you can:
-
Enter the various types of work you require for the class. This is where homework assignments and class participation work lives.
-
Annotate submitted files from your browser and share them back with students.
-
Create assignment notifications (This process takes you out of Faculty and into Academics, so you may want to consider this option after you've finished all work in Faculty. We just want to make sure you know it is an option.)
Note: In order for your assignments to display in the gradebook, you have to configure Gradebook, which is covered in the section below.
Want to learn more on how to work with Assignments? Detailed instructions are available for all of the recommended tasks.
In Discussions you can
-
Create discussion assignments for your students
-
Manage posts by hiding questionable posts, adding comments and more
Want to learn more on how to work with Discussions? Detailed instructions are available for all of the recommended tasks.
In Assessments you can
-
Create exams and tests
-
Schedule them for specific dates
-
Control the number of times students can take an assessment
Want to learn more on how to work with Assessments? Detailed instructions are available in the Assessments Guide.
Setup Gradebook
Once you open your class, you'll see the Gradebook tab under the class title. Select this tab to start working in Gradebook.
Before you can use Gradebook, you do need to do a little setup work to insure the students' cumulative grade calculate properly.
Note: Administrators can set default settings for teachers in Gradebook. If a gradebook is not setup, nothing displays in it. This is also a good practice because it ensures all grading is consistent across all courses in a school level. If your school does this, all teachers must go and view their Gradebook settings and save them.
Setup Gradebook for your class
-
From your class page, select the Gradebook tab. A new screen opens.
-
On the new screen, select the Action drop-down, and select Edit Setup.
-
If you need help completing the setup, visit the Individual Gradebook Setup topic in our help system.
In Gradebook you can
-
Record and track student grades and work
Want to learn more on how to work with Gradebook? Detailed instructions are available for all of the recommended tasks.
What are Bulletin Boards?
When you open your class, you land on the Bulletin board tab. Bulletin boards provide a snapshot of your classroom. Here you want to post general information about your class. This is a good place to create and post a welcome message, introducing students to you class, giving them some background on the subject matter. This page can house a variety of content types, such as text, links, videos and much more.
Note: Platform managers determine the content types, blocks and elements available for users.
In Bulletin boards you can
-
Select the content types you want to include on your site.
-
Use elements to format your layout.
-
Import Bulletin board content used in previous years.
Want to learn more on how to work with Bulletin boards? Detailed instructions are available for all of the recommended tasks.
Use Notes for Announcements, Agendas, and Class Discussions
Share schedule information with students
Add links and attachments to resources, such as online articles or videos you want them to access
Compose a post for all students to see and respond to as a comment. Threaded replies are a great way for students and teachers to reply to one another.
Create a Poll for a quick class check-ins
-
Ask for your students to share opinions on topics or answer a question
-
Maybe allow them to vote on an assignment option
Create exams, tests, and quizzes
-
Track students' understanding
-
Checkpoint before moving on to the next assignment
-
Confirm students are keeping up - a simple reading quiz can be very effective helping students keep up with assignments
Tips for Hosting a live virtual classroom
Remember to record
Mute entry/exit beeps
Mute participants on entry, you can unmute them after they raise their hands
Prep your digital space/have materials loaded and ready to show
Test the virtual room with a partner to make sure your audio is clear for the audience
"Pin" tips for troubleshooting audio and login issues to your messageboard, the virtual classroom, or chat
Mute notifications from email, instant messages, etc
Provide an agenda for the session -- post it ahead of time to a message board or "pin" it to your virtual room
Host with a partner, so one can speak to lead the lesson while the other manages the chat replies, Your partner can also help students troubleshoot any audio or connection issues
Pause periodically to check with your hosting partner to see if there are chat questions that show be shared aloud with the entire class
Greet students aloud by name as they enter your virtual room
Call students by name when you read their chats aloud
Make sure students know how to get your attention to ask a question, such as a raise hand emoji icon
Use caution if you attempt shared virtual whiteboard activities or virtual interactive groups in real time-- make sure groups are small and you test the function with your partner before the live class
For open ended questions, allow participants plenty of time to enter a reply -- some are slow to type or type a lot
End with follow activities/homework
Post the recording to a shared space or in a follow up email after the session
Review the chat log and attendance list from the virtual session to see if anyone needs individual follow up
Additional considerations:
-
E-advising: allows advisers to engage with students for guidance sessions and assist them in overcoming barriers.
-
Tutoring: augment what occurs in the online classroom. provide online tutors or writing support services directly to students, allowing them to submit their reports or papers for review. These services do not provide editing, but they do provide feedback to students to help them identify deficient areas and support the development of critical writing skills.
-
Online study group options