Decisions
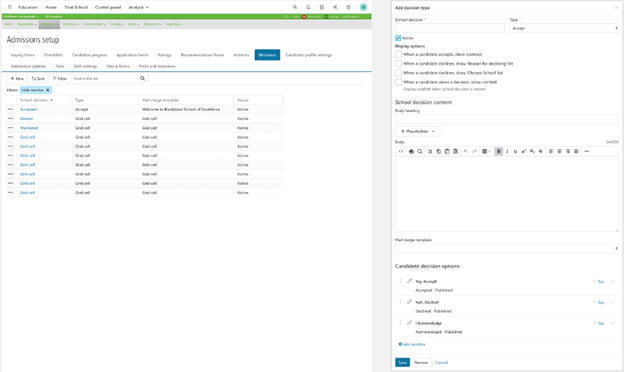
Admissions managers can define the terminology that is used for school decisions (e.g. accepted, wait listed, denied) and for candidate responses (e.g. accept, decline). For each decision type, Admissions managers can enter a custom message that prospective families will see on the Decision page in the community. Managers can also associate a mail merge letter with each decision type.
Use Filters and columns to customize the data that is displayed within this list.
 Add a decision type
-
From Enrollment management, select Admissions, Admissions setup, and choose Decisions.
-
Select +Add
-
Enter the School decision such as Accepted, Declined, or whatever value you need. While this is a required text field, you can enter any value needed.
-
Choose Type to select a specific decision type.
-
Select Active to enable this type, and then select from the following Display options:
-
When a candidate accepts, show contract
-
When a candidate declines, show 'Reason for declining' list
-
When a candidste declines, show 'Chosen School' list
-
When a candidate views a decision, show confetti, which adds a visual effect when the button is pressed.
-
-
Under School decision content, add a custom header and body message that will display. Next, Choose the appropriate mail merge template.
-
With Candidate decision options, you can add potential candidate responses. Some typical options include Accepted, Decline, Deferred, Waitlisted, etc. Add your own terms to the Candidate decision field, then choose the equivalent Candidate decision type value. Select Done to make it live or select Delete to remove it. Select +Add another to repeat the process for another entry.
-
Select Save to add it to the Decision types page or Cancel to go back without saving.
Enter candidate decisions
-
From Enrollment management, use the People Finder, search for the candidate.
-
Select Checklist.
-
Under Decision, select + Add New.
-
Enter the school's Decision Date.
-
Choose the school's Decision.
-
Enter a Publish Date and time to publish the school's decision to the prospective family.
-
Enter an Expire Date if necessary.
-
Choose the Candidate Decision.
Note: These correspond to the school decision selected.
-
Enter the Candidate Decision Date.
-
Upload any applicable Attachments.
-
Enter any Comments and then select Save once you're done.
Note: When a decision is entered, the decision step in the checklist is also updated.
Bulk Decisions for Candidate Checklist Steps
If needed, Candidate decisions can also be handled in bulk by completing checklist steps in bulk. From Enrollment management, Admissions, then Candidate List, administrators can select each candidate that needs to be updated. With multiple students selected, new buttons appear at the bottom of the page including a Bulk complete step(s) option.
Selecting this will open a new modal pop up that displays each selected candidate names, as well as a drop down list of options for Step and Status. A date can also be entered as a timestamp as to when the change was made. These can be done for each individual candidate, or a bulk option drop down at the top will change the status for everyone listed. If needed, select the trash can icon to remove the user from this list.
For our purposes here, set the Step to Decision and then select an appropriate Status. You can do this for all select students, or set them individually in this modal window as needed. When you're set, select Save to confirm your choices, or Cancel to back out as if nothing had happened.
For more information on the Candidate list, check our documentation here.
Auto-waive incomplete checklist steps
Although many students will complete the required checklist steps before your school makes a decision, you may occasionally make a decision when a few steps are incomplete. For example, you might accept a student who didn’t complete a visit that would normally be required. Admissions managers can edit checklists to make this situation easier to handle.
-
From Admissions Setup, select Checklists.
-
Edit the checklist.
-
Edit the decision step.
-
For Auto-Waive Prior Steps, select Yes. If previous milestones have checklist steps which are still “Awaiting,” Enrollment Management waives all prior steps when the decision is entered.
Edit Decisions
Admissions managers can also edit decisions.
From Admissions Setup, select Decisions to see the full list. Edit the school decision to open a new model will all options like the name of the School Decision, the comment that displays, Candidate decisions, and other settings. Select Save to keep the changes made.
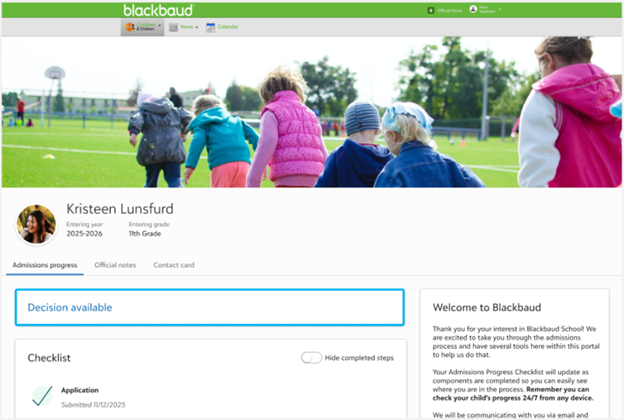
Candidate's Perspective
From the Admissions progress candidate page, decisions have been built in so candidates can see when one is available for them.
When the decision is viewed, a new page appears based on the type for the candidate with the custom header, body message, as well as buttons at the bottom. School can also customize the Congratulations or Let us know your decision buttons, while also adding a confetti effect when the decision has been accepted.