Lists (Content Type)
There are several ways to show list items on a page. Some of the options enable page managers to provide a lot of information while only using a small amount of space on a page. Page managers can edit the appropriate block style to establish the appearance.
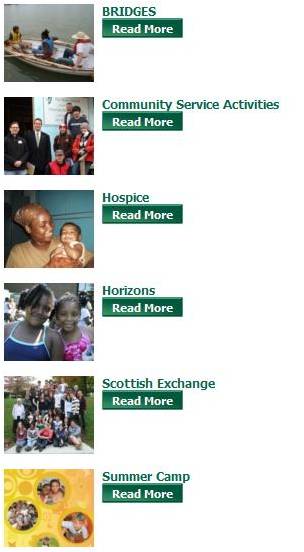
As a page manager, use the lists content type to create listings of items and provide details for each item. Some examples of lists include community service opportunities, extracurricular clubs/activities, employment opportunities, library services, admissions process steps, and giving programs. Each item in a list can contain a title, a brief description (a short summary or introduction), a long description (the full body of content), and photos.
These are not filterable or exportable lists for reporting purposes. For those functions, see Lists.
-
Full: The title and descriptions all appear on the page by default.
-
Expandable: Users select the title to expand the descriptions.
-
Detail page: Users select Read more to access a separate page that contains the descriptions (to use this option, page managers must create a List Detail page in the Pages & Menus task).
Links from this content type that are used in posts on social media will generate a small detail window which shows a short description, the page title, and a link back to the source post. For details, please refer to social media features & integration.
-
Select Core or School website.
-
Select Content.
-
Choose the content type you want to work with.
Lists are an "additional content type."
-
Select Add new category.
-
Enter a description (name) for the category (e.g. Community Service Opportunities).
-
Select Include long description for list items to enable a long description to be entered for each list item.
-
Select Include brief description for list items to enable a brief description to be entered for each list item.
-
Under Roles with access to view content, select Public if the category will appear on a public page. Select Secure, and then select the appropriate roles, if only certain users should be able to view the content in the category.
-
Enter the maximum number of images that can be uploaded for each list item.
-
Select Allow captions on images to enable captions to be entered for the photos.
-
Select Zoom and/or Thumb if a larger and/or smaller version of the photo should be enabled (the Standard size is enabled by default).
-
Enter a maximum width and height for the standard, zoom, and/or thumb versions of the photos.
-
Select Save & add list item or Save & close.
-
To edit the category settings, select Settings(the gear icon).
-
Select Core or School website.
-
Select Content.
-
Choose the content type you want to work with.
Lists are an "additional content type."
-
Select + next to the appropriate category.
-
Enter the list item title (e.g. Volunteer at Habitat for Humanity).
-
Enter the descriptions.
-
Drag and drop the appropriate photos into the Drag Images Here section, or Select from your computer and choose the appropriate images. Photo support must be enabled in the list category before photos can be uploaded.
-
Drag and drop the images into the appropriate display order.
-
Enter a caption for each photo (captions must first be enabled in the list category).
-
Enter the publish date and expire date (optional).
-
If the content should appear in additional categories, select Add more to select the categories with which the content should be shared.
-
Select Save.
-
Select Core or School website.
-
Select Content.
-
Choose the content type you want to work with.
Lists are an "additional content type."
-
Select the name of the appropriate list category.
-
Select Edit next to the appropriate list item.
-
Make the appropriate changes.
-
Select Save.
-
Select Core or School website.
-
Select Content.
-
Choose the content type you want to work with.
Lists are an "additional content type."
-
Select the name of the appropriate list category.
-
Select Edit order.
-
Select Alphabetical, Order added ascending, Order added descending, or drag and drop the list items into a custom order.
-
Select Save.