Couples and Households
Not every couple is the same, so there is more than one way to track them in the database. The right approach depends on your organization's preference and on your relationship with the members of the couple/household. There are two main options:
1. Create a single Account
-
If the couple will always participate and give to your Organization together, then you may create one account for the couple.
-
This account will have one Defined Fields and one Journal that will apply to the couple as a whole.
Option 1 is pretty straightforward; you will create a new Account and fill in the Account and Persona information to address the couple as a whole.
2. Create two separate Accounts and link them using a Household Relationship
-
If the couple will participate with your Organization in separate ways, donating or otherwise, you will want to enter two accounts: one for each partner in the relationship.
-
This will allow you to keep unique Defined Fields and Journal histories for each partner because they will have their own Accounts.
Option 2 requires a lot more work to set up because it involves two different Accounts and configuring a Household Relationship in the database. We’re going to spend the majority of our time discussing best practices for this option.
Household Relationship Questions
-
What is a Household Relationship used for?
-
Household Relationships allow you to link together multiple accounts in order to view their data as a whole group. Typically this is used with families or couples. For example, a Husband, Wife, Son, and Daughter may give or volunteer as individuals, but they all live in the same household and you want to mail them just one letter. When you create relationships to link them all together, you would make one of the parents a Primary Account and the rest would be Members to the Household.
-
-
What if I don’t want to mark one of the Accounts as the Primary? Who should I choose?
-
In order to use Household Relationships, you have to mark one Account as Primary. The best way to decide who the Primary is to see who gives more frequently or volunteers more frequently. That doesn’t necessarily mean they are considered dominant in the Household; they are just the better person to get in touch with for the Household.
-
-
Can I have more than one Primary, or can Accounts belong to more than one Household?
-
You cannot have more than one Primary in a Household.
-
You can have more than one Member to a Household.
-
Once an Account belongs to a Household, either as a Member or Primary, they cannot belong to a second Household.
-
Preparing for Household Relationship
Before we start adding these accounts and linking them together, we need to make sure the database is configured in a way that the information you add makes sense together.
Relationship Types
All Relationships must be configured in your database as a Relationship Type first. We suggest using just the same Relationship Type for couples consistently.
 Create a new Relationship Type for Couples
-
From the Management tab, click Relationship Types under Database Configuration.
-
Under the Tasks menu, click New Relationship Type.
-
In the Participant 1 Role field, enter "Spouse 1". In the Participant 2 Role field, enter "Spouse 2".
-
Click Save And to create the relationship for both accounts and navigate to the option you chose on the Save And menu.
Note: We suggest using names for Participants that will clearly define the difference between the two. Spouse 1 will always be the Primary and Spouse 2 will always be the Member.
Persona Types
You will now need to add a Joint persona type option to your database if you don't already have one. Each partner in the Relationship will have their own Personal Persona filled out on their separate Accounts, but the primary member should have a Joint Persona as well.
-
The Personal Personas is used if you wanted to contact a particular partner of the relationship.
-
The Joint Persona is used if you want to address both partners of the Relationship in a mailing.
Create a Joint Persona Type
-
From the Management tab, click System Defined Fields under Database Configuration.
-
In the list of system defined fields, click Persona Types.
-
In the Name field, enter "Joint" and click Add Value.
-
Click Save And Finish to save your changes.
Getting Started
Now that your database is configured with things you need for Households, we can start setting them up!
You should have already done the following:
-
Created both Constituent Accounts for the Relationship
-
Decided who will be the Primary and who will be the Member
-
Set up a Relationship Type for couples
-
Set up a Persona Type for Joint
How to set up the Household
-
From the primary partner’s account record, click Relationships.
-
Under Tasks, click New Relationship.
-
Under Basic Information, select Spouse 1/Spouse 2 in the Relationship drop down field. Add beginning and/or end dates if applicable. Most relationships do not need start and end dates, but this could be useful if you are tracking a business relationship or a past spouse.
-
Next to the primary partner’s name, select Spouse 1 in the drop down field under Choose Accounts.
-
To add the second account to the relationship, click Select Related Accounts. Search for the account or click Add Account to add one. The other account in the relationship automatically becomes a member of the household.
-
Click Save And to create the relationship for both accounts and navigate to the option you choose on the Save And drop down field.
We need a Joint Persona on the Primary partner’s account so that you can mail to them jointly and address them as such. In addition, it is necessary to keep the Personal Persona on their account, because there may be times when you want to mail to the individual.
How to set up the joint persona
-
From the primary partner’s account record, click Personas.
-
At the bottom of the page, select Joint in the Persona field, and click Copy.
-
In the Short Salutation field, enter the primary partner and member's first names or nicknames. For example, if the names of the constituents are John and Mary Smith, you would enter "John and Mary".
-
In the Long Salutation field, enter the primary partner and member's prefix and last names. For example, if the names of the constituents are John and Mary Smith, you would enter "Mr. and Mrs. Smith".
-
Click Save And to create the Joint Persona and navigate to the option you choose on the Save And drop down field.
Note:
For more information about how to enter names, see Titles and Salutations.
Combining Household Data for Mailings
If you will need to mail to the Household, you probably don’t want to send multiple letters to the same address. When you have accounts in a Household Relationship, there are options you can select when creating Mailing Labels or Documents so that you address both the primary partner and the member in the same letter.
Creating Mailing Labels Grouped by Household
Step 1: Choose to show the Joint Persona as the top hierarchy. This will make it so that if an Account has a Joint Persona it will be shown on the label. If an Account does not have a Joint Persona, their Primary Persona will be used.
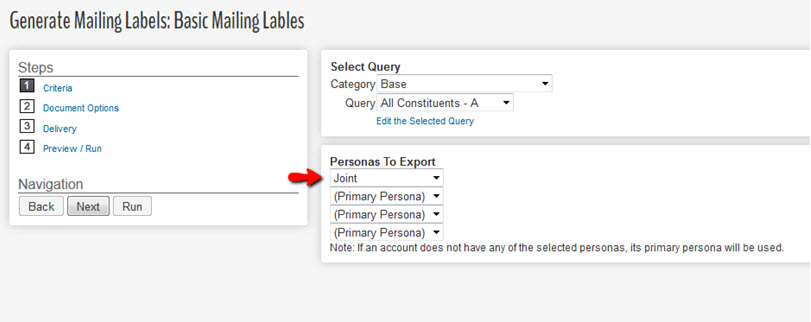
Step 2: Choose the Grouping option as Household. This will make it so that only the Primary’s Joint Persona will be listed on the label.

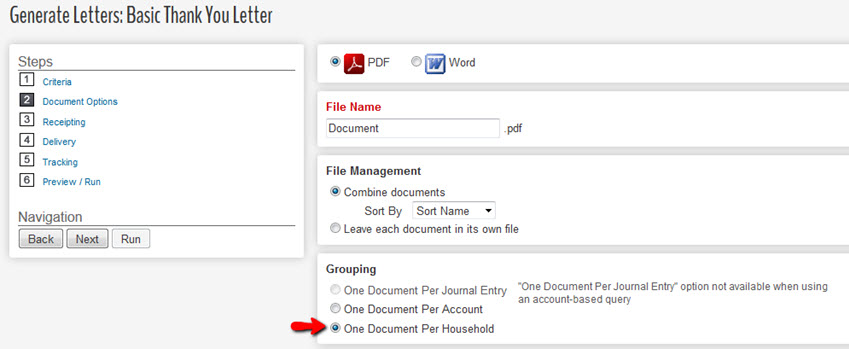
Creating Documents Grouped by Household
Steps 1: Choose to show the Joint Persona as the top hierarchy. This will make it so that if an Account has a Joint Persona it will be shown on the document. If an Account does not have a Joint Persona, their Primary Persona will be used.
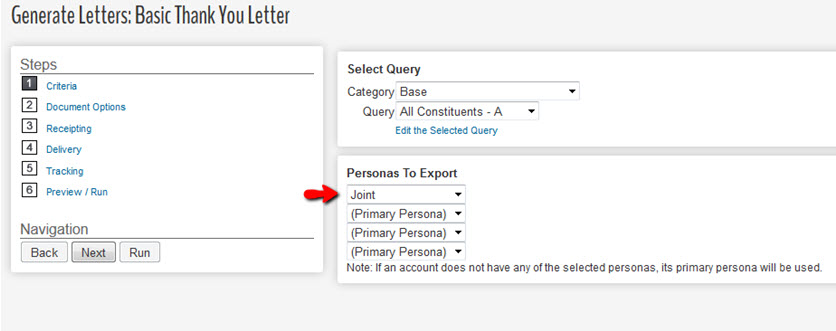
Step 2: Choose the Grouping option as Household. This will make it so that only the Primary’s Joint Persona will be listed on the document. If your Query is pulling Journal Entries, all Members of the Household’s Journal Entries will be in the single Household document as well.
Querying on Household Data
One common query that organizations use is in regards to Household Cumulative data. If you want to find particular donors that meet cumulative criteria, such as “Gave $100+ in 2014” you may want to consider all Household accounts when doing so. If you have a couple with two different accounts that both live under the same roof we would need to use special criteria to find out if their Household meets that $100 altogether. The Query for that would look something like this:
Query 1: Find any and all transactions in the time period you're searching in
-
From the Queries tab, click the Event Queries category under Categories.
-
Under Tasks, click New Query.
-
In the Name field, enter "Query Received Transactions in 2014". Be as descriptive as possible so that you and other users in your organization know what the query is used for.
-
Set the Starting Criteria to Base - All Constituents - A.
-
On the Data Return Type field, set the type of results to Journal Entries.
-
In the Match field, select All of My Criteria so that all of your criteria will be matched in the results.
-
Under the Available Fields drop down, select Commonly Used Fields and click Journal Entry Date.
-
In the Journal Entry Date field, select Custom Range and enter a start date of 1/1/2014 and an end date of 12/31/2014 to search for transactions that occurred in 2014.
-
Under the Available Fields drop down, select Commonly Used Fields and click Individual Transaction Received.
-
In the Individual Transaction Received field, select Greater Than or Equal To and enter "$.01".
-
Click Save And to save the query and navigate to the page selected in the Save And menu.
Query 2: Find the Households that meet your Cumulative criteria and return all of those entries.
-
From the Queries tab, click the Event Queries category under Categories.
-
Under Tasks, click New Query.
-
In the Name field, enter "Query Households $100+ in 2014." Be as descriptive as possible so that you and other users in your organization know what the query is used for.
-
Set the Starting Criteria to Query 1 - Received Transactions in 2014.
-
On the Data Return Type field, set the type of results to Household Journal Entries Per Criteria.
-
In the Match field, select All of My Criteria so that all of your criteria will be matched in the results.
-
Under the Available Fields drop down, select Cumulative Amounts and click Household Cumulative Received.
-
In the Household Cumulative Received field, select Greater Than or Equal To and enter "$100".
-
Click Save And to save the query and navigate to the page selected in the Save And menu.
Now that you have the Households that meet your criteria along with all of their Journal Entries, you can run a Report that shows them all listed together on one line.
Combining Household Data in Reports
Using the Query you created above, you can build a Report that groups the results your Query is finding onto just one line per household. When you do this, the Primary account will be listed above all else. On Step 12 you will choose which Persona from the Primary account will be shown in the results. If you keep Household data on the Joint Persona, this is where you would select that option to show the Household’s Salutations.
Combine Houshold Data in Reports
-
From the Reports tab, select a category where you want to store the report.
-
Under Tasks, click New Report
-
In the Name field, name the report "Household Total Received". The name of the report should be as specific as possible so that you and other users in your organization know what the report is for.
-
Select the information to display on the report:
-
Under the Available Fields drop down, select Sets and click on Name and Address.
-
Under the Available Fields drop drown, select Commonly Used Fields and click Short Salutation, Long Salutation, and Received.
-
-
Under the Group Report By drop drown, select Household then select Collapse Groups to collapse each group into a single line.
-
Under Tasks, click Save and Run.
-
Under Query, select the category where the report will be stored and then select Households $100+ in 2014 in the Query drop down.
-
Under Export As, select the Personas Reported hierarchy based on how you store Household data. Under Personas Reported, choose Joint to keep the household salutations on the joint persona. If an account does not have a joint persona, their primary persona will be used.
-
Under Delivery Options, select how you want to receive the report. If you select an email format, enter you email address and a subject line for the email. For large reports, we recommend you select Archive in Zip File to that the file is compressed for faster transmission to your browser or email account.
-
To run the report, click Submit.