Conditional Logic with Custom Data Tables
You can configure conditional logic in single-response fields using custom data tables for comparison. This enables evaluation against extensive value lists without complex ANY or OR rules.
Supported comparisons
-
Found in custom data table
-
Not found in custom data table
Tip: The referenced data table does not need to be included in the form.
Supported conditional field types
-
Number
-
Text
-
Picklist
-
Radio buttons
Configure conditional logic
-
Access the Grant Manager Portal - Navigate to yourcausegrants.com or your client URL. Sign in using your Blackbaud ID (BBID) or Single Sign-On (SSO) credentials.
-
Open the Form Builder - From the side navigation, select Program Setup > Custom Forms. Click the ellipsis next to the form and choose Edit.
-
Edit a Form Component - In the Form Builder, hover over the field and select Edit component.
Note: Multiple response fields are not supported.
-
Configure the Component - Choose a tab based on what you want to configure:
-
Validation: Under Advanced Validation, click Manage custom validation to define when the component is valid.
-
Display: Select Manage conditional logic to set rules for when the component is shown.
-
Set Value: Select Add new rule to define the field's value.
-
-
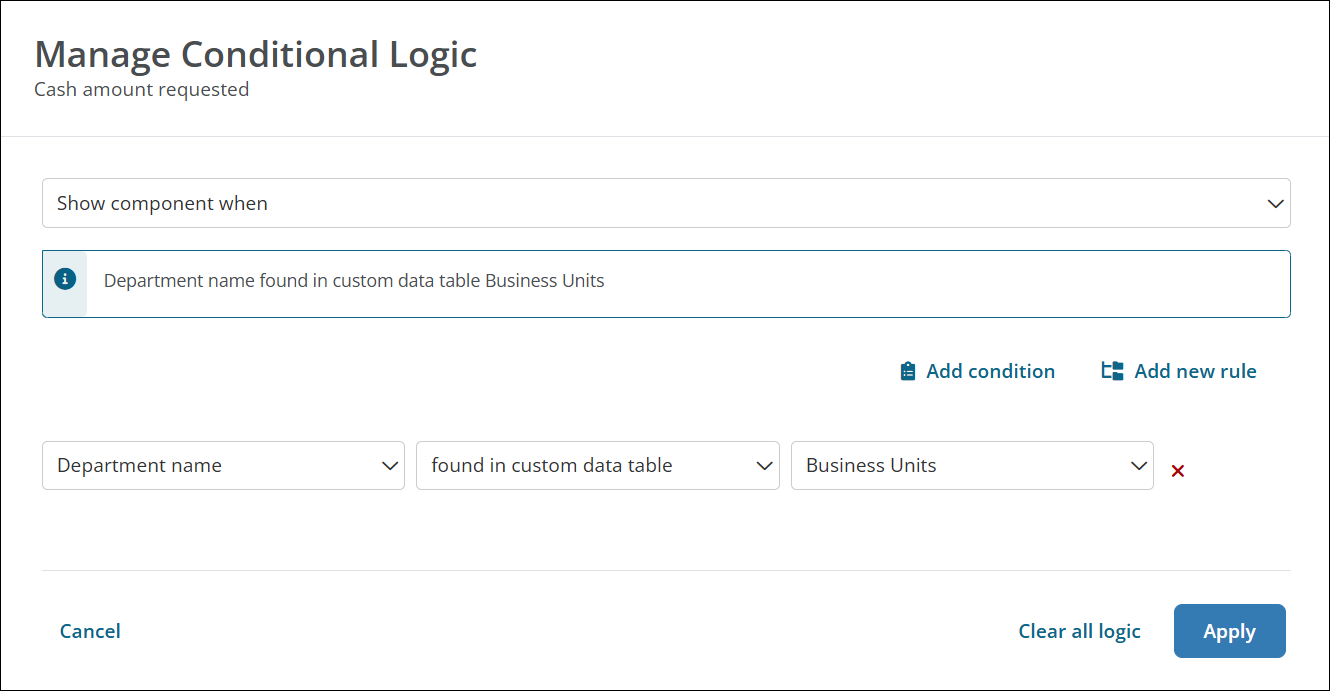
Build Conditions and Rules - In the Manage Custom Validity or Manage Conditional Logic modal:
-
Select Add condition.
-
Choose the field to base the condition on. See Supported conditional field types for the field types you can select.
-
Select a comparison: found in custom data table or not found in custom data table.
-
Choose the data table to reference from the dropdown.
-
Add more conditions as needed.
Tip: Toggle ANY or ALL in the rule to define how conditions are evaluated. For more complex logic, select Add new rule before creating conditions.
-
-
Save Your Changes - Select Save in the Configuration modal and then save the form to finalize your changes.
FAQs
 What's a use case for this feature?
Example:
Show or hide a Picklist field based on an applicant's process level.
To set this up:
-
Add a field to the form where the applicant enters their process level OR use an Employee SSO field as a reference.
-
Create a custom data table that lists all process levels.
-
Configure conditional logic on the Picklist field (Display) to only show when the response in the relevant field is found in the data table.
Results:
-
If the process level is found in the data table, the Picklist field appears in the form.
-
If not found, the Picklist field is not shown.
What should I check if the logic isn't working?
-
Ensure the field is set to single response.
-
Confirm the correct data table is selected.
-
Verify the values in the data table match the format of the field input.
-
Test the form with sample data to confirm expected behavior.
Can I use this logic across multiple forms or programs?
Yes. As long as the data table is accessible in the system, it can be reused across forms.
What happens if the data table is updated?
Logic referencing the data table will automatically reflect the updated values.