Step By Step: Add the Batch Handler to the UI Model Project
Overview
This section focuses on getting our solution ready to build the programmatic pieces to support a batch handler for the Web Shell user interface. We will create a UI Model project, reference the correct assembly, and add a batch handler CLR class file with the appropriate import statements that inherit from the appropriate base class. To keep our code clean, readable, and maintainable, we will reference each form field within the batch as a private constants and shared variables. We will modify the BatchTypeSpec to include a reference to our CLR class.
Prerequisites
This sample assumes familiarity with Batch Types. A Web Shell-based batch handler requires a UI Model assembly project. This section assumes the Food Bank Transaction Add Batch Type was already created and focuses on creating the web event handler. If you have not already done so, go back and complete the previous Example: Webshell Batch Handler topic and download the food bank source code download that contains the specs for the Food Bank Transaction Add Batch Type.
If you are unfamiliar with UI Models or creating a UI Model assembly project review the following topics before you continue:
Step 1 - Ensure the Food Bank Transaction Add Batch Type and supporting specs are loaded into the catalog system.
Step 2 - Ensure you have a UIModel project to support your Web Shell batch.
Step 3 - Within the UIModel project, add a reference to the Blackbaud.AppFx.BatchUI.dll assembly. This assembly contains the BatchEntryHandler base class that your new event handler inherits from.
Step 4 - Add a folder named "Batch" to your UI Model project. Optionally, you can add subfolders within the Batch folder if your UI Model project manages multiple batch types.
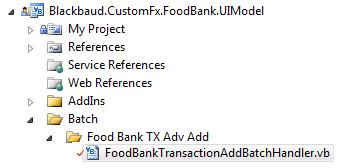
Step 5 - Add a CLR class file into the new Batch folder within your UI Model project.
-
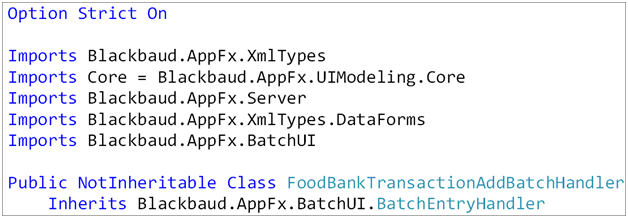
Add an Option Strict On statement to the class.
-
Add Imports Blackbaud.AppFx.BatchUI.
-
Add Imports Blackbaud.AppFx.XmlTypes.
-
Add Imports Core = Blackbaud.AppFx.UIModeling.Core.
-
You usually need an import statement for Blackbaud.AppFx.Server and Blackbaud.AppFx.XmlTypes.DataForms if you plan to call upon other features within your event handler code.
-
Declare your class as Public NotInheritable.
-
Your class should inherit from Blackbaud.AppFx.BatchUI.BatchEntryHandler.
Add Constants and Memory Variables to Represent the Batch Fields
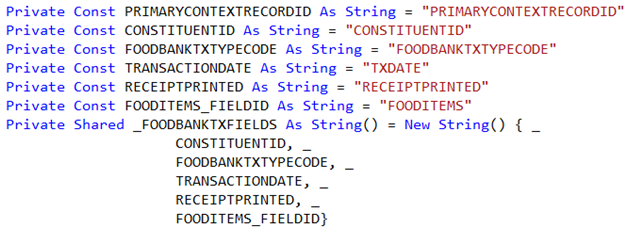
Looking at the batch add data form, we can see the form fields used by our batch type. Note how the FOODITEMS field is a collection of form fields (FOODITEMID, FOODITEMAMOUNT, QUANTITY).
| Field ID | Caption | Data Type | Control Type | ||||||||||||||||
| PRIMARYCONTEXTRECORDID | Food Bank | Guid | SearchList | ||||||||||||||||
| CONSTITUENTID | Constituent | Guid | SearchList | ||||||||||||||||
| FOODBANKTXTYPECODE | Transaction Type | Tinyint | ValueList | ||||||||||||||||
| TXDATE | Transaction Date | Date | Calendar | ||||||||||||||||
| RECEIPTPRINTED | Receipt Printed | Boolean | Check Box | ||||||||||||||||
| FOODITEMS | Food Items | XML | Collection | ||||||||||||||||
|
|||||||||||||||||||
After creating the web event handler class, it is a good idea to provide a private constant for each individual form field and a private string array to groups of related form fields. Use this technique as you see fit as it will help keep your web event handler code organized and consistent. The event handler code will refer to the batch fields by these constants and string arrays.
Add the WebEventHandler to the BatchTypeSpec
Step 6 - Within the catalog project, open the BatchTypeSpec and add a WebEventHandlers XML element.
Step 7 - Within the WebEventHandlersXMLelement, add a BatchEventHandlerXMLelement.
Step 8 - Add AssemblyName and ClassName attributes to the BatchEventHandler element. The value for the AssemblyName attribute should reference the UIModel assembly while the value of the ClassName attribute should reference the CLR class. Note the class name is fully qualified with the name of the UI Model assembly.
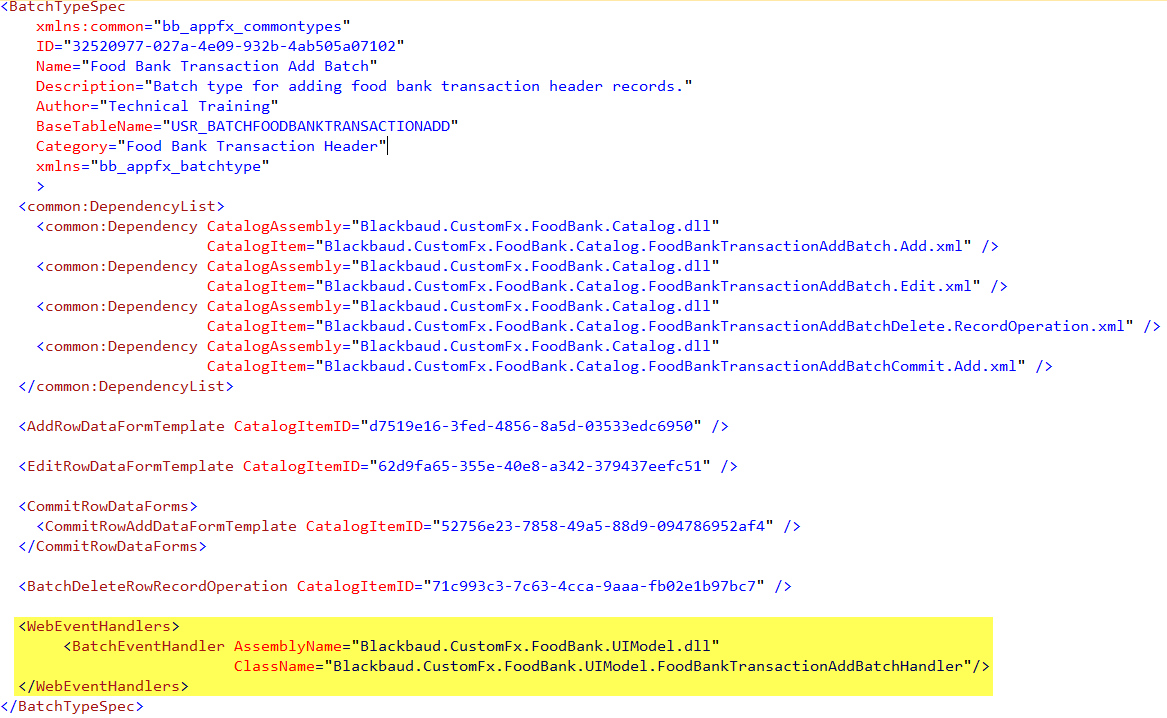
Note: If you have an old ClickOnce EventHandler section within the spec, leave it alone as it will still be used by the ClickOnce app. If you are converting a batch to work within the Web Shell user interface, see Converting a ClickOnce Batch to Webshell.
Step 9 - When you are ready to try out your web event handler, you will need to run LoadSpec on your modified BatchTypeSpec.