Select your user interface:
Exercise: Build the Status Page
A business process instance status page, also known as the "status page," is primarily used to view the recent and historical statuses for a business process and its associated parameter set. After a business process is started manually, the task or action typically redirects the user to the status page. A user should also have the ability to start a new instance of the business process with the chosen parameter set on the status page.
Let's build a status page that fulfills the use case diagram and the requirements described in Business Process Instance Status Page. To start, we will load some custom features from the lab answers source code project. These custom features provide the basis for fulfilling all but one of the green use case ovals above.
Here is a link to the Food Bank Source Code.
Step 1 - Load custom features.
-
Open the Blackbaud.CustomFx.FoodBank Visual Studio solution within Microsoft Visual Studio.
-
Right-click the InventoryProcess folder and select New\Existing Item… from the context menu.
Use the table below to add the following XML files from the source code to your food bank catalog assembly project. Add the files to the new InventoryProcess folder. Each file represents an individual Infinity feature that our new status page will leverage. We will reference these features as we build the status page in the upcoming steps for this exercise.
For instructor-led training, ask your instructor or facilitator for the appropriate location for the specs.
Custom features referenced within the status page
Feature Name
Spec XML File Name
Description
Inventory Process Business Process Status View Form
InventoryProcessPageExpression.View.xml
Expression Data Form used by the status page. Provides data for use on the inventory process business process status page.
Inventory Business Process View Data Form
InventoryProcess.View.xml
Summary View Data Form used by the status page to view business process parameter set information.
Inventory Process Business Process Status List
InventoryProcessStatus.DataList.xml
Returns a status list for the inventory process business process. Referenced within the page's History tab.
Inventory Process Business Process Edit Form
InventoryProcess.Edit.xml
Data form for editing inventory process business process parameters. Edits the parameter set for the business process.
Inventory Process Business: Delete
InventoryProcessDelete.RecordOperation.xml
Deletes the specified inventory process business process.
-
Mark each file as an embedded resource within the catalog project.
-
Use the LoadSpec utility to load each spec into the appropriate Infinity database.
In future steps, we will utilize these features along with out-of-the-box features that ship with Blackbaud CRM to build a status page.
Step 2 - Configure a new page and set the context, expression view form, caption, and summary section.
Let's build a new page for our status page. Our page requires a context value of "Inventory Process Parameter." A page that is configured with a context record type requires that an ID value of that same record type is passed to the page when the page opens. After the context is passed to the page, this value is stored within a property on the page named PageContext. By configuring the page in Design Mode, an administrator can use the value for the PageContext property to pass the context value to other features and actions referenced on the page. For more information on pages, see Pages.
As a reference, we will review the metadata for a completed example of the status page that we will ultimately build with this exercise. Below, we see the context record type is equal to "Inventory Process Parameter," which is a reference to the primary key value of the custom USR_INVENTORYPROCESS table that holds the parameter sets for our custom business process. For more information on the entity relationship diagram supporting business processes, see Tables.
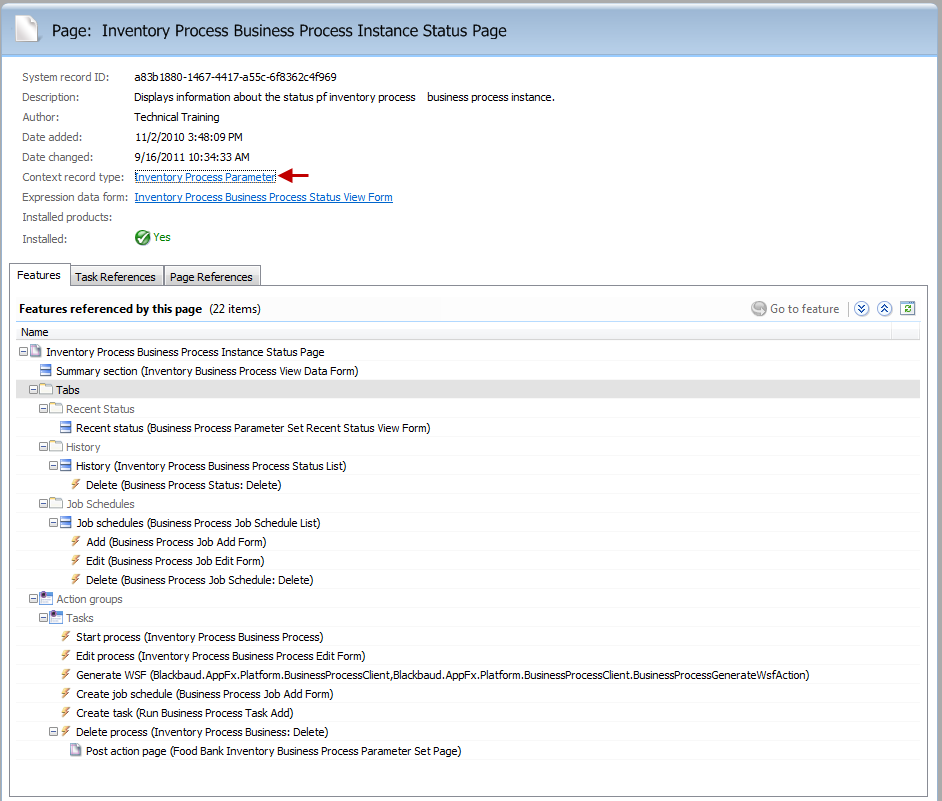
Within the page, the value for PageContext, which is the primary key value of the custom USR_INVENTORYPROCESS table that holds the parameter sets for our custom business process, is passed to a myriad of features referenced within the page. A few examples are the summary view data form, View Data Form within the Recent Status tab, and the expression data form on the page.
Let's begin to configure a new page:
-
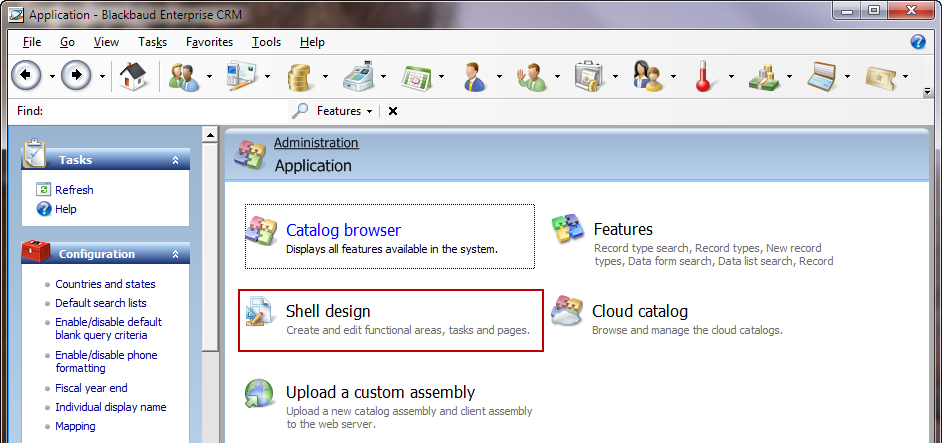
Navigate to Administration > Application > Shell Design page

-
Select the Pages tab.
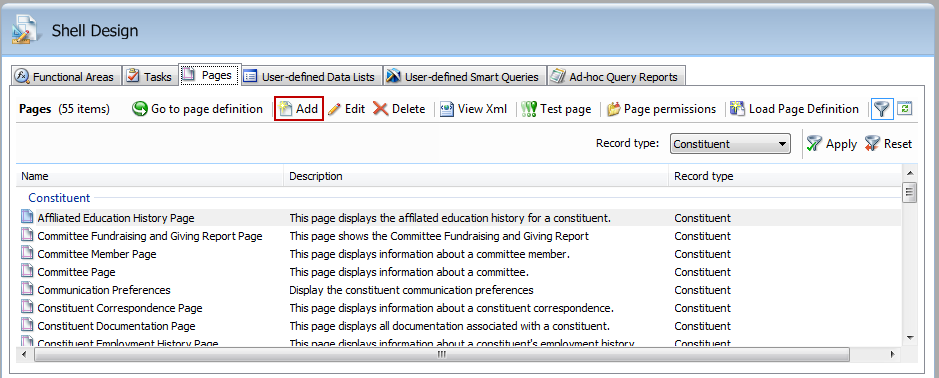
Add a new page 
Add a new page -
Click the Add action above the Pages data list to open the property sheet and create a page.
-
Use the figure below as a guide to enter the initial properties for the page.
-
Note the value for the RecordType property (context record type). This value equates to the Name attribute within the TableSpec that creates the USR_INVENTORYPROCESS table.
-
Note the reference to the expression data form named "Inventory Process Business Process Status View Form" within the ExpressionDataForms property. You must configure the expression data form before you write an expression to leverage a form field on the expression data form.
-
For more information about the expression view data form, see Expression Data Form Drives Expressions on the Status Page.
-
-
Note the Caption property and how it leverages the Name form field value from the Expression Data Form.
-
Note the reference to the summary view data form named "Inventory Business Process View Data Form" within the SummarySection property.
-
For more information, see Summary Section.
-
-
You should change the name of the author to "Technical Training" after you reverse engineer the Page Spec back into your Visual Studio project.
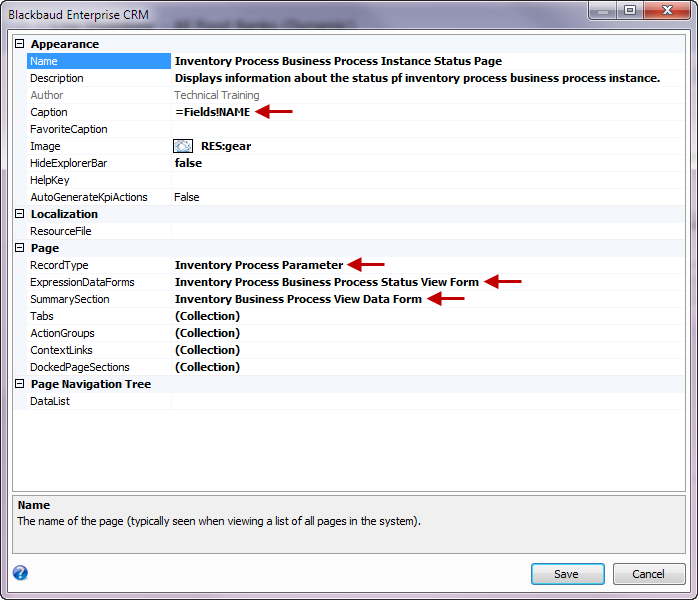
Status page properties in Shell Design 
Status page properties in Shell Design -
-
Save the page.
-
In SQL Server Management Studio, write a query to retrieve the rows from the USR_INVENTORYPROCESS table.
This table represents the parameter sets for the business process.
-
Copy one primary key value from the table to the clipboard.
In the next step, we need this value when we test the page since our page requires a context value of this record type.
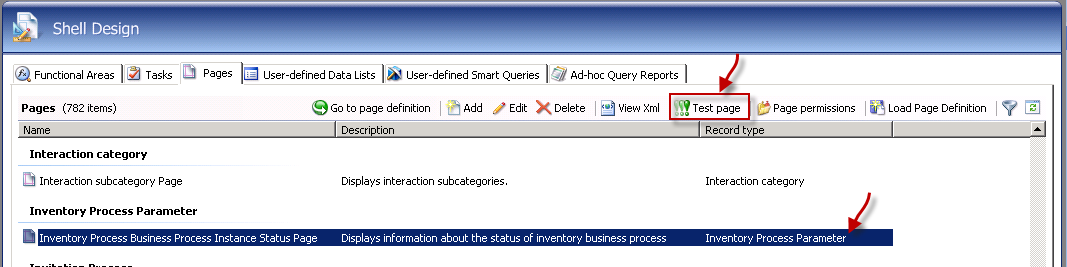
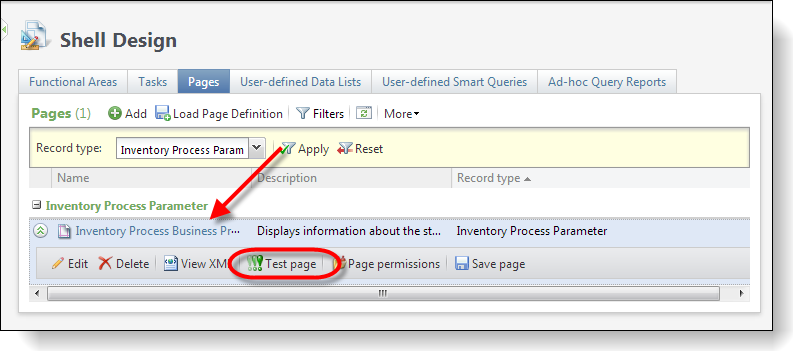
Step 3 - Test the page.
-
On the Pagestab of the Shell Design page, find the page we just created. Note the rows are grouped by record type. The record type for our page is "Inventory Process Parameter."
-
Select the row and click the Test page action. See below.
-
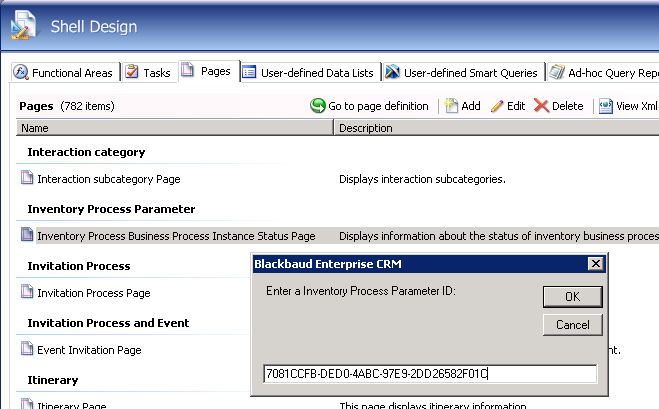
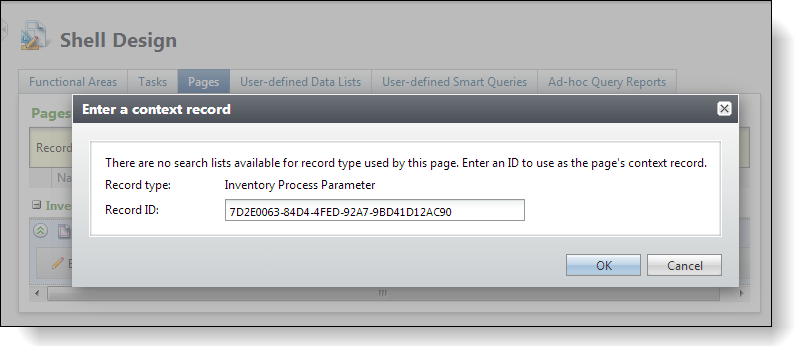
Provide the context value for the pageon the simple dialog screen that appears. Since our page is configured to accept a context value of a record type of Inventory Process Parameter, paste the GUID from the USR_INVENTORYPROCESS table that represents the parameter set ID for a business process.
-
Review the page.
The page should open with the appropriate parameter set displayed in the page's summary section at the top.
-
Place the page in Design Mode.
Select Tools\Design Mode from the main menu. With the page in Design Mode, you can continue the configuration of the page.
Click the Toggle design mode on button near the top right of the web browser. With the page in Design Mode, you can continue the configuration of the page.
Step 4 - Configure 3 tabs on the page.
Our new page will contain three tabs: Recent Status, History, and Job Schedules.
Recent Status Tab
-
This tab will contain one section to hold the "Business Process Parameter Set Recent Status View Form" that ships with Blackbaud CRM. This data form displays the most recent status information for the given business process parameter set. This section will contain no actions.
-
With the page in Design Mode, click the Edit tabs button to open the tabs property sheet.
-
On the property sheet, click the Add button and then enter "Recent Status" for the Caption property.
-
Click the ellipsis button for the Sections property to add the data form.
Configure the Recent Status Tab 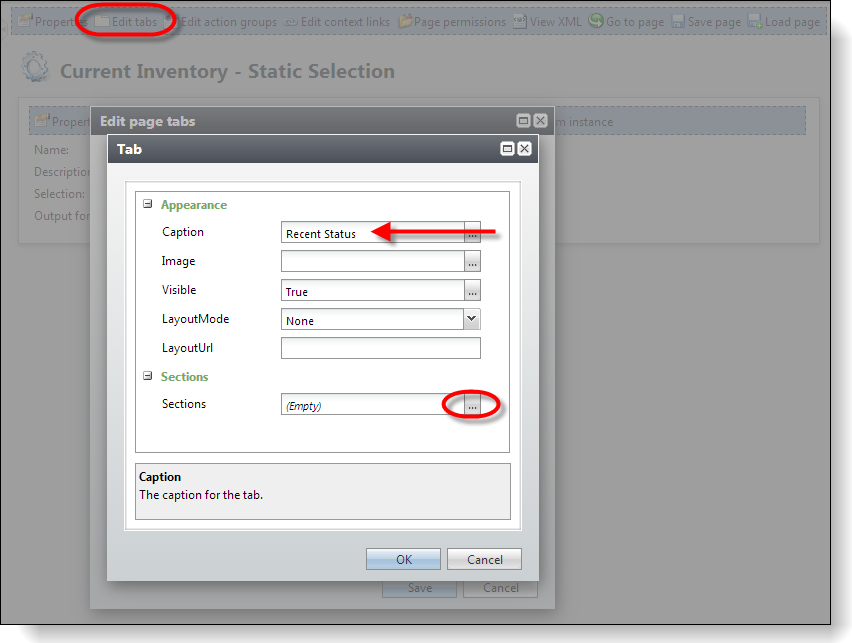
Configure the Recent Status Tab -
Use the figure below as a guide and click the Add button to add a section and provide the values for the SectionType, DataForm, and ContextType properties.
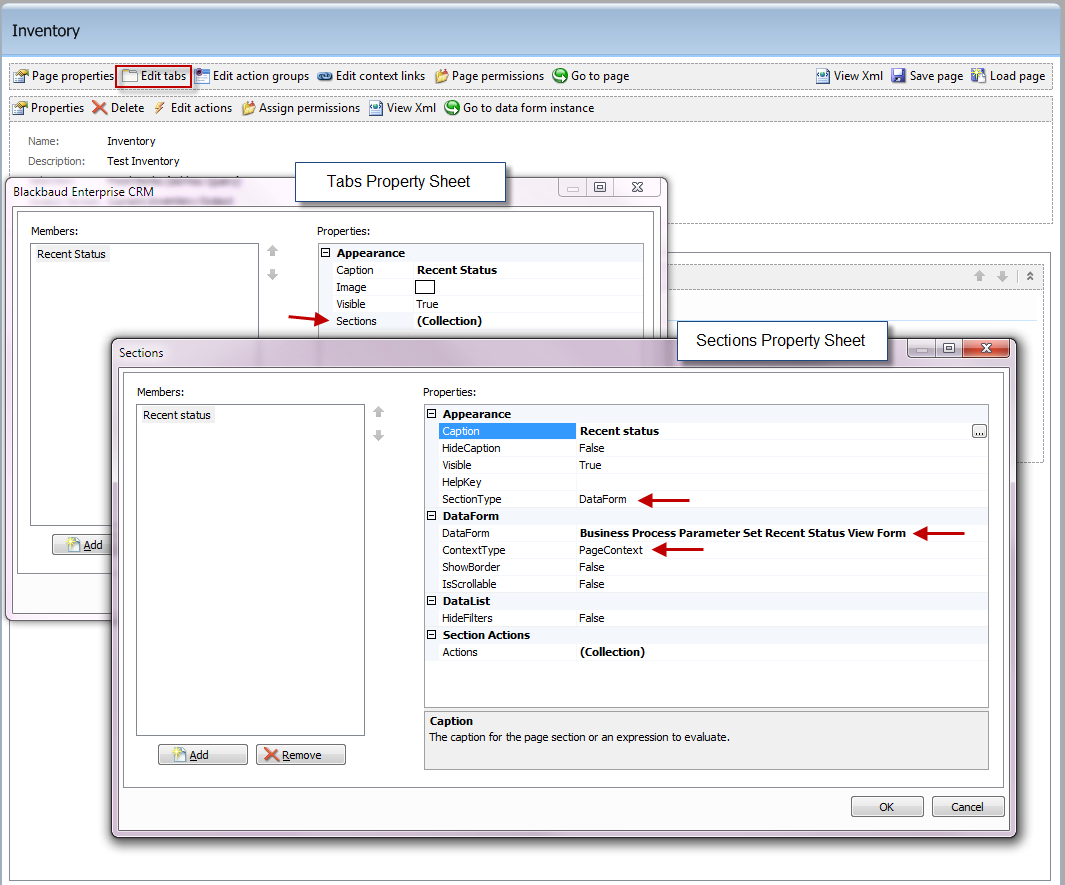
Configure the Recent status section within the Recent status tab 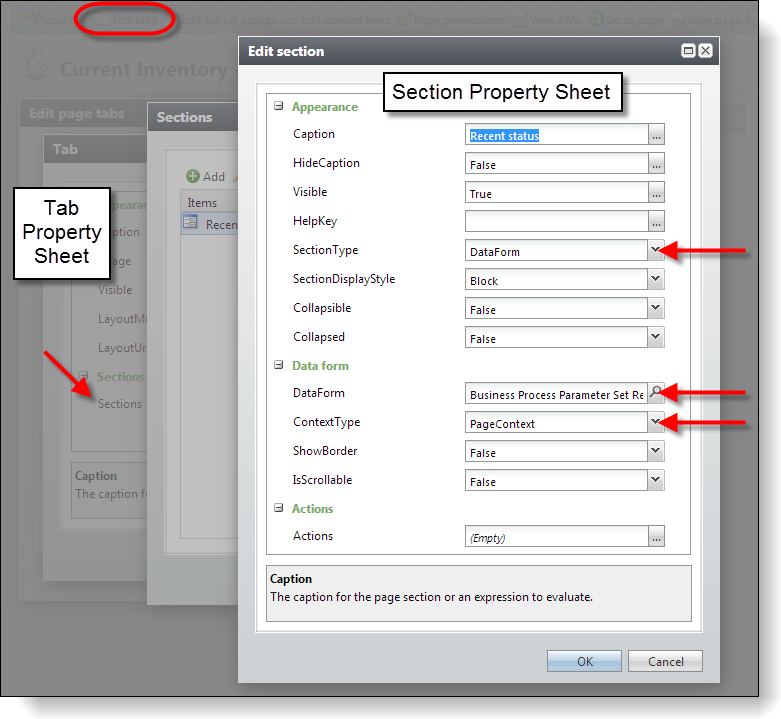
Configure the Recent status section within the Recent status tab -
Click OK on the sections property sheet to accept the settings, and c lick Save on the tabs property sheet to save the new tab.
-
Click OK on the Edit Section property sheet to accept the settings, and then click OK on the Sections and Tab screens and Save on the Edit page tabs property sheet to save the new tab.
History Tab
-
This tab will contain one section to displays a custom data list named "Inventory Process Business Process Status List" that returns a status list for the process.
-
With the page in Design Mode, click the Edit tabs button again to open the tabs property sheet.
-
On the property sheet, click the Add button and enter "History" for the Caption property.
-
Click the ellipsis button for the Sections property to add a data list to the new section.
-
On the section dialog, click the Add button to add a section to the tab. Use the figure below as a guide and provide values for the Caption, SectionType, DataList, ContextType, Style, and Groups properties.
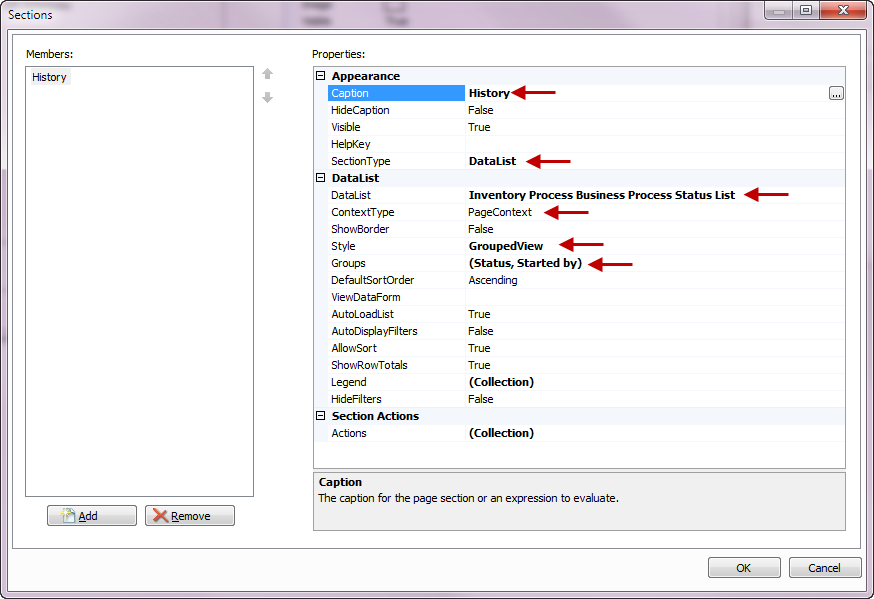
Configure the History section within the History tab 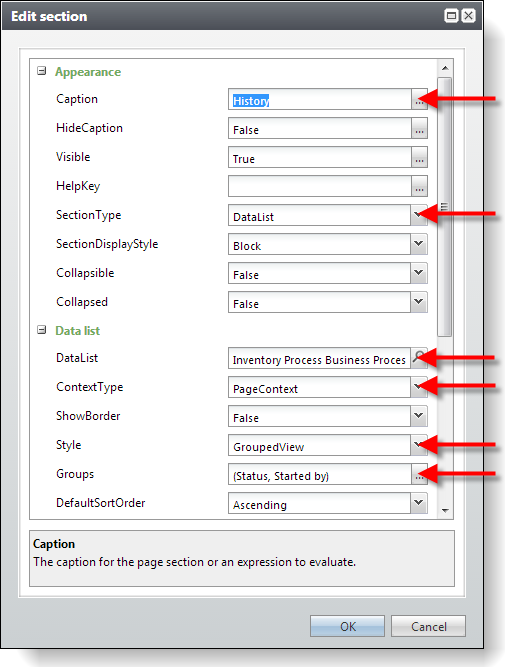
Configure the History section within the History tab -
Click the ellipsis button for the Actions property to add a Delete action.
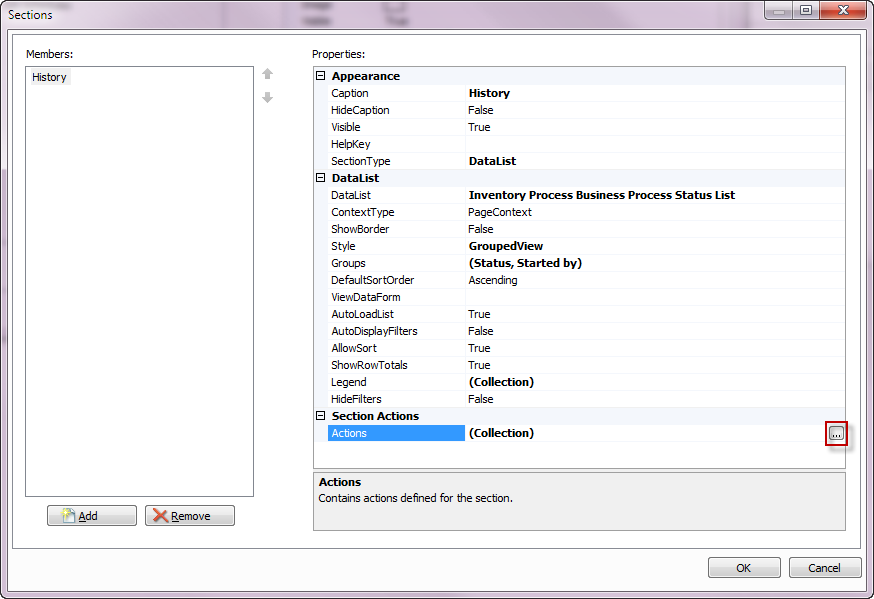
Configure a Delete action for the History section 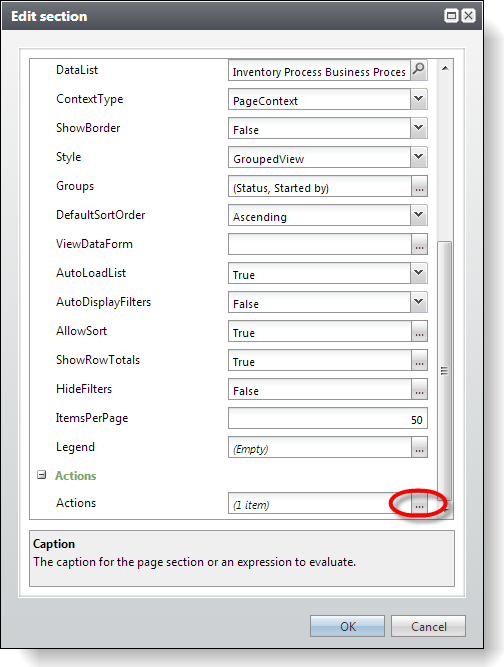
Configure a Delete action for the History section -
On the Actions property sheet, click the Add button to add an action to the section. Use the figure below as a guide and provide values for the Caption, Image, ActionType, Post-Action Event ActionType, Record Operation, ContextType, and SectionField.
On the Actions property sheet, click the Add button to add an action to the section. Use the figure below as a guide and provide values for the Caption, Image, ActionType, Record Operation, ContextType, SectionField, and PostActionType.
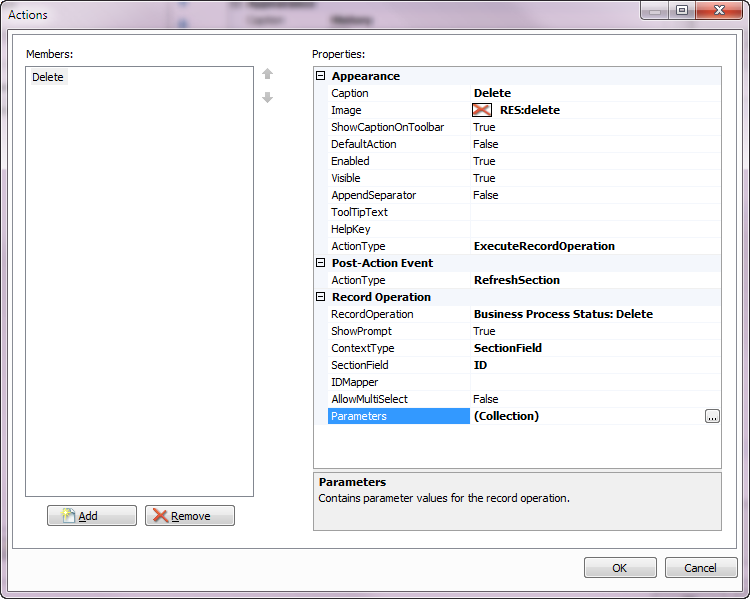
Add a Delete action 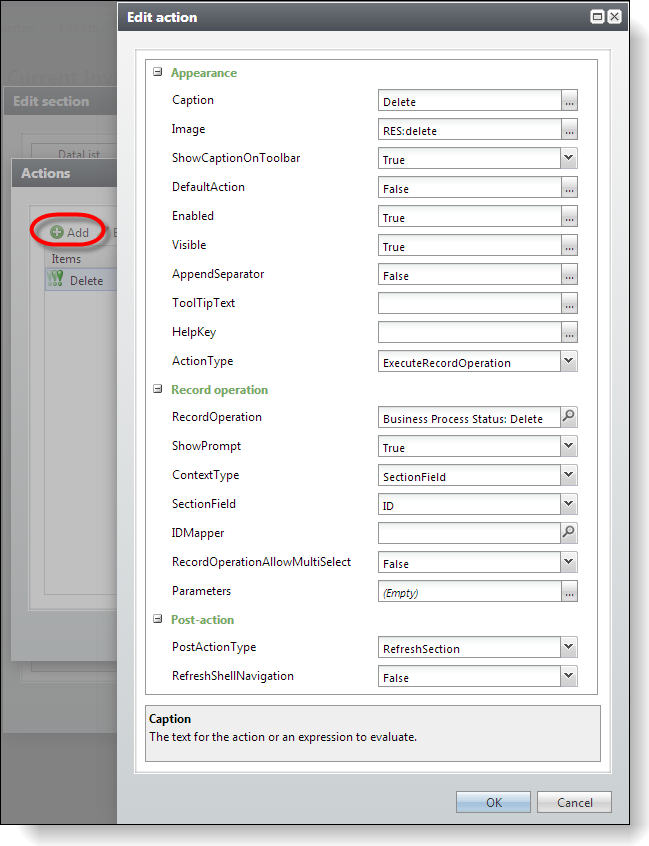
Add a Delete action -
Click OK on the Actions and Sections property sheets to accept the settings for the action and section, and then click Save on the tabs property sheet to save the new tab.
-
Click OK on the Edit action, Actions, Edit section and Sections property sheets to accept the settings for the action and section, and then click Save on the tabs property sheet to save the new tab.
Job Schedules Tab
-
With the page in Design Mode, click the Edit tabs button one more time to open the tabs property sheet.
-
On the property sheet, click the Add button and enter "Job Schedules" for the Caption property.
-
Click the ellipsis button the Sections property to add a data list to the new section.
-
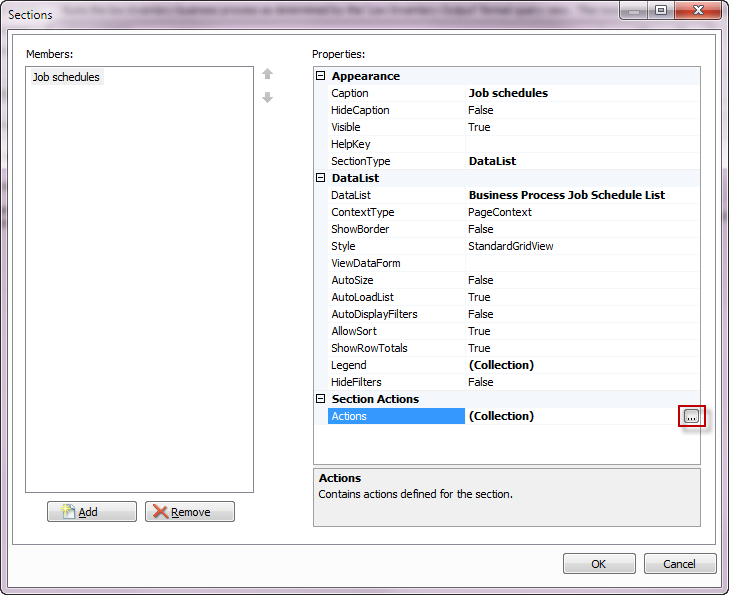
On the sections dialog, click the Add button to add a section to the tab. Use the figure below as a guide and provide values for the Caption, SectionType, DataList, and ContextType, properties.
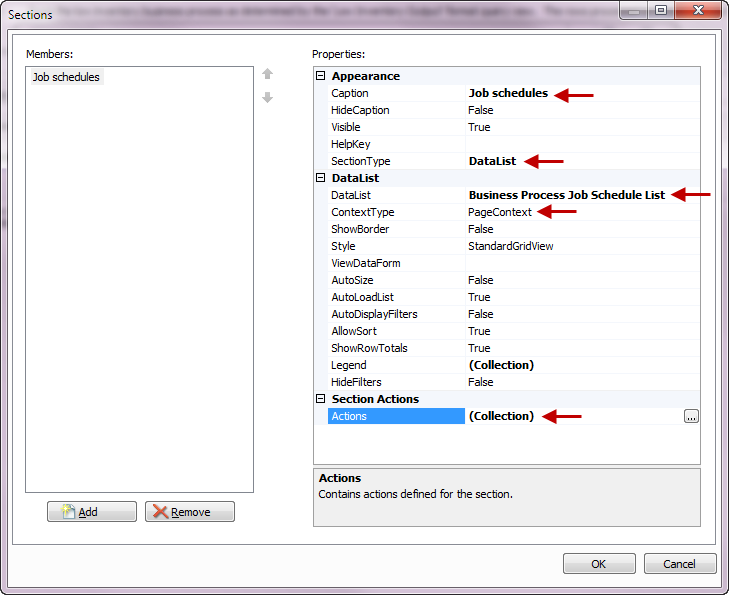
Configure the Job schedules section within the Job Schedules tab 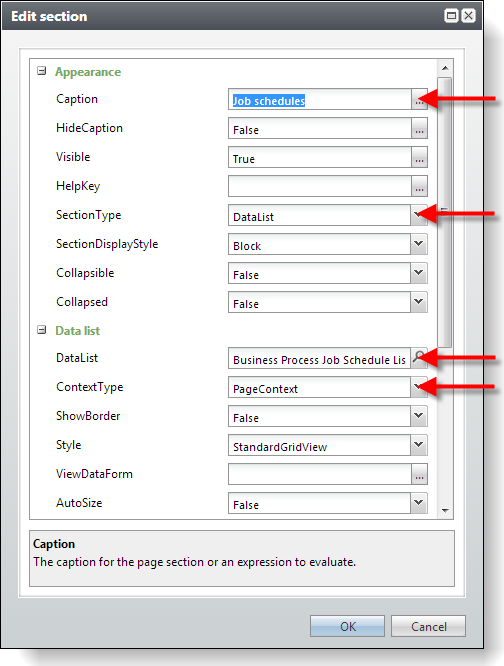
Configure the Job schedules section within the Job Schedules tab
Configure the Add, Edit, and Delete Actions for the Job Schedules Section
This tab will contain one section to display the "Business Process Job Schedule List," and the section includes actions to add, edit, and delete job schedules.
Add Job Schedules Action
-
On Job Schedules section property sheet, click the ellipsis button for the Actions property to add an Add action.
Configure a Add action for the Job schedules section 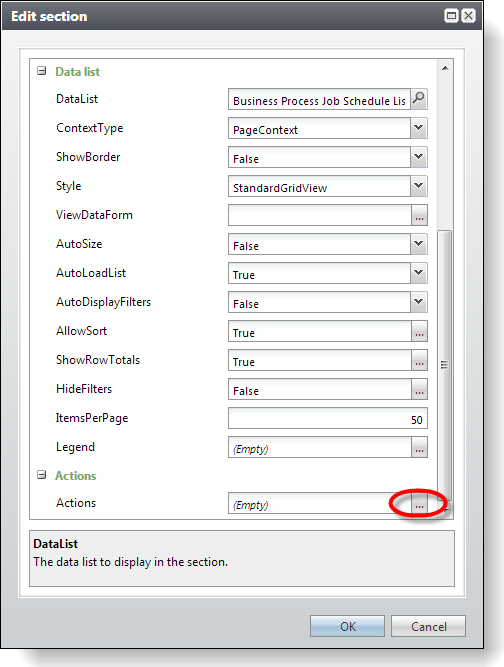
Configure a Add action for the Job schedules section -
Add an Add action to the section. On the Actions property sheet, click Add and use the figure below as a guide to provide values for the Caption, Image, ActionType, Data Form, ContextType, and Expression properties.
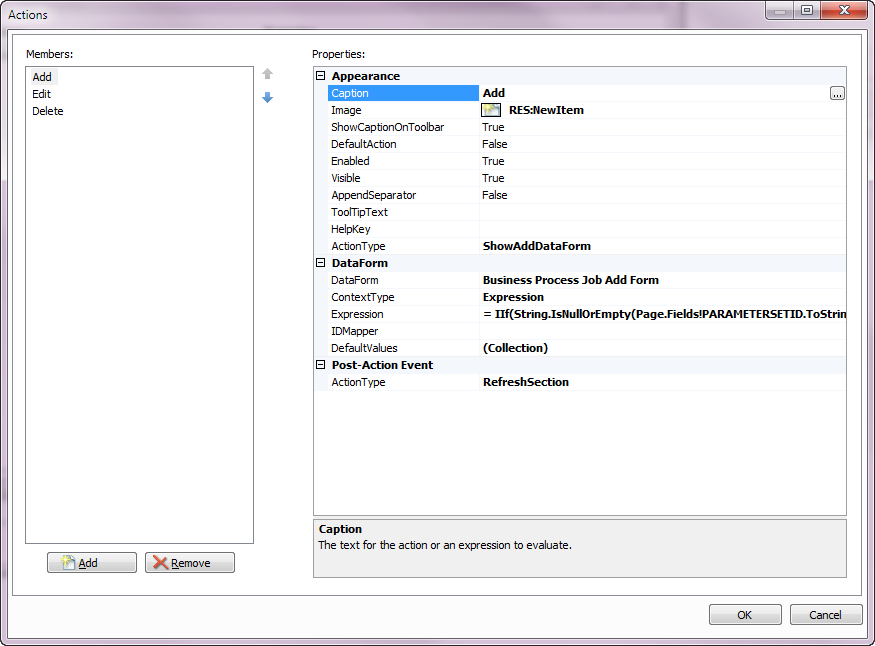
Configure the Add action for the Job Schedules tab 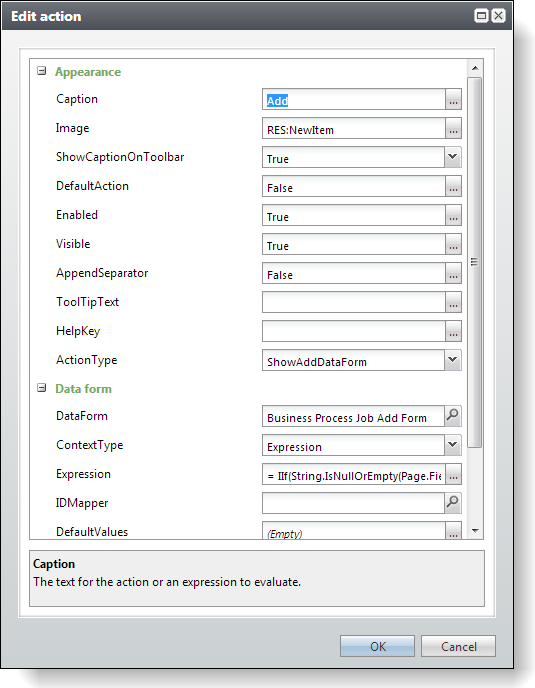
Configure the Add action for the Job Schedules tab -
For the expression to derive the context value for the Add action, use the following value:
IIf(String.IsNullOrEmpty(Page.Fields!PARAMETERSETID.ToString()), "", String.Concat("Exchange Contact Synchronization Process|B531B950-2534-4E95-B104-805DB1328806|", Page.Fields!PARAMETERSETID.ToString())).ToString() -
Click OK on the Edit action property sheets to accept the settings for the action.
Edit Action
-
On the Actions property sheet, click Add to add an Edit action to the section. Use the figure below as a guide and provide values for the Caption, Image, ActionType, Data Form, ContextType, SectionField,and Post-Action Event ActionType properties.
On the Actions property sheet, click Add to add an Edit action to the section. Use the figure below as a guide and provide values for the Caption, Image, ActionType, Data Form, ContextType, SectionField,and PostActionType properties.
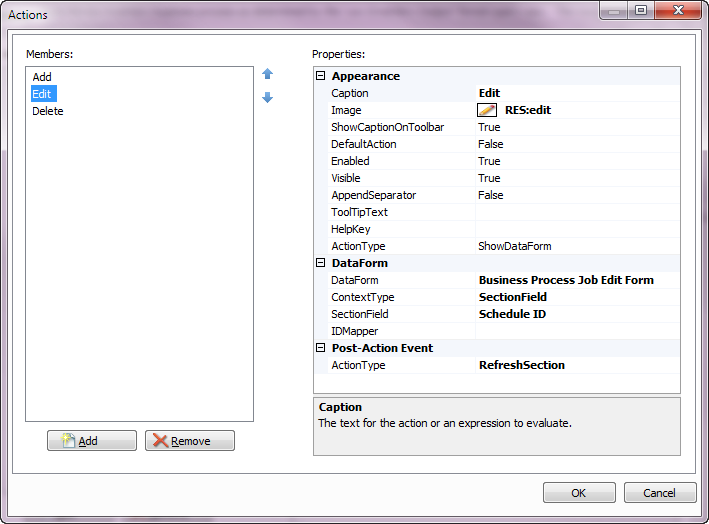
Configure the Edit action for the Job Schedules tab 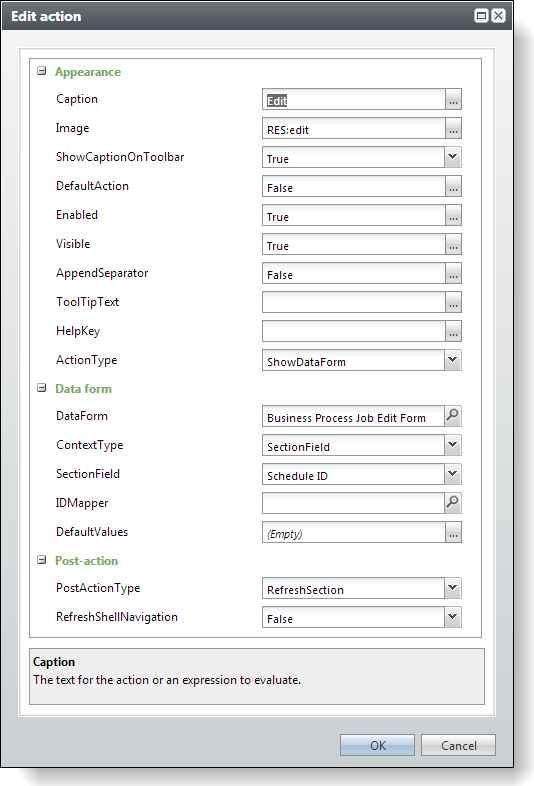
Configure the Edit action for the Job Schedules tab
Delete Action
-
On the Actions property sheet, click Add to add a Delete action to the section. Use the figure below as a guide and provide values for the Caption, Image, ActionType, Post-Action Event ActionType, Record Operation, ContextType, and SectionField properties.
On the Actions property sheet, click Add to add a Delete action to the section. Use the figure below as a guide and provide values for the Caption, Image, ActionType, Record Operation, ContextType, SectionField, and PostActionType properties.
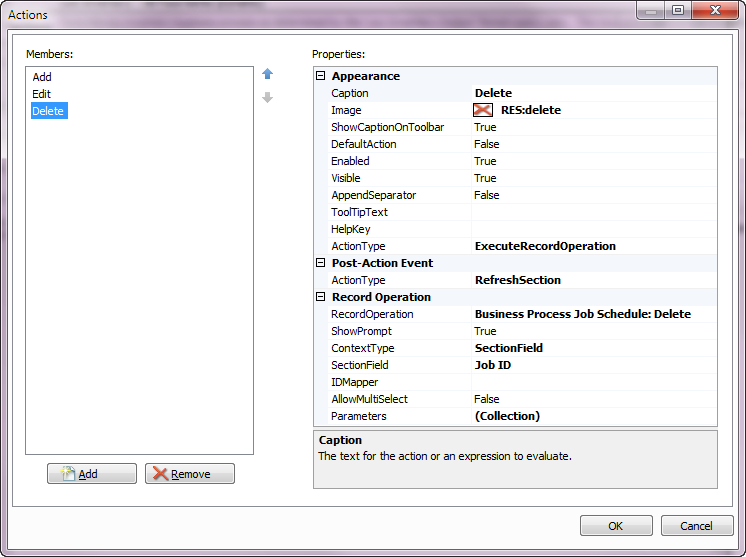
Configure the Delete action for the Job Schedules tab 
Configure the Delete action for the Job Schedules tab -
Click OK on the Actions property sheet to accept the settings for the three actions. Click OK on the Sections property sheet to accept the settings for the section. Then click Save on the tabs property sheet to save the new tab.
-
Click OK on the Edit action and Actions property sheets to accept the settings for the three actions. Click OK on the Edit section and Sections property sheets to accept the settings for the section. Then click OK on the Tab property sheet and Save on the Edit page tabs property sheet to save the new tab.
Step 5 - Configure the Tasks action group with new actions on the page. Configure the Edit process action.
You will now add actions to the Tasks action group on the far left side of your new page.
-
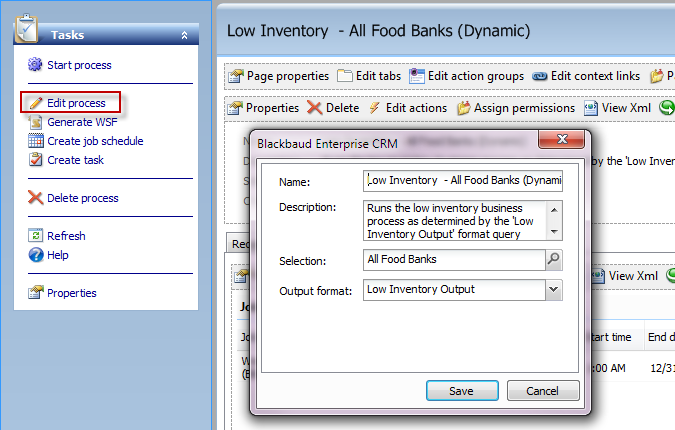
Edit process
-
Generate WSF
-
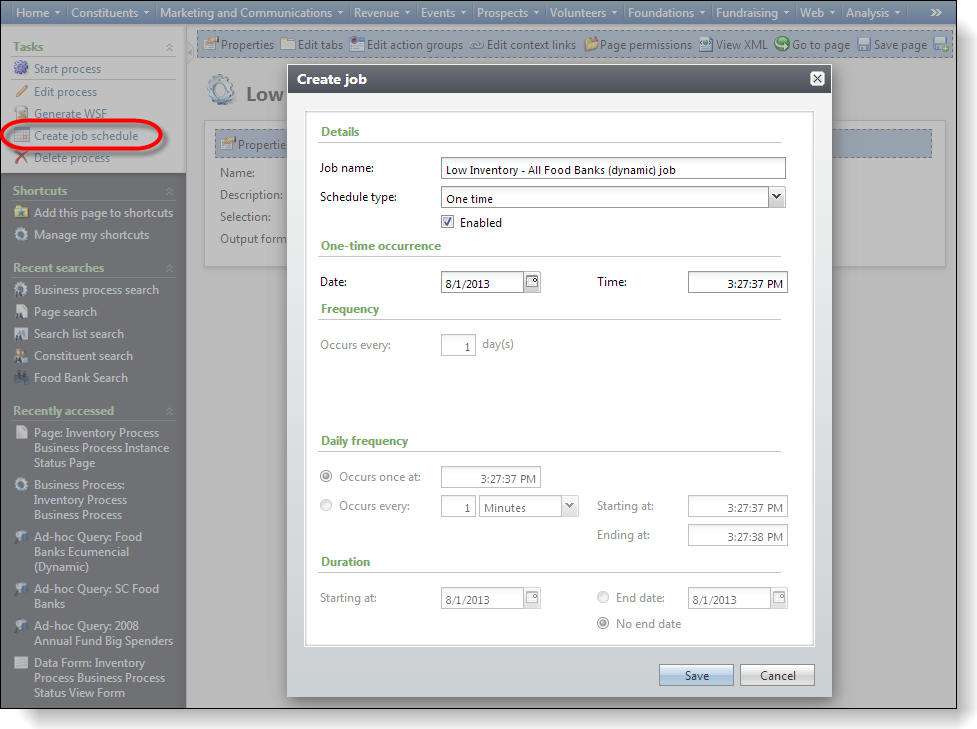
Create job schedule
-
Create task
-
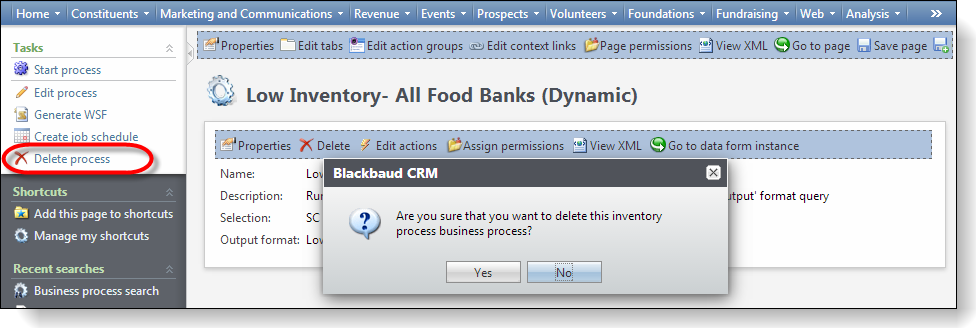
Delete process
-
Start process
-
Create an action to open the "Inventory Process Business Process Edit Form." This custom Edit Data Form allows end users to edit the parameter set associated with a business process. The data form was loaded previously in step 1. The action should pass the page context to the data form.
The Inventory Process Business Process Edit Form 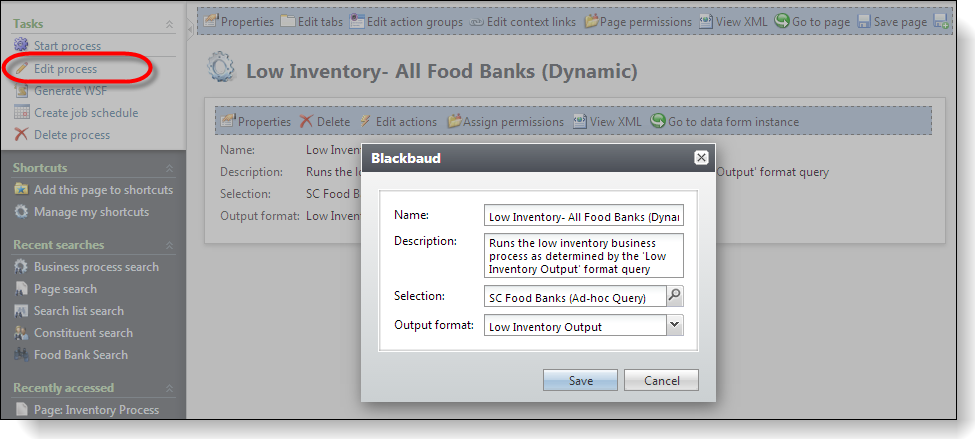
The Inventory Process Business Process Edit Form -
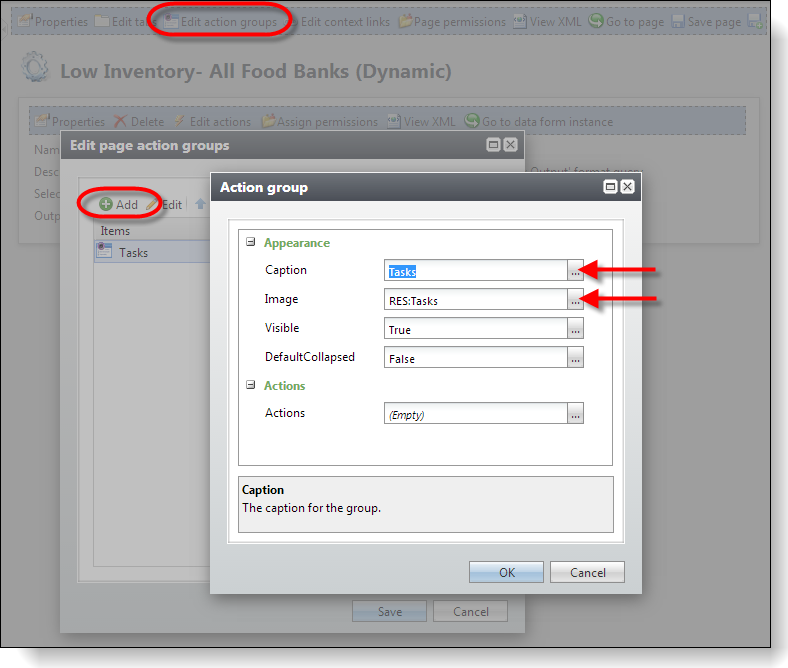
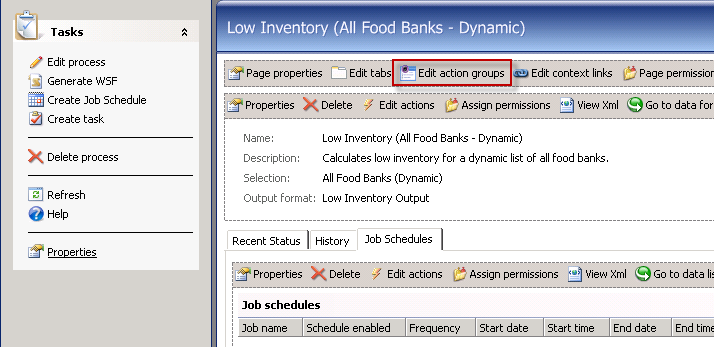
With the page in Design Mode, click the Edit action groups button at the top of the page.
-
Click the Add button to add a Task action group. Use the figure below as a guide and provide values for the properties.
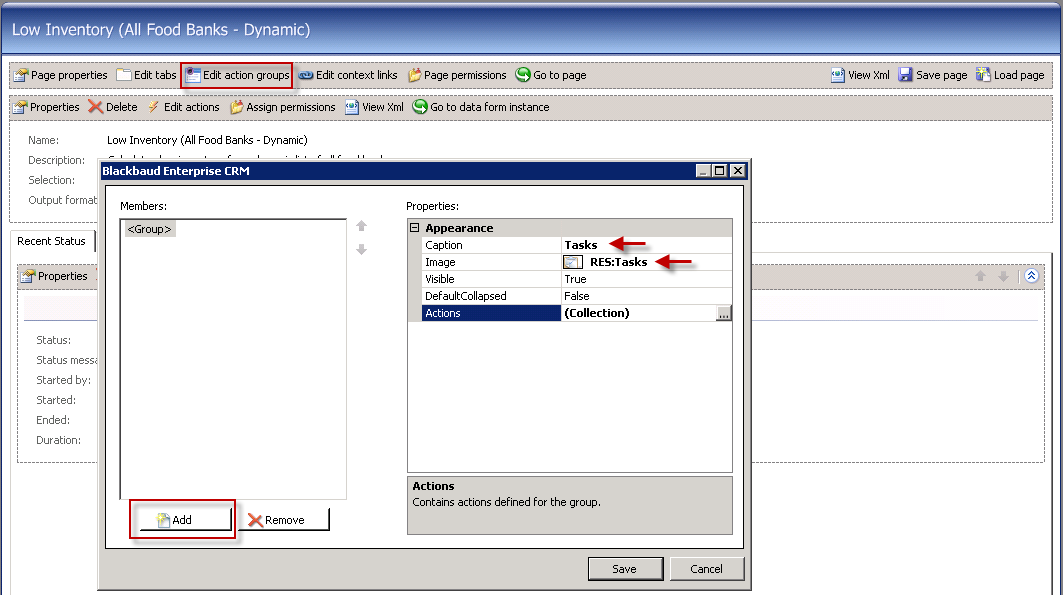
-
Click the ellipsis button for the new Tasks action group.
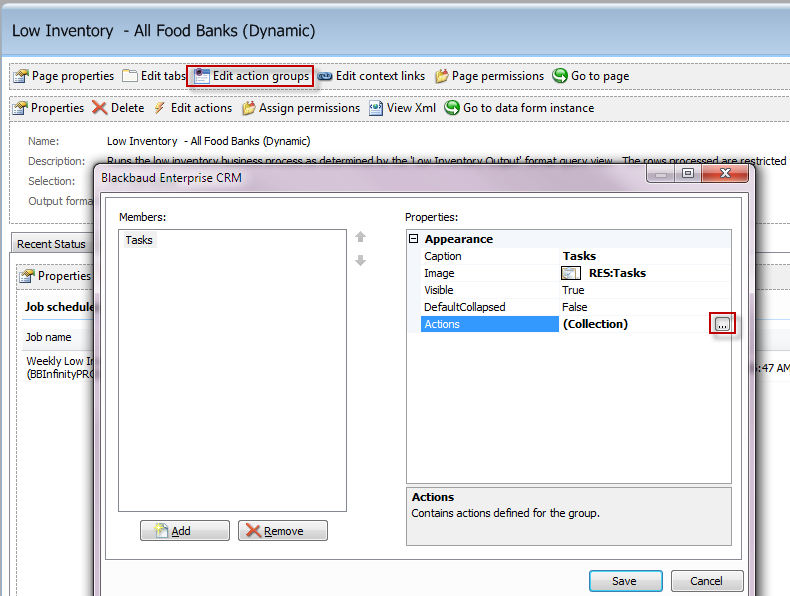
Add an action to the Tasks action group 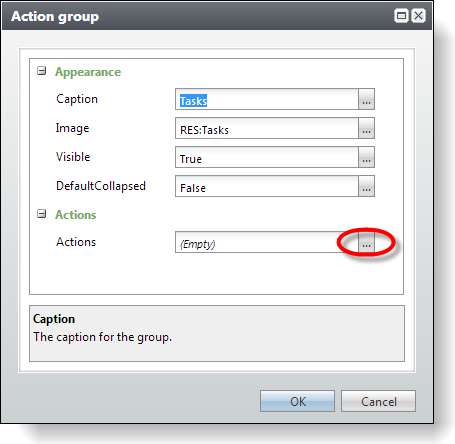
Add an action to the Tasks action group -
On the Actions dialog open, click the Add button to add the Edit process action. Use the figure below as a guide and provide values for the Caption, Image, ActionType, DataForm, ContextType, and Post-Action Event ActionType properties.
On the Actions dialog open, click the Add button to add the Edit process action. Use the figure below as a guide and provide values for the Caption, Image, ActionType, DataForm, ContextType, and PostActionType properties.
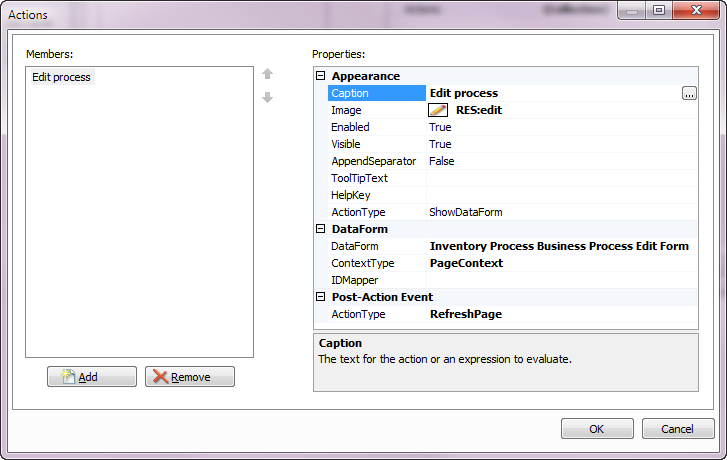
Edit process action 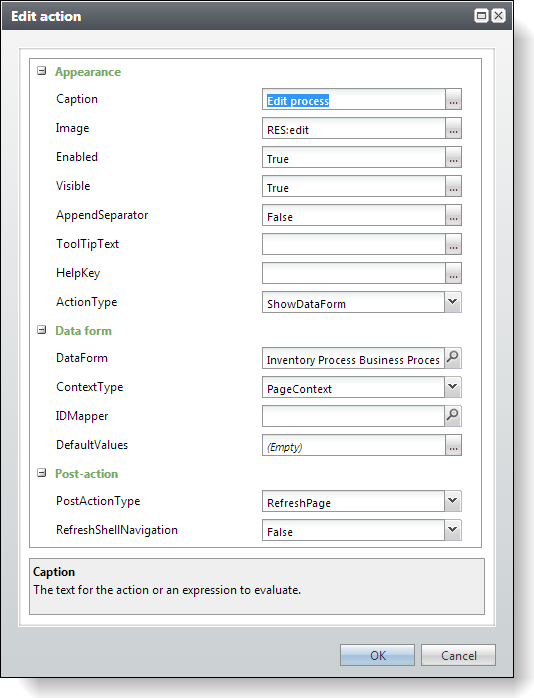
Edit process action - Click OK and save the action. Try out the new action.
Step 6 - Configure the Generate WSF action.
The Generate WSF action creates a Windows Scripting File that you can run once or schedule using Windows Task Scheduler. For more information. see Generate WSF Action.
-
On the Actions dialog, click the Add button to add the Generate WSF action. Use the figure as a guide and provide values for the Caption, Image, ActionType, CustomComponent (see next bullet), ContextType, and Post-Action Event ActionType properties.
On the Actions dialog, click the Add button to add the Generate WSF action. Use the figure as a guide and provide values for the Caption, Image, ActionType, ScriptIdentifier Url (see note below), Post-Action Event, Record Operation, ContextType, and PostActionType properties.
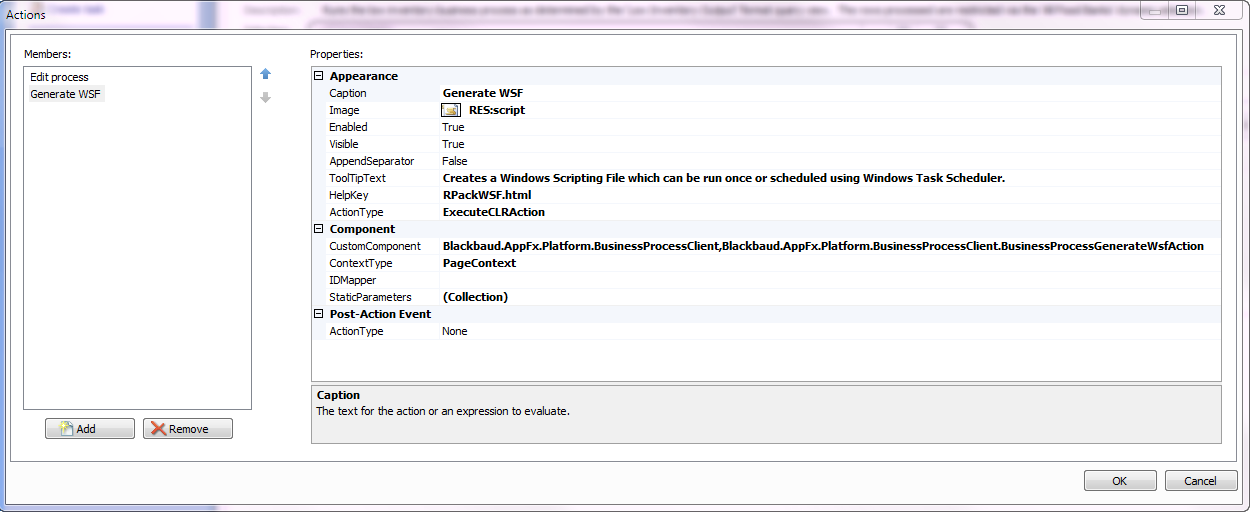

Generate WSF Properties -
For the ClickOnce shell, use the following value for the CustomComponent property: Blackbaud.AppFx.Platform.BusinessProcessClient,Blackbaud.AppFx.Platform.BusinessProcessClient.BusinessProcessGenerateWsfAction
-
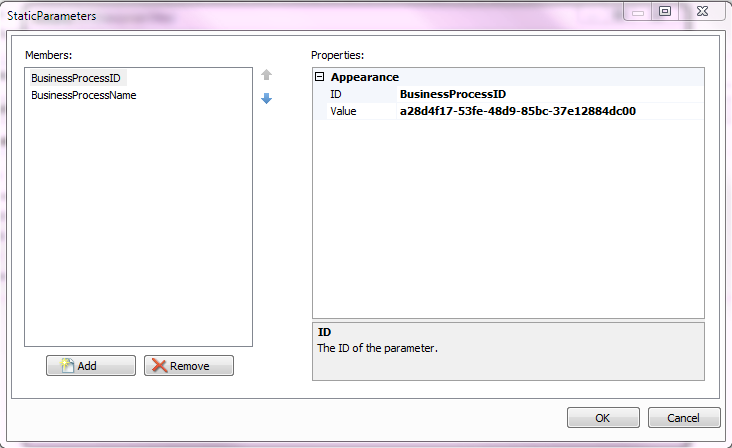
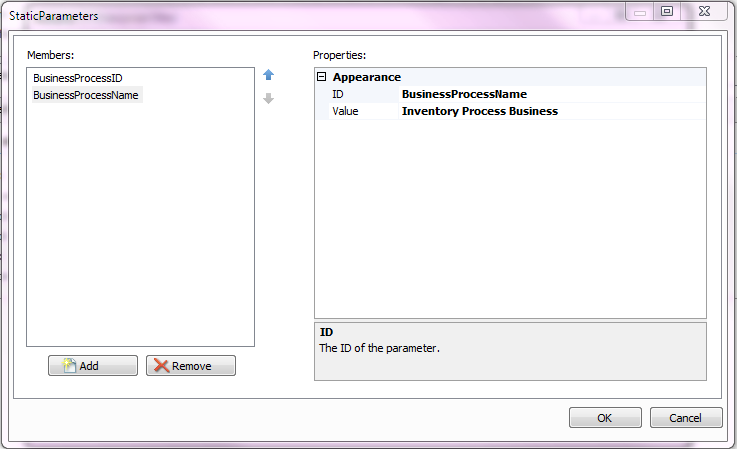
Also for the ClickOnce shell, click the ellipsis button for the StaticParameters property and add the values for the BusinessProcessID parameter. The BusinessProcessID references the ID attribute of your BusinessProcessSpec.
Tip: MAKE SURE THE VALUE YOU PROVIDE MATCHES YOUR ID FROM YOUR BUSINESSPROCESSSPEC.
-
Also for the StaticParameters property, add the following values for the BusinessProcessName parameter.
-
For the Web Shell shell, use enter the value for the ScriptIdentifier Url property.
Note: Web Shell Alert. ExecuteCLRAction elements are not supported in Web Shell and must be converted to include ScriptIdentifier elements. Because CLR actions are written in .NET code and executed on the client with assumptions that certain features like Windows forms are at the author's disposal, CLR actions won't just work with Web Shell like pre-existing server-side code does. We must call upon a Web Shell-friendly replacement to ExecuteCLRAction known as a ScriptIdentifier. What we use in the Web Shell user interface is to call a JavaScript object that, like CLR actions, would follow a certain pattern and could be invoked by the platform when the user clicks the button or link that the action is mapped to. We can call upon ScriptIdentifier and reference a JavaScript file where the action code resides. Fortunately, the code to generate the scripting file in the step above is provided courtesy of Blackbaud and performs the same basic functions as the referenced ExecuteCLRAction code. To prepare for Web Shell, we can modify our PageDefinitionSpec by adding a ScriptIdentifier XML element within the same Action XML element that contains the ExecuteCLRAction tag. Our action would therefore contain both an ExecuteCLRAction tag and a ScriptIdentifier tag, each one working in the appropriate user interface.
<Action ID="80ade27c-b61f-402e-8778-2a21537158ec" Caption="Generate WSF" ImageKey="RES:script" ToolTipText="Creates a Windows Scripting File which can be run once or scheduled using Windows Task Scheduler." CaptionResourceKey="$$generate_wsf" ToolTipResourceKey="$$creates_a_windows_scripting_file_which_can_be_run_once_or_scheduled_using_windows_task_scheduler">
<ExecuteCLRAction xmlns="bb_appfx_commontypes">
<ComponentIdentifier AssemblyName="Blackbaud.AppFx.Platform.BusinessProcessClient" ClassName="Blackbaud.AppFx.Platform.BusinessProcessClient.BusinessProcessGenerateWsfAction">
<StaticParameters>
<ParameterList>
<Param ID="BusinessProcessID">
<Value>ED318C58-4035-41D0-A38F-A5310F3CC9DD</Value>
</Param>
<Param ID="BusinessProcessName">
<Value>Configuration Export Process</Value>
</Param>
</ParameterList>
</StaticParameters>
</ComponentIdentifier>
<ScriptIdentifier Url="browser/htmlforms/platform/businessprocess/BusinessProcessGenerateWsfAction.js" ObjectName="BBUI.customactions.platform.BusinessProcessGenerateWsfAction">
<StaticParameters>
<ParameterList>
<Param ID="BusinessProcessID">
<Value>ED318C58-4035-41D0-A38F-A5310F3CC9DD</Value>
</Param>
<Param ID="BusinessProcessName">
<Value>Configuration Export Process</Value>
</Param>
</ParameterList>
</StaticParameters>
</ScriptIdentifier>
<ActionContext>
<PageContextID />
</ActionContext>
</ExecuteCLRAction>
<HelpKey>RPAckWSF.html</HelpKey>
</Action>
Step 7 - Configure the Create job schedule action.
Click the Create job schedule action to open the Business Process Job Add Form, which is a data form that ships with Blackbaud CRM.
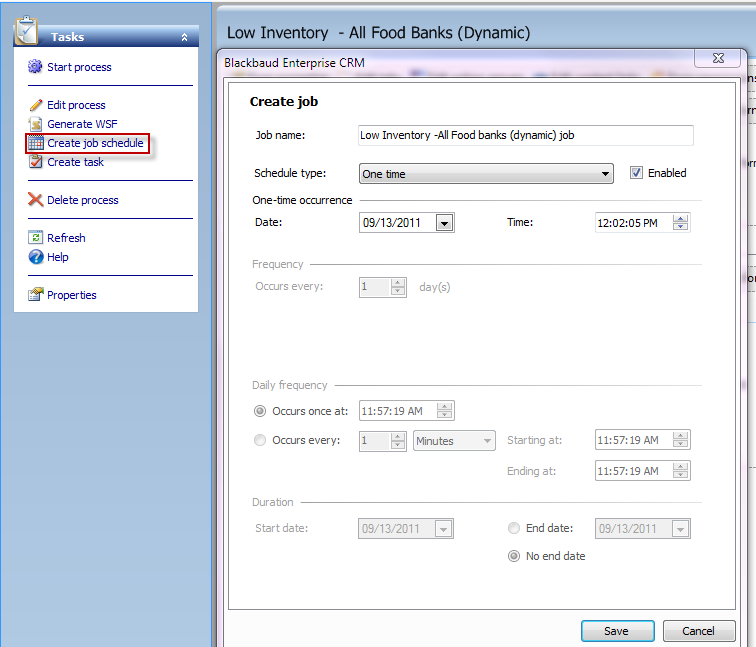
When the data form is saved, it creates a SQL Server Agent job using an ActiveX script to run the business process with a specific parameter set. For more information, see Create Job Schedule Action.
-
On the Actions dialog, click the Add button to add the Create job schedule action.
-
Use the screen shot to provide values for the Caption, Image, ToolTipText, ActionType, DataForm, ContextType, Expression (see next bullet for the complete expression), and Post-Action Event ActionType properties.
Use the screen shot to provide values for the Caption, Image, ToolTipText, ActionType, DataForm, ContextType, Expression (see next bullet for the complete expression), and PostActionType properties.
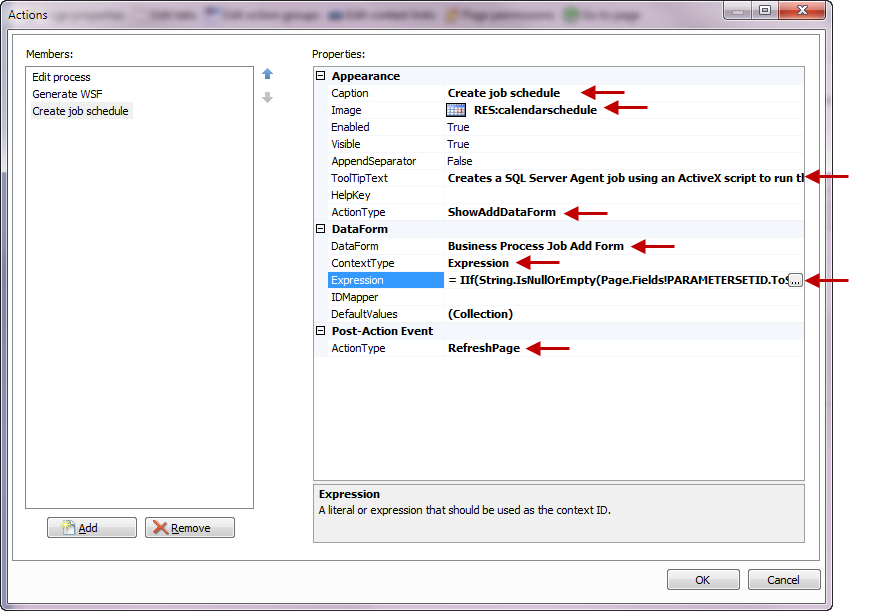
Create job schedule's action properties 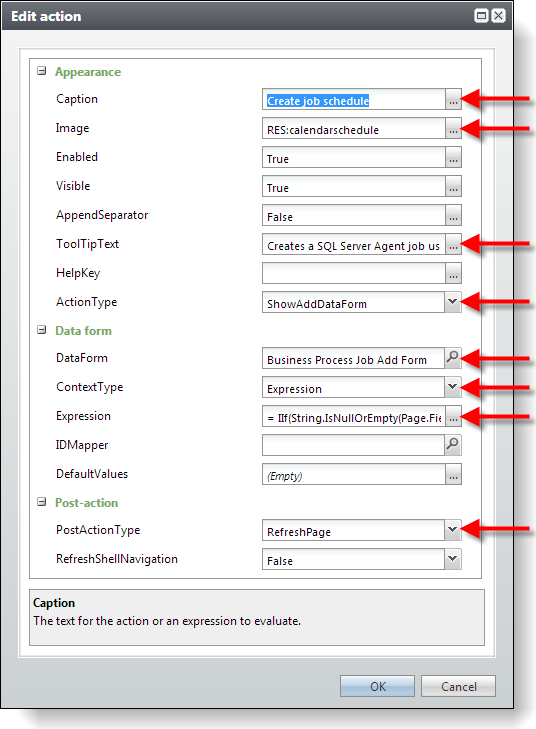
Create job schedule's action properties -
Here is the complete expression value for the Expression property:
= IIf(String.IsNullOrEmpty(Page.Fields!PARAMETERSETID.ToString()), "",
String.Concat("Exchange Contact Synchronization Process|B531B950-2534-4E95-B104-805DB1328806|",
Page.Fields!PARAMETERSETID.ToString())).ToString()
Step 8 - Configure the Create task action.
Note: Web Shell Alert. The Create task action only surfaces in the ClickOnce user interface. It is not available in Web Shell.
The Create task action opens the Run Business Process Task Add Form that ships with Blackbaud CRM. This data form looks strikingly similar to a property sheet for a task. At run time, this data form allows the user to create a task to run the business process with the current parameter set. For more information on this action, see Create Task Action.

-
On the Actions dialog, click the Add button to add the Create Task action.
-
Use the screen shot to provide values for the Caption, Image, ActionType, DataForm, and ContextType properties.
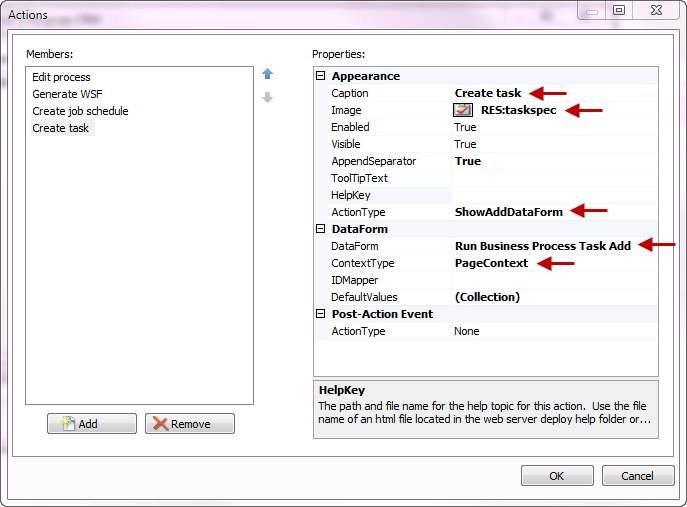
The Create task action's properties
Step 9 - Configure the Delete process action.
The Delete process action in the Tasks action group on our status page calls upon a custom record operation named "Inventory Process Business: Delete" to delete the parameter set for the business process. The record operation calls upon a stored procedure to delete a row from the custom USR_INVENTORYPROCESS table that stores parameter data for a specific business process. For more information, see Business Process Parameter Set Table.

-
On the Actions dialog, click the Add button to add the Delete process action.
-
Use the screen shot to provide values for the Caption, Image, ActionType, Post-Action Event ActionType, Post-Action Event Page, RecordOperation, and ContextType properties.
Use the screen shot to provide values for the Caption, Image, ActionType, RecordOperation, and ContextType, PostActionType, and Page properties.
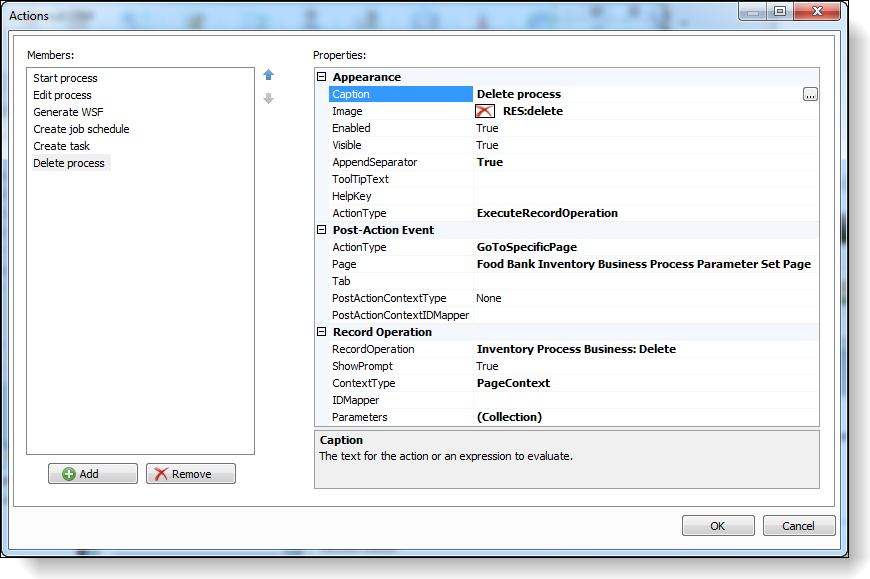
The Delete process action's properties 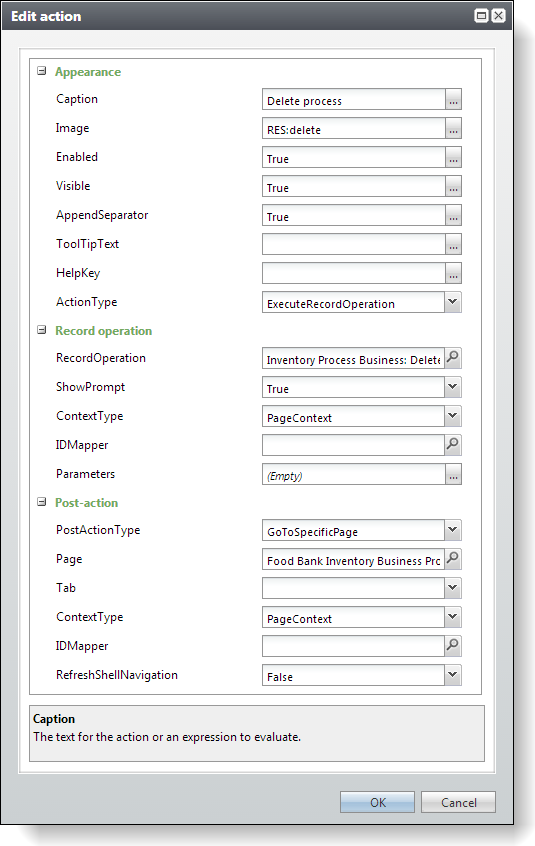
The Delete process action's properties
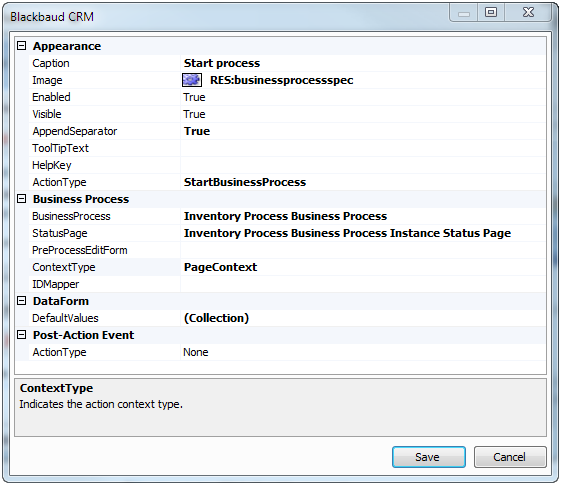
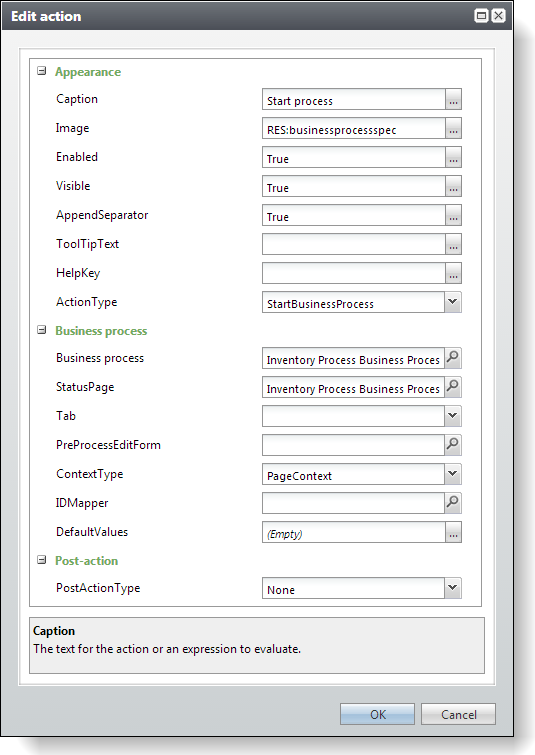
Step 10 - Configure the Start process action.
Create a new action to start our business process. End users can click the Start process action within the Tasks action group to start the business process with the specified parameter set.
In this step, we will start the business process and then navigate back to the same status page to view the results. This step assumes that the Business Process Spec was completed and loaded into the Infinity catalog/database. This step also assumes the CLR code that forms the logic for the business process was compiled within the catalog assembly and the assembly was deployed to the Infinity web server. We will create an action button to start the business process given a selected parameter set. After the business process starts, we will navigate to the page via the StatusPage property within the action.
-
In Design Mode, click Edit action groups to configure a new action to start our food bank inventory business process.
Add a new action 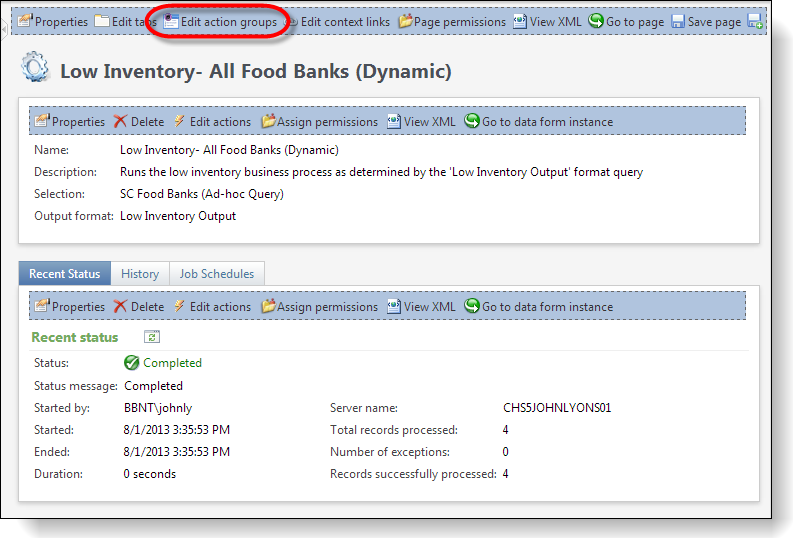
Add a new action -
Select the Tasks action group and then click the ellipsis button for the Actions property.
-
Select the Tasks action group and click Edit. Then on the Action group screen, click the ellipsis button for the Actions property.
-
On the Actions dialog, click the Addbutton and use the screen shot below as a guide to complete the property sheet.
The ActionType property should be set to "StartBusinessProcess," and the business process name is "Inventory Process Business Process" as defined within our Business Process Spec. Configure the action to navigate to the Inventory Process Business Process Instance Status Page after the business process starts. Provide the ID of the current row within the data list as the context for the business process. This provides the business process with the primary key value of the parameter set to run with the business process.
-
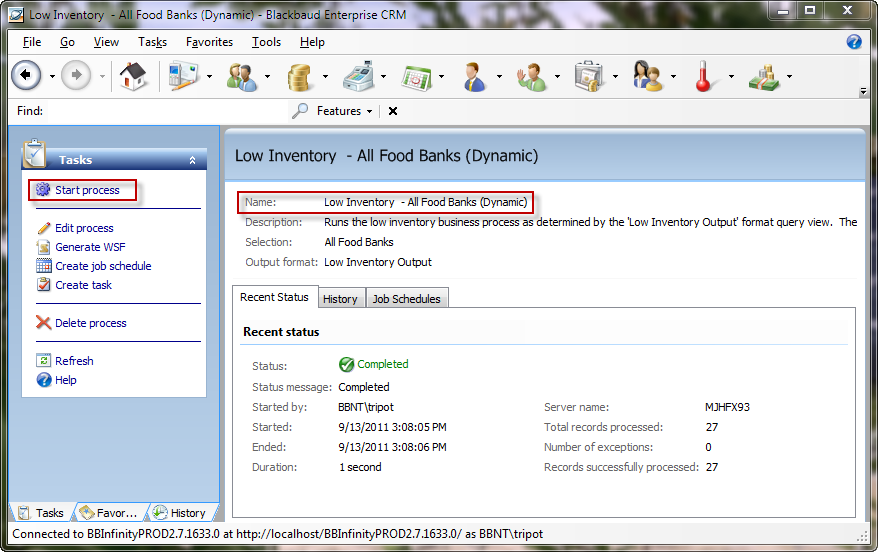
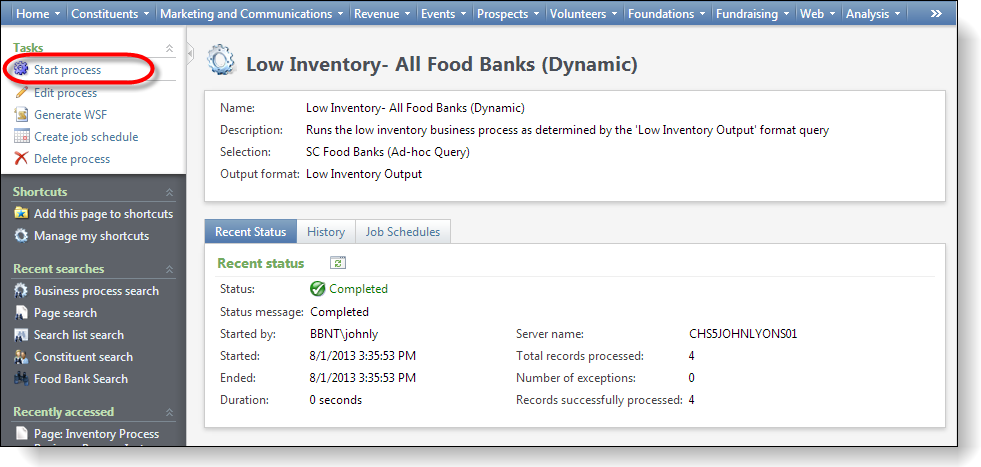
Finally, to start the business process, click the Start process action.
Step 11 - Inspect the output format table.
Output tables may be created as a result of a business process. The BusinessProcessOutput table contains data describing the output of a particular business process run. The BusinessProcessOutput.TableName field refers to an output table for a given instance of a business process. The BusinessProcessOutput.TableKey field is the key by which this table is referenced internally. For more information, see BusinessProcessOutput.
Open SQL Server Management Studio and query the BusinessProcessOutput table within the appropriate Infinity database. Use the Transact-SQL SELECT statement below to determine the name of the generated business process output table.
Tip: Be sure to use your BusinessProcessSpec's ID attribute value within the WHERE clause.
SELECT TOP 1000 BPO.[ID]
      ,BPO.[BUSINESSPROCESSSTATUSID]
      ,BPO.[TABLENAME]
      ,BPO.[TABLEKEY]
      ,BPO.[ADDEDBYID]
      ,BPO.[CHANGEDBYID]
      ,BPO.[DATEADDED]
      ,BPO.[DATECHANGED]
      ,BPO.[TS]
      ,BPO.[TSLONG]
      ,BPO.[DOWNLOADPARAMETERS]
      ,BPO.[COLUMNMETADATA]
  FROM [dbo].[BUSINESSPROCESSOUTPUT]BPO
  INNER JOIN BUSINESSPROCESSSTATUS BPS ON BPO.BUSINESSPROCESSSTATUSID = BPS.ID
  INNER JOIN BUSINESSPROCESSCATALOG BPC ON BPS.BUSINESSPROCESSCATALOGID = BPC.ID
  WHERE BPC.ID = 'YOUR BUSINESS PROCESS ID GUID GOES HERE'
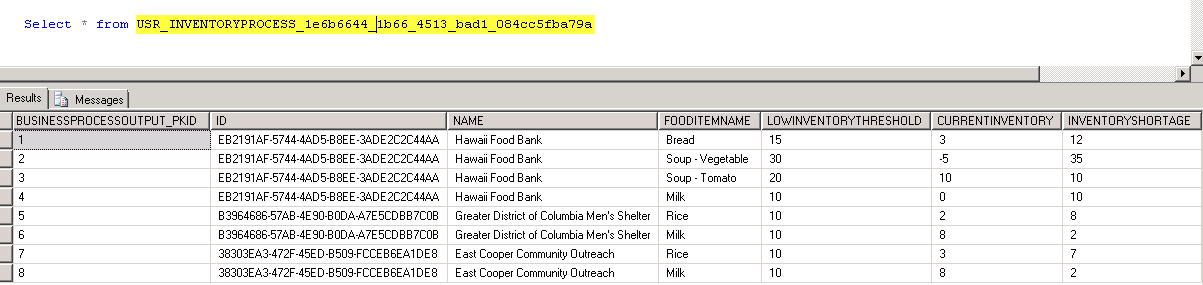
For example, the query below results in the following results:
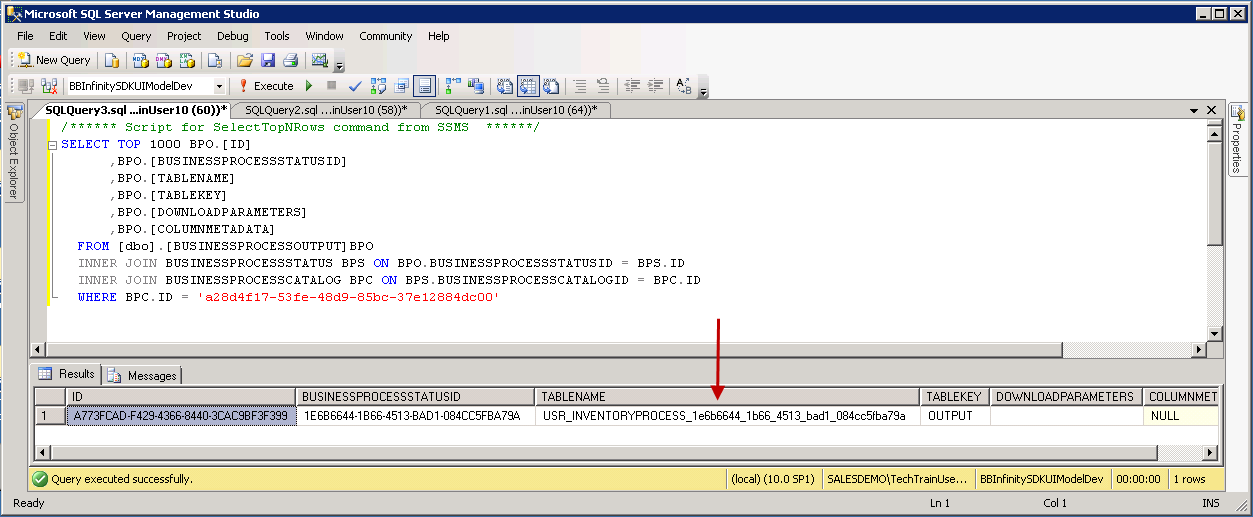
In the sample query results above, the TableName column provides the name of the output table generated from our business process. Querying this table provides the results of the business process run given the selected parameter set. See below. Your results will vary depending on the food bank transaction within the database and the parameters chosen for the given parameter set.