Update Database Table to Designate Form as a Constituent Tile
This material pertains only to the first three service packs for version 4.0 of the Blackbaud CRM SDK.
The final step to create custom tiles for the Constituent page’s summary is to insert a row or multiple rows for the view data form in the CONSTITUENTSUMMARYAVAILABLETILE table. The rows in this table designate the forms as tiles and tell the system the circumstances where they are available. To display a tile for multiple constituent types, you must add a row that specifies each type.
Tip: This step only applies to custom tiles created in Blackbaud CRM 4.0 Service Pack 3 or earlier. For Blackbaud CRM 4.0 Service Pack 4 and later, you can include the SummaryTile element on the view data form spec to designate a form as a tile. This improves the developer experience and removes the need to manually update the database with a SQL statement. You can still use a SQL script in Blackbaud CRM 4.0 Service Pack 4 to manually insert a row in the CONSTITUENTSUMMARYAVAILABLETILE table to designate the form as a tile, but we recommend the new, easier method to deploy tiles.
To insert rows for tiles in the CONSTITUENTSUMMARYAVAILABLETILE table, you manually update the table with a SQL statement.
Tip: For version 4.0, the application does not provide a mechanism to insert rows in the CONSTITUENTSUMMARYAVAILABLETILE table, so you need to do this manually with a SQL statement. An SDK-level solution to achieve this step is in the works and will be included in a future release or in a service pack between releases.
The CONSTITUENTSUMMARYAVAILABLETILE table contains several key columns to consider when you add a row to the table.
| Column | Description |
|---|---|
| TILENAME |
Specify a tile name for when end users customize the Constituent page’s summary. When users click Customize tiles in the summary, this tile name appears on the Customize constituent summary tiles screen. |
| CONSTITUENTTYPECODE | Specify the constituent type that the tile is available for. For individuals, enter "0." For organizations, enter "1." For households, enter "2." And for groups, enter "3." To make a tile available for multiple constituent types, create a SQL INSERT statement for each type. |
| DATAFORMINSTANCECATALOGID | Specify the instance ID for the tile's view data form. On the view data form spec, you can find this GUID in the root element's DataFormInstanceID attribute. |
| ISDEFAULT | Specify whether to display the tile by default when the Constituent page’s summary appears. This defaults to false, and the tile does not display unless end users customize the summary to include it. To set this to true to display the tile by default, enter "1." |
| SEQUENCE | Specify where to place the tile within the default order or tiles. For example, to specify the third tile in the summary, enter "3." This value only matters if you set ISDEFAULT to true. |
Here is an example of a SQL statement that adds a custom tile to the table.
/*
  Insert row for custom tile. Set name to 'Custom tile 3' and specify
  individual constituent type. Do not display tile by default.
*/

declare @CHANGEAGENTID uniqueidentifier;
declare @CURRENTDATE datetime = getdate();

exec dbo.USP_CHANGEAGENT_GETORCREATECHANGEAGENT @CHANGEAGENTID
output;

if not exists(
  select 1
  from dbo.CONSTITUENTSUMMARYAVAILABLETILE
  where DATAFORMINSTANCECATALOGID = '8e21b69f-1638-4f66-909b-b42c60476775' and CONSTITUENTTYPECODE = 0
)
begin
  insert into CONSTITUENTSUMMARYAVAILABLETILE(
    TILENAME,
    CONSTITUENTTYPECODE,
    DATAFORMINSTANCECATALOGID,
    DATEADDED,
    DATECHANGED,
    ADDEDBYID,
    CHANGEDBYID
  )
  values(
    'Custom tile 3',
    0,
    '8e21b69f-1638-4f66-909b-b42c60476775',
    @CURRENTDATE,
    @CURRENTDATE,
    @CHANGEAGENTID,
    @CHANGEAGENTID
  );
end
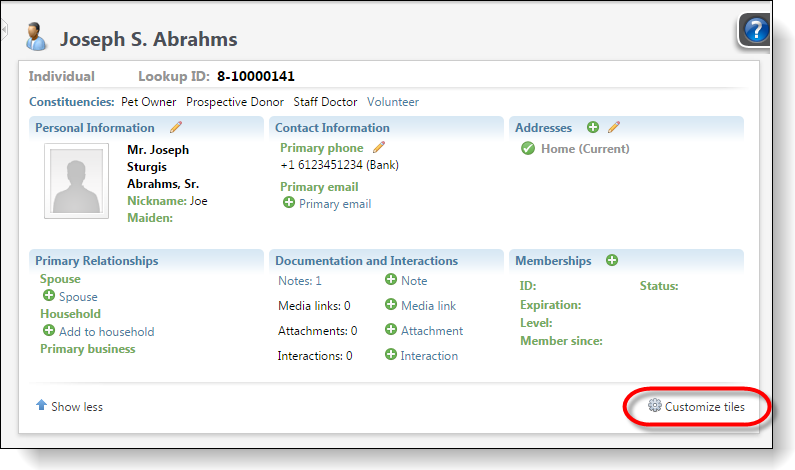
After you add entries for the view data form to the CONSTITUENTSUMMARYAVAILABLETILE table, users can customize the Constituent page summary to display your custom tile. Within the summary on the Constituent page, users can click Customize tiles to modify the tiles that appear in the summary.
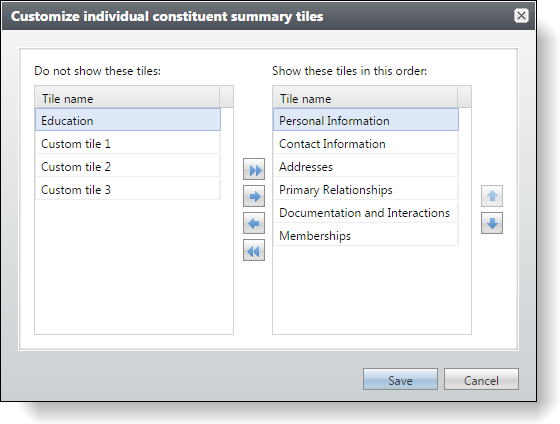
Then on the Customize constituent summary tiles screen, users can add your custom tile to the list of tiles that the summary displays.
Tip: Keep in mind that for end users to view the tile, they must be in system roles with permission to view the feature. For information about how to grant permissions to system roles based on the security folder you specify on the view data form, see the Security Guide at Blackbaud CRM User Guides.