Modify an Existing Page to Display a List Builder
This material pertains to version 4.0 of Blackbaud CRM SDK.
The AlterExistingPages element and its child elements allow you to load list builders onto existing pages in the system without directly editing the specs for those pages.
On the query view spec for a list builder, you can include the AlterExistingPages element to provide instructions about how to modify existing pages when you upload the query view spec.
For example, if you create a list builder to replace an existing data list or list builder in the program, you can use the AlterExistingPages element to automatically replace the original data list or list builder when you load your new query spec. This simplifies implementation of the new list builder and also automatically restores the original data list or list builder if you unload the new one.
Note: The AlterExistingPages element is new to query view specs in version 4.0 but was previously available for several spec types, including pages, data forms, data lists, and packages. The AlterExistingPages element includes the same child elements and is implemented the same way for all of these spec types. For more information about the element, see Modify Existing Pages.
Basically, the AlterExistingPages element is useful to create and implement a list builder from a central location instead of managing it on multiple specs. With this element, you can create a query view spec for a list builder and include instructions to load it on an existing page without directly editing the spec for the target page.
Load a List Builder onto an Existing Page
The query view spec for a list builder creates a view for returning data and designates output fields just like any other query view spec. Then it includes a ListBuilder element to specify the default columns for the list builder.
With these pieces in place, you can insert the AlterExistingPages element into the query view spec to provide instructions about how to modify existing pages.
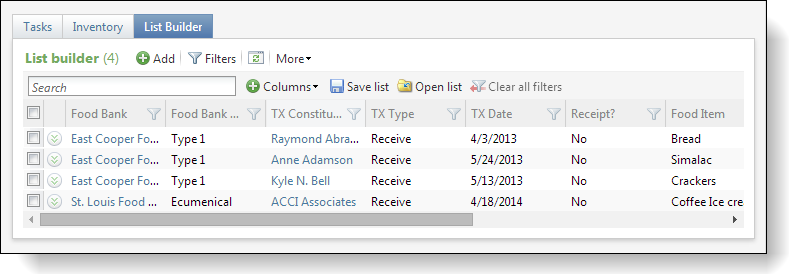
For example, you can use the AlterExistingPages element and its child elements to add a section to a tab on an existing page and display your list builder. To illustrate this example, take a look at the food bank transactions list builder in the food bank customization. In the Food Bank functional area, this list builder demonstrates the capabilities of list builders by returning the transactions of all food banks.
For the customization, the page spec was updated directly with instructions to display this list builder on a List Builder tab.
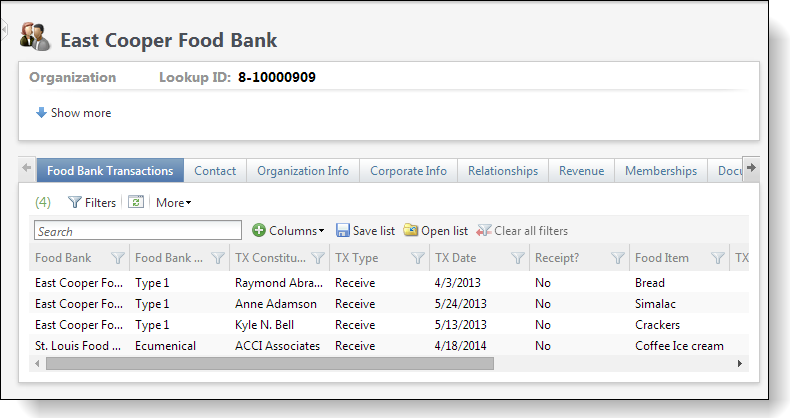
But starting with version 4.0, you can provide the instructions on how to display a list builder in the AlterExistingPages element of the query view spec instead of the spec for the page to update. For example, you can use the AlterExistingPages element and its child elements to add the food bank transactions list builder to a new tab on the Constituent page.
<AlterExistingPages xmlns="bb_appfx_pagedefinition">
 <AlterPages>
  <AlterPage PageID="88159265-2b7e-4c7b-82a2-119d01ecd40f">
   <AlterTabs>
    <AddTab>
     <Tab Caption="Food Bank Transactions" ID="395ADAD7-B251-43A4-989A-3201D18AC298" Visible="true">
      <Sections>
       <Section ID="05341B4B-2954-441F-9DC4-DE13E8EC06E7">
        <ListBuilder QueryViewID="9CD7E7F8-50C3-4F35-B784-7C6C2B70EC77"></ListBuilder>
       </Section>
      </Sections>
     </Tab>
    </AddTab>
   </AlterTabs>
  </AlterPage>
 </AlterPages>
</AlterExistingPages>
On the query view spec for the list builder, you start with the AlterExistingPages and AlterPages elements and then identify the page to modify with its GUID in the AlterPage element's PageID attribute. For this example, you use the GUID for the Constituent page.
Next, you insert the AlterTabs and AddTab elements, and then in the Tab element, you can provide a caption and GUID for the new tab and specify that it is visible. If you only want the tab to appear on certain records, you can provide an expression in the Visible attribute, but for this example, we'll set it to "true" to add the tab to all Constituent pages.
Next, you can add the Sectionsand Section elements and provide a GUID in the ID element to create a section on the new tab to display the list builder. And finally, you add the ListBuilder element and provide the GUID from your query view spec in the QueryViewID attribute.
When you load your new spec, a new Food Bank Transactions tab appears on the constituent page.
Using the AlterExistingPages element this way allows you to organize changes in one central location instead of managing them on multiple specs. You can load your list builders onto target pages without directly editing the specs for those pages, and if you unload the query view specs, the list builders and their tabs and sections are removed automatically along with the specs.