Add LoadSpec to the Microsoft Visual Studio Development Environment
To add the external LoadSpec.exe utility to the development environment, complete the following steps:
-
In Visual Studio, select Tools\External Tools… in the main menu. The External Tools dialog window appears.
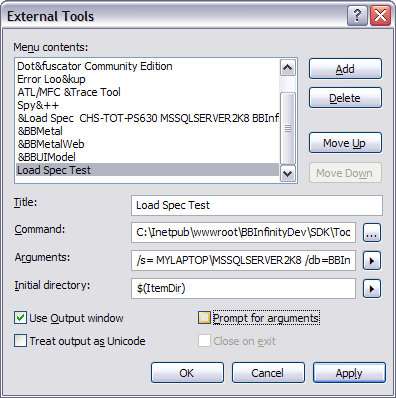
External Tools window -
Check for the existence of the LoadSpec command under Menu contents. If it is not present or you want to verify the existing load spec command arguments or add a new load spec command, then continue following the steps outlined below.
Click the Add button to add a new command that references the LoadSpec utility.
-
Title: Provide a Title that includes Load Spec, the name of the SQL Server instance, and the database name.
-
Command: For the command, navigate to the LoadSpec.exe utility located within the SDK folder on your local machine. For example, if you installed the SDK in the C:\Inetpub\wwwroot\BBInfinity folder on your local machine, then the LoadSpec.exe utility is in the following location: C:\Inetpub\wwwroot\BBInfinityDev\SDK\Tools\LoadSpec.exe.
-
Arguments: We use these arguments to point to the following:
-
/s = the SQL Server instance. For example, let’s say I have a SQL Server 2008 instance on my laptop. The SQL Server instance name is MYLAPTOP\MSSQLSERVER2K8. (The instance name for your SQL Server can be found by looking within the Microsoft SQL Server Management Studio at the top of the Object Explorer.) Therefore the /s = MYLAPTOP\MSSQLSERVER2K8.
-
/db = the Infinity database name. For example, the database name is BBInfinity. Therefore, the /db = BBInfinity.
-
/spec=$(ItemPath) – Keep this as the default.
-
/nodepends – Keep this as the default.
Using the sample arguments above, the completed argument string would look like this:
/s= MYLAPTOP\MSSQLSERVER2K8 /db=BBInfinity /spec=$(ItemPath) /nodepends
-
-
Initial directory: $(ItemDir) – Keep this as the default.
-