Exercise: Automate an Infinity Feature within the Workflow
The purpose of the exercise is to discover how we can leverage existing Infinity features, such as data forms, within our workflow. When a large gift comes into the system, we want our workflow to automatically set the payment's "Do Not Acknowledge" flag to True. We don't want to give the donor a stock thank you acknowledgement. We need a more personal touch. We can utilize the Payment Edit Form 2 feature to update the payment and set the "Do Not Acknowledge" flag to True.
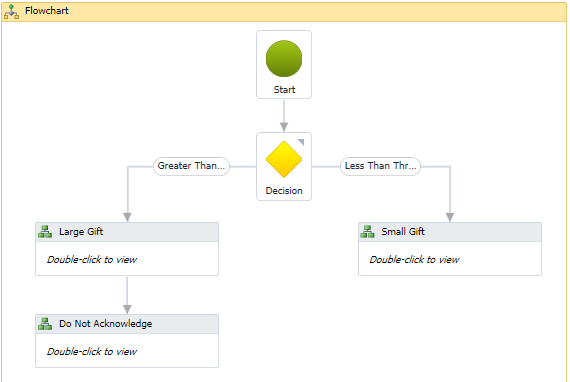
We will add a BusinessActivity named "Do Not Acknowledge" to the flowchart. We will add a Sequence activity within the BusinessActivity and then leverage the PaymentEditForm2 edit data form within the Sequence activity.
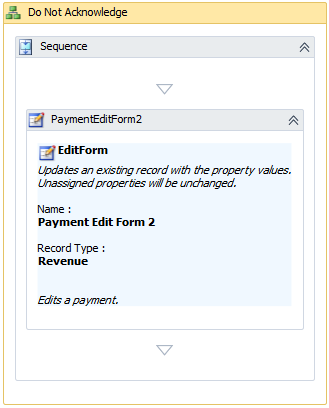
In the figure above, you probably noticed the activity named PaymentEditForm2. You may have asked yourself "How did that activity get into the toolbox?" Using Infinity features such as data forms, record operations, and data lists to automate functionality inside of a workflow is pretty easy to set up. The pattern is to set up a System Role within the Infinity application that is configured with the features to use within our workflow. So in the case of the PaymentEditForm2, we grant permissions to the edit data form within a System Role that is dedicated to the workflow.
For more information on how to add Infinity features into Visual Studio 2010 as workflow activities, see Add Features to an Infinity System Role and Add System Role Activities.
Instructions
Step 1 - Add the System Role for the workflow within the appropriate instance of your Infinity application.
-
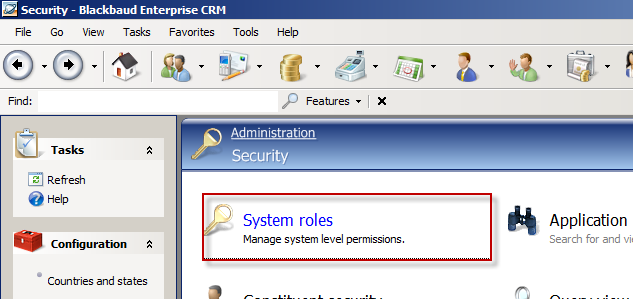
Navigate to the Administration functional area.
-
Click the Security task, and then on the Security page, click the System roles task.
-
Click the Add action and name your new system role "Workflow System Role for Training Exercise."

Step 2 - Locate the feature using "Go to."
To find the data form that allows you to edit the "Do Not Acknowledge" flag on the payment, we need to navigate to a revenue transaction page and find the feature that allows you to edit the transaction.
-
Navigate to the Constituent page.
-
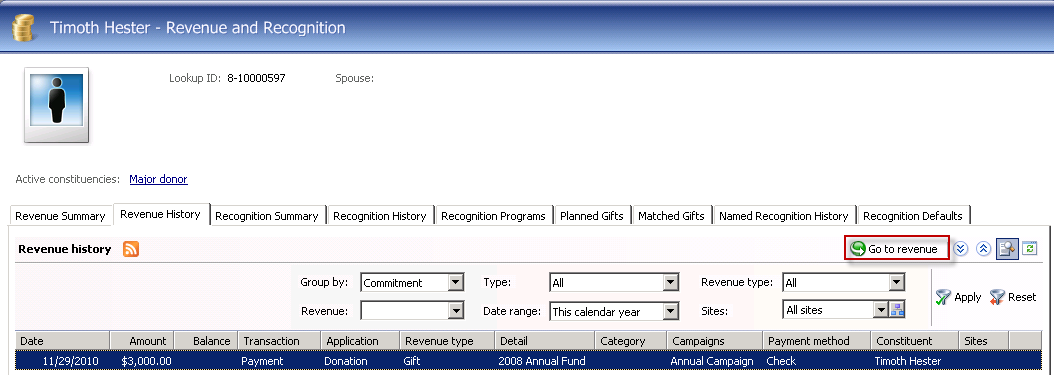
Click the Revenue and recognition action on the left side of the page. This takes you to the Revenue and Recognition page.
-
Select on the Constituent Revenue Information Page.
-
On the Revenue History tab, select a payment and click the Go to revenue action.
-
Place the shell into Design Mode.
-
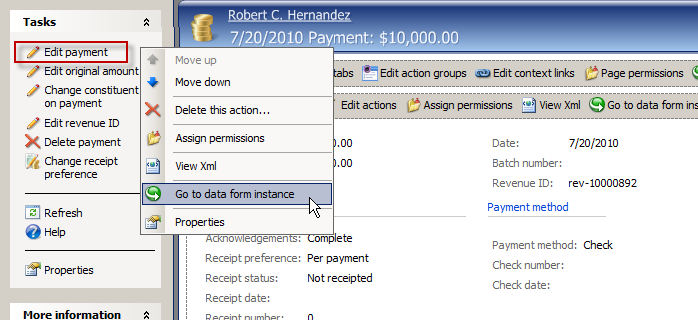
Right-click the Edit payment action on the left side of the Revenue Transaction page. Click the Go to data form instance action in the popup menu.
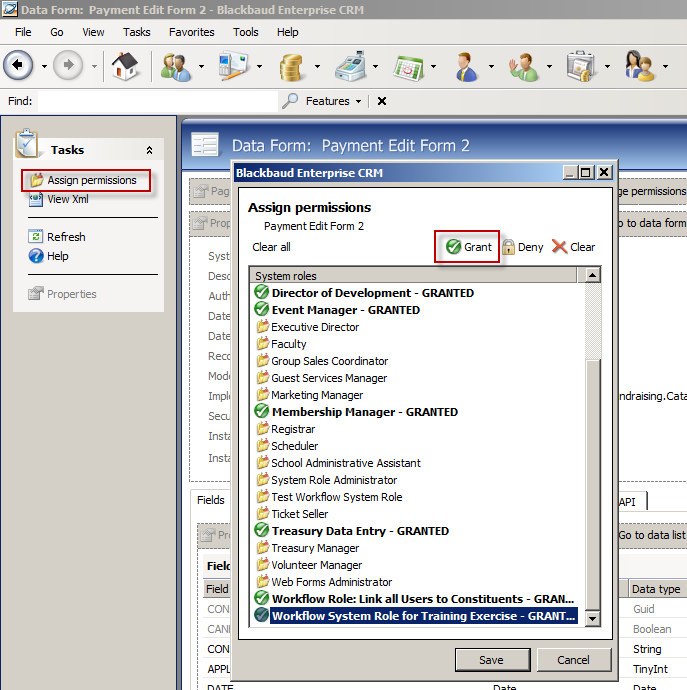
Step 3 - Permission the feature.
We can now see all the metadata for the Payment Edit Form 2 feature.
-
Click the Assign permissions action on the left side of the feature page.
-
Select the system role named Workflow System Role for Training Exercise.
-
Click the Grant action.
Step 4 - Add the "IIS AppPool\BBWFAutoStart" user to the new system role
The Infinity workflows that we author in Visual Studio 2010 run within the Blackbaud Workflow Service application (BBWF). BBWF is configured to run under an application pool (BBWFAutoStart). On a local install where SQL Server is on the same machine as the AppFabric server, this account is the local IIS AppPool\BBWFAutoStart user that was created when the BBWFAutoStart application pool was created. If SQL Server is on a separate server from the Blackbaud Workflow Service application (BBWF), then this account is the machine account of the AppFabric server.
SQL Server Login and Database User Account
When the Infinity database server was configured for Infinity workflow, a SQL Server login was created for the Application Pool account. If SQL Server is on the same machine as the workflow server, then this login is named IIS AppPool\BBWFAutoStart. A database user account by the same name was then added to the appropriate Infinity database for the SQL Server login.
Blackbaud CRM Application User
The Application Pool account will also connect to the application web service, so in addition to granting permissions for direct access to SQL Server, we also need to create an Application User in Blackbaud CRM. To create the Blackbaud CRM application user, a row was added to the dbo.APPUSER (application user) table that maps to the app pool user windows account SID. In the screen shots below, this application user is also named IIS AppPool\BBWFAutoStart. This is a standard, non-system administrator application user in the Blackbaud CRM. It shows up in the application as an application user so it can be added to workflow system roles as needed. The workflow service executes workflow services that connect via the web service API, so the permissions granted to this user vary based on the individual workflows that are defined.
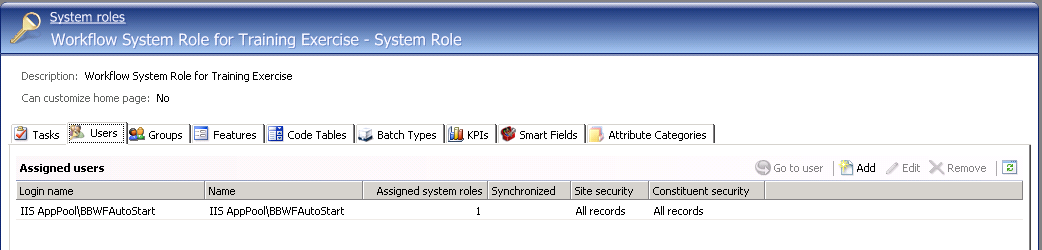
Since the IIS AppPool\BBWFAutoStart application user account needs permission to automate Infinity features, it is placed into a system role that is used to organize the workflow features. In the example below, the system role is named Workflow System Role for Training Exercise.
-
Navigate back to the Workflow System Role for Training Exercise system role.
-
Select the Users tab.
-
Add the IIS AppPool\BBWFAutoStart user to the workflow.
Step 5 - Bring the feature into the development environment.
Our next step is to move over to Visual Studio 2010 and bring the feature into the workflow designer.
-
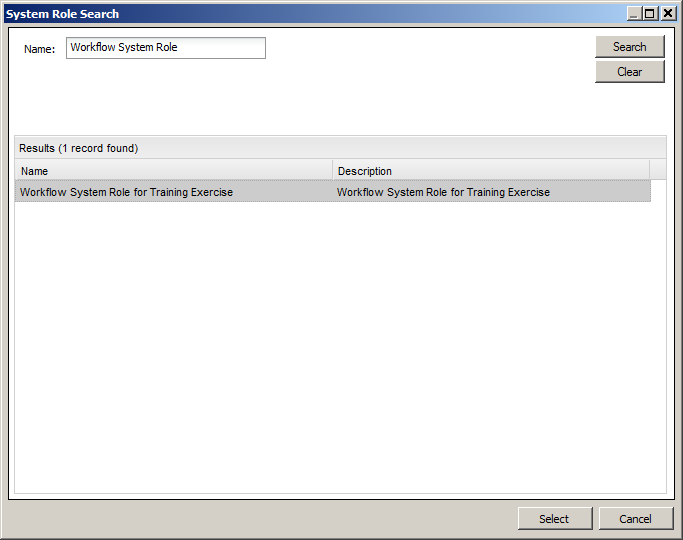
With the MajorGiving.xamlx workflow open, select Tools\Add System Role Activities from the main menu.

-
Use the System Role Search screen to search for the system role we created in the Step 1.
Note: Add System Role Activities is a helpful tool that comes with the Blackbaud Workflow Visual Studio 2010 Extension that is installed with Blackbaud.AppFx.Workflow.VSPackage.vsix, which is a Visual Studio 2010 extension deployment file. The Blackbaud.AppFx.Worfklow.VSPackage extension makes it easy to work with the specific activities you need to use for a given workflow because it allows you to quickly place activities from many different catalogs into a single tab on your Visual Studio 2010 workflow toolbox. Add System Role Activities helps us add some of the pre-built Blackbaud Workflow 4 activities that ship with the SDK as part of every out of the box feature catalog. In fact, more than 8000 activities are in the Blackbaud activity library. You can see these activity assemblies within your SDK\DLLReferences folder. The assemblies end with the name ".Activities.dll." To learn more about how to configure your Visual Studio 2010 development environment, see Preparing Your Visual Studio 2010 Development Environment for Infinity Workflow.
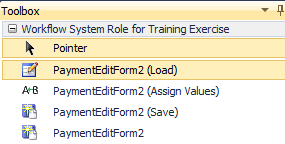
Within Visual Studio 2010, your toolbox should look like the following:
Step 6 - Add the BusinessActivity, Sequence, and PaymentEditForm2 workflow activities feature to the flowchart.
-
Open the flowchart within your MajorGiving.xamlx workflow designer.
-
Drag a Blackbaud BusinessActivity to the flowchart underneath the Large Gift BusinessActivity. This activity can be found within the Blackbaud Workflow Activities tab within the Toolbox.
-
Provide the following properties for the BusinessActivity:
Property Name
Value
DisplayName
Do Not Acknowledge
Description
Mark Revenue TX record as 'DoNotAcknowledge = True'
DetailLevel
High
-
Double click the BusinessActivity and drag a Sequence Activity inside of the BusinessActivity. The Sequence Activity can be found within the Control Flow tab within the Toolbox.
-
Drag the PaymentEditForm2 activity inside of the Sequence Activity.
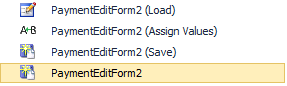
Tip: When you added the Payment Edit Form 2 Infinity feature to the system role and then added the feature into the Visual Studio 2010 development environment as a workflow activity, why did four activities appear within the Toolbox instead of a single workflow activity? In the figure below, we see four activities for a given edit data form. The PaymentEditForm2 activity allows us to retrieve the values to edit, provide a way to update the values, and then commit or save the values to the database, all in a single activity. The other three activities (Load, Assign Values, and Save) allow you to do the same thing, but you have the option to perform other operations/activities in between each activity. The PaymentEditForm2 (Load) activity only loads the data into a variable. After the data is retrieved, you are free to perform other activities within the workflow. You may then update the values at a later time with the PaymentEditForm2 (Assign Values) activity. You may then perform other activities and assign more values. Finally, you can save the values back to the database with the PaymentEditForm2 (Save) activity.
The PaymentEditForm2 retrieves the appropriate revenue transaction and allows you to set values and save the altered revenue transaction back to the database. This form needs the unique identifier for the revenue transaction. Fortunately, we provided the workflow with this ID. The value for the revenue ID resides within our inputformfieldRevenueID workflow variable. We can provide the value of this variable as the RecordID property within the PaymentEditForm2 workflow activity.
The DONOTACKNOWLEDGE property sets the appropriate flag on the revenue transaction. We should set this flag to True.
-
Provide the following properties for the InteractionAddForm2:
Property Name
Value
DisplayName
PaymentEditForm2
RecordID
inputformfieldRevenueID.ToString
DONOTACKNOWLEDGE
True
Navigate back to the Flowchart Activity and wire up the Blackbaud BusinessActivity below the Large Gift BusinessActivity.
Step 7 - Save, build, deploy, and test the changes to the workflow.
-
Save the MajorGiving.xamlx file.
-
Within the Visual Studio Solution Explorer, right-click the Blackbaud.CustomFx.MajorGiving.Workflow project and select Build in the popup menu.
-
Add a new individual and add a new payment of greater than the threshold.
-
In Blackbaud CRM, navigate to the Workflow functional area.
-
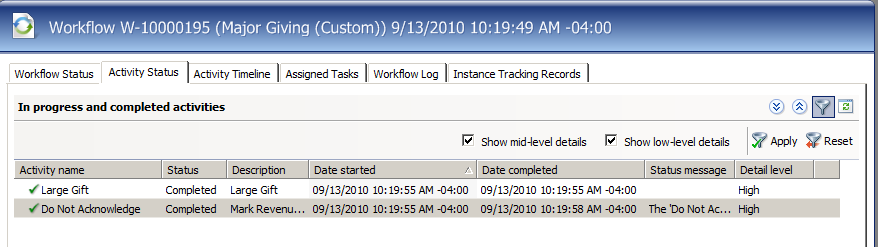
Search for the latest workflow instance and open the workflow instance page. On the Activity Status tab, notice the new Business Activity "Do Not Acknowledge."
-
Review the Activity Status, Activity Timeline, and Workflow Log tabs. Notice how the properties of the PaymentEditForm2 workflow activity impacted the workflow instance.