Exercise: Manually Trigger an Integrated Application Workflow from an Add Data Form
Next, we will build a "trigger" to start our workflow from within Blackbaud CRM. Specifically, when a particular data form is saved within the Infinity application, our workflow will automatically be triggered.
Most workflows require some kind of input parameterization. In other words, we need a way to get data from the Infinity application into the workflow. Our major giving workflow requires four pieces of data:
-
Constituent ID
-
Revenue ID
-
Amount
-
Amount Threshold
As we progress through the exercises, we will use the Constituent ID parameter to identify the constituent who added the payment and use the id to add things such as constituent notes, research requests, and prospect plans to the constituent record. We will also pull constituent data such as a person's name for descriptive messages within the workflow log and various comments.
We will use the Revenue ID parameter to edit the "Do Not Acknowledge" flag on the revenue transaction record and to pull revenue transaction information on a future "task landing" page.
We will use the Amount and Amount Threshold parameters for the future evaluation of a large gift within the workflow designer.
So we need a way to obtain the input parameters and route them to the workflow. It turns out that the Infinity platform already has a fairly well developed idiom for gathering input from a user to create a new instance of something, and that idiom is the "Add Form," a.k.a. "Add Data Form." So the workflow solution leverages this existing idiom as the mechanism to obtain input for workflow parameters. By using an Infinity SDK add data form, the author of a workflow can implement parameter validation using the standard techniques that are already familiar, including using UIModel and implementing custom logic using either SQL or a CLR implementation.
Some workflows will have minimal parameter validation or custom logic outside of the workflow logic itself, so for convenience there is a pre-defined CLR-based AddForm template (Workflow Start Add Data Form Template Spec ) specifically designed for use with workflow input parameters. For our example, workflow we will use this template.
Tip: There is a pre-defined AddForm template specifically designed for use with workflow input parameters named Workflow Start Add Data Form Template Spec. It is a CLR data form, meaning there is reference to a .NET class that lives within an assembly on the Infinity web server. The class is named Blackbaud.AppFx.Server.AppCatalog.WorkflowStartAddForm, and it expects a single parameter named BBWORKFLOWCATALOGSPECID that is the ID of the WorkflowSpec catalog item.
Instructions
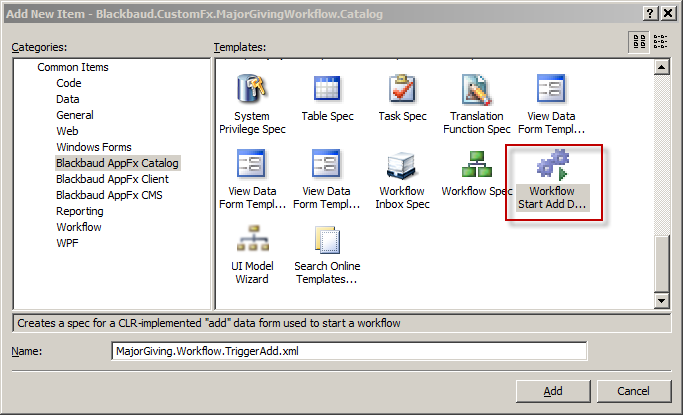
Step 1 - With our Visual Studio 2008 catalog project open, add the Workflow Start Add Data Form to the catalog.
-
Within Visual Studio 2008, right-click the catalog project and select Add\New item… from the popup menu.
-
Select the Workflow Start Add Data Form Template Spec template.
-
Name the spec: MajorGiving.Workflow.TriggerAdd.xml
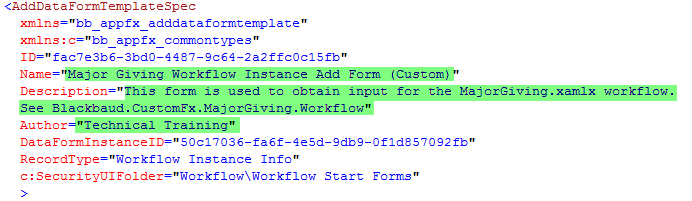
Step 2 - Provide values the Name, Description, and Author attributes.
|
Attribute Name |
Value |
|---|---|
|
Name |
Major Giving Workflow Instance Add Form (Custom) |
|
Description |
This form is used to obtain input for the MajorGiving.xamlx workflow. See Blackbaud.CustomFx.MajorGiving.Workflow |
|
Author |
Technical Training |
Step 3 - Provide the ID of the WorkflowSpec for the static parameter.
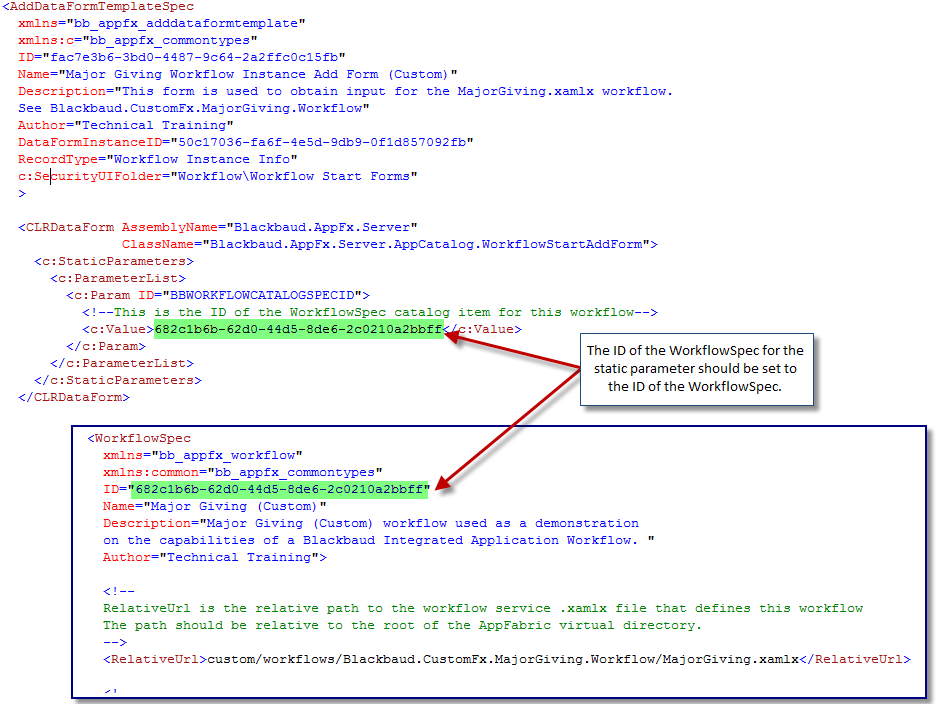
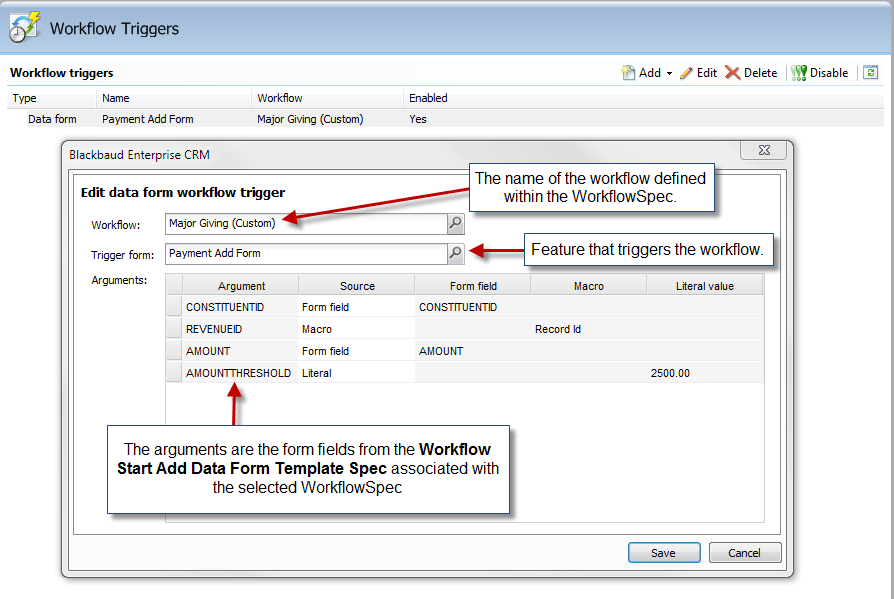
This is the ID of the WorkflowSpec catalog item for this workflow. This associates the WorkflowSpec with the data form. In a future exercise, you will configure a data form trigger within Blackbaud CRM; select the major giving workflow along with the "triggering" payment add data form. The form fields listed within this spec will be displayed as arguments within the workflow trigger data form. See below for a glimpse of how the future configured workflow trigger will look.
Step 4 - Define the form fields for the Workflow Start Add Data Form.
Now we need to define the metadata for the input parameters in the FormMetaData section of the Workflow Start Add Data Form.
|
Form Field ID |
Data Type |
|---|---|
|
CONSTITUENTID |
GUID |
|
REVENUEID |
GUID |
|
AMOUNT |
Decimal |
|
AMOUNTTHRESHOLD |
Decimal |
When you are done with this step, your add data form should look something like this. Note the form fields for each parameter into our major giving workflow. Note the SearchList child elements for the ConstituentID and RevenueID form fields.
<AddDataFormTemplateSpec
	xmlns="bb_appfx_adddataformtemplate"
	xmlns:c="bb_appfx_commontypes"
	ID="fac7e3b6-3bd0-4487-9c64-2a2ffc0c15fb"
	Name="Major Giving Workflow Instance Add Form (Custom)"
	Description="This form is used to obtain input for the MajorGiving.xamlx workflow.
  See Blackbaud.CustomFx.MajorGiving.Workflow"
	Author="Technical Training"
	DataFormInstanceID="50c17036-fa6f-4e5d-9db9-0f1d857092fb"
	RecordType="Workflow Instance Info"
	c:SecurityUIFolder="Workflow\Workflow Start Forms"
	>

  <CLRDataForm AssemblyName="Blackbaud.AppFx.Server"
               ClassName="Blackbaud.AppFx.Server.AppCatalog.WorkflowStartAddForm">
    <c:StaticParameters>
      <c:ParameterList>
        <c:Param ID="BBWORKFLOWCATALOGSPECID">
          <!--This is the ID of the WorkflowSpec catalog item for this workflow-->
          <c:Value>682c1b6b-62d0-44d5-8de6-2c0210a2bbff</c:Value>
        </c:Param>
      </c:ParameterList>
    </c:StaticParameters>
  </CLRDataForm>

   <!-- define the metadata for the input parameters in the FormMetaData section of the spec-->
  <c:FormMetaData FixedDialog="true">
    <c:FormFields>
      <c:FormField FieldID="CONSTITUENTID" Caption="Constituent" DataType="Guid" >
        <c:SearchList SearchListID="23c5c603-d7d8-4106-aecc-65392b563887" EnableQuickFind="true"/>
      </c:FormField>

      <c:FormField FieldID="REVENUEID" Caption="Revenue" DataType="Guid"  >
        <c:SearchList SearchListID="78e403c2-f4d6-482e-a9f4-f53c5b3c8740" EnableQuickFind="true"/>
      </c:FormField>

      <c:FormField FieldID="AMOUNT" Caption="Amount" DataType="Decimal" />
      <c:FormField FieldID="AMOUNTTHRESHOLD" Caption="Amount Threshold (Integer)" DataType="Decimal"/>

    </c:FormFields>
  </c:FormMetaData>
</AddDataFormTemplateSpec>
Step 5 - Save and load the Workflow Start Add Data Form: Major Giving Workflow Instance Add Form (Custom).
Step 6 - Update the Workflow spec with the instance ID of the Workflow Start Add Data Form.
The WorkflowStartInputsForm element indicates the ID of an add data form that starts the workflow.
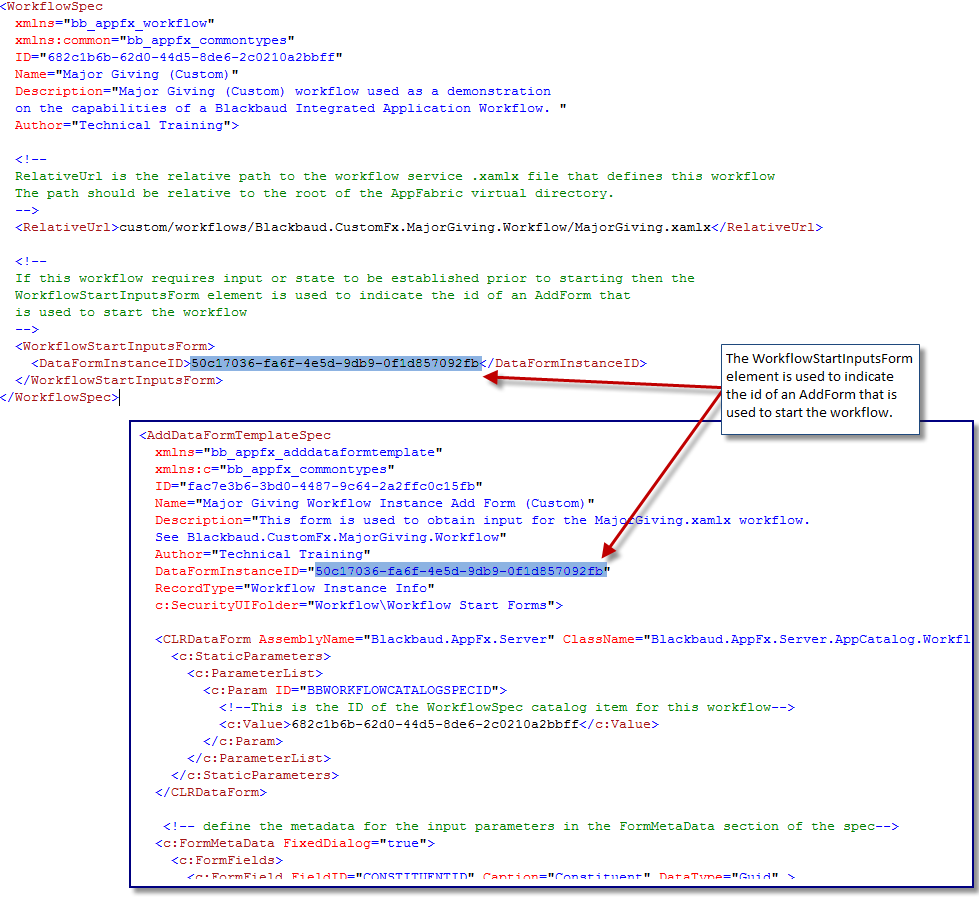
Step 7 - Save and re-load the changes to the WorkflowSpec: Major Giving Workflow (Custom).
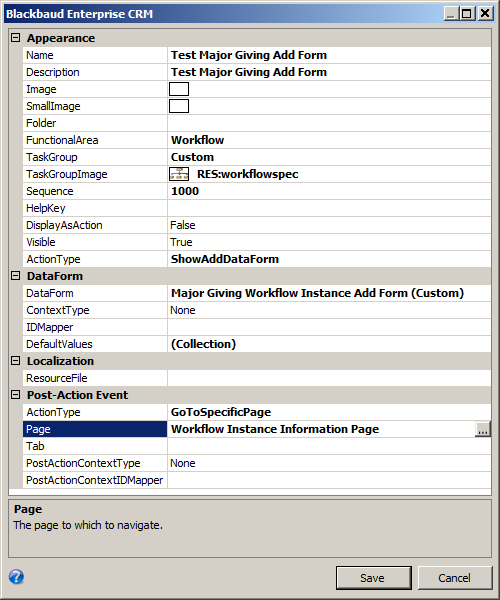
Step 8 - Create a temporary task to test the Workflow Start Add Data Form and Workflow spec.
-
Using Shell Design, create a new task in the Workflow functional area to open the Workflow Start Add Data Form and then navigate to the Workflow Instance Information page using the task's Post-Action Event.
This task can be removed after we wire up a trigger to our workflow in future exercises.
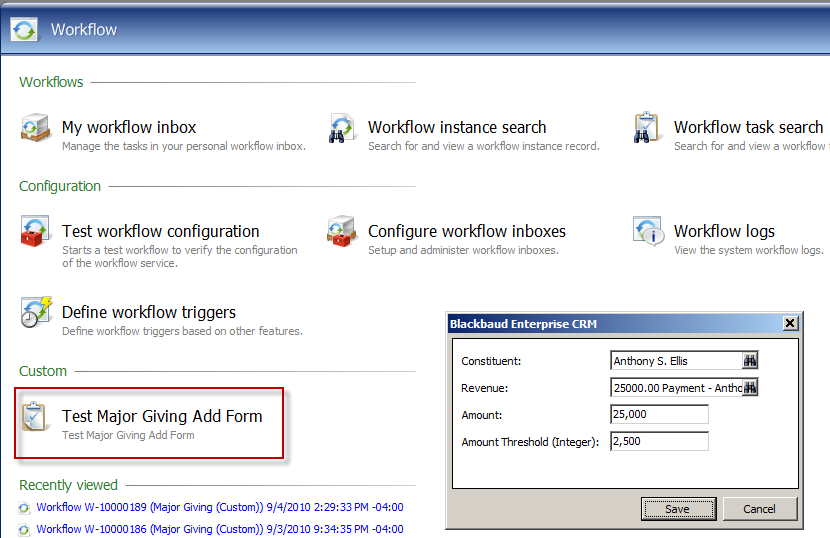
-
After you create the task, refresh shell navigation and test the new task. Find a revenue transaction and note the constituent associated with the revenue transaction. Enter values for the constituent, revenue transaction, amount and amount threshold.
-
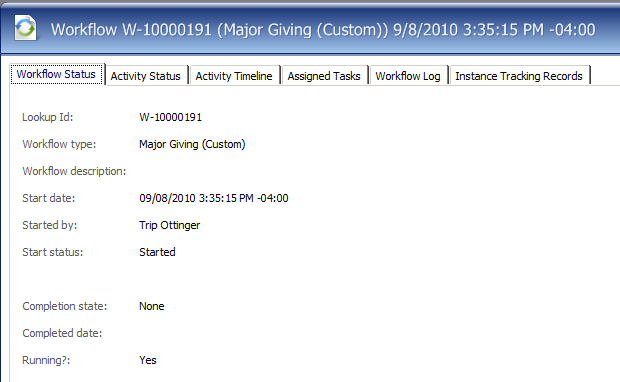
Click the Save button to launch the major giving workflow instance.
If all goes well, you should be redirected to the workflow instance page.
Our application is now hooked up to our workflow, albeit from a simple task that we "trigger" manually. In future exercises, we will trigger the workflow by configuring a new Workflow Trigger followed by building out the workflow to implement the necessary functionality.