Add Social Sharing icons with a Social Sharing Component:
Open your web page in the WYSIWYG content editor.
Tip: In TeamRaiser, go to an event's Customize Pages section, click Configure, and scroll down to the WYSIWYG Content Editor.
Click the Components
 icon.
icon. In the Component Type list, click Social Media.
In the Component list, click Social Sharing.
In Share Setup, enter the following information:
Type of Sharing Component - (Optional) Enter a label for this component to group it with similar components so you can track the component use in reports.
Text Displayed As the Label for the Sharing Component on Your Site Page - For the words to display with your component, either accept the default "Share with Friends in" wording, or change the wording to your preferred text.
Default Text to Display in the Comment Section of the Post on Social Media Page - (Not supported by Facebook posts) Leave the field blank or add a phrase to display in the Comment area of a post when the constituent clicks the component. The constituent may overwrite this comment with their own words.
Description to Display on the Social Media Page Post (Facebook only) Either choose the default, or enter a Custom phrase or statement that you want displayed in the post on a Facebook page.
Click the Links and Images tab.
In the Image Information area, to include a picture on the Facebook post do the following:
URL of the Image to Display on a Facebook Post - (Optional) Enter the URL where the image file is located.
Note: This image does not need to be in a secure location.
URL of the Page Displayed when the Image Link is Clicked on Social Media Page Post - Either:
Leave the default option selected to link back to the page where the component is placed.
Click the second button and enter the URL of the page that should display in the field provided.
In the Action Link Information area, to change the default text displayed as the action link on Facebook and LinkedIn posts:
For Text to Display as the Action Link on Facebook and LinkedIn Posts, optionally enter the text you want to display as an action link that people can click for this post.
For URL of the Page to Display When the Action Link is Clicked on Facebook and LinkedIn Posts - Either:
Leave the default option selected to link back to the page on which the component is placed.
Click the second button and enter the URL of the page to display when the action link is clicked in the field provided.
In the Link Back Information area:
For Text to Display in the Title Section, optionally enter the text you want to display as the title of the post, which people can click to go to a page on your site (except in a Tweet)
For URL of the Page to Display When the Title of the Post is Clicked - Either:
Leave the default option selected to link back to the page on which the component is placed.
Click the second button and enter the URL of the page to display when this link is clicked in the field provided.
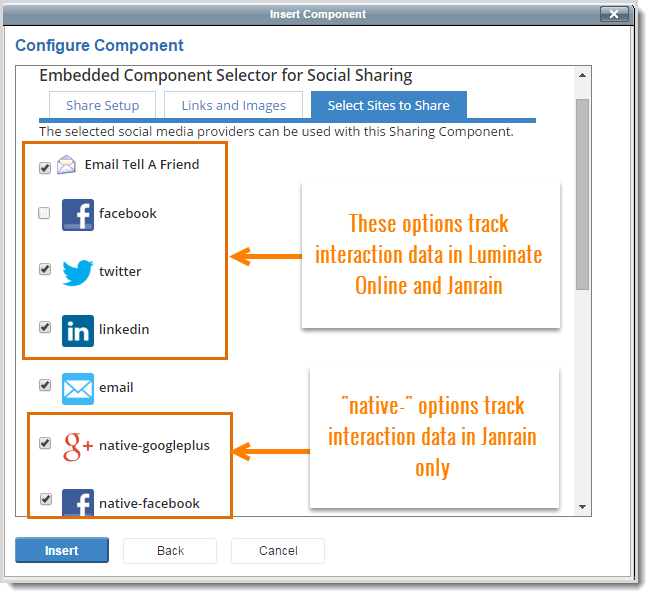
Click the Select Sites to Share tab.
Select social sites to display as "share" icons.
Note: Both Luminate Online and Janrain native widgets display in this window. Janrain widgets are called "native-social provider." Choose only one option for each social provider. Selecting two options for a social provider will cause two share icons to display. Due to a change in Facebook functionality, choose the native-facebook option for Facebook sharing.

Tip: The difference between Email Tell A Friend and Email is that Email triggers an email provider, such as Gmail.
Click Insert. The source for the component displays in the content area.
Note: If you are in the Plain Text Editor, the inserted component string often displays on the bottom line of the file. You must scroll down, copy the line, and paste it in the correct place.
Click Finish.
