Add New Prospects
The Prospective Admin Outreach feature can be used to invite individuals to become nonprofit administrators for their organizations.
Tip: If you're inviting multiple prospects, you can use the Import Prospects tool to upload them in bulk. Prospects are also added automatically when a Vetting Request is created.
-
Navigate to the Nonprofit Management > Prospective Nonprofit Administrators area.
-
Click on the New Prospect tool.
-
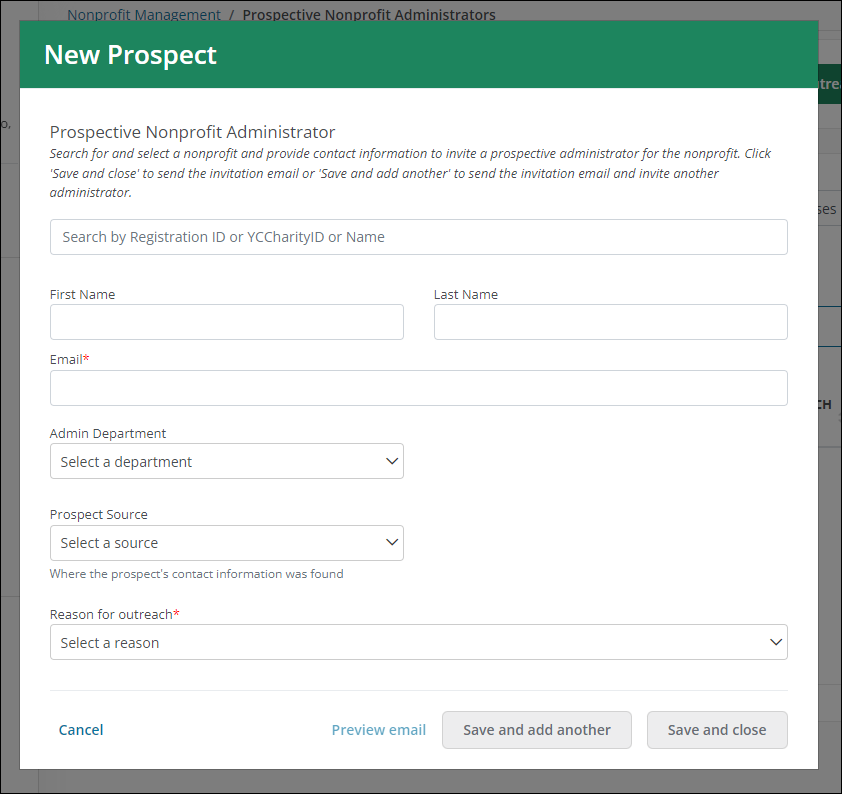
In the New Prospect screen, provide the following information.
-
Search for and select the nonprofit that the individual belongs to. You can search by their Registration ID, YC Charity ID, or Name.
-
Optional - Enter the prospect's name.
-
Enter their email address.
-
Optional - Specify the Admin Department the prospect works in.
-
Optional - Select the source of the prospect's contact information from the Prospect Source dropdown.
-
Select a reason for outreach - Stranded Funds, Compliance, Returned Payment, or Registration.
Note: The reason specified determines the type of email sent to the prospect.
-
-
After adding the prospect's information, you can take one of the following actions to continue:
-
Preview email - Open a preview of the email that will be sent to the prospect in a new modal.
Note: For more information about the emails that are sent for each outreach reason, see Preview Outreach Emails.
-
Save and add another - Save the prospect and send the invitation email to the email address provided. Once sent, you'll return to the New Prospect screen to add and invite another prospect.
-
Save and close - Save the prospect and send the invitation email to the email address provided. Once sent, you'll return to the Prospective Nonprofit Administrators page.
-
Frequently asked questions (FAQs)
 What's the Admin Department ID?
The Admin Department ID indicates the department in which the individual works at their organization.
| ID | Name |
|---|---|
| 1 | Finance |
| 2 | Marketing |
| 3 | Development |
| 4 | Human Resources |
| 5 | General Administration |
| 6 | Legal/Compliance |
| 7 | Giving/Fundraising/Corporate Grants |
| 8 | Volunteering |
| 9 | Other |
Tip: This ID can be included in the Outreach Import File when importing prospects in bulk. You can find them by clicking on the Download Admin Departments link in the Import Outreach screen. Likewise, it can be selected in the New Prospect screen when adding prospects individually.
What's the Outreach Reason ID?
The Outreach Reason ID specifies the purpose of contacting the individual and their organization. This is required as it determines the type of outreach email that's sent.
| ID | Name |
|---|---|
| 84 | Stranded funds |
| 86 | Compliance |
| 87 | Returned Payment |
| 88 | Registration |
Tip: This ID must be included in the Outreach Import File when importing prospects in bulk. You can find them by clicking on the Download Outreach Reasons link in the Import Outreach screen. Likewise, it must be selected in the New Prospect screen when adding prospects individually.
What's the Prospect Source ID?
The Prospect Source ID denotes where the individual's contact information originated from. This is optional.
| ID | Name |
|---|---|
| 1 | Online Search |
| 2 | Organization's website |
| 3 | Provided by client/donor |
| 4 | Organization contacted support |
| 5 | Tax Return |
| 6 | 3rd Party (Candid, other charity databases) |
| 7 | Provided by other contact charity |
| 8 | Other |
Tip: This ID can be included in the Outreach Import File when importing prospects in bulk. You can find them by clicking on the Download Prospect Sources link in the Import Outreach screen. Likewise, it can be selected in the New Prospect screen when adding prospects individually.