Download donations and gifts from Luminate Online
Tip: As a best practice, process constituents first because you can only accept Luminate Online gifts for constituents that already exist in Raiser's Edge. To avoid transaction duplications, reload the plug-in or click Refresh in Gifts and Registrations before processing gifts or transactions.
-
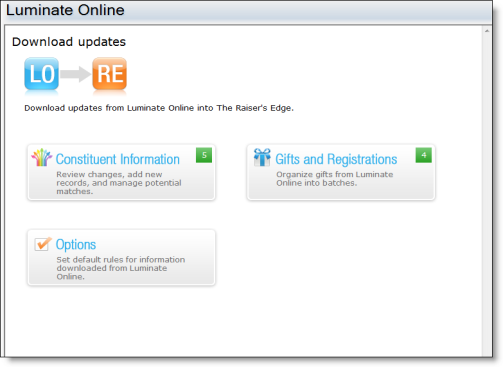
From the Raiser's Edge home page, click Luminate Online on the navigation bar.
-
Click Gifts and Registrations.

Tip: Every new donation received through Luminate Online displays in the Gifts and Registrations tab. To organize your donations, select Filters and choose an option such as date range, payment type, appeal, fund, event, or tribute.
Tip: Before you can process gifts, you may need to include required fields such as bank information for Direct Debit gifts and Tribute linking for Tribute Gifts.
-
In the Gifts and Registrations tab, select the gift to download. The gift information displays in the Record Linking tab.
Tip: When you select a gift, the gift information is locked so no other user can attempt to download or reject the information at the same time.
-
In the Constituent Linking grid, the constituent who gave the gift displays. To view the constituent record, select Open Constituent.
-
(Optional) Under Constituent Code, select a constituent code to apply to the constituent when the gift is processed, such as a special code that you want to track.
-
-
Review the Fund Linking grid to see the fund to which the gift will be applied. Online Data shows the Luminate Online fund, and Linked Funds shows the associated Raiser's Edge fund. If the gift should be applied to a different fund, such as to link a write-in fund from Luminate Online to the appropriate fund in The Raiser's Edge, click Find Funds to search for and select a different fund.
Tip: Changes to the fund need to be done in the batch.
-
Repeat these steps for the other gift records. When you have reviewed your records and are ready to create a batch and process, check the check boxes of the gifts (or select Select All), then select Bulk Processing on the left side of the toolbar.
Note: If any changes were made to the constituent information, such as updated address information when the donation was made in Luminate Online, a screen displays to ask whether to process those changes before the gift batch is created. When you click Yes, the Constituent screen displays to review and accept the changes. To accept the changes, select the rows to update in the Process column, and click Save and Close on the toolbar. You return to the Donations and Gifts screen.
-
Click Yes. A gift batch is created, and a confirmation message appears.
-
Click Yes to view the gift batch.
-
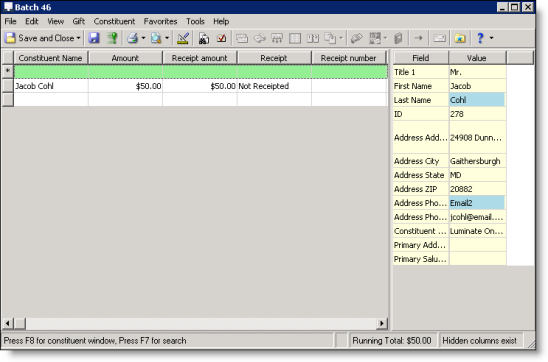
From the Batch screen, you can edit gift information, such as amount, receipt amount, and fund.
-
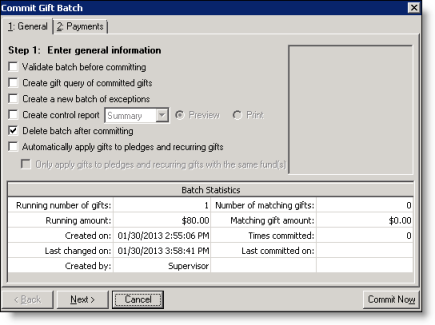
Click Commit.
-
On the General tab, make selections such as validating and create a batch of exceptions, or create a control report.
Tip: For more information about the items on this screen, see the Batch Guide.
-
Click Next.
-
On the Payments tab, indicate how to process pledge payments and membership dues if you have the membership module.
Note: For more information about the items on this screen, see the Batch Guide.
-
Click Commit Now. If you validate, then a validation screen appears. If there are no exceptions, click Commit Now again.
-
Click Exception Report to view any exceptions in the batch. If there were no exceptions , click Close. You return to the Gifts and Registrations screen.
Tip: You can also download donations and gifts into Raiser's Edge with bulk processing. From the Donations and Gifts screen, select the gifts to process on the Gifts tab, and click Bulk Processing on the toolbar. The Bulk Processing screen displays. Click Process Now. A gift batch is created that includes each gift you selected. For information about bulk processing, see the Batch Guide.