Product Update Briefing
Raiser's Edge NXT: November 2023
Details about the "Available now" capabilities discussed in the October 2023 Product Update Briefing are below. For the functionality described as "Coming soon," be sure to check What's New to learn when these features release.
Note: Any "coming soon" references in the feature descriptions or blog posts below are historical.
Sky Developer
Constituent Management
Previously, duplicate detection only used a proprietary algorithm to determine the likelihood that records were duplicates. Raiser's Edge NXT now augments this process with artificial intelligence — specifically, machine learning — to further refine the proprietary algorithm, improving the insights based on which records customers mark as duplicates through the web view.
For information about how to compare possible duplicates and decide whether to merge them, see Possible Duplicates.
Donation Forms
Now you can use a donation form as the source of a website component, and display the progress of a fundraising goal or a key metric for donations received through the form. When you set a donation form as the source of a website component, the total amount updates shortly after the donation is processed in the form, making it quicker than when the gift list is the source of the website component.
Donor cover fees are included in the website component's total amount. Changes made to the donation after the initial transaction, such as a refund, are not reflected in the total amount. For more information, see Fee Coverage.
For recurring gifts, only the first gift is included in the total amount.
To set a donation form as the source of a website component, from Tools, Donation form designer, select Website components under Related Links. Edit an existing website component or select New to create a new one. Under Source, select Donation form, and select an existing donation form. For more information, see Website Components.
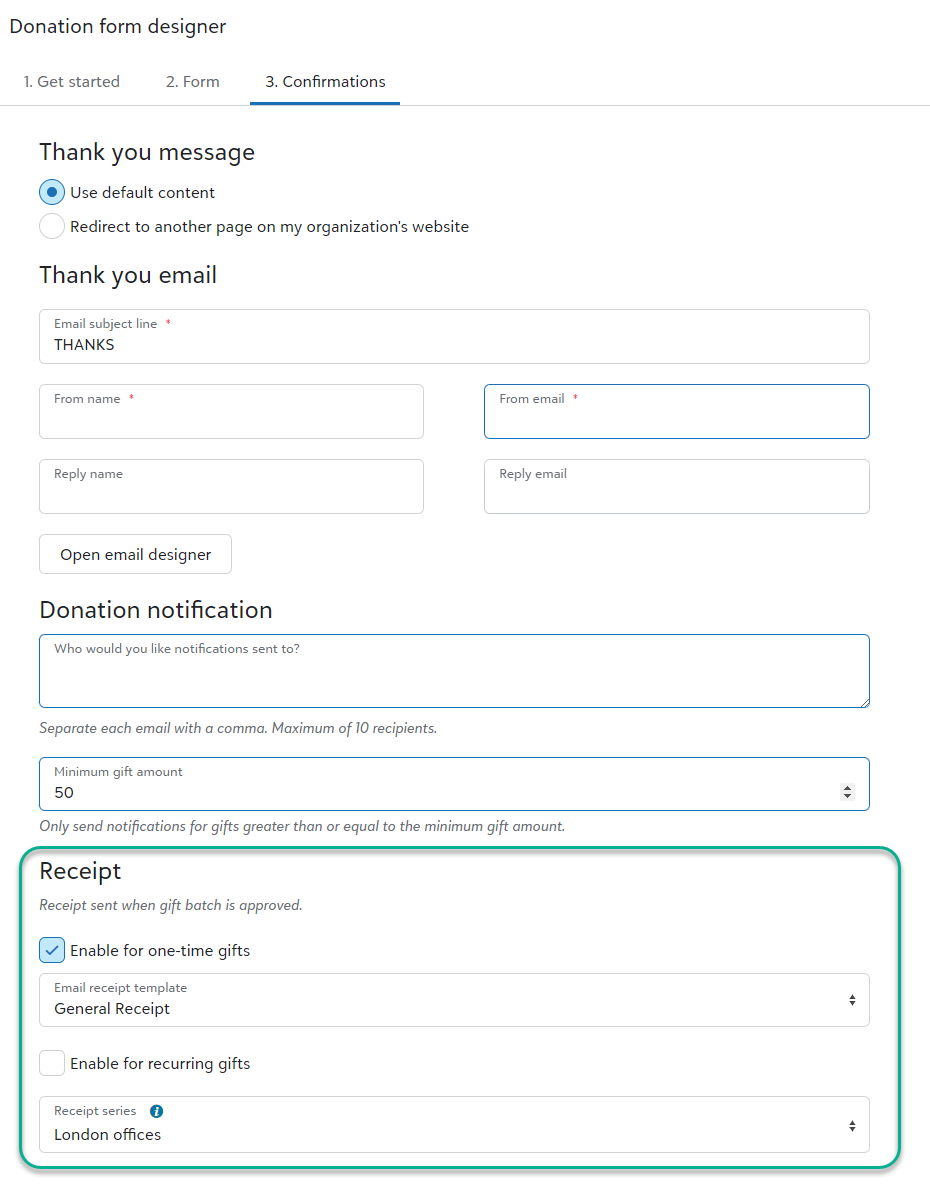
As part of ongoing improvements to the receipting process, you can now set up your donation forms to send receipts to donors. After you approve donation batches from Gift management, Raiser's Edge NXT generates the receipts and emails them to donors.
Receipts for gifts that come in through donation forms include the same receipting functionality as gifts entered in the web view. For example, you can track receipt history, cancel and duplicate receipts, and set up receipt series. For an overview of all the gift receipting capabilities, see Gift Receipting.
To send receipts from donation forms, navigate to Tools, Donation form designer, and add or edit a donation form. Under Confirmations, choose to send receipts for one-time gifts, recurring gifts, or both. Then select an email receipt template for each gift type. Next, select a receipt series to apply a numbering system and prefix to the receipts. For more information, see Donation Forms
To help you raise more and build trust during a recurring gift upsell, the highest amount button in the prompt respects font and color changes made to the Payment button in the Form designer. From Tools, Donation form designer, create or edit form with recurring gift upsell. Under Form, select Payment button under Style in the Form designer.
For more information, see Recurring Gift Upsell.
Now, when donors give recurring gifts through donation forms, you can let them select an end date before processing the payment. From Tools, Donation form designer, create or edit a form. Under Form, select Click to edit on the gift amounts. Under Recurring, select Enable recurring gift end date.
For more information, see Donation Form Gift Options.
To increase revenue for your mission, Blackbaud Checkout now presents a fee cover option to those who pay for their recurring gifts by credit card through a donor cover or Complete Cover-enabled donation form. Future recurring gift payments include the covered amount.
To enable a fee cover on donation forms, from Tools, Donation form designer, create or edit a form. Under Get started, Payment processing, select a payment configuration in the Process payments with field. Next, select how you would like to cover fees for the form under Fee coverage. For more information, see Donation Forms.
To cancel the covered amount from future recurring gift payments, go to the recurring gift record and select Amend gift amount. Unmark the fee coverage option from future payments. For more information, see Recurring Gift Amendments.

Now, when the lowest amount offered on the upsell prompt for a donation form is less than the minimum amount for recurring gifts, it defaults to monthly gift amounts based on the minimum. Previously, the prompt wouldn't appear to donors when the lowest amount was below the minimum recurring gift amount.
Now, you can add gift custom fields to your donation forms. Previously, you could only add constituent custom fields. We also made an enhancement to the location of custom fields in Form designer. To add custom fields to a form, from Tools, Donation form designer, create or edit a donation form. Under Form, move Custom fields from Fields in Form designer to a location on the form. For more information, see Fields.

Donors with Apply Pay enabled devices can now use Apple Pay through Blackbaud Checkout for one-time gifts on embedded donation forms. Previously, they could only use Apple Pay on standalone forms.
To display Apple Pay as an option, you must complete a verification process on your website. For more information, see KB 201611.
Note: To display Apple Pay on donation forms already embedded on a web page, copy the form's HTML and embed the code again.
Now when you access a donation form, either from All donation forms under Related Links or from Recently Accessed, you can copy the HTML code, the URL, and download the QR code under Share form. Previously, these actions were under Publish in the donation form designer. For more information, see Donation Forms.

To organise your fundraising tools together, we moved Website components to Donation forms designer, Related links. Don't worry, all your existing website components are safe. For more information, see Website Components.

For organisations that use naming conventions for their fund names, such as GO2023 for the 2023 general operating fund, you can now label the funds with donor-friendly names on donation forms. You can also sort the funds alphabetically or set your own order by moving them where you would like.
From Tools, Donation form designer, edit or create a form. Under Get started, select more than one fund. Next, under Form, select Click to edit on the fund field on the form and make your selections.
For more information, see Donation Form Designations.

The table field type is now available in constituent custom fields for donation forms. To add custom fields to a form, from Tools, Donation form designer, create or edit a donation form. Under Form, move Constituent custom fields from Donor information in Form designer to a location on the form.
If the custom field enables donors to select multiple responses because Allow 1 per Record isn't set for the field in the database view, responses display as checkboxes.

If the custom field is set to only allow one per record in the database view, responses display as a single-select dropdown.

For more information, see Donation Form Donor and Gift Information.
Note: To configure and add new custom fields in the database view, from Configuration, select Attributes. After you configure an attribute or custom field, you can add it to donation forms. If a field is set to only allow one per record, any existing data in the field is overwritten. For more information, see Custom Fields.
Event Management
To identify which host participants purchased different types of tickets, such as golf foursomes or parking passes, you can now filter the participant list by fee.
From Events, open an event record. Under Participants, select Work with participants and then select Filter , Fees under Fees and payments. Next, select Fees and choose whether to include participants who purchased any fees, specific fees, or no fees.
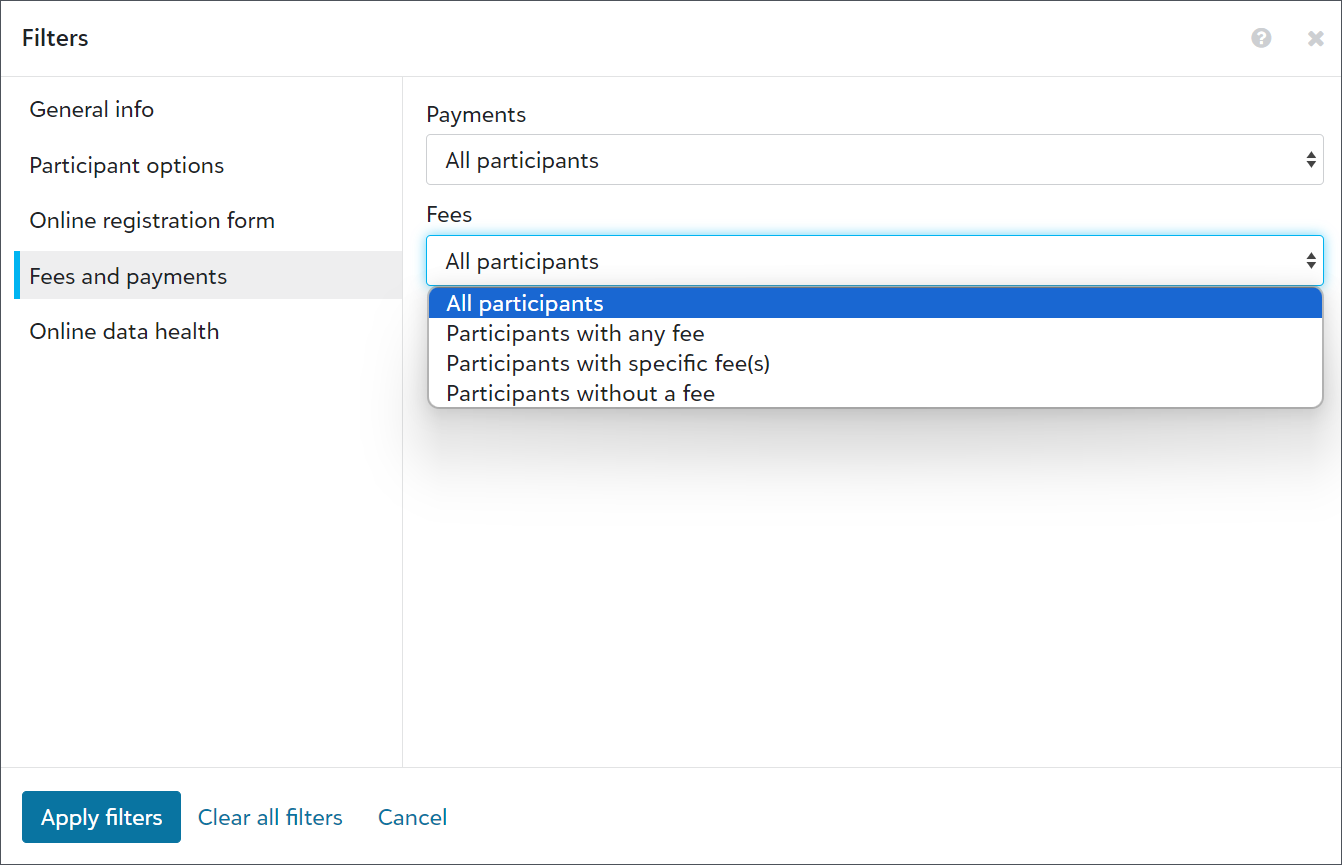
Note: Previously, you could only filter fees by participants who paid or had open balances, and the results were displayed in the Registration fees column. To prevent confusion, the Registration fees column and filter now display as Payments.
To view or export fees, and the number each host participant purchased, select Columns , Fees from the participant list.
Note: Exports include columns for all fees, regardless of whether participants purchased them. They also display amount and quantity columns to help you determine how many people signed up and how much they paid.
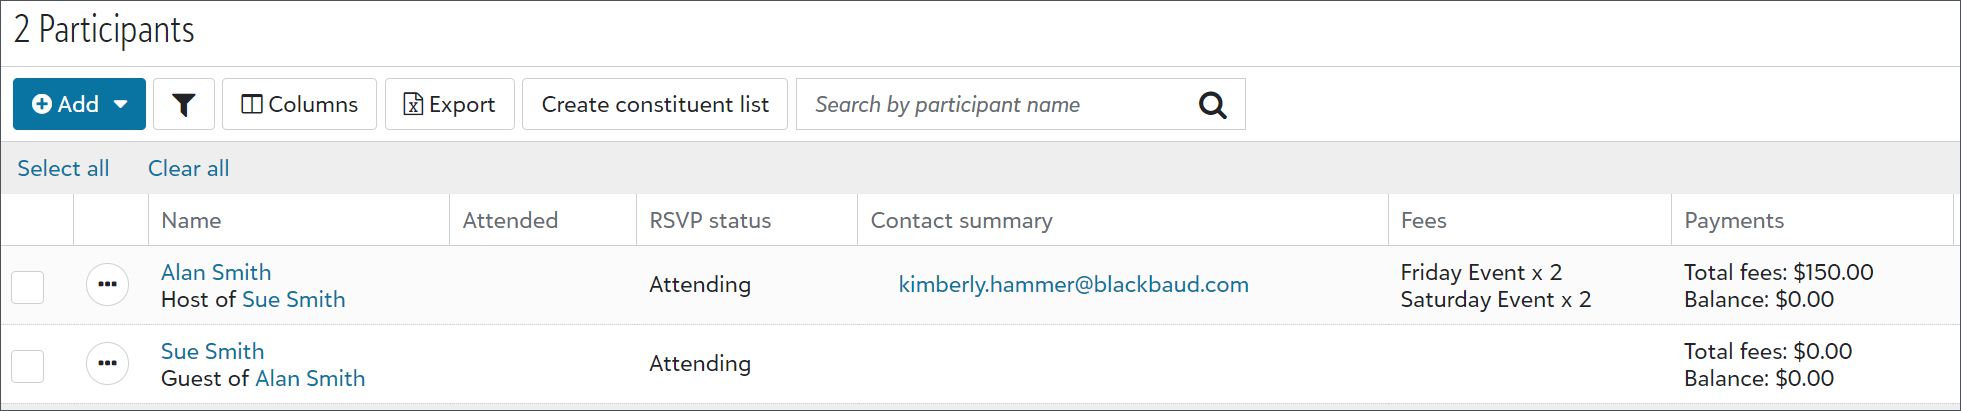
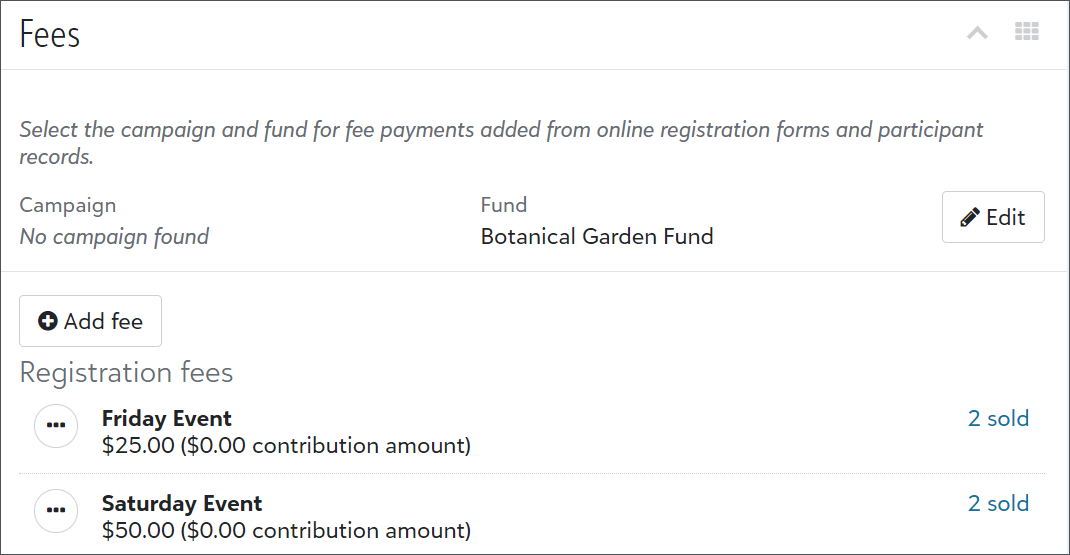
Also, from an event record, under Fees, you can select the number sold for each fee to view a pre-filtered list of participants who purchased tickets.
To remove a guest from a registration group so they can host their own separate group, you can now change a guest to a host participant. For example, if a constituent is signed up as a guest, but later decides to sign up to bring their own guests, you can change their registration status and add guests to their record.
From an event record, under Participants, select Work with participants. From the list, find the guest and select Change to host from the participant’s menu  . Then from their participant record, select Add guest under Party information.
Note: You can only change a guest to a host if the guest has a constituent record. If a guest is a named guest and not a constituent, you must first select Change to constituent from the participant’s menu and then select Change to host.
Tip: To resolve situations where a participant is a constituent and a named guest for an event, you can sort the participant list by name and then follow up with the hosts to learn how they want to apply the extra registrations, such as toward other participants or as donations.
Gift Management
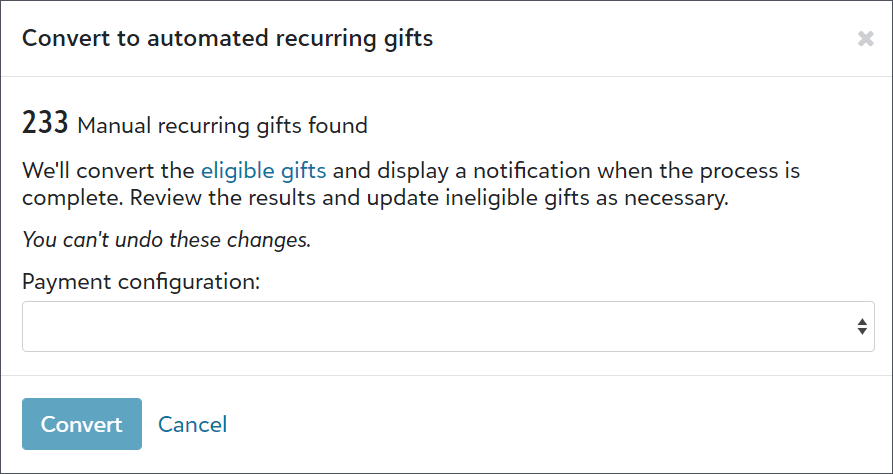
To help you easily change your manual recurring gift process in the database view to automated processing in the web view, you can now bulk convert recurring gifts. Previously, you individually identified the gifts and converted them from their gift records in the web view.
From Control panel, Settings, select Gift management. Under Automate manual recurring gifts, select Get started to identify all the manual recurring gifts in your database. Next, select Convert to convert the eligible gifts. When the process is complete, Raiser's Edge NXT displays a notification in your top-level navigation ![]() so you can review the results.
so you can review the results.
For details about which gifts are eligible for conversion, see Automate Manual Recurring Gifts.
You can now add stock/property gifts when you add single gifts in the web view. Previously, you could only add them in the database view. These gifts can be stock certificates, land, or estates which your organisation may choose to keep or sell.
To add a stock/property gift, you can choose whether to add the gift from the constituent's record, from Fundraising, Gift management, or Home, Add gift. For more information, see Gifts.
In response to customer feedback, we updated donation forms to no longer require split gifts when you allow donors to cover transaction fees. Previously, when you used donor cover, you selected a fund for fees. Raiser's Edge NXT now, by default, uses the gift fund for fees.
Note: If you previously selected a fund and prefer to stop splitting gifts, clear the fund from Control panel, Settings, Gift management, Donor cover designation. Otherwise, Raiser's Edge NXT will continue to use the selected fund for fee coverage amounts.
Tip: For information on how the fees are calculated, see this Knowledgebase article.
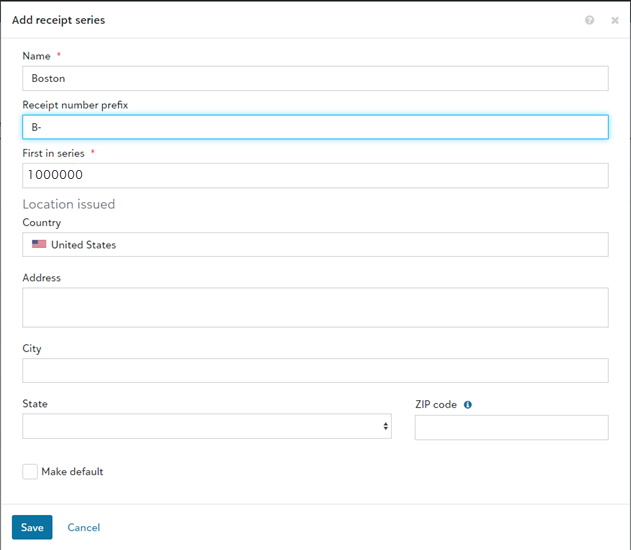
Receipt series is new tool to organise your receipts and view historical receipt data in one place. You can group your receipts together into a series by giving them a prefix and a numbering system. Under Fundraising, Gift receipting, Receipt series, a default receipt series is provided with a starting receipt number. Select Edit on its menu to change its name, prefix, and starting receipt number.
Note: The first receipt number in the default receipt series is 1000000.
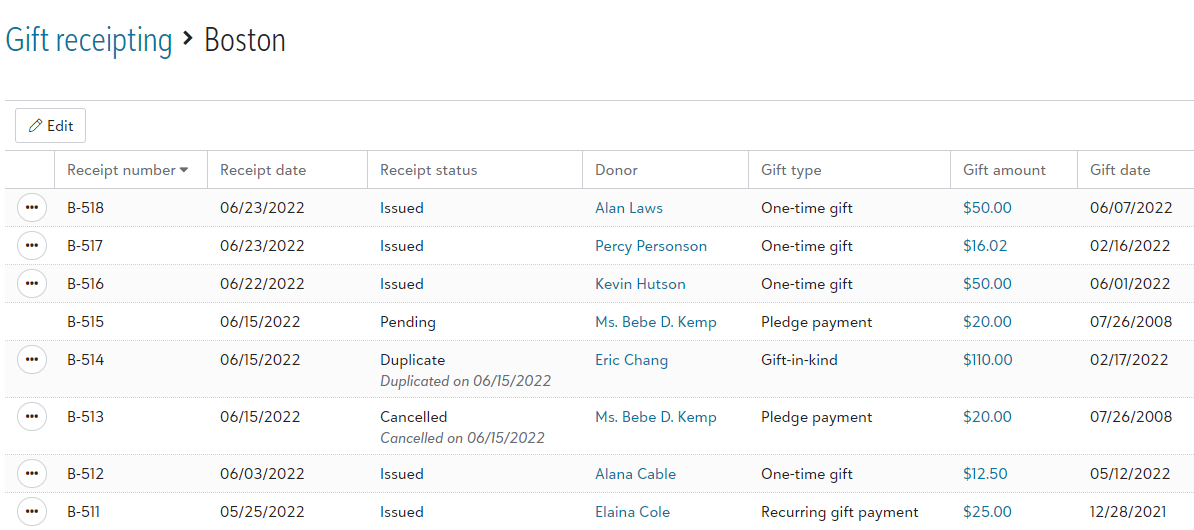
After you've generated receipts in the series, you access the receipt series to see all the receipts listed chronologically by the receipt date.
Tip: If your organisation has multiple offices or locations, you can use receipt series to track where each of your receipts were issued from. For example, if you have offices in New York and Los Angeles, you can create separate receipt series that use the prefixes NY- and LA-. You can even set a different starting receipt number for each location. To create additional receipt series, under Fundraising, Gift receipting, Receipt series, select New.
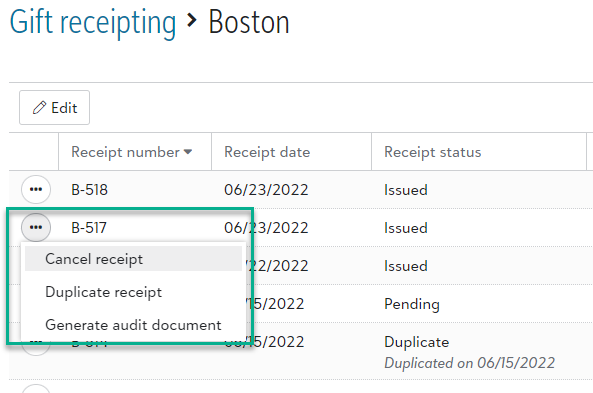
When viewing the list of receipts in a receipt series, select a receipt's menu to
-
Cancel receipt to void the receipt and remove the receipt number from the receipt series.
Tip: Canceled receipts are marked Not receipted and can be receipted again.
-
Duplicate receipt to send the receipt again with the same receipt number and date.
-
Generate audit document to create a PDF copy of the receipt for your organization's auditor.
For more information, see Receipt Series.
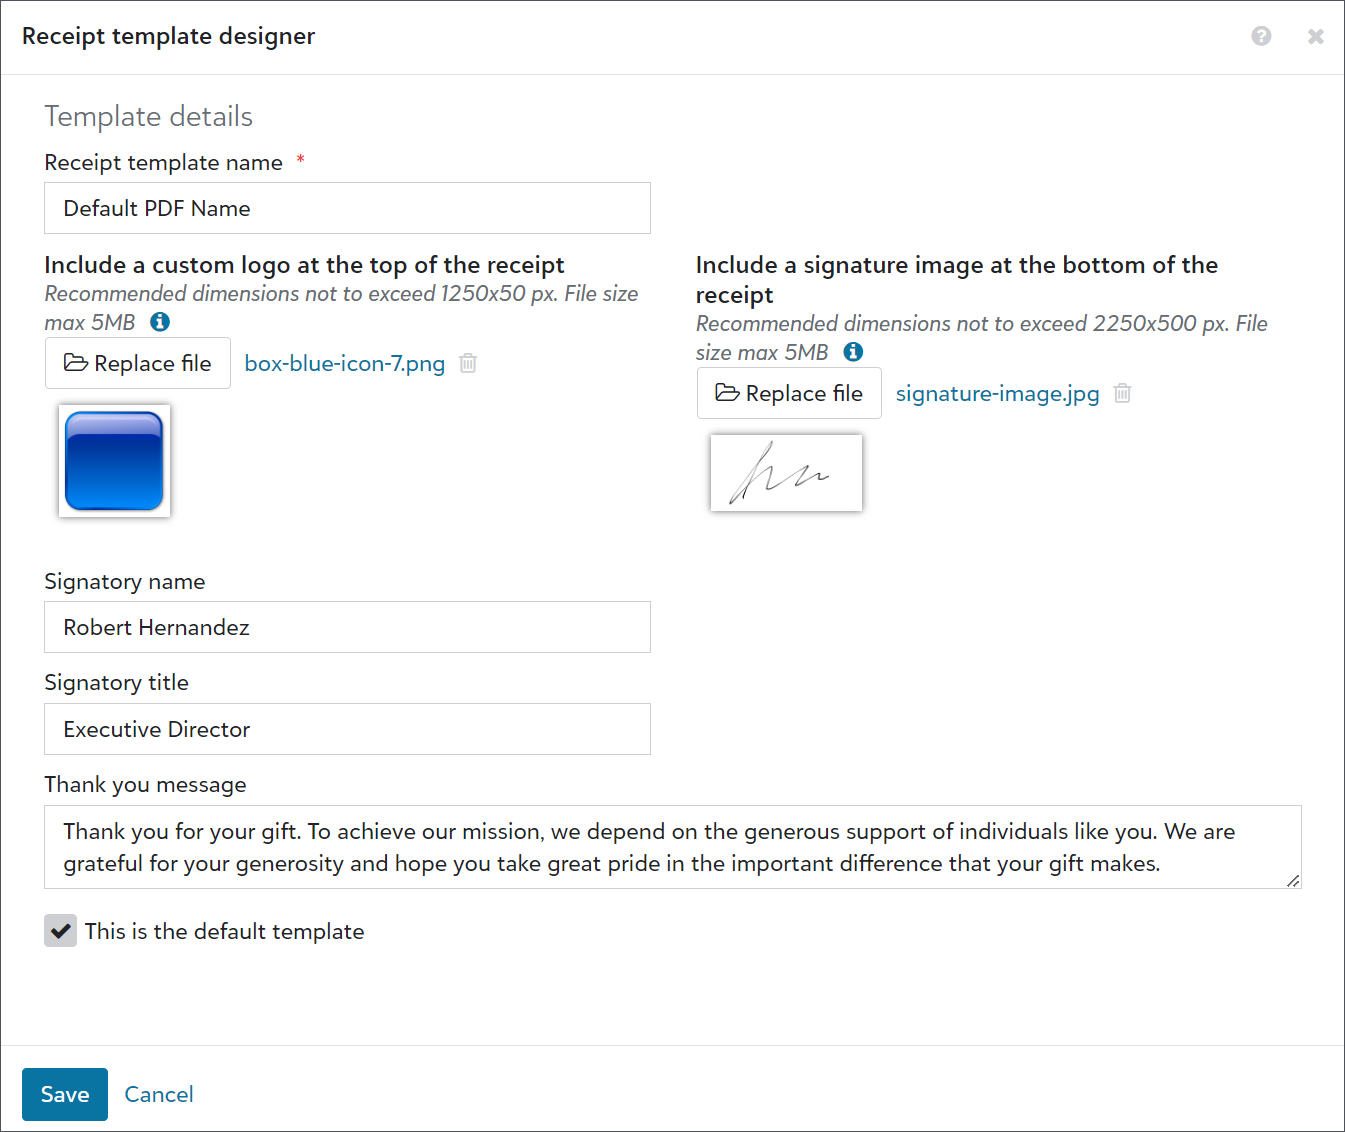
You can now use PDF receipt templates to enhance your PDF receipts with your organisation's logo, a signature, and a personalized Thank you message. From Fundraising, Gift Receipting, select PDF receipt templates. On the Default PDF's menu, select Edit.
Enter a name to help you identify the PDF template internally. Enter a custom logo, signature image, signatory name, and signatory title. In the Thank you message field, modify the default text to match your organisation's messaging.
For more information, see PDF Receipt Templates.
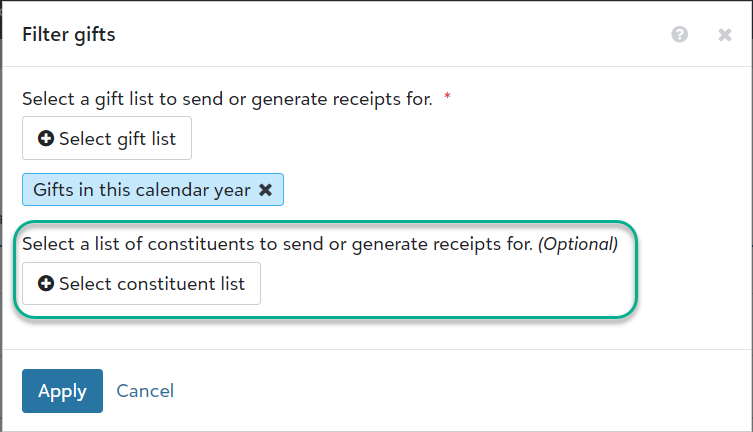
Now you can use a constituent list to narrow down your receipt recipients. From Fundraising, Gift receipting, select Filter. Under Filter gifts, select the list of constituents you want to send receipts to.
You can use this filter to fulfill donors' receipt preferences. For example, create a constituent list of donors whose records are marked as Requests no email, select this list in Filter gifts, and then generate PDF receipts to print and mail to those donors. For more information, see Gift Receipting Filters
Previously when your organisation's tax ID was missing, you'd receive an error after generating receipts and giving statements. Now you receive an alert on Fundraising, Gift receipting and Giving statements, and you're prevented from generating receipts and giving statements until you enter your tax ID under Settings.
To better personalise your PDF receipts, you can now edit the thank you message and add a signatory name and title. From Fundraising, Gift receipting, select PDF receipt templates, and edit an existing template.
-
In the Signatory name and Signatory title fields, enter name and title of the person from your organisation who is authorised to sign receipts. If you already included a signature image, the name should match the signature you used.
-
In the Thank you message field, modify the default text to match your organisation's messaging.
For more information, see PDF Receipt Templates.
Payments
Credit Card Updater from Blackbaud Merchant Services helps you increase authorisation rates and avoid disruptions in recurring giving. Now, recent enhancements make it even easier to keep your supporters' credit card information updated and accurate.
-
Credit Card Updater now automatically updates stored card info for all organisations who process payments through Blackbaud Merchant Services. Previously, the service was only available to organizations with subscriptions.
-
Credit Card Updater is now available for all currencies! Previously, it was only available to accounts that process in the US and Canadian dollars.
-
All stored cards are now eligible for updates. Previously, you needed to manually register and deregister cards from the database view.
-
Credit Card Updater now updates card information in real time. Previously, it updated cards on a monthly basis.
Note: Reporting enhancements are coming soon! Existing reports will continue to be available mid-month. Also, failed card updates temporarily won't appear in reports.
For more information, see Credit Card Updater.
As a part of our ongoing optimisation efforts, we have temporarily disabled Click to Pay while we improve the user experience.
Portal
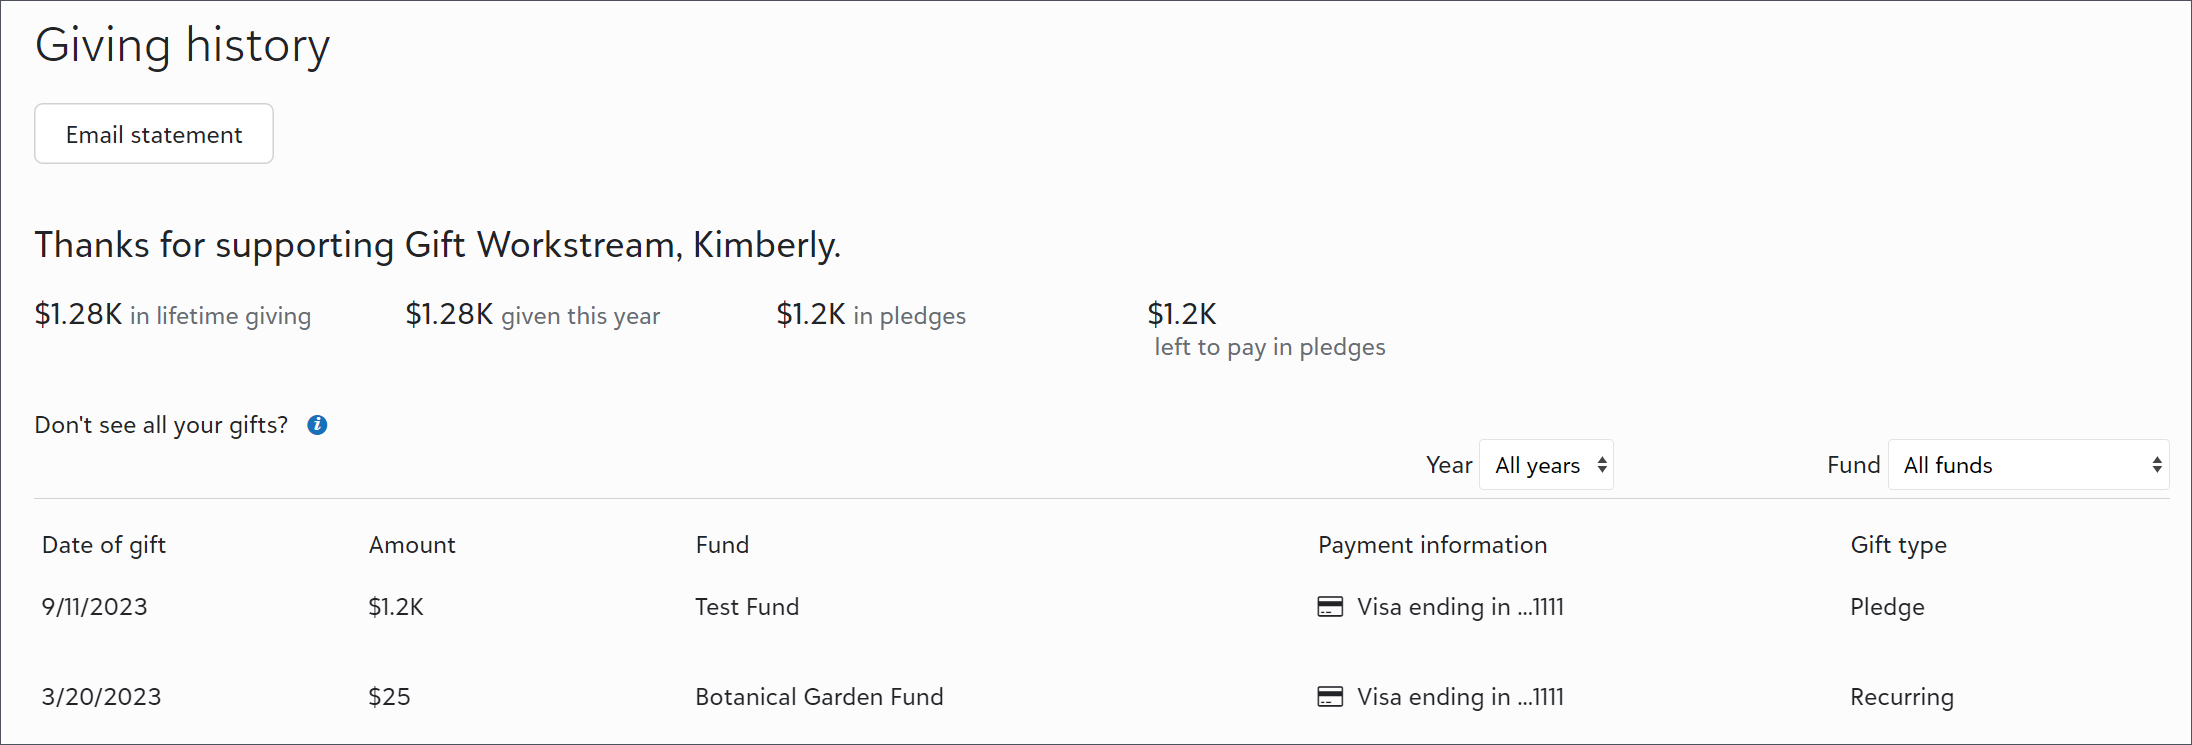
Now, portal users can view how much they pledged and how much they have left to pay toward their pledges on the Giving history page in the portal. They can also now use the list to view their pledge information. Previously, they could only view pledge payments from the list.
For more information, see Portal Giving History.
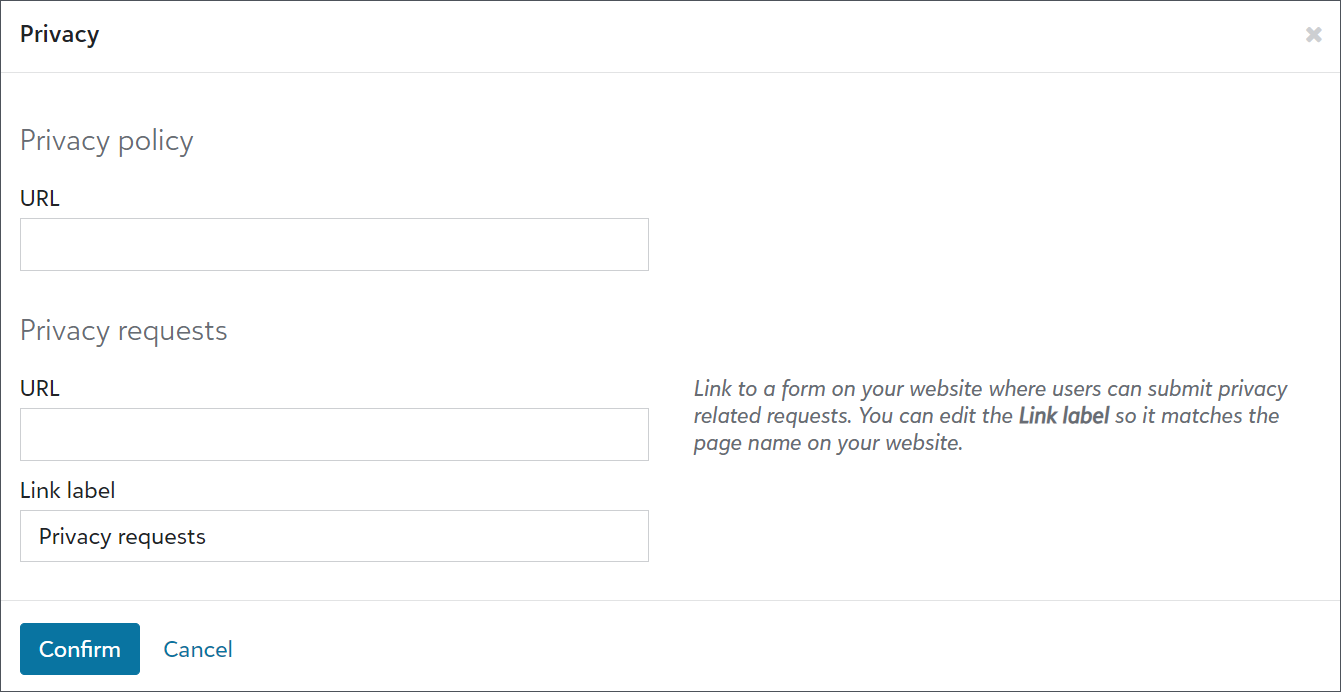
To help your organisation comply with various privacy requirements, a new link option is available for the bottom of portal pages. From Tools, Settings, Portal settings, you can now link to a form hosted on your website where users can submit privacy related requests, such as to delete their accounts from your database.
Under Branding and customisation, select Edit privacy links. In the URL field under Privacy requests, enter the link to your organisation’s form. Then, in the Link text field, enter text to match the link name with the form’s page name on your website.
Reporting and Lists
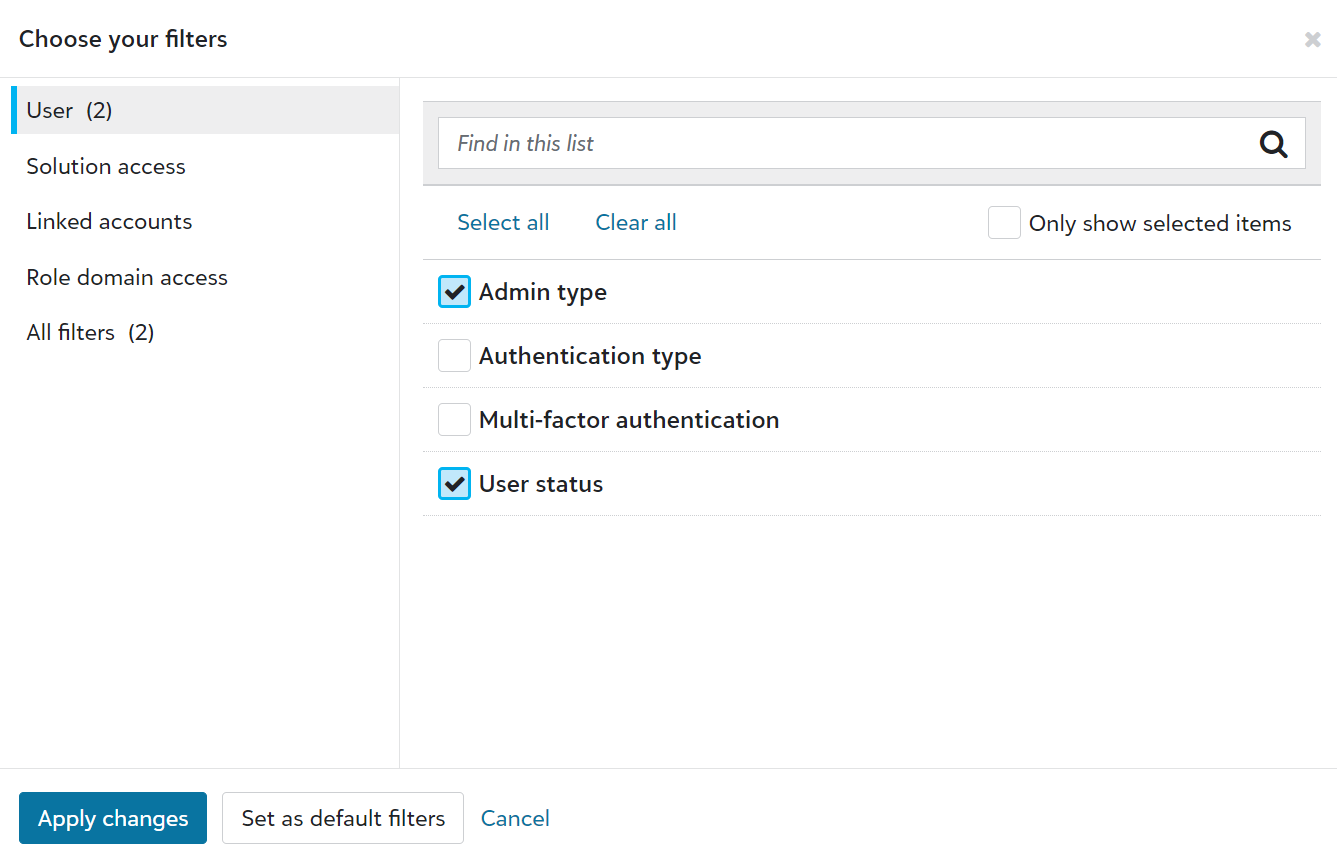
To help admins better manage users, we improved user lists. We also updated the navigation under Control panel to include new pages for Users, Roles, and History. Previously, admins accessed these pages from Control panel, Security.
Tip: To view the default user list, select Control panel,Users, Build a new list, Show all records.
From Control panel, Users, admins can now:
-
Use solution access, linked accounts, roles, admin types, authentication types, and multi-factor authentication statuses as columns and filters.
-
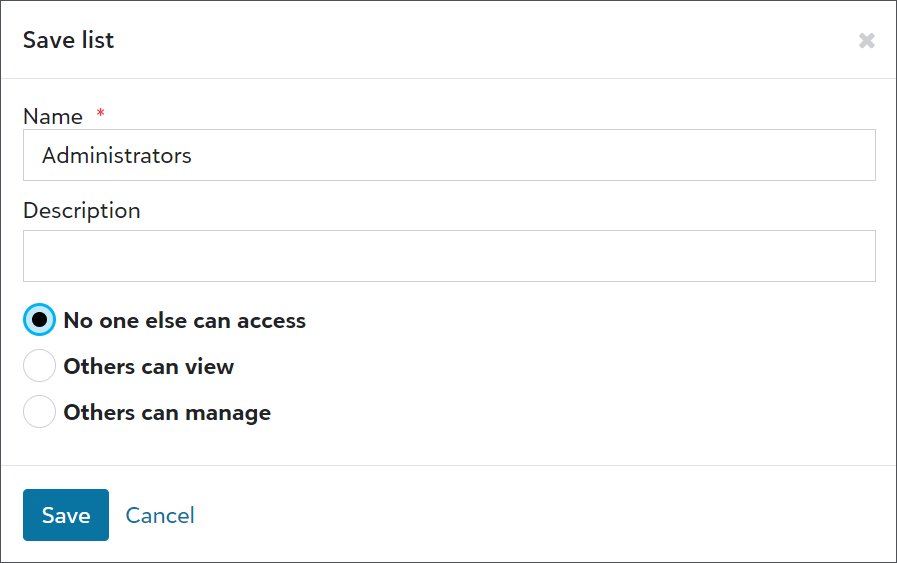
Save lists to easily reference user information.
-
Export user lists for compliance reviews or to analyse data alongside third-party data, such as from Human Resources or your organisation’s Identity and Access Management (IAM) group.

-
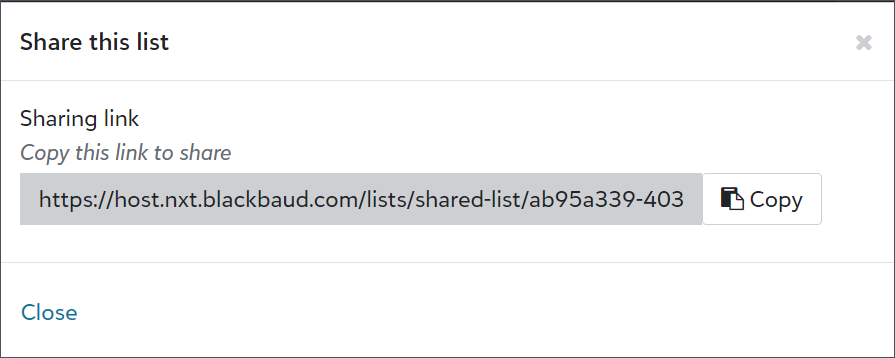
Share user lists with other admins.
Security and Reliability
To help your organisation comply with upcoming privacy laws and standards, the donor portal and donation forms now recognise and record universal opt-out signals, like the Global Privacy Control (GPC). When individuals use browser add-ons or plugins with universal op-out enabled, browsers send the opt-out signals in header data through HTTP calls to websites.
Note: Universal opt-out signals are only enabled or not enabled for a user and don’t include additional specifications or configurations.
OnceRaiser's Edge NXT receives a signal, it adds an opt-out on the constituent's record under Consent with the Data processing channel and Global Privacy Control category. In the database view, configure business rules for the Global Privacy Control category from Configuration, Business Rules, Consent options to also update the constituent's record with the appropriate solicit codes. For more information, see Recognize and Respect Universal Opt-out Signals.
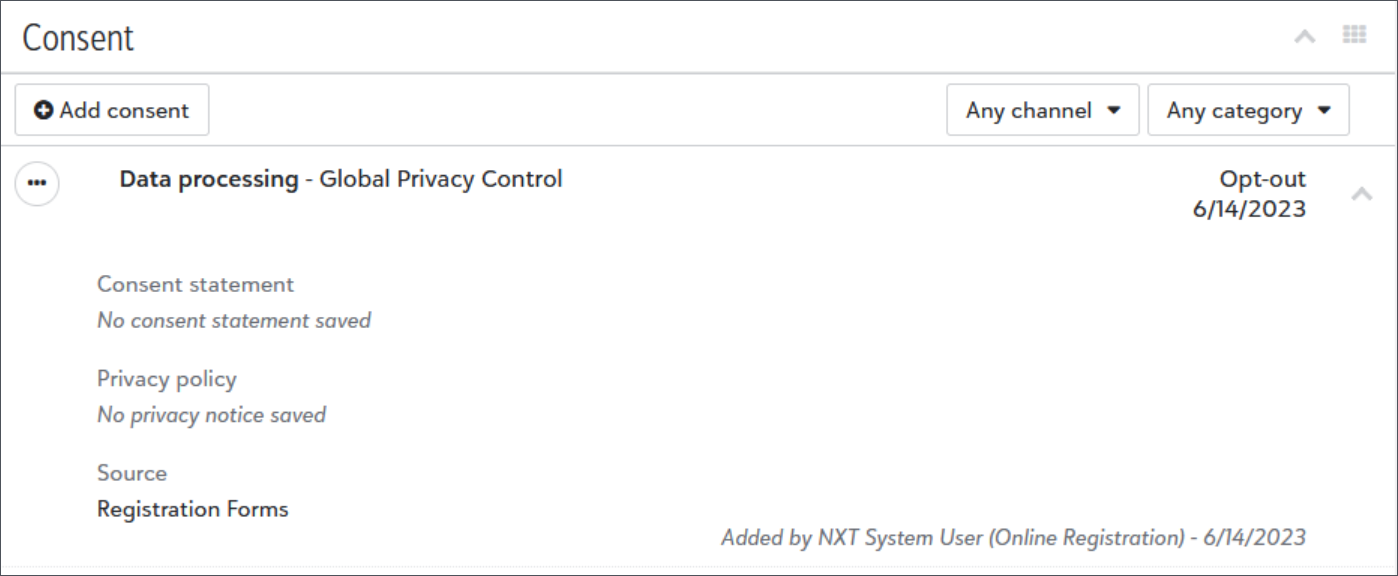
Note: Raiser's Edge NXT creates the Global Privacy Control category if you don’t have one configured from Control panel, Tables, Consent Categories.
Tables
To help speed table cleanup, you can now identify which records use table entries before you remove the entries.
From Control panel, Tables, open the table with the entry to remove. Next, select View uses from the menu next to the entry's name in the table entries list. If any records include the entry, a list of system IDs for each record type appears. In the database view, from Query, you can use the system IDs to search for and update the records as necessary.
For more information, see Tables.
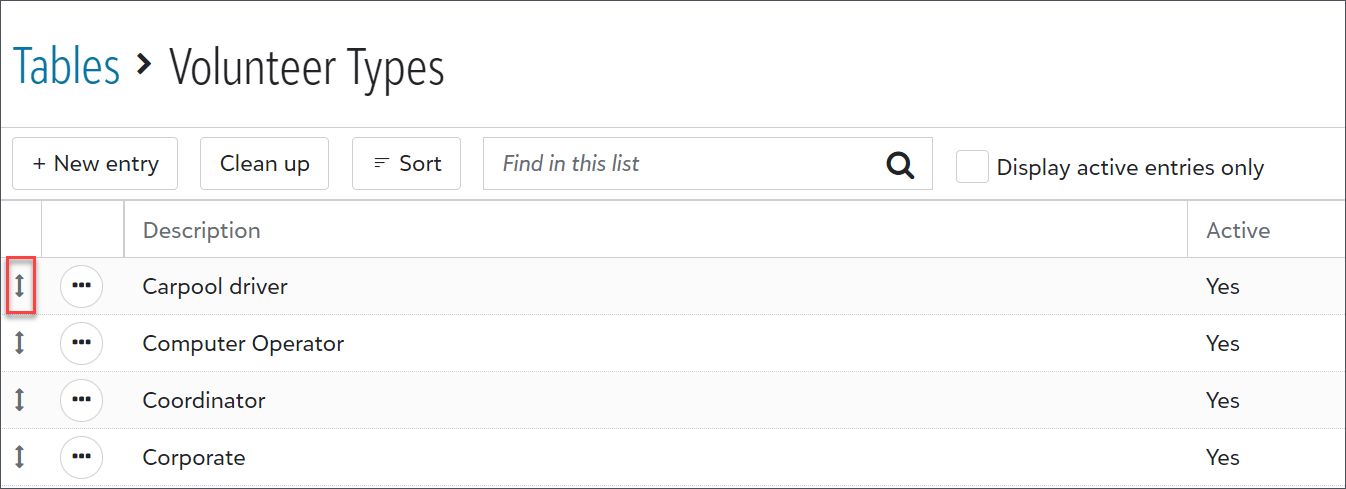
You can now manage tables from Control panel, Tables. From the web view, you can view the list of tables in your database and define new donor category tables. For each table, you can add, edit, delete, and change the order of entries.
Note: To define a donor category table, select New donor table above the list of tables. To define an attribute table, navigate to Configuration, Attributes in the database view and add an attribute with a table data type.
The web view also includes improvements to help you work with tables more efficiently. You can now:
-
Use drag and drop options for table entries to change their order or tab to the drag icon on your keyboard and press the up or down arrows to move entries within the list. In the database view, you can only use a menu to move entries.
-
Continue working during table entry cleanup. In the database view, you must pause your work while a cleanup is in progress.
For more information, see Tables.