Getting started checklist
After you onboard your agent, use the Getting started checklist on the Development Agent page to move from your first manual assignments to an agent that assigns constituents on its own. A progress bar shows how close you are to a fully running agent.
The checklist has five steps. Each step is worth 20% of the progress bar. You can complete steps in any order, except Step 5, which stays locked until you complete Step 3.
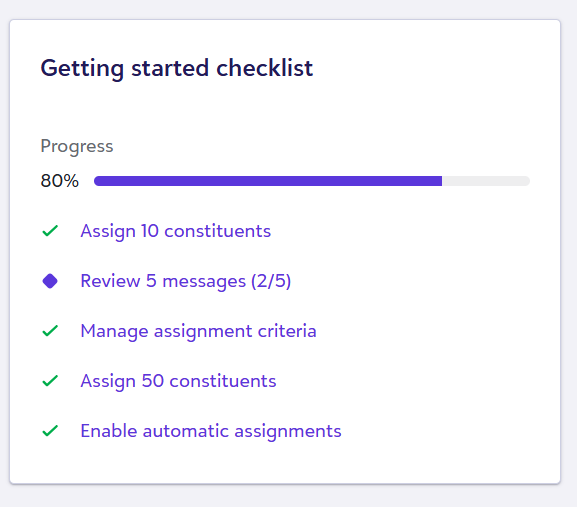
Checklist steps and What to do
The following table shows each of the 5 steps, what to do to complete them, and how progress is shown at each phase.
| Step | What to do | Progress Shown |
|---|---|---|
| 1 | Assign 10 constituents | x/10 |
| 2 | Review 5 messages | x/5 |
| 3 | Mange assignment criteria | Done or Incomplete |
| 4 | Assign 50 constituents | x/50 |
| 5 | Enable automatic assignments | Done or Incomplete |
A step is complete when its condition is met, no matter the order you finish steps in. For example, if you assign 50 constituents before you manage your assignment criteria, you receive credit for Step 1 and Step 4. The progress bar reaches 100% only after you also complete Steps 3 and 5.
If you already use Development Agent, the checklist marks steps you have already completed as complete, based on your current phase.
Note: Steps with a count, such as Assign 50 constituents, show your progress until complete (for example, 15/50).
Manage assignment criteria
Choose the source the agent uses to find constituents to assign.
-
On the checklist, select Manage assignment criteria. You can also open it later by selecting Manage criteria in the Assignments tile.
-
Under Assignment method, select an option:
-
Prospect Insights recommendations — The agent identifies constituents using Prospect Insights recommendations.
-
Custom list — The agent assigns from a Raiser's Edge NXT list that you select.
-
-
If you select Custom list, search for and select the list.
-
Select Save.
You can change your criteria at any time. Changing criteria affects future assignments only; constituents already assigned stay assigned until you unassign or replace them.
Enable automatic assignments
Until you complete Step 3, this step is locked. It reads "Automatically assign from your criteria" with the message "Locked until you select your criteria." After you select your criteria, it unlocks and reads "Enable automatic assignments."
-
On the checklist, select Enable automatic assignments.
-
In the Manage agent assignments window, select Automatically assign constituents.
-
In How many assignments per day?, enter the number of constituents the agent can assign each day.
-
Select Save to complete this step.
Phase-based limits on automatic assignments no longer apply, so the agent assigns without a fixed cap.
Finish the checklist
When you complete all five steps, the progress bar reaches 100% and the checklist no longer appears on the Development Agent page. Your agent continues to assign constituents automatically based on your criteria and daily limit.
Tip: To change your criteria or daily limit later, select Manage criteria in the Assignments tile on the Development Agent page.