|
|
Guides (SDK /API) | Technical Reference | BBDN | How-to Documentation |
Copy the Files for a Custom Part
Typically, a custom part consists of two user controls (.ascx files) and one or more DLL assemblies for your project. You copy the .ascx files to the \NetCommunity\Custom folder of your installation (or a subfolder within \NetCommunity\Custom), and you copy the .dll files to the \NetCommunity\bin folder.
You must deploy custom parts every time you build a Parts project, so to save time and reduce errors, you can configure the project’s post-build event to automatically deploy the project after you build.
-
In Visual Studio, open the properties sheet for the Parts project.
-
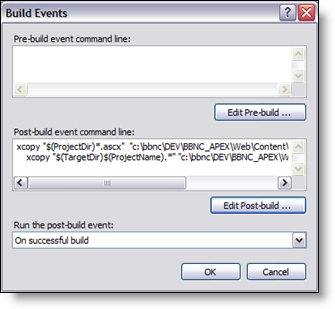
On the Compile tab, click Build Events. The Build Events screen appears.
-
Click Edit Post-build. The Post-build Event Command Line appears.
-
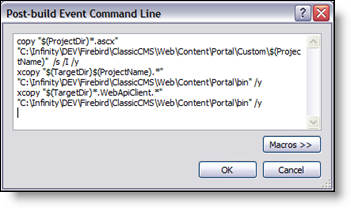
In the command line edit window, replace the default post-build event commands with the following commands and then replace the destination paths with the locations in your installation directory:
copy "$(ProjectDir)*.ascx" "C:\Infinity\DEV\Firebird\ClassicCMS\Web\Content\Portal\Custom\$(ProjectName)" /s /I /y
xcopy "$(TargetDir)$(ProjectName).*" "C:\Infinity\DEV\Firebird\ClassicCMS\Web\Content\Portal\bin" /y
xcopy "$(TargetDir)*.WebApiClient.*" "C:\Infinity\DEV\Firebird\ClassicCMS\Web\Content\Portal\bin" /y
-
Replace the destination paths in the commands with the appropriate locations in your installation directory. Remember to place your .ascx files in the \custom folder or a subfolder and your code-behind DLL and any *.webApiClient.dlls in the \bin folder.
-
When you successfully recompile, these commands copy files to your installation folder.
-
The first command copies.ascx user controls from your project to the \NetCommunity\Custom folder or a subfolder. In our example, the command copies the file to the \Hello subfolder.
-
The second command copies the DLL to the \bin folder of your installation. The command includes “$(ProjectName)” to ensure that you only copy the DLL for your project and not other DLLs that you reference that are in the \bin folder.
Note: For more complex custom parts, you can add commands to copy related files such as images, scripts, and style sheets.