Exercise: Workflow Tasks and Inboxes
Workflow is the combination of the automation of Infinity features and end user interaction. This exercise deals with user input often required within a workflow.
In the following exercise, we will gain experience working with two new concepts: Workflow Tasks and Workflow Inboxes. For more information on tasks and inboxes, see Workflow Tasks and Inboxes.
Instructions
Step 1 - Add the WorkflowInboxSpec to the catalog project.
Make sure the Blackbaud.CustomFx.MajorGivingWorkflow.Catalog project is open within Visual Studio 2008.
-
Right-click the project and select Add\New Item… from the popup menu.
-
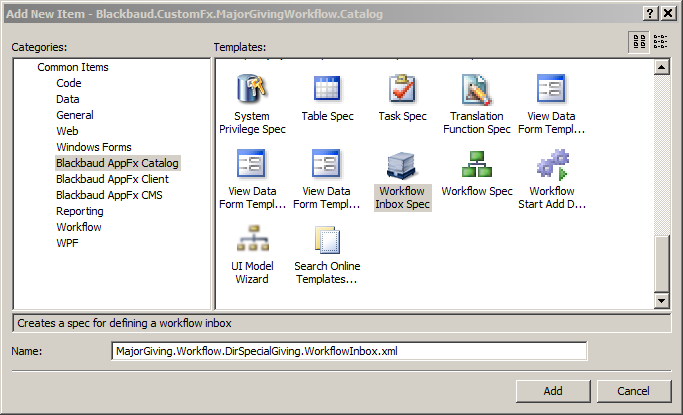
Select Blackbaud AppFx Catalog from the Categories list on the left side of the screen, and select the Workflow Inbox Spec template under Templates.
-
Name the spec "MajorGiving.Workflow.DirSpecialGiving.WorkflowInbox.xml."
Step 2 - Complete the WorkflowInboxSpec.
Using the XML below as a guide, complete the WorkflowInboxSpec.
<WorkflowInboxSpec
	xmlns="bb_appfx_workflow_inbox"
	xmlns:common="bb_appfx_commontypes"
	ID="cdc6e2ea-0bf9-42a2-b6f1-d4dae5a4398a"
	Name="Director of Special Giving Inbox (Custom)"
	Description="Infinity SDK Customization.
Used by workflows that involve the approval of large or other special gifts.
  See Major Giving (Custom) Workflow."
  Author="Technical Training">
</WorkflowInboxSpec>
Step 3 - Save and load the spec.
Step 4 - Configure the inbox.
-
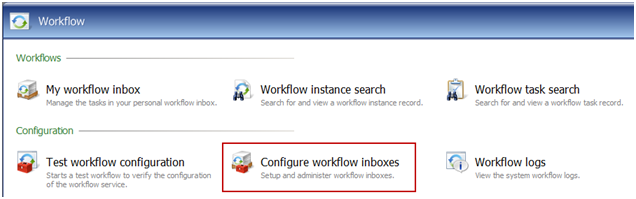
Navigate to the Workflow functional area and click the Configure workflow inboxes task to open the Workflow Inboxes page.
-
Select the new Director of Special Giving Inbox (Custom) in the list of inboxes and select the Goto Inbox action. This is the inbox you created with the spec earlier in this exercise.
Step 5 - Add the necessary roles/application users to the workflow inbox.
In this step, we will add the appropriate application user to the inbox.
Go ahead and add yourself to the inbox.
-
Click the Add button to add an application user to the inbox.
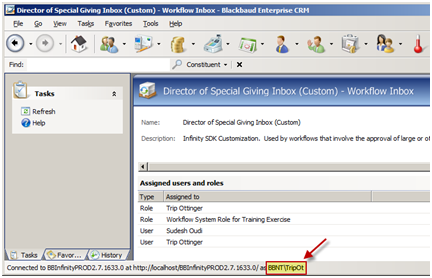
Note: If you are using a training environment provided by your instructor, you may find the name of the application user in the lower left corner of the shell. However, in most real world situations, you would most likely add a system role to the inbox. In this way, you could permission multiple users to the role, and these users could manage tasks within the inbox.
-
Enter the following values for the assignment of the user to the inbox:
Field Caption Value Assignment type User User < you may find the name of the application user in the lower left hand corner of the shell >
Ex: SALESDEMO\TechTrainUser12
Role: <Leave blank>
Step 6 - Use a DefineTask workflow activity to send a task to the workflow inbox.
-
Open the Blackbaud.CustomFx.MajorGiving solution within Microsoft Visual Studio 2010.

-
Open the MajorGiving.xalmx workflow designer.
-
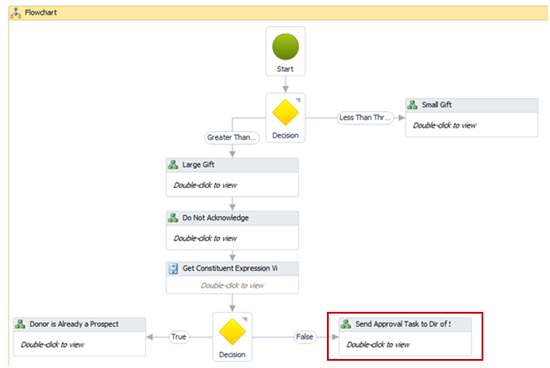
Open the Flowchart activity.
-
Open the BusinessActivity activity named Send Approval Task to Dir of Special Giving Inbox.
Step 7 - Add a DefineTask workflow activity to send a task to the workflow inbox
-
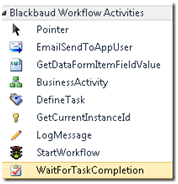
From within the Blackbaud Workflow Activities Toolbox tab, drag a DefineTask workflow activity into the Sequence activity.
-
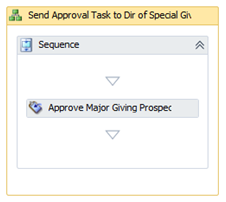
Add the following properties for the activity:
Property Name Value DisplayName Approve Major Giving Prospect Result taskData
(Add a variable named taskData to the workflow designer prior to adding the variable name to the Result property. The variable type is ‘Blackbaud.AppFx.Workflow.Contracts.WorkflowTaskData’ and the scope is ‘Flowchart’)
TaskCategory Approve Major Giving Prospect TaskDescription "Request to Dir. of Special Giving. Please approve donor " & _
resultConstituentPageExpressionViewFormData.NAME.ToString & _
" as a major giving prospect with a gift of " & _
FormatCurrency(inputformfieldAmount).ToString & "."
TaskDueDate Date.Now + TimeSpan.FromDays(2) TaskInboxName Director of Special Giving Inbox (Custom) TaskPageID <Leave Blank for Now. We will reference a page spec later.> TaskSubject Approve Major Giving Prospect UserCanCancel True UserCanComplete True
At this point, your business activity should look similar to this:
Step 8 - Add a WaitForTaskCompletion workflow activity.
There are always two steps involved with Workflow Tasks – define the task and then assign and wait for it to be completed. So the next step in our sequence is to assign and wait for the task to be completed. The WaitForTaskCompletion activity is used for the second step.
Note: The WaitForTaskCompletion activity has an InArgument property that accepts the WorkflowTaskData variable we named taskData in the DefineTask step. It also allows specifying a duration of type TimeSpan to wait before timing out via the timeOutDuration InArgument. The cancelled and timedOut properties are boolean OutArguments that you can use to make a decision based on whether the task was cancelled or if the timeout expired prior to the task being cancelled or completed. When the workflow executes and reaches the WaitForTaskCompletion activity the workflow will pause until the task is completed. Under the hood the Workflow Service will save the current state of the workflow to the database and unload the in-memory footprint of the workflow definition and classes. In other words the workflow will go idle, persist, and unload. Since we did not specify a timeout the workflow will pause indefinitely until somebody marks the task completed in the application.
-
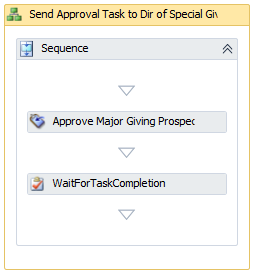
Add the WaitForTaskCompletion activity below the DefineTask activity.
-
Add values for the cancelled, Displayname and taskData properties.
Property Name Value cancelled taskCancelled
(Add a variable named taskCancelled to the workflow designer prior to adding the variable name to the Cancelled property. The variable type is ‘Boolean’ and the scope is ‘Major Giving Service’)
DisplayName WaitForTaskCompletion taskData taskData
(This is the name of the variable we created in the previous step.)
The property sheet for the WaitforTaskCompletion should look like this:

At this point, your business activity should look similar to this:
Step 9 - Add the WorkflowTaskViewForm feature as a workflow activity.
After the task is completed, we need to provide the workflow with the name of the person who completed the task. In other words, we need the name of the person who performs the part of the Director of Special Giving.
Fortunately, there is a view data form called Workflow Task View Form that is part of the out-of-the-box Workflow Task page. You can view this page if you have tasks associated with a workflow instance. We utilize this view data form within our flowchart as a workflow activity and obtain the name of the person who completed the workflow task.

-
Grant permission the Workflow Task View Form feature to the Workflow System Role for Training Exercise System Role. The feature can be found within the Workflow\Workflow Task security folder.
-
Within Visual Studio 2010, select Tools\Add System Role Activities to add the activity to the Toolbox. Select the Workflow System Role for Training Exercise as the system role.
-
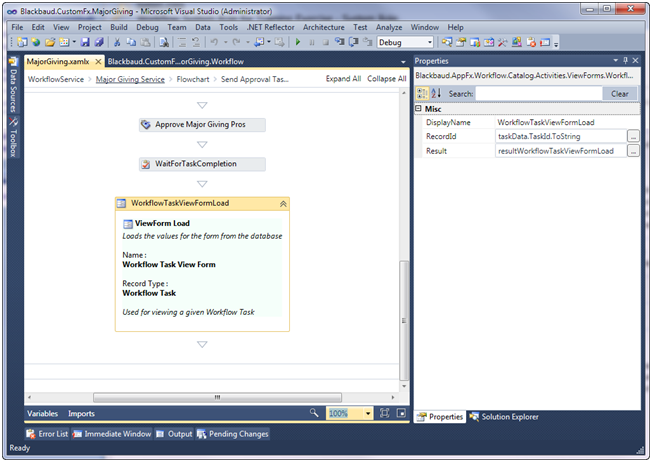
Drag the WorkflowTaskViewForm (Load) Activity onto the workflow designer below the WaitForTaskCompletion Activity.
-
Provide the following properties for the WorkflowTaskViewForm (Load) Activity:
Property Name Value DisplayName WorkflowTaskViewFormLoad RecordID taskData.TaskId.ToString Result resultWorkflowTaskViewFormLoad
(Add a variable named resultWorkflowTaskViewFormLoad to the workflow designer prior to adding the variable name to the Result property. The variable type is ‘Blackbaud.AppFx.Workflow.Catalog.WebApiClient.ViewForms.WorkflowTask.WorkflowTaskViewFormData and the scope is ‘Major Giving Service’)
Step 10 - Save, build, and test the workflow.
-
Save the files within the Visual Studio 2010 solution.
-
Right-click the Blackbaud.CustomFx.MajorGiving.Workflow project within Microsoft Visual Studio 2010 and select Build from the popup menu.
-
Add a new constituent and add a payment greater that the threshold to trigger the workflow.
-
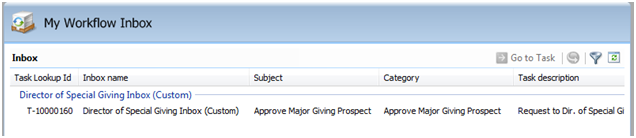
In Blackbaud CRM, use the My workflow inbox task to view the new task sent by the DefineTask workflow activity.