Get Started with Blackbaud Integrated Payments
Blackbaud's payment services make it easy for you to accept payments from your supporters. Create accounts with the Blackbaud Payment Service and Blackbaud Merchant Services to start securely processing payments through your Blackbaud solutions today.
Training: For a step-by-step eLearning course, enroll in our free Blackbaud Integrated Payments Learning Path.
Register for the Blackbaud Payment Service
The Blackbaud Payment Service is Blackbaud's Payment Card Industry (PCI) Data Security Standards compliant vault. It securely stores sensitive credit card, bank account, and merchant account info, and replaces credit card numbers with reference tokens in your Blackbaud solution.
To connect with Blackbaud Merchant Services, you need a Blackbaud Payment Service account. To register, visit the Blackbaud Payment Service sign-up page.
Tip: You’ll need to connect your Blackbaud Payment Service account to your Blackbaud solution, so retain the credentials for your records.
Add a Blackbaud Merchant Services account
Blackbaud Merchant Services is Blackbaud’s end-to-end payment processing solution that serves as both a payment gateway and processor. It supports U.S., Canadian, Australian, and New Zealand dollars, British pounds, and Euros.
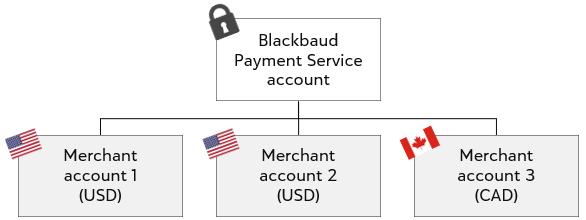
From Blackbaud's website, you can add a Blackbaud Merchant Services account. Add multiple accounts if you accept more than one currency, need payments sent to separate bank accounts, or need to display different info on supporters' credit card and bank statements (such as a local affiliate's name or contact info).
-
Sign in to the Admin section of Blackbaud's website.
-
From Settings, select Merchant accounts.
-
Select Add account, then choose Blackbaud Merchant Services.
Note: Support for third-party payment gateways varies by Blackbaud solution. Additional fees apply. For more information, see Supported Gateways and Interconnect Fees.
-
Follow the steps to enter required details and configure settings. For Blackbaud Merchant Services accounts, you also create login credentials.
Tip: You can save your progress for up to seven days and return to pick up where you left off.
-
When finished, select Save.
For more information, see Add a Blackbaud Merchant Services account.
Example account setup
Add account configurations
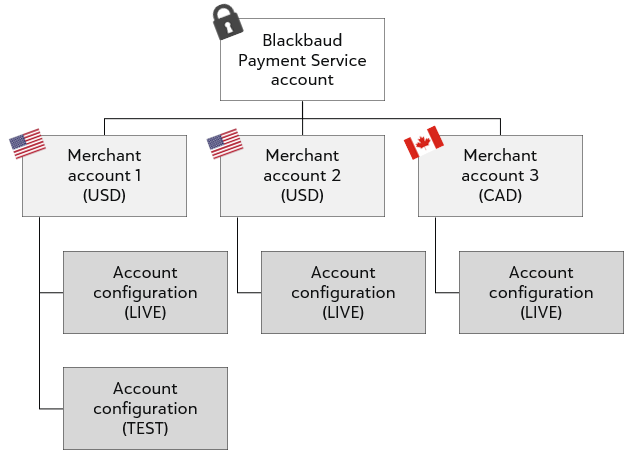
For each merchant account, you can set up multiple configurations. Account configurations determine which credit card types you accept, whether transactions process in live or test mode, and the level of fraud protection provided with settings such as Card Security Code (CSC) and Address Verification Service (AVS).
-
Sign in to the Blackbaud Merchant Services Web Portal.
-
From Control Panel, Settings, expand Account configurations.
-
Select Add configuration.
-
Enter a name and description, choose security settings and supported credit cards, then save.
For more information, see Account Configurations.
Note: For AVS levels, CSC levels, and card type settings, solutions using Blackbaud's new checkout experience (such as Blackbaud Donation Forms and Luminate Online) use industry best practice settings.
Example account setup
Connect to your Blackbaud solution
After you set up required payment accounts, sign in to your Blackbaud solution to connect accounts and start processing payments. For next steps, select your solution from the list below.
 Blackbaud Altru
-
From Revenue, select Blackbaud Payment Service merchant accounts under Configuration.
-
Under Tasks, select Edit Blackbaud Payment Service login.
-
Enter your Blackbaud Payment Service credentials and test the connection. When it succeeds, select Save — your Blackbaud Merchant Services accounts automatically appear.
-
Choose default settings.
-
To mark the account as the default for authorization, select the account, select Default, and select Mark as default authorization account.
-
To mark the account as the default for card-present transactions, expand the merchant account, then select Default and select Mark as default card present account.
-
-
From Web, select Web payment settings under Configuration.
-
Under Payment methods, choose which account to use for online payment processing, then save.
After you connect your accounts, you can configure online forms and payment devices, start adding payments, and more. For more information, search the Altru Help Center.
Blackbaud CRM
-
From Revenue, select Blackbaud Payment Service merchant accounts under Configuration.
-
Under Tasks, select Edit Blackbaud Payment Service login.
-
Enter your Blackbaud Payment Service credentials and test the connection. When it succeeds, select Save — your Blackbaud Merchant Services accounts automatically appear.
-
Choose default settings.
-
To mark the account as the default for authorization, select the account, select Default, and select Mark as default authorization account.
-
To mark the account as the default for card-present transactions, expand the merchant account, then select Default and select Mark as default card present account.
-
After you connect your accounts, you can configure online forms, add offline payments, and more. For more information, search the Blackbaud CRM Help Center.
Blackbaud Education Management Solutions
Connect your Blackbaud Merchant Services account to process payments for your school store and application, giving, event registration, and school forms.
-
From Core, Settings, select Payment Settings.
Tip: Don't see this option? To connect your payment accounts, you must have the Platform Manager or Payment Services Manager role.
-
Enter your Blackbaud Payment Service credentials, choose a currency, then save.
-
From Core, Settings, select Payment Settings, then select Payment Processing.
-
Select Add new account.
-
Select BBMS, enter merchant account credentials and other required details, then save.
-
After you connect your accounts, assign them to your online forms. For more information, select a form type from the following list.
Tip: To manage forms, you must have the appropriate Manager role for the form type.
-
Test your form:
-
From your event registration or giving form, enter a payment using a test credit card. The payment should fail.
-
Sign in to the Blackbaud Merchant Services Web Portal. Under Transactions, Transactions list, confirm the failed payment appears.
-
For more information, see the Education Management Help Center.
Blackbaud eTapestry
-
From Management, My Organization, select Preferences.
-
Enter your Blackbaud Payment Service credentials and save.
Note: If you use Cart, Personal Fundraising, or eCommerce, or if you switch to Blackbaud Merchant Services from IATS or Sage, additional steps are required. For more information, contact Support.
-
From Management, My Organization, select eCommerce.
-
Under Tasks, select Add BBMS Processor.
-
Choose whether to mark the account as the default for authorization, then enter a reference name, account credentials, and currency.
-
Set other configuration options (such as whether to support EFT), then save.
After you connect your accounts, you can configure online forms. For more information, see the eTapestry Help Center.
Blackbaud Guided Fundraising
-
From Admin, Payment Settings, select Get Started in Blackbaud Payment Services.
-
Select your merchant account.
-
Select Enable credit card payments in Agent Portal, then save.
Tip: You need to be an Administrator in Guided Fundraising to access Payment Settings.
Blackbaud Luminate Online
Note: By default, Luminate Online uses Blackbaud Merchant Services. For information on using a third-party payment gateway, contact solutions@blackbaud.com.
-
From Setup, select Payment capabilities, then select Payment services.
-
Select Import Blackbaud Merchant Services, enter your Blackbaud Payment Service credentials, and select Import.
-
Under Payment capabilities, select Merchant accounts, then select Create account.
-
Select your Blackbaud Merchant Services account configuration and enter required details such as tax ID, supported credit cards, and whether to process recurring transactions.
-
Select Finish.
After you connect your accounts, you can configure settings for donation campaigns, eCommerce stores, and ticketed events. For more information, see Payment Capabilities in Luminate Online Help.
Blackbaud NetCommunity
For information on how to connect your NetCommunity forms, see these Knowledgebase articles:
Blackbaud Online Express
For information on how enter your Blackbaud Payment Service credentials, follow the steps under Blackbaud Raiser's Edge 7/Raiser's Edge NXT.
For information on how to set a merchant account for online forms, see How do I choose a different BBMS account to use? in Knowledgebase.
Blackbaud Online Giving
For information on how to connect payment configurations and choose fee coverage options for online forms, see the Optimized Donation Form and Standard Donation Form tutorials.
Blackbaud Raiser's Edge 7/Raiser's Edge NXT
-
Sign in to the database view as Supervisor.
-
Under Config, General, enter your Blackbaud Payment Service credentials and test the connection.
-
Under Config, Business rules, select Merchant accounts.
-
Confirm your Blackbaud Merchant Services accounts appear in the list. If you don't see your accounts, contact Support.
After you connect your accounts, you can configure online forms, add offline payments, and more. For more information, see Get Started with Payment Processing in Raiser's Edge NXT Help.
Go further
After you complete setup for your Blackbaud Merchant Services account, you can start taking advantage of exclusive features and capabilities:
-
Manage transactions and run key reports from the Blackbaud Merchant Services Web Portal
-
Accept payments on the go with Blackbaud MobilePay Terminal
To learn more, and to stay up to date on the latest features, resources, and best practices, visit the Blackbaud Payment Services Help Center.