Custom Content Forms
Use the custom forms content type to create and show online forms with the fields you require for electronic submission.
Specific roles and capabilities may include other types of forms.
In addition to the standard category options for all content types, custom forms include other settings.
-
Additional Category Information
-
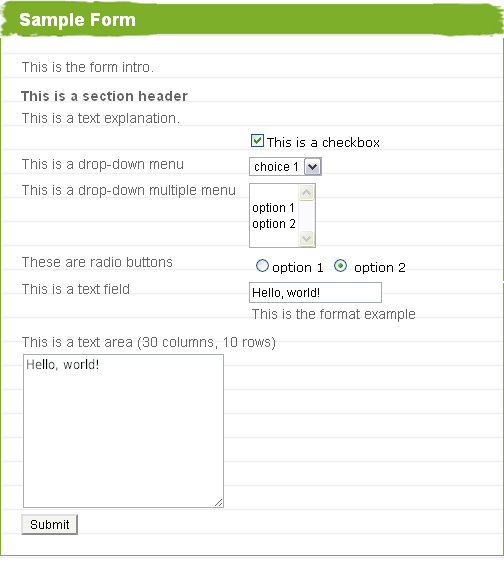
Form intro
This appears at the top of all forms within the category. This text field is limited to 5,000 characters.
-
-
Form Submission
-
Allow multiple submissions by public users
If selected, users who are not logged into the site can submit the form multiple times.Submissions are stored via a cookie. If a user deletes their cookies, they can submit the form again.
-
Allow multiple submissions by private users
If selected, users who are logged into the site can submit the form multiple times.
-
-
Select Core or School website.
-
Select Content.
-
Select Additional content types.
-
Select Custom forms).
-
Each form must have a corresponding content category. After a category is created, page managers or content managers can build a form by adding fields to it.
-
From row of the field category, select Add new.
-
For the Form field type, select the item you want to add to the custom form.
-
Blank row - This provides space between items on the form. Although users can't enter content into the blank space, the space improves readability.
-
Checkbox - Enable users to select one or more options from the options you provide.
-
Drop-down menu - Enable users to select one option from a list in a menu.
-
Drop-down menu multiple - Enables users to select multiple options from a list in a menu.
-
Radio buttons - Enable users to select only one option from the options you provide.
-
Section header - This provides bold text to label the sections of a long form. Although users can't enter content into the section header, the text improves readability.
-
Text - Enables users to enter text into a blank field, such as for name, email address, phone number, etc.
-
Text area - Enables you to control the size of a text field (for questions and comments boxes). We recommend recommend 30 columns by 10 rows.
-
Text explanation -
Use this to provide instructions or comments from your school to users. Explain your expectations or how you will use user responses.
-
-
For each field, you might also configure the:
-
Sort order - This controls the order in which the fields are listed on the form.
-
Height (pixels) - For blank row field type, enter how tall (in pixels) the blank row should be.
-
Label - Enter a descriptive label to inform users what you expect them to enter. For example, if users should enter their name in a text field, enter "Name" for the label.
-
Add value - Enter the options that should appear for users to select. For example, if users should select their t-shirt size from a dropdown list, enter "Small", "Medium", "Large", etc. as values. Then select Add after you enter the values.
-
Number of columns - For the text area field, enter how wide the field should be.
-
Number of Rows - For the drop-down menu multiple and text area fields, enter how tall the field should be.
-
Format example - If you want users to submit information in a specific way, provide them with an example of your preferred format. For example, you can tell users to enter birthday as "mm/dd/yyyy".
-
Required - Select this to make a field required. Users must complete required fields before submitting the form.
-
-
Select Save/add another to add another field.
-
Select Save & exit.
Page managers and platform managers can customize email notifications for forms.
-
Select Core.
-
Select Communication.
-
Select Notifications.
-
Select Notifications.
-
From Category, select Forms.
-
Select View.
-
In the list, find the appropriate form and the notification.
-
Custom form - administration -- User who are school administrators are notified that the form was submitted.
-
Custom form - confirmation -- Each time a custom form is submitted by a user who is logged in, the user who submitted the form receives a notification as a confirmation. If the user isn't logged in, the confirmation email is not sent.
-
-
Select Edit.
-
You can change the Name of the notification.
-
By default, notifications are Active and will be sent. clear this option to inactivate the notification if you do not want the notification sent.
-
Enter a Reply email for users who might respond to the notification.
-
Enter the From name which users will see in the "from" field of the email notification.
-
Use Placeholders to craft the Body of the notification.
-
Enter the Subject for the email notification.
-
For administration notifications, search for the user(s) who should be notified when news comments are submitted. Select the user's name and then select Add to recipient list.
-
Select Save & exit .
Page managers, content managers, and content editors who have access to a form category can view and manage the submitted forms in that category.
-
From Core or School website,
-
Select Content.
-
Select Additional content types.
-
Select Custom forms).
-
Select the Edit link for the appropriate category.
-
On the right side, from the drop down menu, select to view Not handled (newly submitted) or Handled submissions (submitted and reviewed) forms.
Regardless of whether a submission is handled or not yet handled, the data can still be viewed and printed.
-
To export the form submissions to Excel, select the Excel icon in the upper right-hand corner of the page.
-
Select View to review each submission.
-
Select Print to open a printer-friendly version of the information.
-
To mark submissions as reviewed and completed, select the checkbox for Handled .
Submissions marked as handled, can't be changed back to not handled.