Receivables: What's Recent
Receivables features in Blackbaud Financial Edge NXT continue to release in waves - as small, usable increments to our United States customers first. As we progress with development and testing, we'll fully support additional locales in a future release. The list below reflects the Receivables features we've introduced in web view so far.
To track newly released features, see What's New.
 Duplicate records
When duplicates are detected while saving records for charges, credits, invoices, and payments, you are prompted to accept or override the duplicates. This prompt only displays when Warn user is selected for these record types from Settings, Business rules. For more details, see Business rules.
Returns
From Receivables, Clients, you can now view return records in web view. To view a return for an invoice or a line item, open the client's record and select Activity.
Note: You can now add a return by reversing an invoice. For more details, see Reverse invoices.
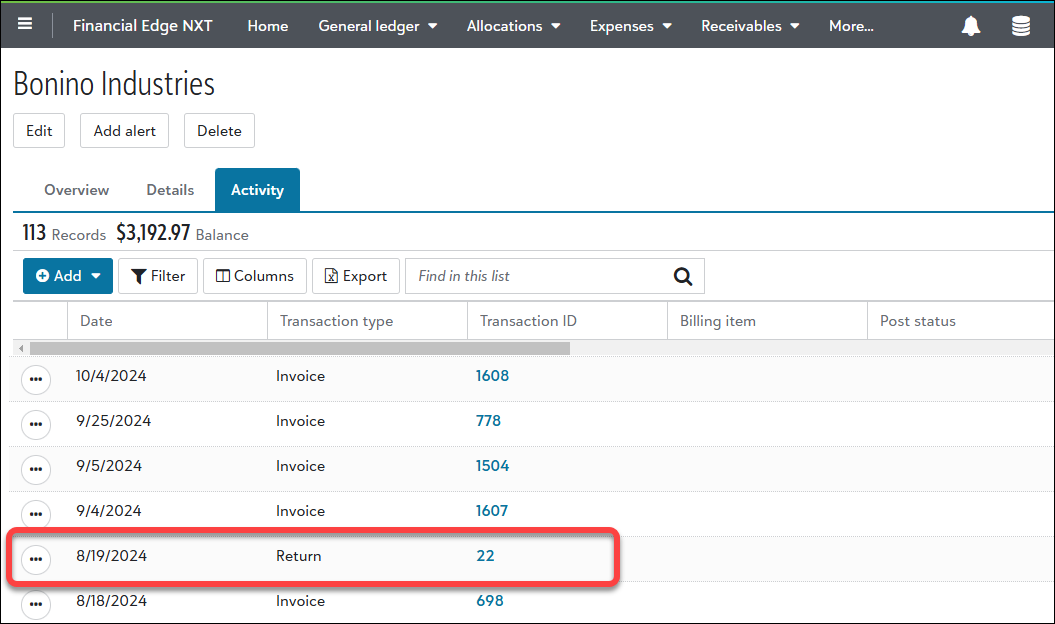
To view the return record, select View from a row's menu. The Overview, Distributions, and Applications tabs display for you to view and edit additional info.
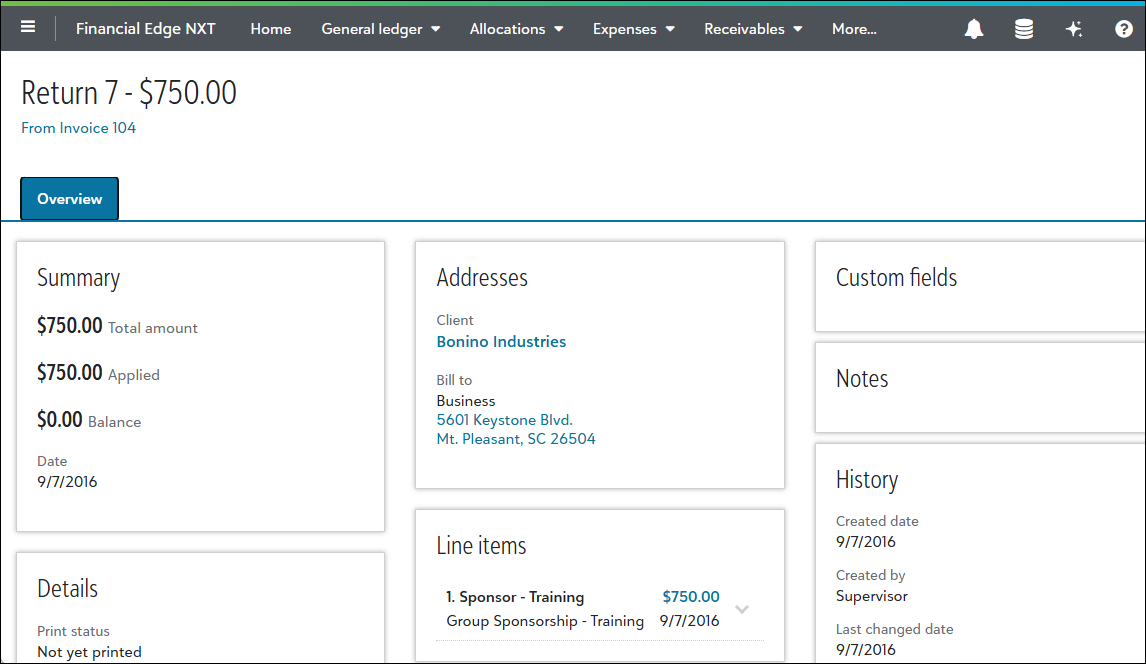
For more details, see Returns.
Applications
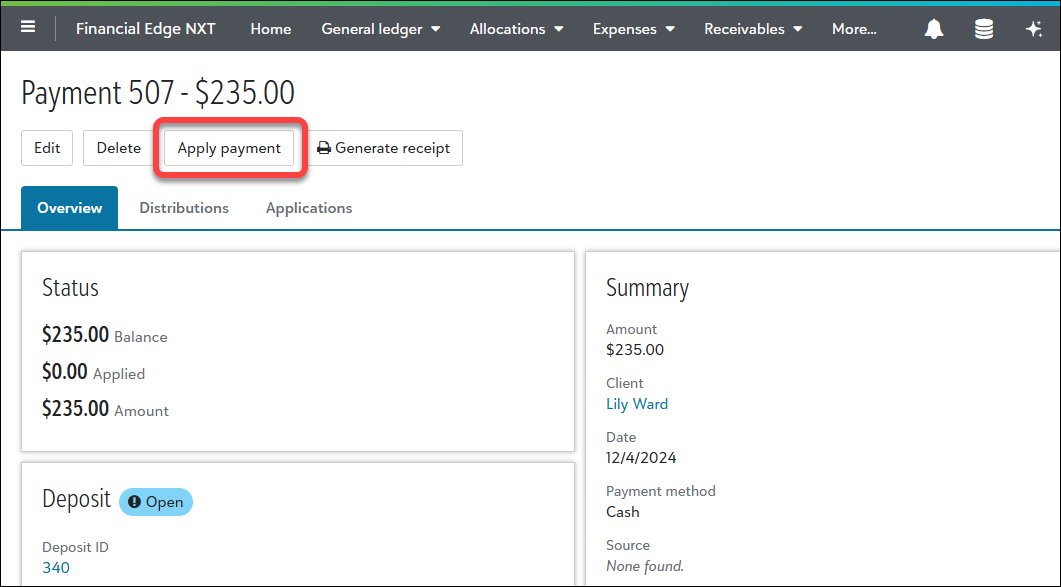
You can apply payments and credits to charges and line items for invoices in web view. To begin, you must first save the record, such as a payment or credit, before you can apply it.
To apply the payment or credit, open the record and select Apply payment (or Apply credit).
Tip: From a charge or line item record, you have the option to Apply payments and credits.
To apply the payment, select the checkbox in the row you're applying and enter the amount under Applied amount. Save your changes.
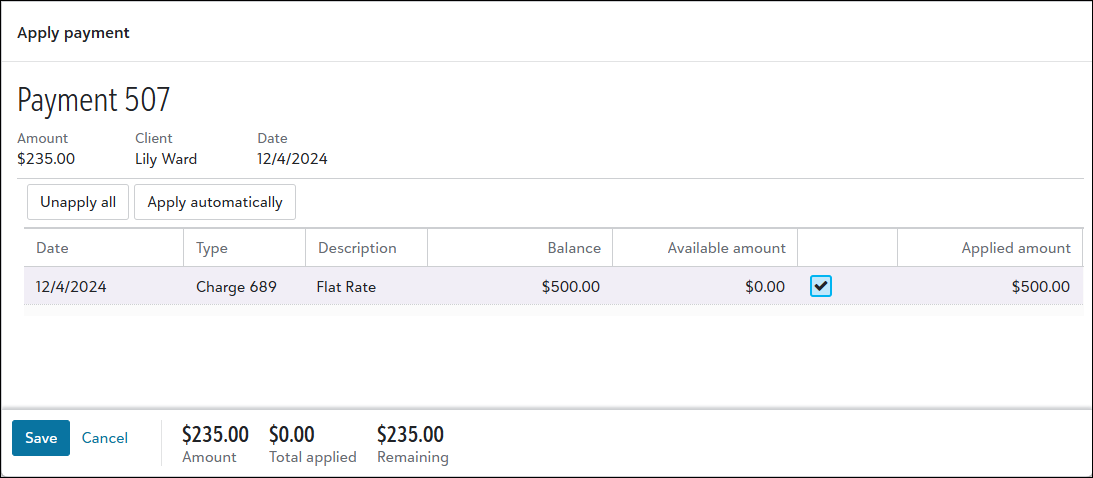
To automatically apply the payment to the charge or line item in the first row, select Apply automatically. If the payment amount exceeds the charge or line item amount, the payment is deducted from subsequent rows until the balance is $0.
To unapply all applications in the list, select Unapply all.
Note: You can also edit fields that don't impact distributions on receivable records with applications. For example, you can edit Payment method and Notes for payments with applications and Description and Comment for invoice line items with applications.
For more details, see the following:
Invoices
From Receivables, Invoices, you can add, edit, and delete invoices with line items for receivables and view their record pages in web view.
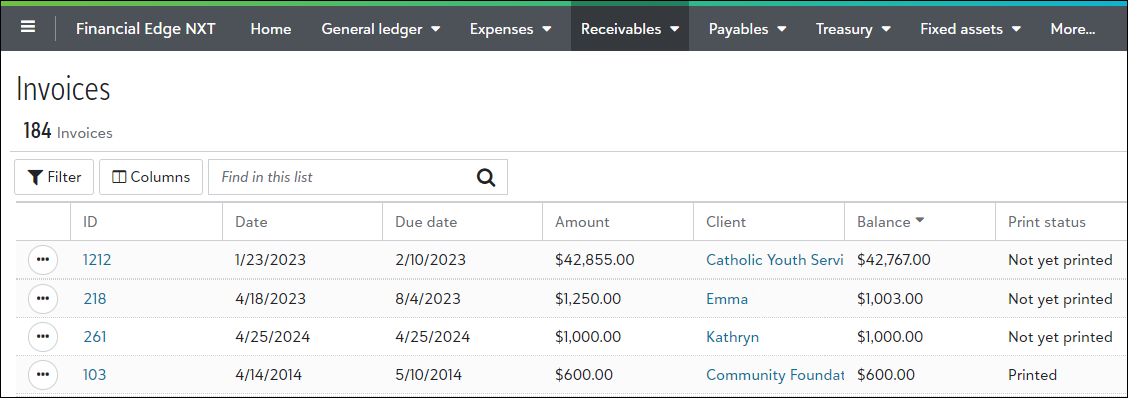
To view an invoice, select it in the ID column.

The page opens for you to view important data such as the summary, line items for the invoice, and the history.
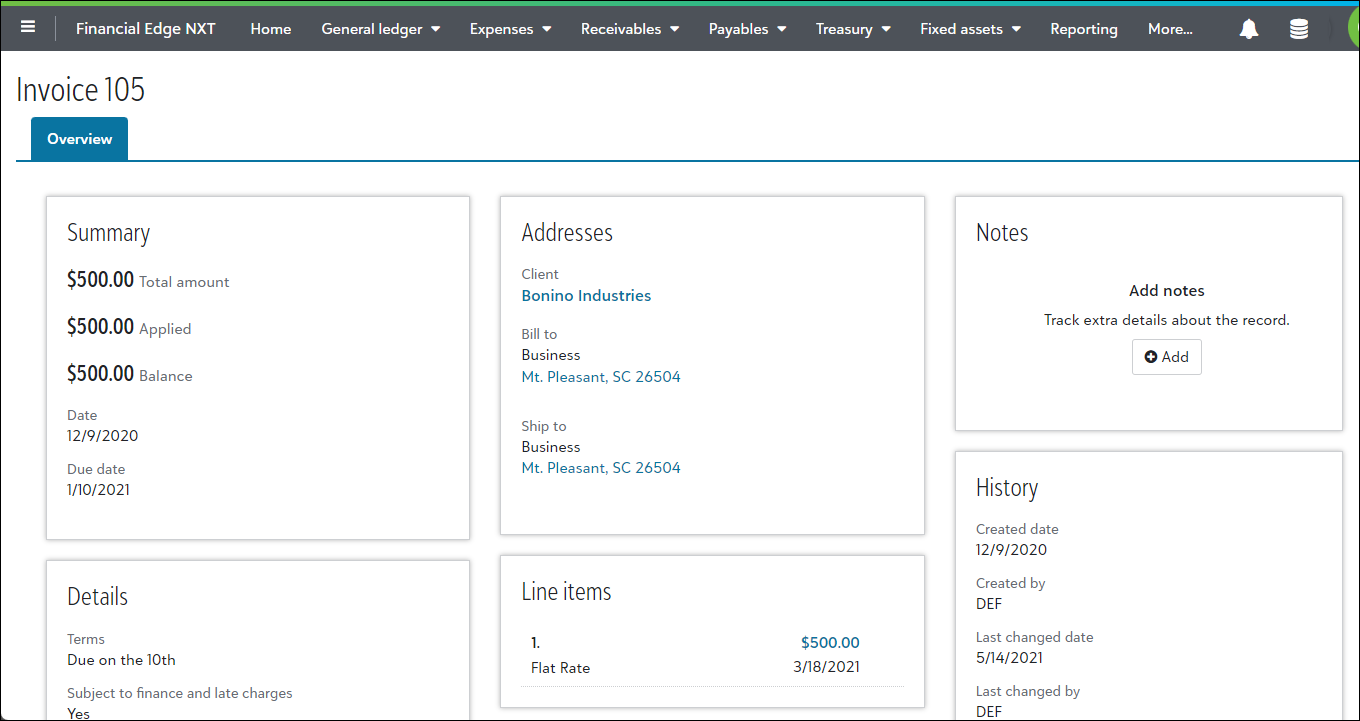
Note: When you add a new invoice, you can now add new line items for it under Line items. For more details, see Add Standard Invoices in Receivables.
Tip: In database view, invoices display associated payments and credits (applications). In web view, open the line item records for the invoice and review Applications.
To reverse an invoice and generate a return for the client, select Reverse.

After confirming the reverse, the return record displays.
Tip: After you save the return, you can access it on the client's record under Activity. For more details, see Return Records.
For more details, see Standard Invoices in Receivables.
Invoice line items
To open a line item record, select the one you need under Line items on an invoice record.
Note: You can now manage invoice line items with the Finance charge billing item type.
The page opens for you to view important data such as the balance, billing item, distributions, and applications for the line item.
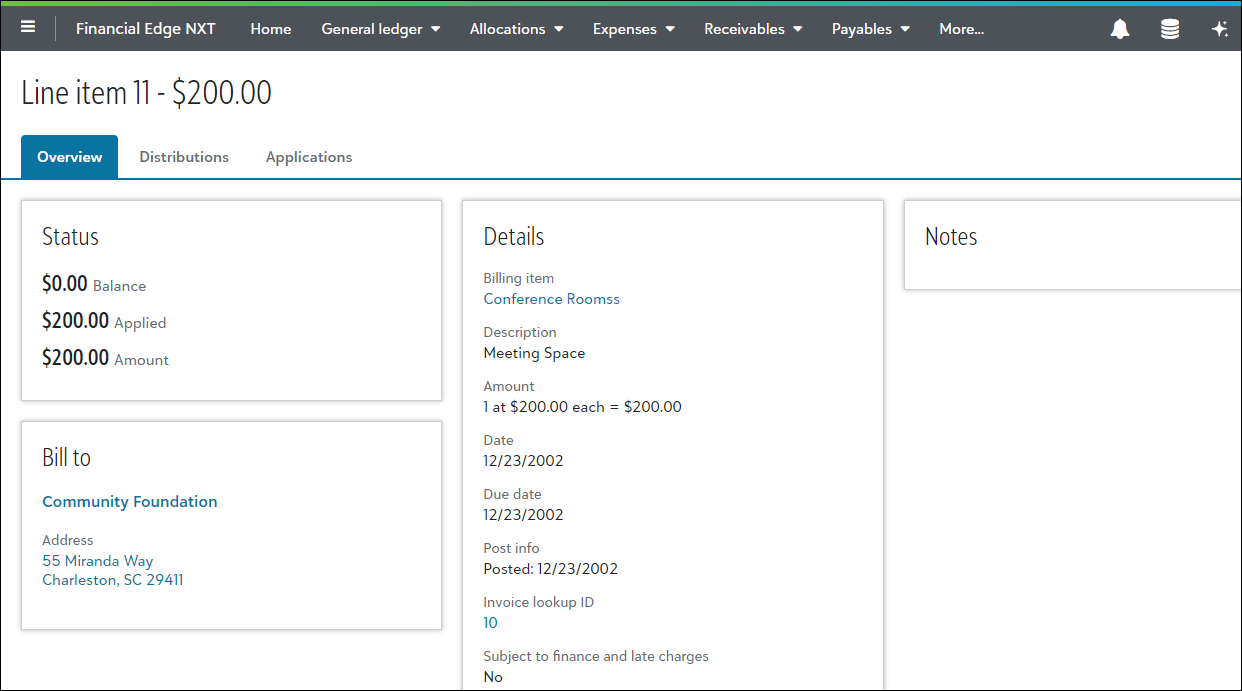
Tip: In database view, invoices display associated payments and credits (applications). In web view, open the line item records for the invoice and review Applications.
When adding an Invoice with line items in the web view, you will be prompted to enter the billing item information. This information will be used to populate the line item grid.
Reverse line items
To reverse a line item, open one with a Posted status and select Delete.
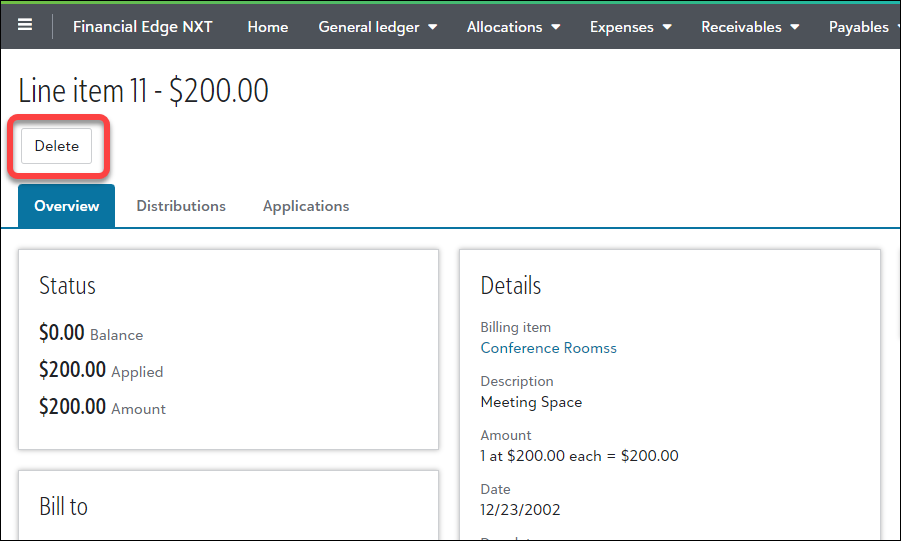
Tip: You can't delete a line item with unposted adjustments.
After you confirm to delete the line item, enter a reversal date for the journal entry that automatically generates the next time you post.
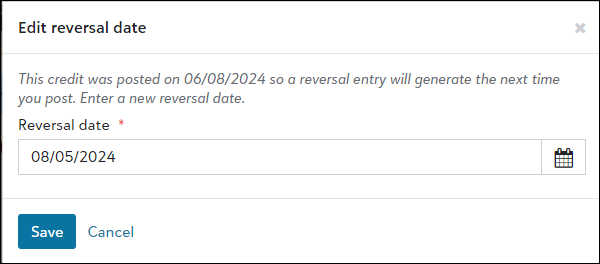
Note: You can edit the reversal date before posting it.
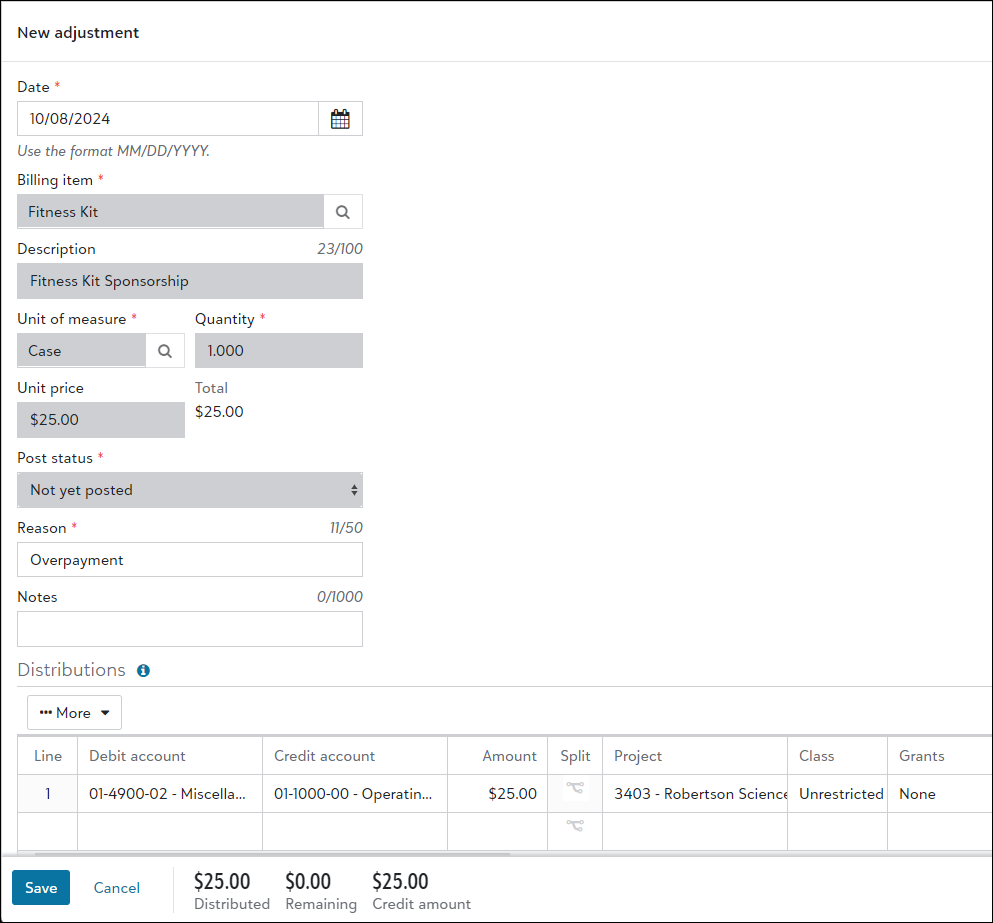
Adjust line items
To adjust a line item, open one with a Posted status and select Adjust.
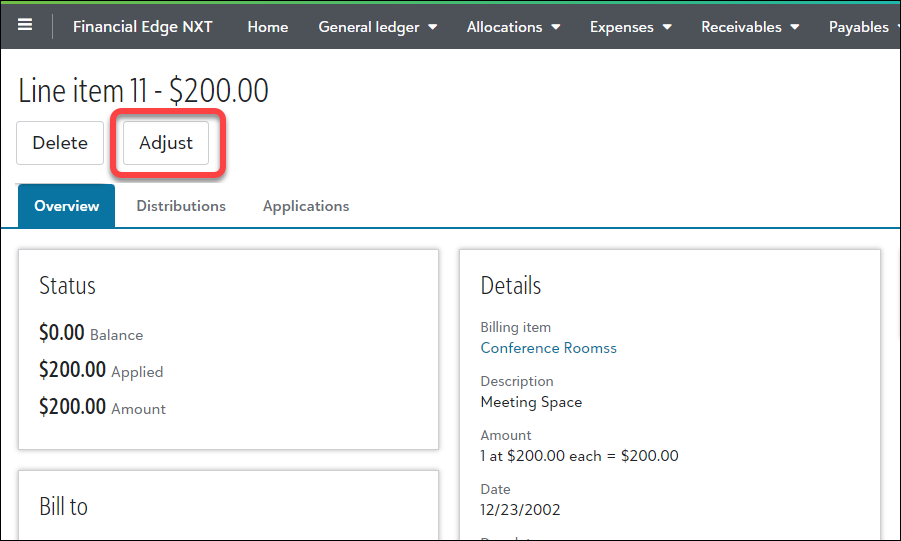
Enter adjustment details, such as the new date and reason, then save.
For more details, see Invoice Line Items in Receivables.
View and generate recurring invoices
Note: Currently, you can view and generate existing recurring invoices. Look for the ability to add, edit, and delete in a future release.
Use recurring invoices to create regular invoices quickly and easily according to a schedule. From Invoices, select Recurring to view the list and generate recurring invoices based on selected criteria and filters.
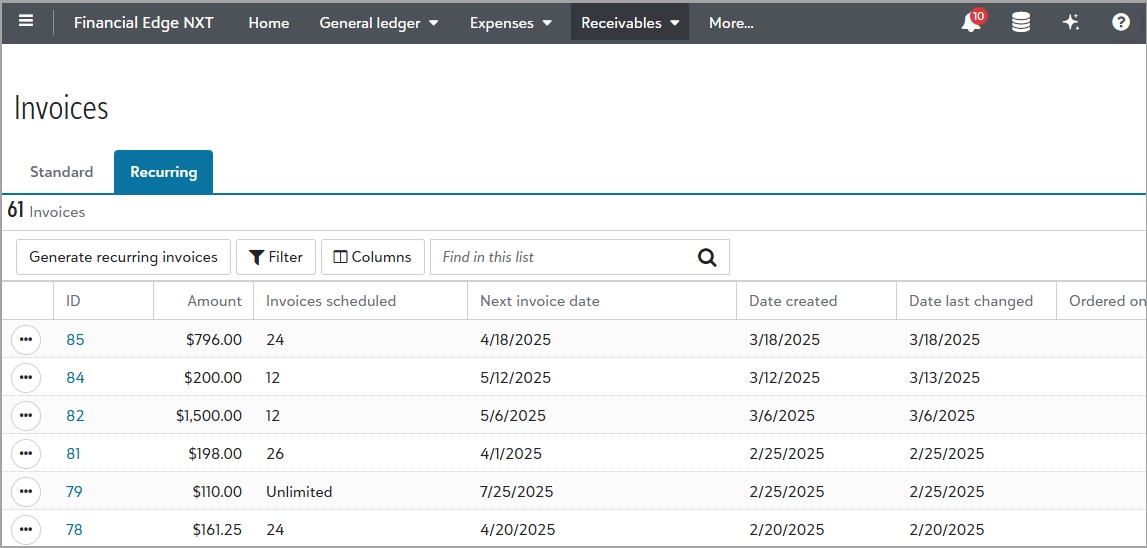
To open a recurring invoice, select it in the ID column.
For more details, see Recurring Invoices in Receivables and Generate Recurring Invoices in Receivables.
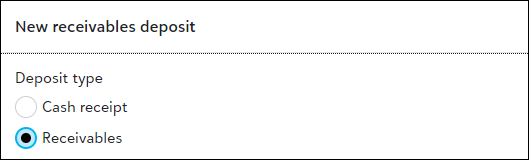
Deposits
You can add, edit, void, and delete deposits from Receivables, Deposits in web view. When you add a new deposit, under the new Deposit type section, select Receivables.
The remaining steps to add and manage a deposit for receivables is the same as a deposit in Treasury. For more details, see Deposits.
Note: You can enter default info for new payments you associate with the deposit, including the payment date, amount, and payment method.
Establish misc payment defaults
You can work with misc payment defaults for deposits, including the category and amount.

For more details, see Add Deposits.
Payments
You can add, edit, void, and delete payments from a deposit in Receivables and view their record pages in web view.
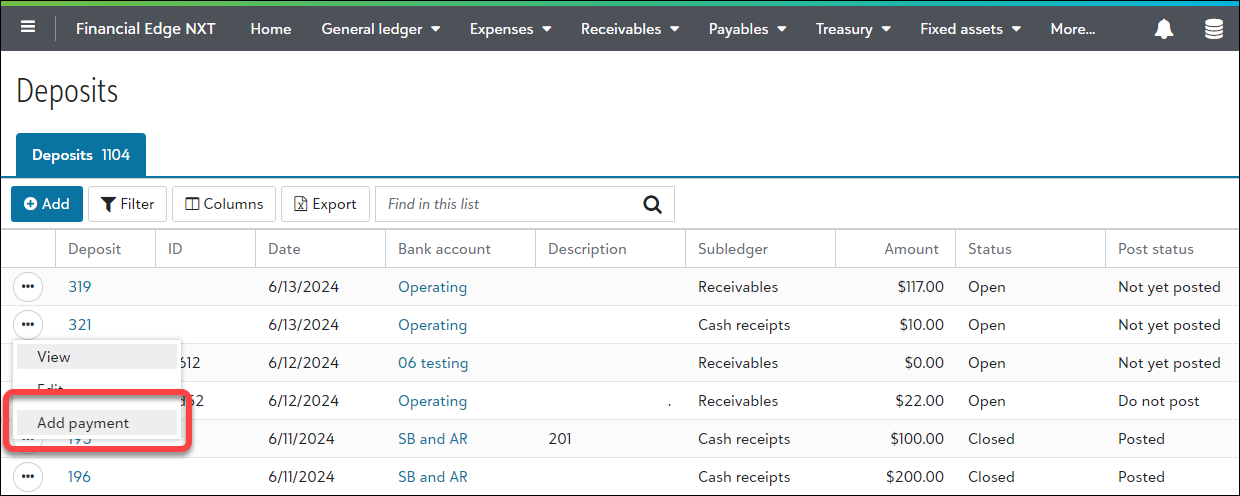
To view a payment from Receivables, Payments, select it under Payment ID.
Tip: From the list of payments, you can calculate fixed automatic payments and preview the results before generating transactions. For details, see Calculate Automatic Payments.

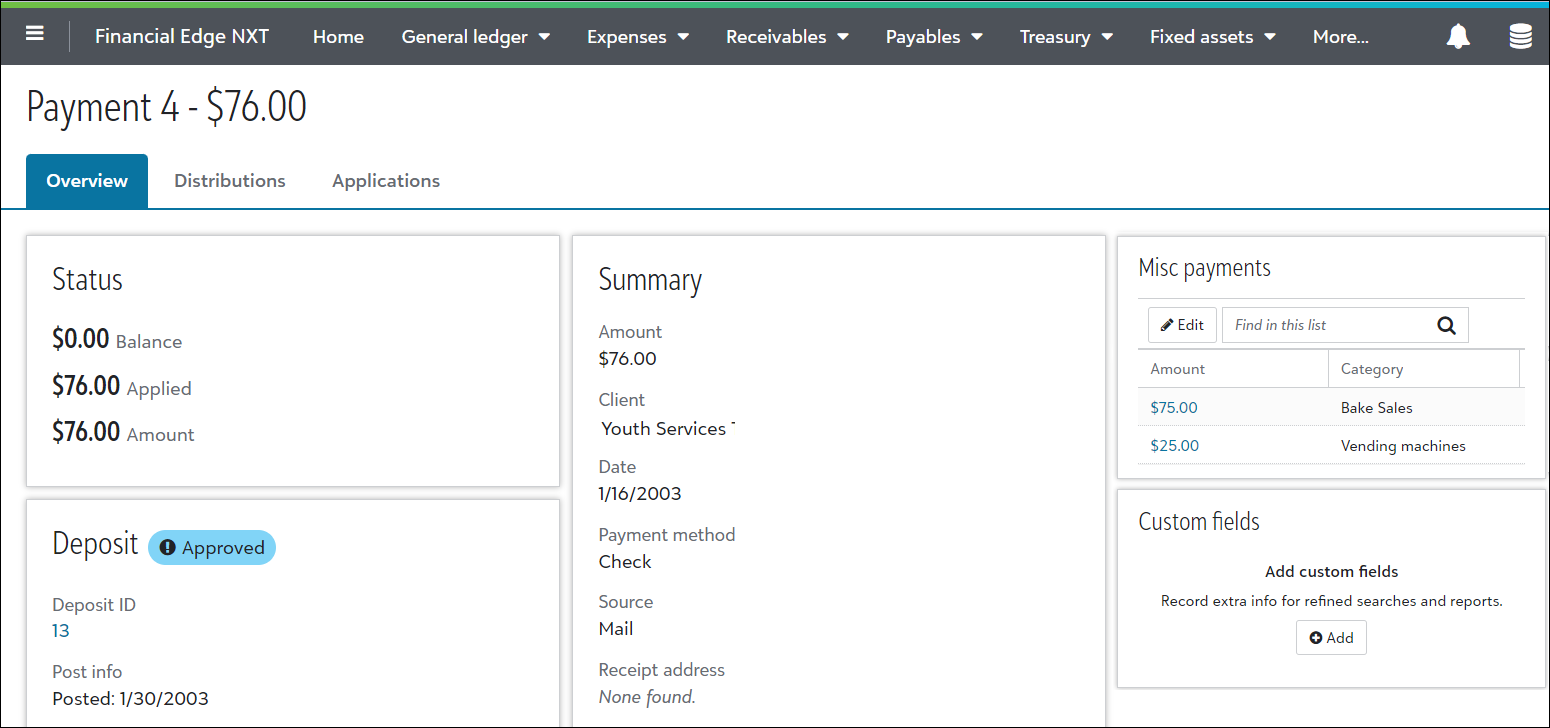
The page opens for you to include important data such as status, payment method, and details for the associated deposit. You can also split a receivable and misc payment.
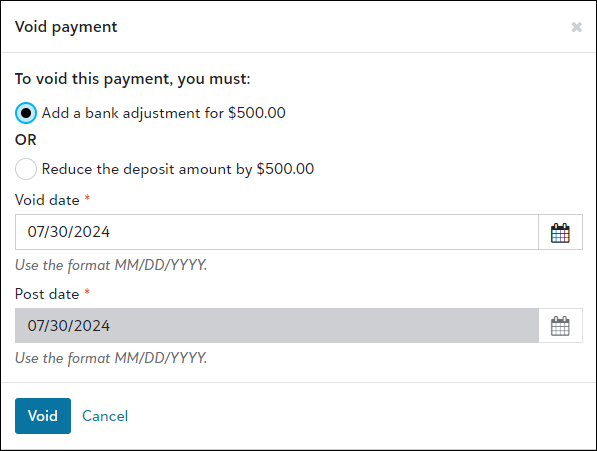
Void payments
To void a payment, open one with a Posted status and select Void.
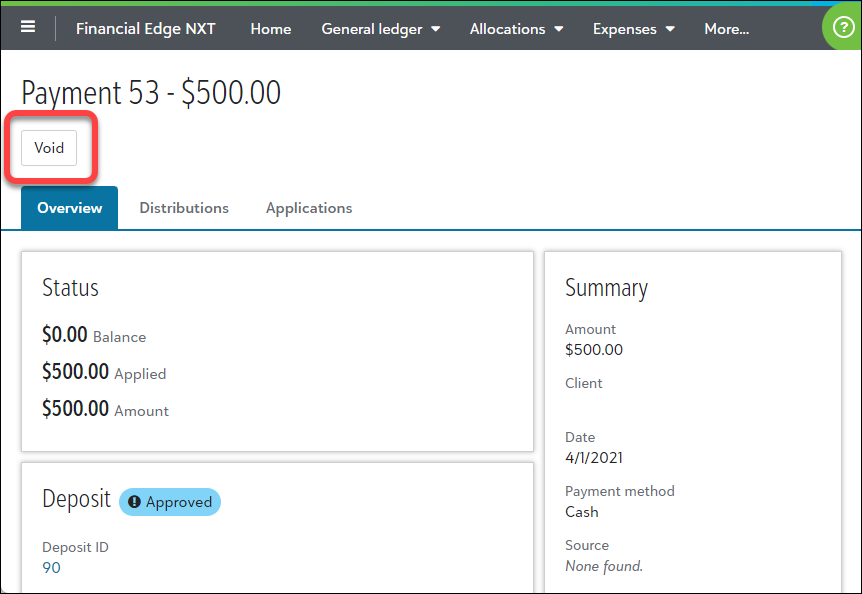
After you confirm to void the payment, determine if you want to add a bank adjustment to decrease the balance or reduce the deposit amount. Enter the void and post dates, then select Void again to complete the changes.
For more details, see Payments.
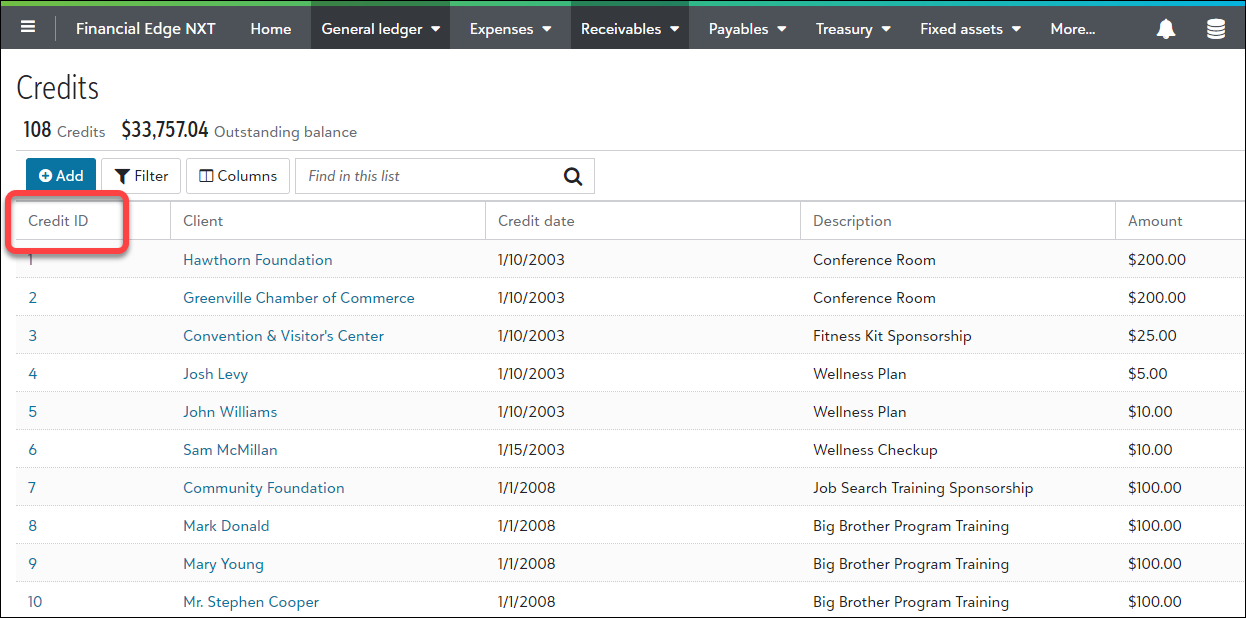
Credits
You can add, edit, reverse, and delete credits from Receivables, Credits and view their record pages in web view. To view a credit, select it under Credit ID.
Note: You can now manage credits with the Finance charge billing item type.
The page opens for you to view important data such as status, description, and post info.
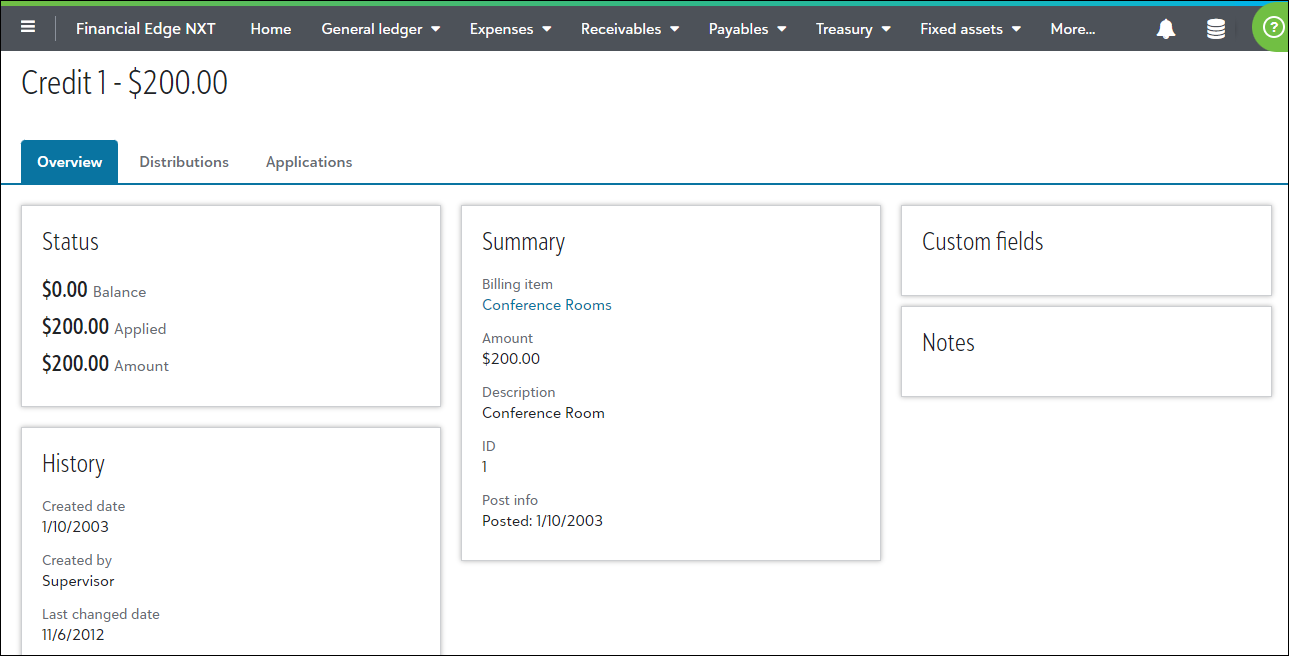
You can also view distributions and applications for the credit.
Reverse credits
To reverse a credit, open one with a Posted status and select Delete.
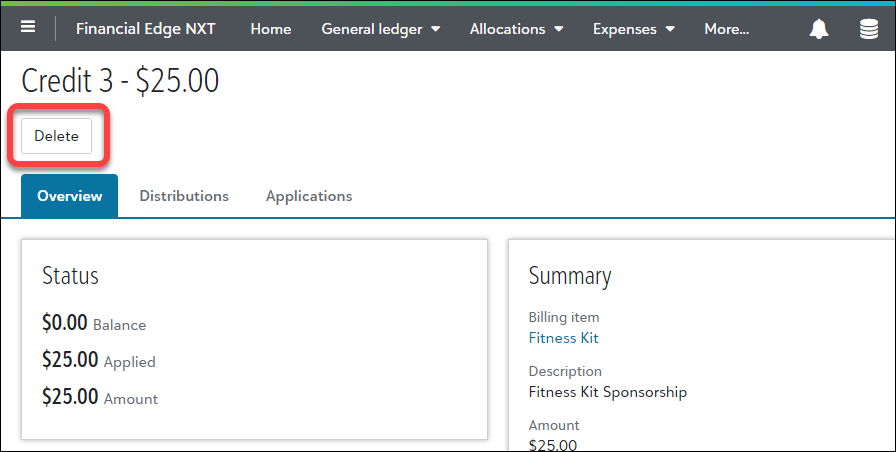
Tip: You can't delete a credit with unposted adjustments.
After you confirm to delete the credit, enter a reversal date for the journal entry that automatically generates the next time you post.
Note: You can edit the reversal date before posting it.
Adjust credits
To adjust a credit, open one with a Posted status and select Adjust.
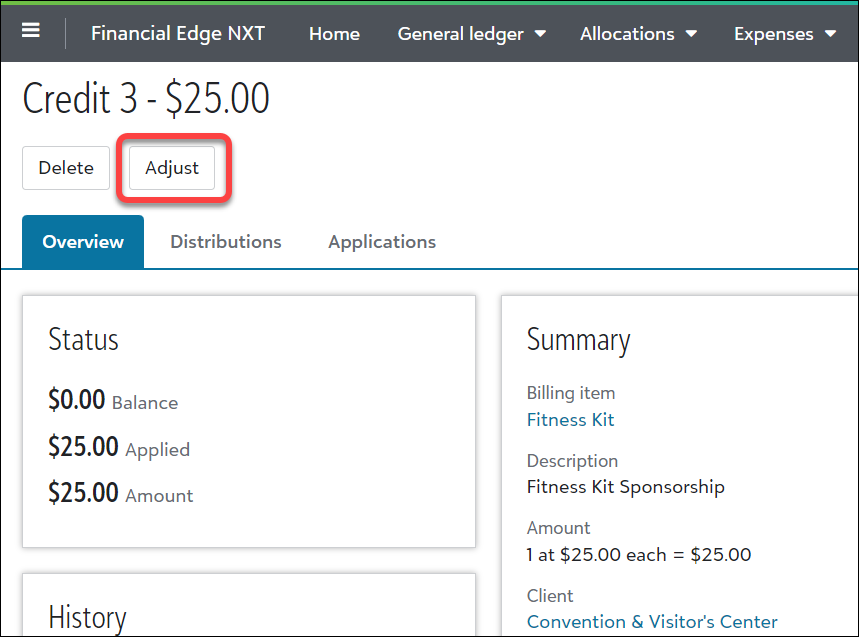
Enter adjustment details, such as the new date and reason, then save.
For more details, see Credits.
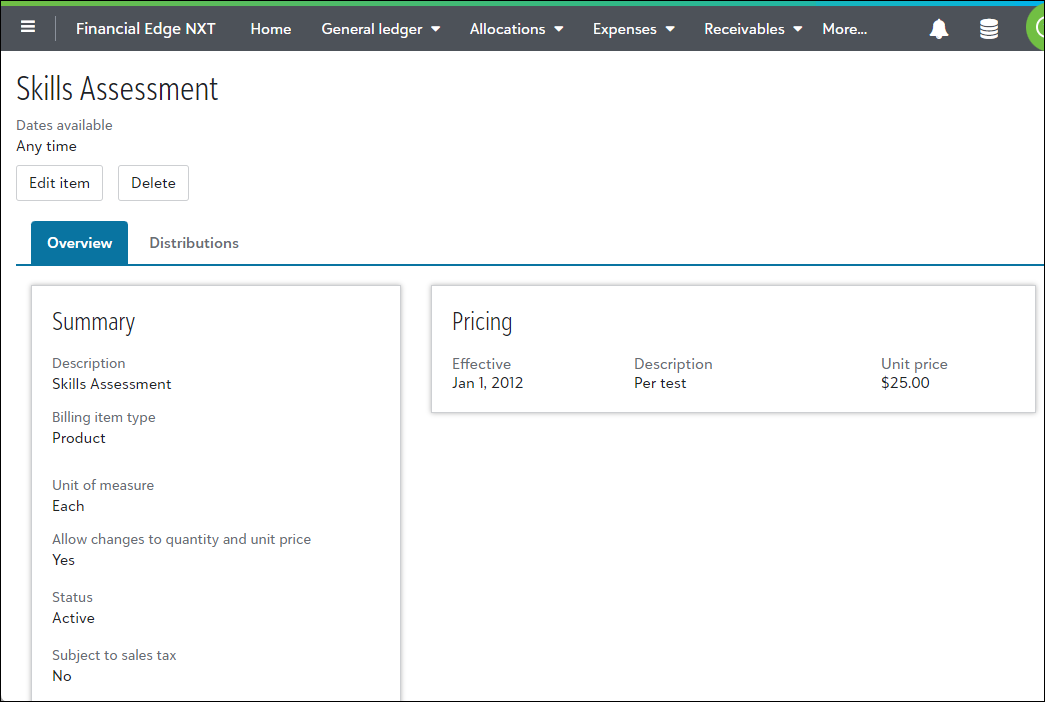
Billing items
You can add, edit, and delete billing items from Receivables, Billing items and view record pages for these flat rate, variable rate or quantity, and product billing items in web view. You can also manage and filter finance charge, refund, and sales tax billing item types. For details, see Billing Item Types
Note: Variable rate billing items were previously called per usage in the database view.
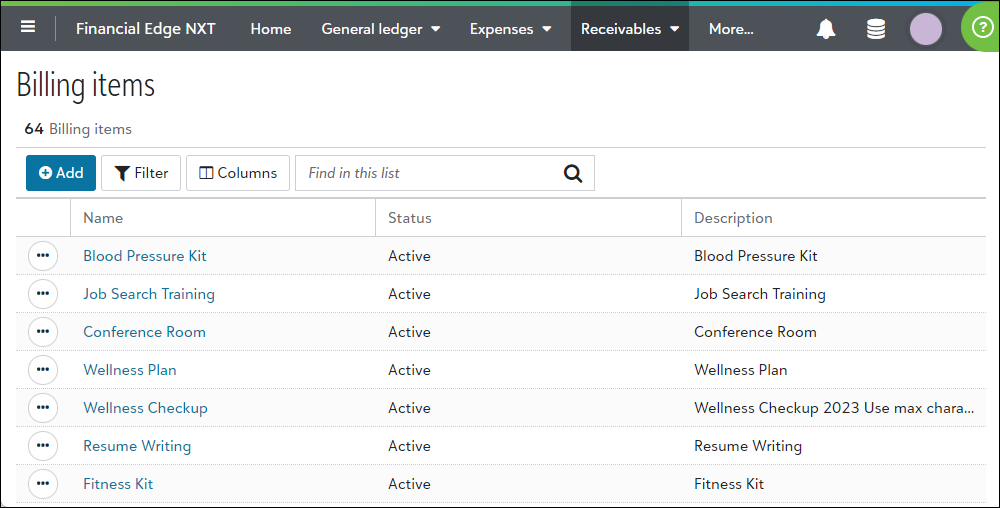
To view a billing item record, select it in the Name column.
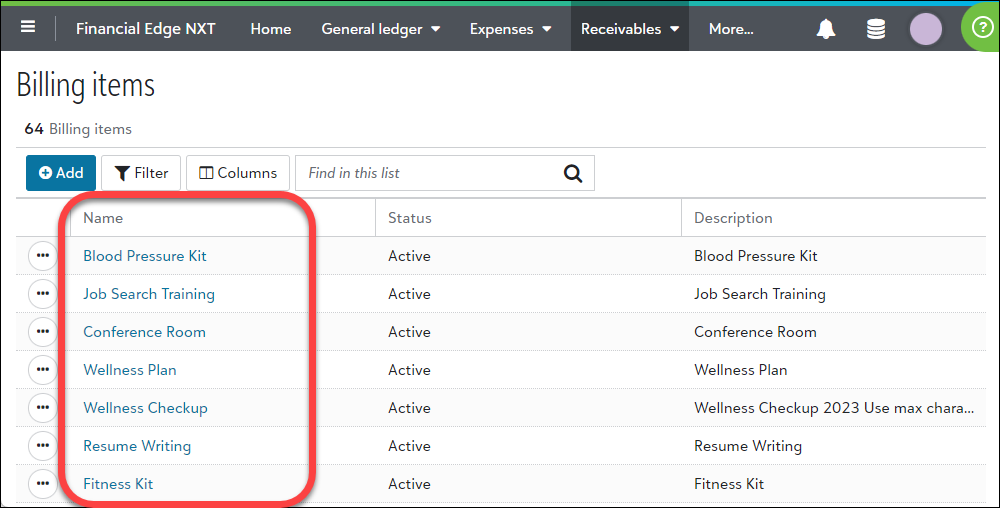
The page opens for you to view important data such as the description, status, comments, and history.
For more details, see Billing Items.
Clients
From Receivables, Clients, you can view, add, edit, and delete client records in web view. You can also calculate finance and late charges for selected clients.

To add a new client, select Add, Individual client or Organization client. Enter client details such as status, address and contact info, as well as data entry and billing item defaults.
To view a client record, select it under Client. From the client record, you can review transaction activity and manage details related to the client including notes, relationships, and payer info. You can also view and add new charge, credit, invoice, return, and refund records from the Activity tab.
For individual client records, you can manage name formats, as well as address and salutation information. To add or edit name formats, select Edit, Name. To add or edit address and salutation information, select Edit, Addresses/salutation.
You can also add a status and custom fields to the actions you create on client records. To add a status or custom filed to an action, go to the Action tile of a client record. If you add an incorrect record type, you can quickly convert an individual to an organization and vice versa. Keep in mind that record details are discarded if they aren't needed for the new type.
Tip: From a client record, you can determine who receives statements (or copies) and add automatic payments for clients. For details, see Statements and Automatic Payments.
For more information, see Clients.
Manage Fixed automatic payment plans
From a client record, you can now add and manage Fixed automatic payment plans. With fixed plans, clients pay fixed amounts according to a schedule. For even greater efficiency, use EFT transactions to draft automatic payments from a specified bank account.
For more information, see Client Records.
Generate refund checks
You can now generate and print a check for a refund. On a refund record (that you access from a client's record under Activity), select Generate refund check.

After you enter bank and payee info, enter check details such as check number, description, and distributions.

Before you generate the check, select Edit print settings to set or change format settings for the check. You can also test the format from here.
Note: Print format settings are based on your bank selection. Anything you change remains in place until they're changed again by you or someone else at your organization.
To generate and print the check, select Generate check.
For more details, see Refund Checks.
Automatic applications
You can now automatically apply new payments and credits for clients in web view. From Settings, Business rules, General select Always or As defined on each client under Automatically apply new payments or Automatically apply new credits. If you define them for each client, make sure to select Automatically apply new payments and Automatically apply new credits under Data entry defaults on the client's record.
Note: The ability to process automatic applications is new in web view, but settings and client defaults were introduced in an earlier release.
Additional settings exist to determine how you want to automatically apply applications. For example, you can select to always apply new payments and credits to existing charges or ask each time, and you can determine whether payments and credits apply to the oldest charge first or the most recent. For more details, see General.
Charges
You can add, edit, reverse, and delete charges from Receivables, Charges and view their record pages in web view. To view a charge, select it in the Charge ID column.
Note: In a future release, you'll be able request grant reimbursements from charge records.
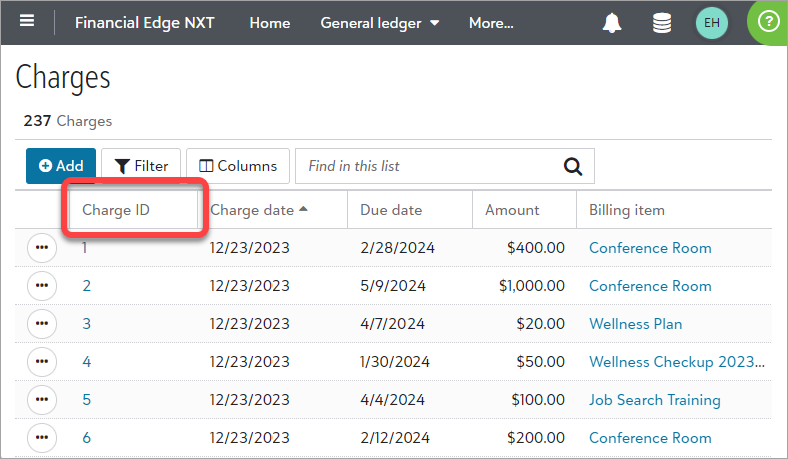
The page opens for you to view important data such as charge details and billing info, payments and credits, and distributions.
Reverse charges
To reverse a charge, open one with a Posted status and select Delete.
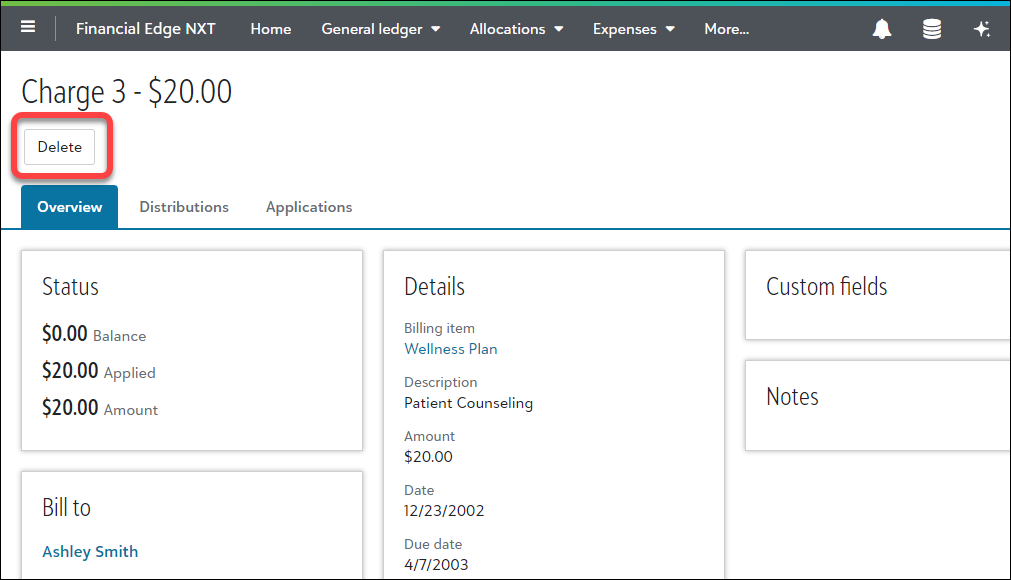
Tip: You can't delete a charge with unposted adjustments.
After you confirm to delete the credit, enter a reversal date for the journal entry that automatically generates the next time you post.
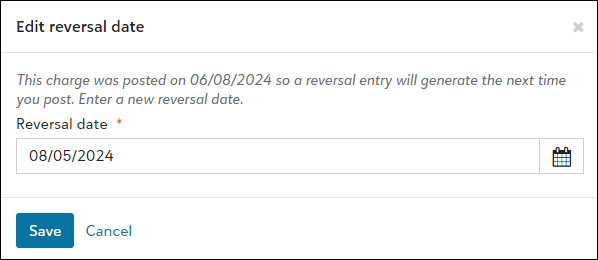
Note: You can edit the reversal date before posting it.
Reverse charges as credits
You can now reverse a charge as a credit in web view. From the charge record, select Reverse charge.
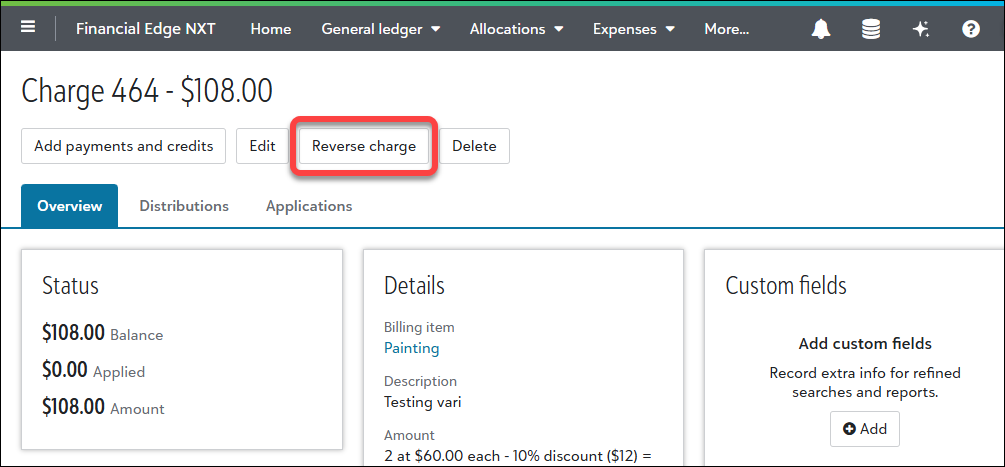
After you confirm the reverse, the new credit is saved and automatically applied to the charge to reduce the client's balance.
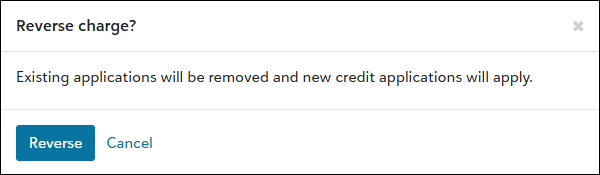
Tip: If you don't want to reverse the entire charge amount, select Reverse part of charge to enter a different amount for the new credit. The amount you enter also automatically applies to the charge to reduce the client's balance.
Adjust charges
To adjust a charge, open one with a Posted status and select Adjust.
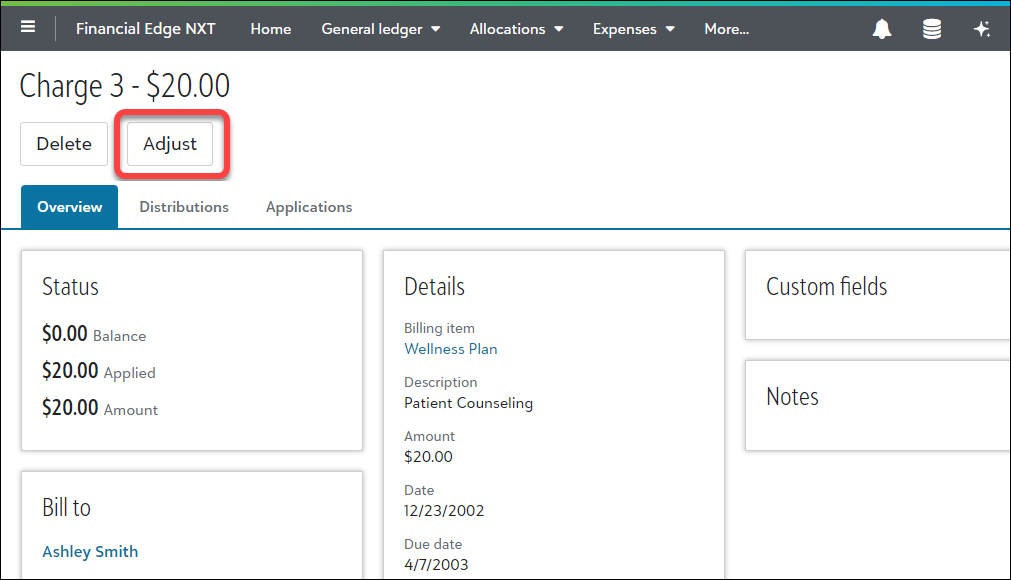
Enter adjustment details, such as the new date and reason, then save.
For more information, see Charges.
Refunds
From Receivables, Clients, you can now add and edit refund records in web view. To add a refund, open the client's record and select Add, Refund under Activity.

To view a refund record, select it under Transaction ID.

The Overview, Distributions, and Applications tabs display for you to add and edit additional info.

Tip: You can also now view a refund from a bank's Register tab. To locate the refund, search by One-time check for Transaction type and select View from the row's menu.
Reverse refunds
To reverse a refund, open one with a Posted status and select Delete.

You can't delete a refund with unposted adjustments.
Tip: After you confirm to delete the refund, enter a reversal date for the journal entry that automatically generates the next time you post.

Note: You can edit the reversal date before posting it.
Adjust refunds
To adjust a refund, open one with a Posted status and select Adjust.

Enter adjustment details, such as the new date and reason, then save.

For more details, see Refund Records.
Request grant reimbursements
If your organization receives reimbursable grant funding, you can add criteria to report, track, and request qualified expenses for reimbursement.
First, you must establish reimbursement rules on the grant record. For more details, see Add Reimbursement Rules.
Next, you can request reimbursements to generate charge and line item transactions from Receivables, Charges, Request Grant reimbursements.
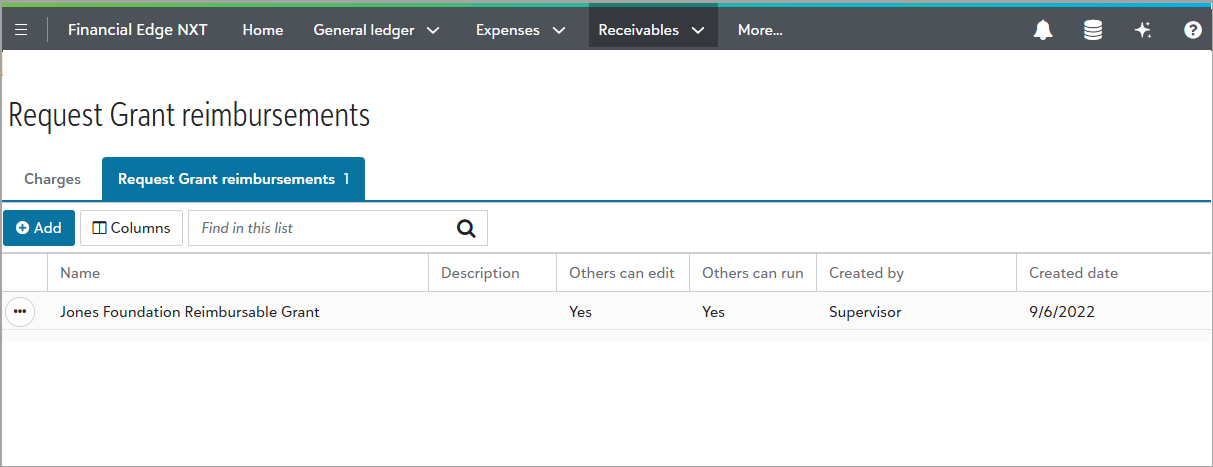
For more information, see Request Grant Reimbursements.
Communications
From Receivables, Communications, you can view, add, edit, rename, and generate statements, as well as invoice and receipt forms. Under Statements, Invoices, or Receipts, search and sort the list to quickly locate the form you want. To edit, select the form name, or choose Edit from the form's menu.
After you add and generate, view the form to ensure your parameters are accurate (if not, simply edit and generate again). From the form, you can choose to export to a PDF, then print.
For more information, see Receivables Communications.
Settings - General
From Settings, Receivables, you can select Configuration, General to add contact info such as address and phone.
Settings - Aging info
From Settings, Receivables, you can select Configuration, Aging info to track receivables invoices and determine if they are current or overdue (and by how many days).
For more information, see Aging Info.
Settings - Statement info
From Settings, Receivables, you can select Configuration, Statement info to view and edit custom transaction references to use on statements. Here, you define reference info for all receivables transaction types, such as payments and credits.
For more information, see Statement Info.
Settings - Payment terms
From Settings, Receivables, you can select Configuration, Payment terms to define terms for invoices so you can offer your clients discounts if they make early payments. For example, if you offer a 3/5 net 30 discount, clients receive a 3% discount if they pay within 5 days.
For more information, see Receivables Settings.
Settings - Addressee and salutations
From Settings, Receivables, you can select Configuration, Addressee and salutations to define the way client addressee info and salutations display on statements, invoices, and other correspondence.
For more information, see Receivables Settings.
Settings - Default accounts
From Settings, Receivables, you can select Configuration, Default accounts to designate specific accounts to use in distributions. Since the accounts you select impact your records and distributions, evaluate each setting closely.
For more information, see Receivables Default Accounts.
Settings - Business rules
You can access all business rules for Receivables in web view!
Receivables business rules help you customize standard procedures and requirements to suit your organization. To define receivables business rules, navigate to Settings, Receivables.
For more information, see Receivables Settings.
Reimbursement rules
If your organization receives reimbursable grant funding, you can now add criteria to report and track qualified expenses for reimbursement.
From a grant record, you can view, edit, and delete existing rules, or add new ones. You can also view distributions for each existing rule, including credit and debit accounts.
For more information, see Add Reimbursement Rules.
Attachments
With attachments, you can upload or link files as attachments, including images, PDFs, Word documents, or Excel spreadsheets. In addition to clients and deposits, you can now add and manage attachments for the remaining receivables records:
For more details, see Attachments.
Invoice report
Under Reports in web view, you can add and run the Invoice report for Receivables. The Invoice report lists invoice and return information. For example, you can specify to include invoice order and return dates.
Project distribution report
Under Reports in web view, you can add and run the Project distribution report for Receivables. The Project distribution report shows debit and credit amounts for projects, created by receivables transactions and adjustments.
Account distribution report
Under Reports in web view, you can add and run the Account distribution report. Use this report to view debit and credit amounts created by receivables transactions and adjustments.
For more information, see Account Distribution Report for Receivables.
Aged accounts receivable report
From Reports in web view, you can add and run the Aged accounts receivable report. Use this report to view balances distributed in aging periods which will help determine past due and current balances for clients.
For more information, see Aged Accounts Receivable Report.
Open items report
From Reports in web view, you can add and run the Open items report. Use this report to view open transactions (including charges) based on a selected date. Determine if transactions posted properly and which subsidiary ledger transactions are causing a difference in your general ledger balance.
For more information, see Open Items Report.
Journal references for posting
You can customize journal references in web view. A journal reference is a user-defined, alphanumeric code added to each journal entry transaction during batch creation. Use journal references to track details and compare transactions with source documents.
From General ledger, Settings, Posting info, customize these journal references using prefixes for adjustments and reversals, journal values for transactions, as well as field and length details.
For more information, see Posting Info.
Post
From General ledger, Post subledgers, you can add post parameters and post transactions for receivables in web view.
When you add a post parameter, under Subledger, select "Receivables". You can then specify a journal code to assign to transactions.
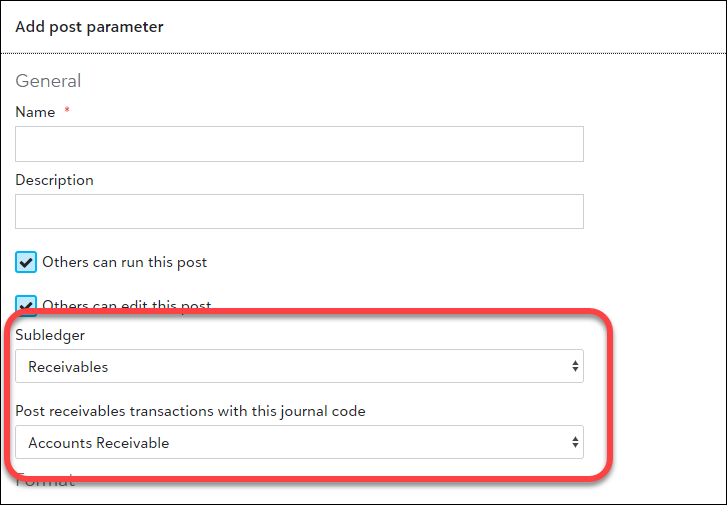
To post receivables transactions, select Receivables.
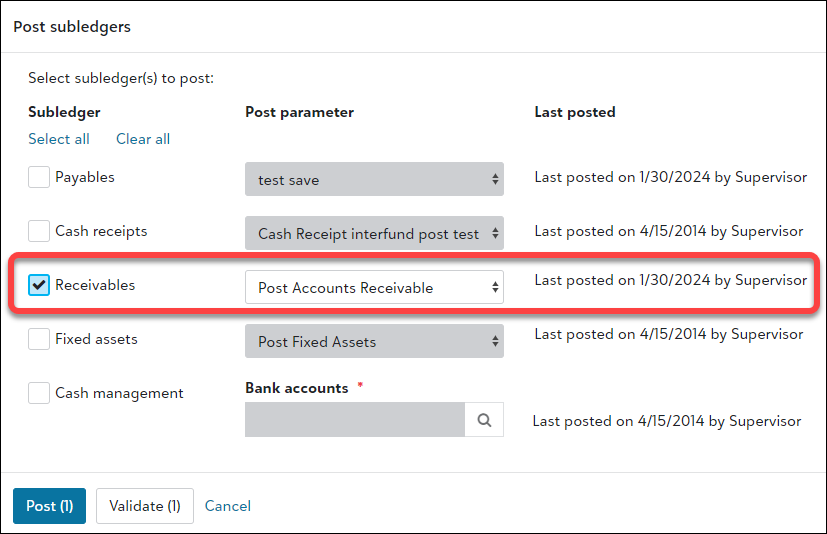
Note: Receivables transactions will post from database view. In a future release, we'll offer full support for adding and managing receivables in web view.
The remaining steps for adding parameters and posting transactions remains the same as it is for other subledgers. For more details, see Post Subledgers.
Query
From Receivables, Query, you can view queries from the database view. For more details, see Query.
Note: While most of your queries are visible in web view, you may not be able to view or run a query if you don’t have permission to view them or support for the query is coming in a future release.
Custom fields
You can add custom fields for receivables from Settings, Fields and tables in web view. When you add a custom field, under Subledger, select "Receivables" to make the field available for use in all relevant areas.
Note: In database view, custom fields are called attributes.
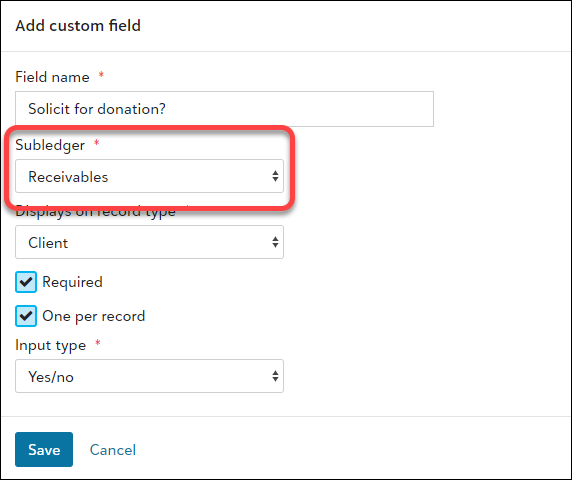
For more details about custom fields, see Add Custom Fields to a Record.