What's New
Blackbaud Financial Edge NXT releases new features on a regular basis, so keep an eye on this space for details about these additions! Some features will release generally for all customers while others will be available in waves - as small, usable increments. Similarly, some will release to our United States customers first, while support for other locales will be added to future releases. We'll note locales so that you can be aware of what's available.
 Start Your Web Purchasing Workflow in Web View!
From Expenses, you can now add, edit, and delete purchase requests in web view. This is the first step in the web purchasing workflow.
Note: Don’t see this yet? Adding and editing purchase requests is in Limited Availability (LA) and rolling out in waves. This is the first feature in the web purchasing workflow. See What’s next for purchase requests for upcoming features. During LA, we’ll use participant feedback to prepare for general availability.
To get started, under My purchase requests, select New request.
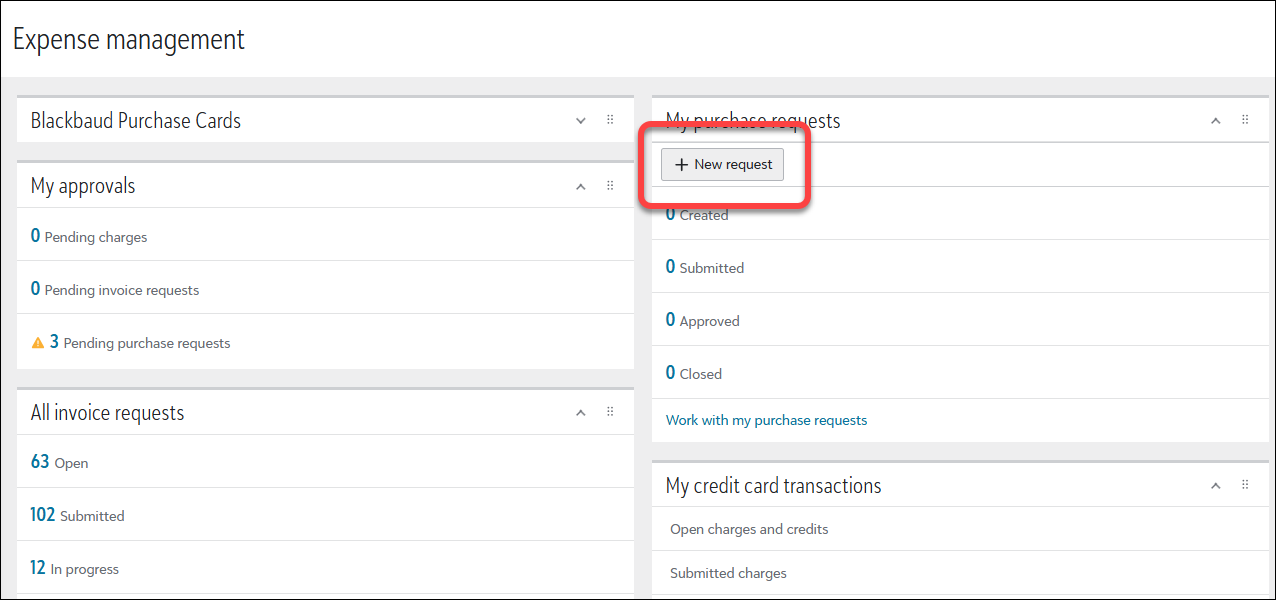
Tip: You can also create a new purchase request by selecting Work with my purchase requests, then select Add.
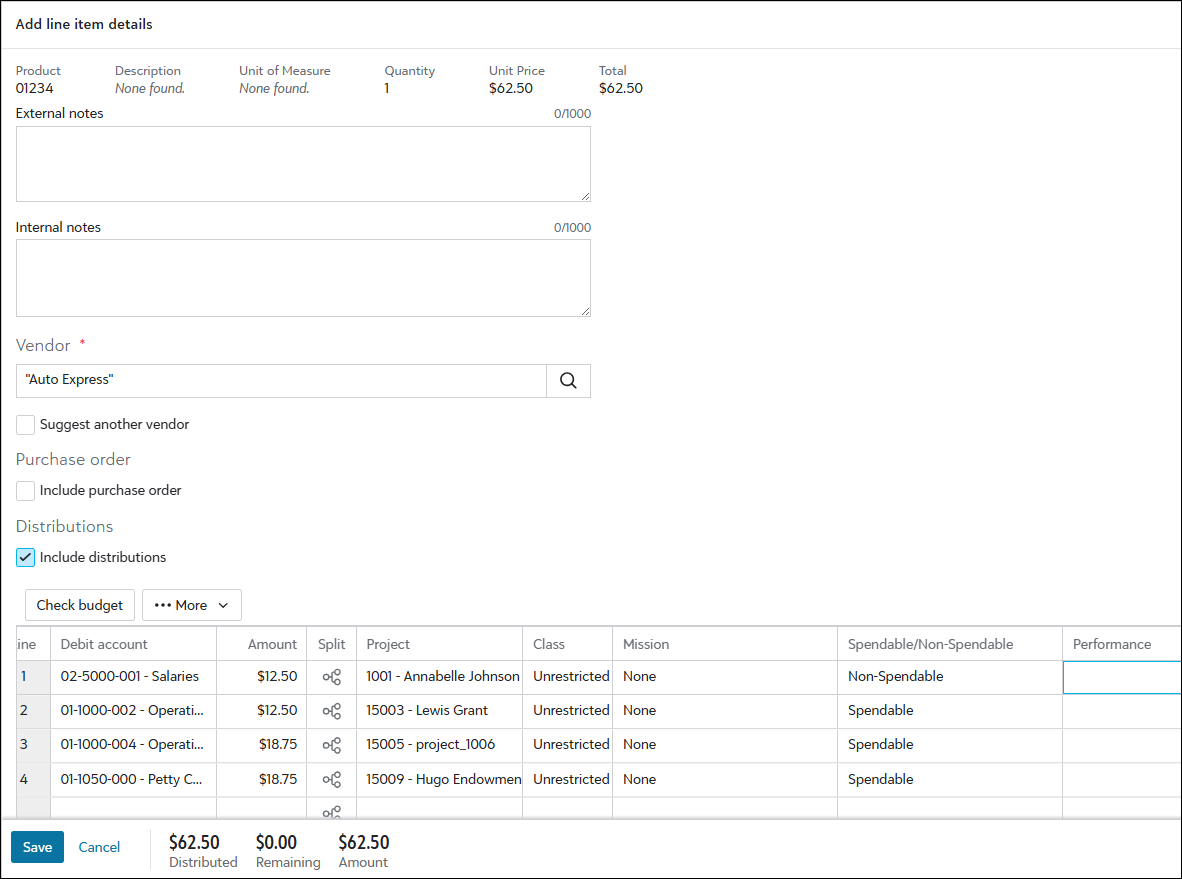
After you enter a description, select the approval rule, add a line item, then Edit details.
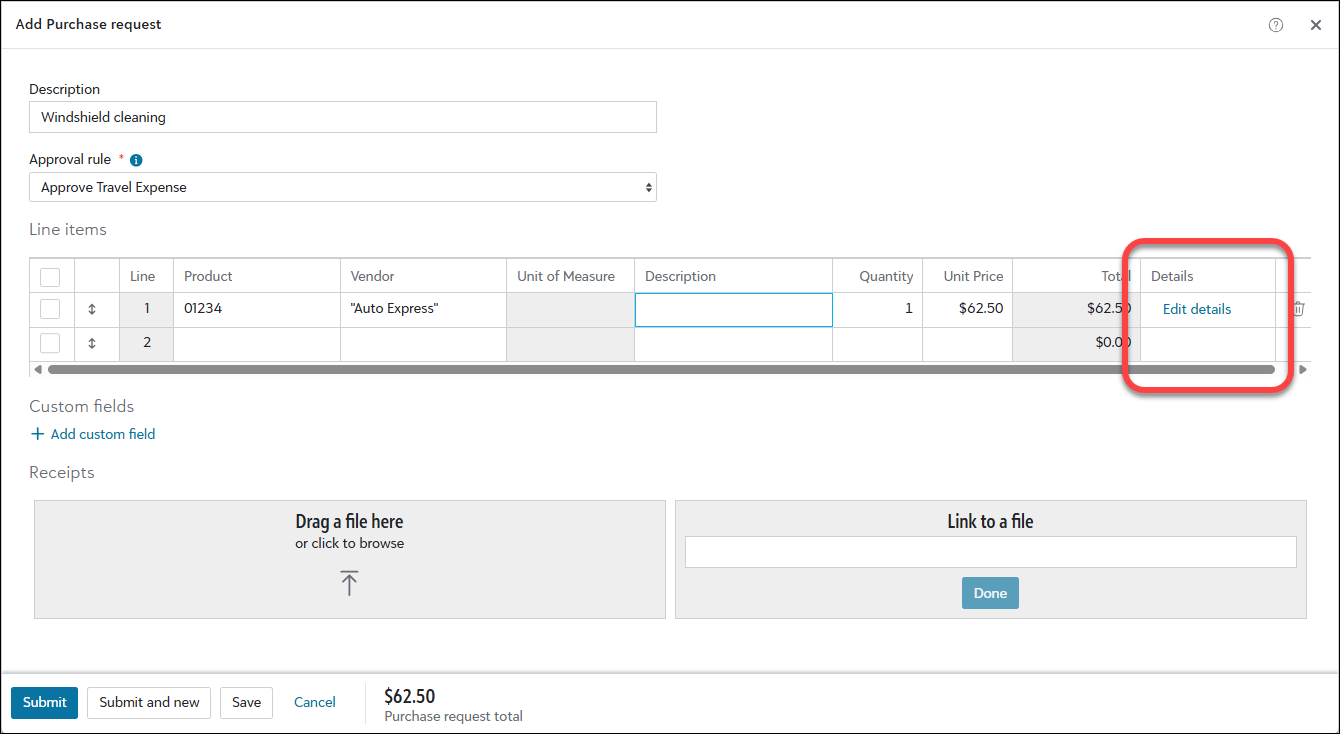
From here, you can:
For more details, see My Purchase Requests.
What’s next for purchase requests?
The ability to add and edit a purchase request in web view is the first step in the web purchasing workflow. Additional functionality, such as sending notifications, approving or rejecting requests, and generating receipts will be available in a future release.
If you only need to add, edit, or delete a purchase request, you can now do this in Financial Edge NXT. To complete the full purchasing workflow, return to WebPortal.
Improved visibility into vendor Payment Assistant enrollment
The new Payment Assistant tile on vendor records shows, at a glance, whether a vendor is enrolled in Payment Assistant and how they’re set up to receive payments through REPAY. This makes it easy to quickly confirm a vendor’s payment setup without digging through vendor details.
For enrolled vendors, the tile highlights the payment method and enrollment date. It also surfaces supporting information — such as recent payment activity — so you can better understand a vendor’s overall payment status.
You can review how a vendor receives payments, spot missing or incomplete EFT (electronic funds transfer) details, and take action directly from the vendor record.
In addition, Enrolled delivery method is now available as a new column on the Payments tab in Payment Assistant, making it easier to review payment setup across vendors.
Void one-time checks from bank accounts
You can now void one-time checks directly from bank account records in Treasury. This provides greater control when managing check payments and makes it easier to correct errors.
From Treasury, Bank accounts, open the bank account associated with the payment. On the Bank account tab, Pay invoices tile, select More, then Void selected payments. Set One-time checks as your Transaction type and enter your criteria. Select Void now and confirm.
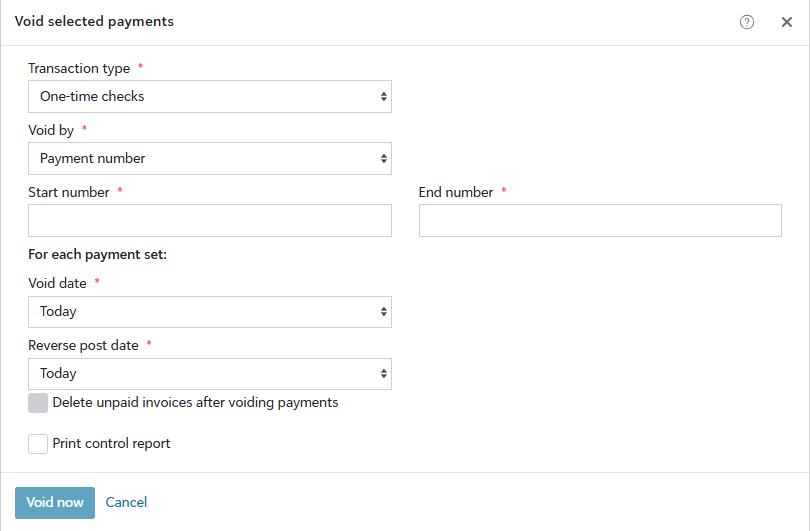
From the Register tab of the bank account, you can void a transaction that does not already have a Voided status. Open the transaction’s menu, enter the required criteria, select Void now and then confirm.
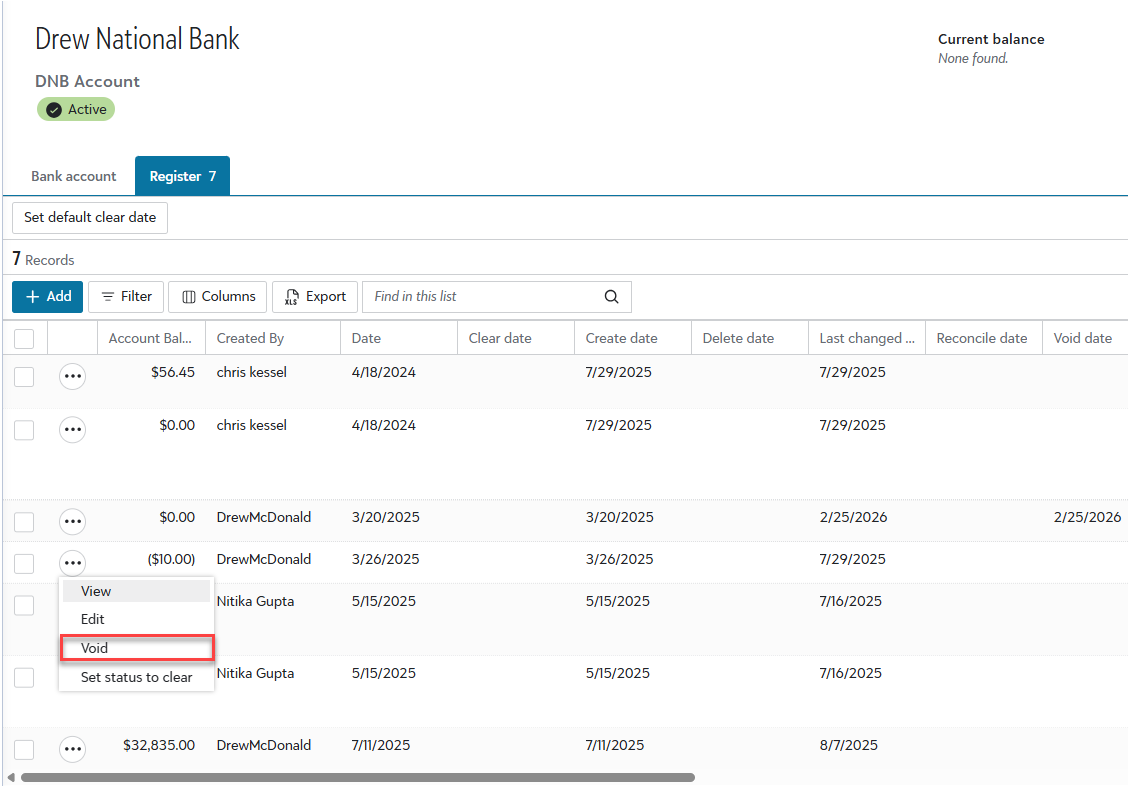
Note: One-time checks can also be voided directly from the check record, consistent with other payment workflows.
Improved MICR line generation for printed checks
Printed checks were not properly decrypting user-defined field values, which caused incorrect and unreadable MICR data. We’ve enhanced the MICR line generation to provide correct formatting and readability on printed checks.
You can also adjust the MICR line position up or down, giving you greater flexibility to align checks to your print layout. These enhancements help ensure your checks meet banking standards for smooth, reliable processing.
For more details, see Print Checks.
Preview Reports Before You Generate Them
Note: Don't see this yet? Previewing reports are in Limited Availability (LA) and releasing in waves. During the LA, we'll review and implement participant feedback to prepare for general availability.
You can now preview a report before generating the final output. From the report’s parameters, select Generate, Preview (PDF) to start the preview process. The preview begins processing immediately and you can monitor its progress as it runs.
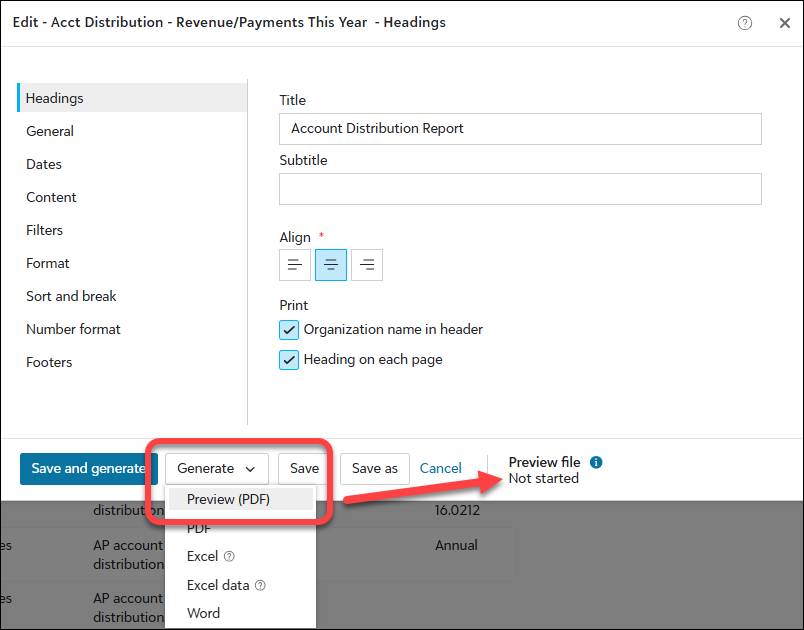
When processing is complete, a link appears under Preview file. Select the link to open and review the PDF in a new tab.
Note: These improvements don't apply to validation and post reports in General ledger.
For more details, review the Generate Reports Tutorial.
Streamlining report generation
From Analysis, Reports, you now generate reports in a more efficient and reliable way! Reports process in the background so you can continue working without interruption. When complete, you now access them under your top-level navigation bell, even after you close your browser.
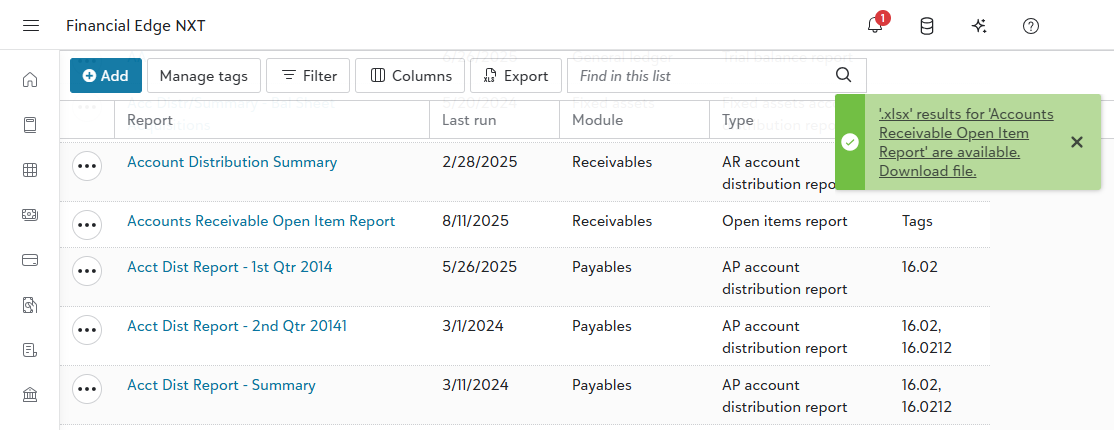
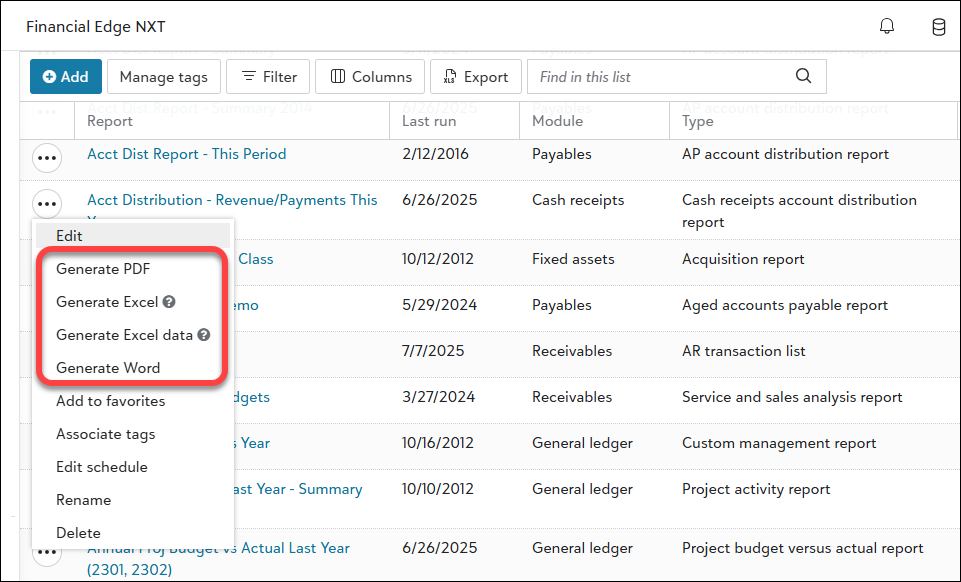
Also, report options have changed. Run and Export have been replaced with four new Generate options that streamline the report generation process, making it easier to select the format that best fits your needs.
-
Generate PDF. Generates a PDF file of the report.
-
Generate Excel. Generates an Excel file of the report that includes multiple report titles and multiple column headers.
-
Generate Excel data. Generates an Excel file of the report that includes one report title with one set of column headers. Use this for custom formulas and calculations.
-
Generate Word. Generates a Word file of the report.
Tab updates
The Recently run and Frequently run tabs are now Recently generated and Frequently used for consistency with these changes. Additionally, select the tabs to view column updates such as Name (previously called Report), Generated date, and Subledger (previously called Module).
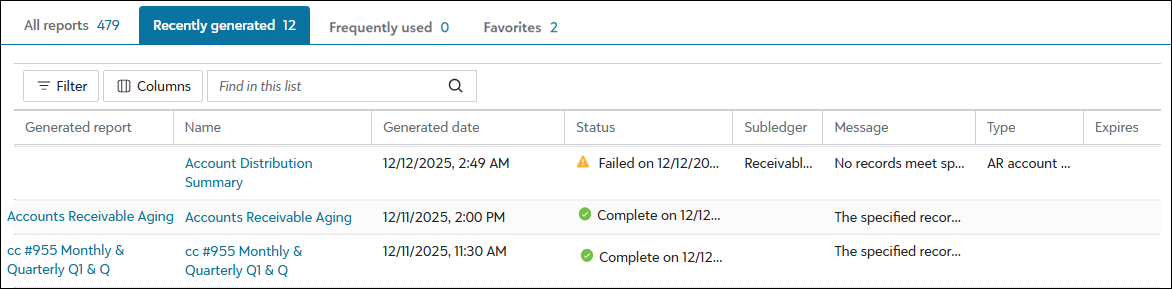
Note: The Description, Email schedule, Last run,and Tags columns have been removed from Recently generated.
Note: These improvements don't apply to validation and post reports in General ledger.
For more details, watch the demo and review the Generate Reports Tutorial.
Receivables
Optimize your experience with third-party applications
Note: Don't see this yet? The ability to manage third-party applications is in Limited Availability (LA) and releasing in waves. During the LA, we'll review and implement participant feedback to prepare for general availability.
Receivables now gives you the ability to track and monitor third‑party applications when an additional payer shares financial responsibility for a client’s charges. This is often used when someone other than the client assumes part of the cost.
From a client's record, go to Details. Under Payers, you can now select Edit to add the additional responsible party.
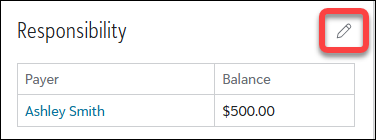
Under Responsible for paying, specify the percentage the client and each payer will cover.
Tip: These percentages can be adjusted later. For compliance purposes, it's a best practice to verify the payer’s contact and billing info and keep a record of any agreements to pay before you save these changes.
The Apply to owner's charges business rule you define also determines how payments and credits are applied when multiple parties are responsible for different portions of a client’s balance. This helps ensure consistent application behavior and supports accurate, reliable billing for both the client and third‑party payers.
For more details, including guidance on when and why to use third‑party applications, review Receivables: Managing Third-party Applications Tutorial.
Efficiently manage recurring invoices and their line items
You can now easily manage recurring invoices by adding, editing, or deleting them, as well as including line items. To view a recurring invoice, navigate to Receivables, Invoices, Recurring, and select the invoice under ID.
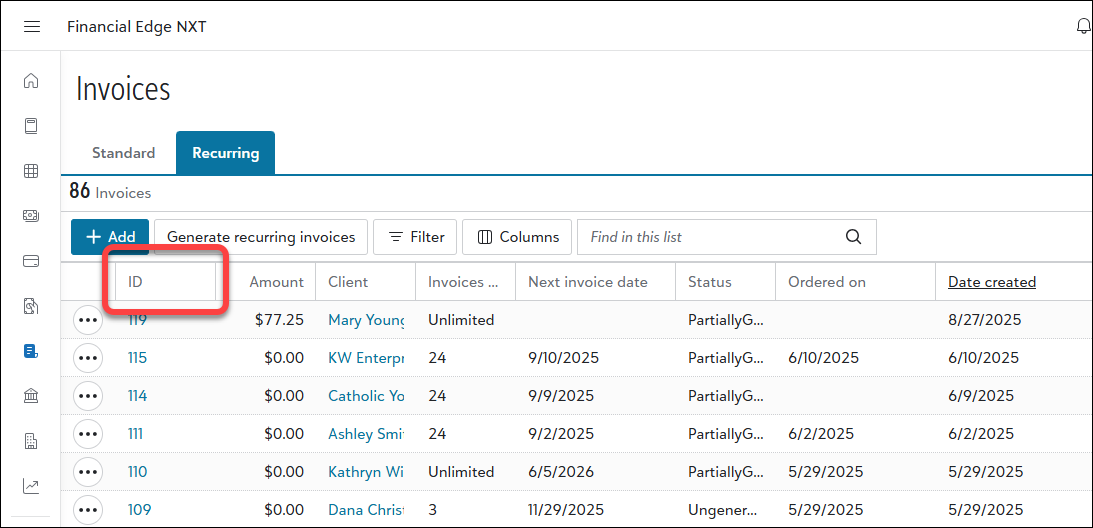
The page opens for you to view important data such as the schedule, client details, and history. You can also edit or delete the recurring invoice.
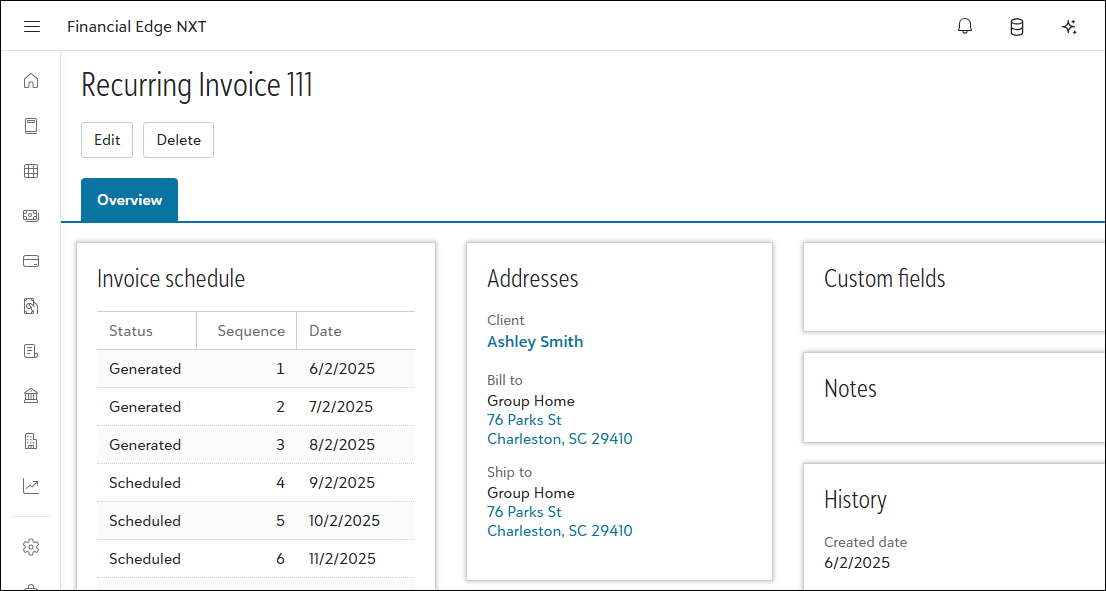
For more details, see Recurring Invoices in Receivables.
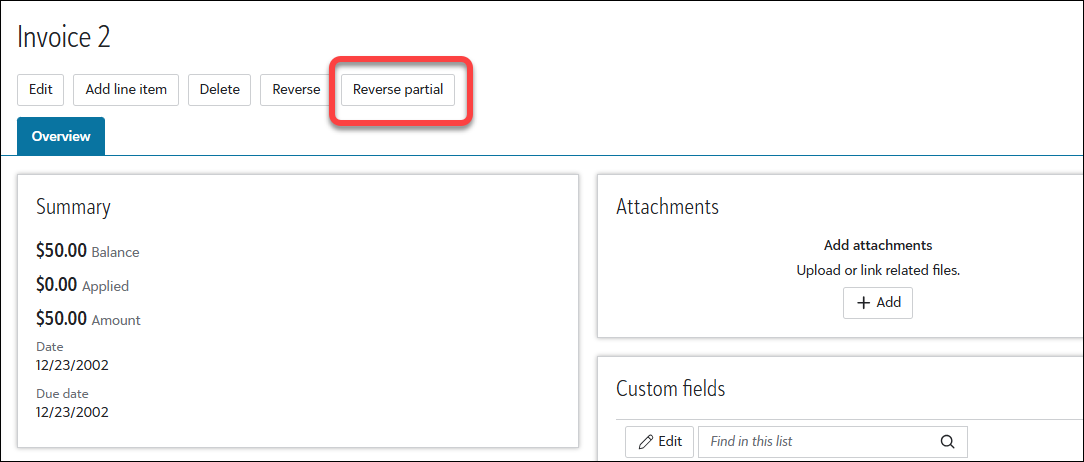
Simplify returns for improved processing
Note: Processing full returns is now generally available! Processing partial returns will be in a future release.
To add a return for a client, you can now reverse an invoice. From an invoice record with unposted line items, select Reverse.

After confirming the reversal and saving the return, existing applications will be removed and new return applications will apply.
Note: You can't reverse an invoice with applications in web view. If the status is Posted, first unapply the application. You can then reverse the invoice to add the return.
You can also edit and delete return records. From the client's record, under Activity, open the return. From there, you can edit or delete the record.

Partial returns
Note: Don't see this yet? Processing partial returns is in Limited Availability (LA) and releasing in waves. During the LA, we'll review and implement participant feedback to prepare for general availability.
You can also now process partial returns for clients. From an invoice record, select Reverse partial.
In the new return, set the Return status to "Partially received". Under Line items, enter the amount for the partial return.
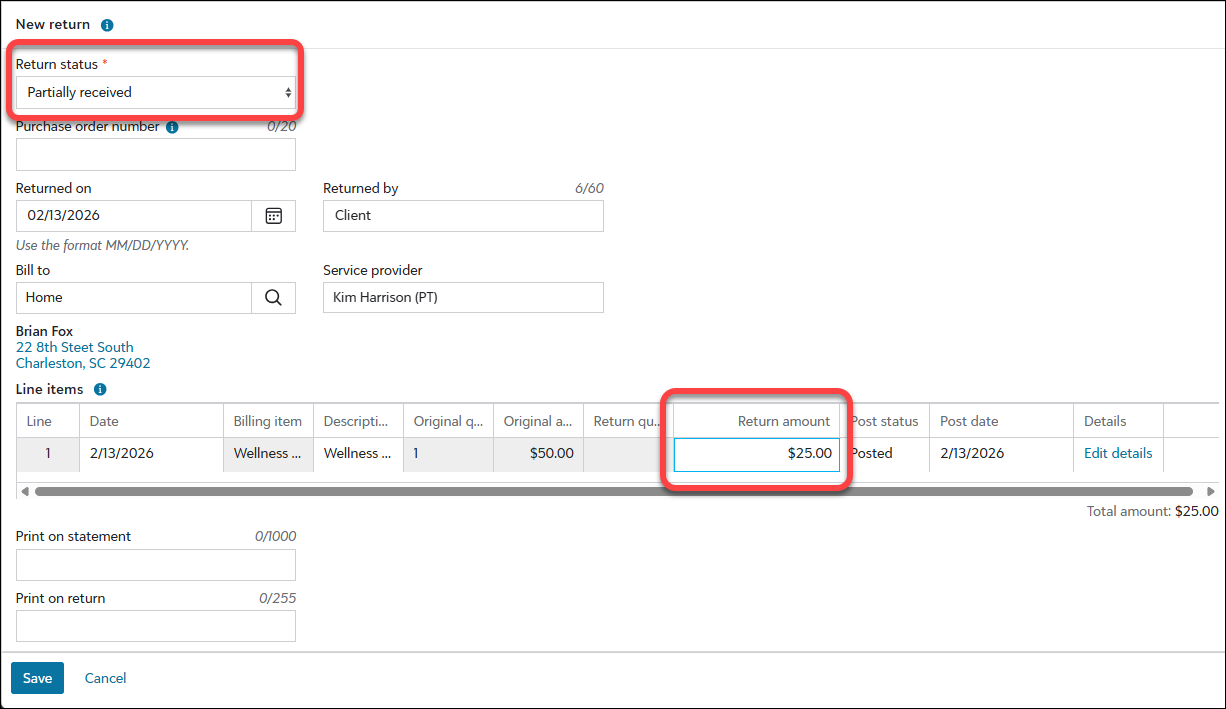
For more details, see Returns.
Tip: To receive this information as an email, subscribe to the Community blog.
Total Web Solution
As Blackbaud Financial Edge NXT shifts to a total web solution, we're moving features from database view exclusively to web view. As this shift progresses, we'll remove access to these features in database view.
To reduce the risk of service interruptions, gather feedback, and scale as needed, we're releasing these updates in waves instead of deploying everything at once.
For each feature area, we've listed "wave" dates to indicate when a feature area will begin to turn off in database view. If your organization is included in a wave, you will no longer have access to that specific feature beginning on the date listed. It's important to know that you may receive the updates immediately or in a future release.
To review feature areas and dates, see Total Web Solution.
Automate Payment Processing with Payment Assistant™
Payment Assistant automates and delivers vendor payments for you directly from Financial Edge NXT. With virtual card payments, accelerated ACH processing, and remote check printing, vendors are paid quickly and on time. By providing a faster, more cost-effective, and more secure way to pay invoices, you have more time to focus on your mission. Included in your subscription cost of Financial Edge NXT, Payment Assistant is now in General Availability (GA).
Key features
-
Group the invoices you need to pay into payment runs.
-
Use roles, permission, and approval tiers to decide who can create payment runs, who can approve them, and how many approvers are required based on the payment amount.
-
View the Payments tab to track the progress of individual payments.
-
When you select to pay invoices, REPAY®, our trusted payments technology partner, contacts them to select their preferred payment method. After set up, all communication with vendors is automated for subsequent payments.
-
When you create a payment run, use filters to help you find and select the invoices you are ready to pay.
Learn how to use Payment Assistant
-
Review the big picture with our Get Started with Payment Assistant tutorial.
-
Look over our additional docs, including onboarding info and FAQs in our Payment Assistant help.
-
Check out Payment Assistant bbcon session (requires registration).
Tip: Tip! Learn how Seth Hurd, Financial Controller and Director of Information Systems at Berwick Academy (Berwick, ME), adopted Payment Assistant!