Get Started with Post Lists
This tutorial reviews how to create post lists and manage them when new transactions appear in the list. You'll also learn how to assign permissions for post lists and batch and validate the list's transactions to prepare for posting in the general ledger.
Tip: Post lists help you organize and group transactions to prepare for posting to the general ledger. For example, when new charges appear in your list of January charges, you can resolve any exceptions to avoid posting failures. After January ends, use the list to batch and validate the charges to prepare for posting.
Review and set permissions
Control panel> Roles
Before you begin working in General ledger, review and set permissions for users who can manage post lists.
-
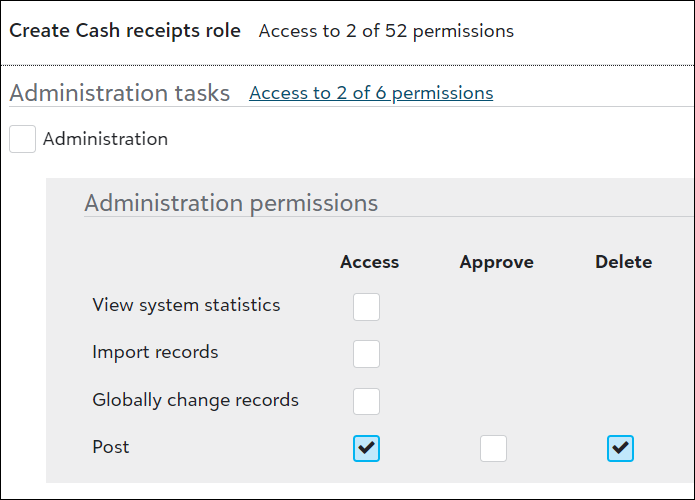
From Roles, under Cash receipts roles, select New to add a new role for post lists.
Note: The Cash receipts role will be renamed in a future release.
Tip: A role combines tasks and permissions to determine a user's level of access in General ledger. For more information, see Role-based Security.
-
To display permissions for post lists, select Show permissions for Administration tasks.
-
In the Post row, select the permissions you want to grant to Treasury users with this role.
-
Access — Provides access, including add and edit rights, to post lists.
Note: Access also provides rights for posting transactions to the general ledger. For more details about posting, see Get Started with Post to General Ledger.
-
Delete — Provides users with the ability to delete a post list.
Note: Delete also provides rights to delete a batch record.
-
Default list
Treasury> Related links> Post lists
Before adding your first list, locate the "Unposted transactions" list with "True" in the Default column. This is the default, system-generated list that includes all transactions not in a journal entry batch with a post status of "Not yet posted."
You can adjust filters to view specifics for transactions, but you can't save those filters or delete the list. For more details, go to Default Post List.
Add new post list
Treasury> Related links> Post lists
On the action bar, select New list. A new list of transactions displays.
Note: Transactions in a new list are not in a batch and have a post status of "Not yet posted." If you save the list without making changes, you're duplicating the default list. While it's common for transactions to appear in multiple lists, it's not necessary to manage a duplicated list.
Customize and manage the list
To manage a specific list of transactions that fits your needs, use filters on the action bar to limit transactions based on criteria. For example, filter by Post date or Transaction date to create a list of January transactions. To create a list of only payments, filter by Transaction type.
When you're done, select New, Save on the action bar.
Note: Transactions you view in the list are the only ones that save in the list. To view transactions you excluded by applying filters, open the default list.
To save time, you can also customize a new list based on an existing one.
-
Open the list that's similar to the one you need.
-
Change the filters to the specific criteria for the new list.
-
From the action bar, select New, Save, Save as.
-
Enter a different name and description for the new list.
Resolve exceptions
List> Exceptions column
To avoid post failures, review and resolve any exceptions in the list.
For example, a transaction's exception message may inform you that debit and credit amounts don't match. If so, open the transaction from the list and match the amounts to resolve the exception.
Batch and validate transactions
Before you batch and validate the transactions in the list, make sure everything is accurate to help prepare for posting to the general ledger.
-
On the list's action bar, select New, Batch and validate.
-
Review the info that displays to make sure you're ready. You can:
-
Modify the list's description (it becomes the batch's description).
-
Review filters applied to the list.
-
Review the number of transactions in the list.
-
Review the total transaction amount.
-
-
When you're done, select Batch and validate. A batch record page appears where you can review details and transaction distributions, and add attachments.
Note: The batch's status is "Processing" until generating is complete.
Tip: To quickly locate the batch going forward, make a note of the batch ID in the Summary box on the right.
Access the batch
After you create the batch, the list no longer exists. You can access the batch in one of two ways.
General ledger> Related links> Post history> search batch ID
General ledger> Recently accessed
To learn how to post the transactions in the batch, review Get Started with Post to General Ledger.