Upload Documents
After you submit your application, upload all required documents before your application can be reviewed.
If your school uses the IRS integration, you may also need to complete income verification.
Note: For additional assistance, please reach out to the Parent Contact Center.
Upload Required Documents
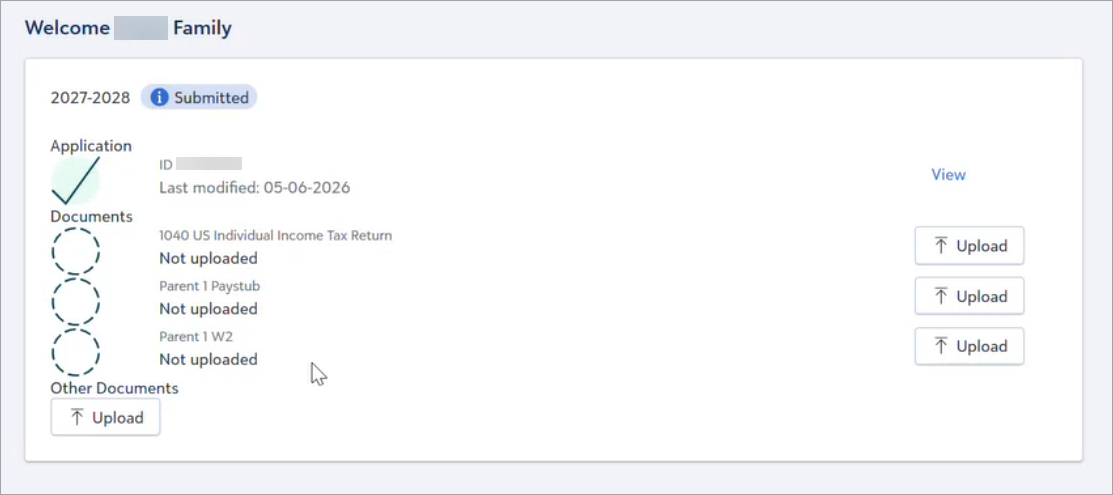
After you submit your application, the required supporting documents are listed on the Home page under the application year. You must submit the required documents before your application is considered complete and ready for review.
If you cannot provide a specific document, see What if I cannot provide a required document?
-
On the Home page, select Upload next to the document you are providing.
-
Select Attach file and choose the document file from your device.

-
Select Save.
-
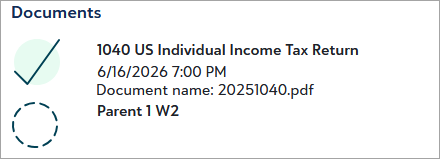
A green checkmark and the filename display for the submitted document.
-
Repeat for any remaining required documents.
Required Document Cannot be Provided
If a required document is unavailable, you can submit a reason instead of uploading the document.
-
Select Upload next to that document type.
-
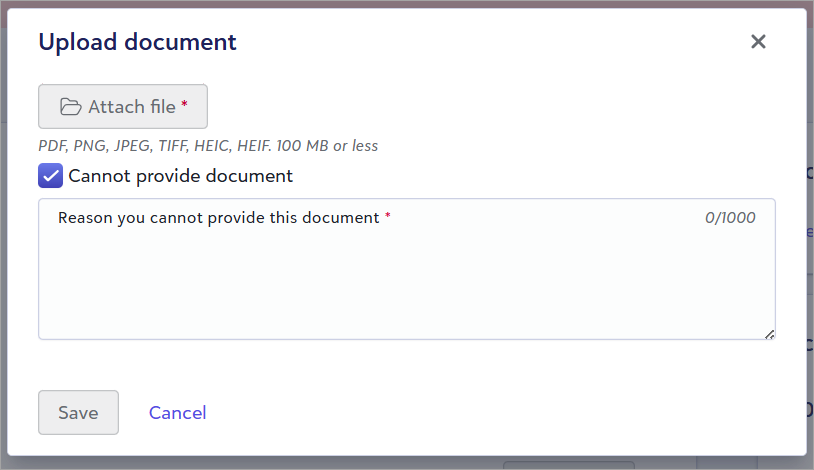
Select Cannot provide document.
-
Enter the reason the document cannot be provided.
-
Select Save.
Note: Providing false or misleading information may result in disqualification from financial aid.
Documents FAQs
 What file types are accepted?
The following file types are accepted:
-
PDF
-
PNG
-
JPEG
-
TIFF
-
HEIC
-
HEIF
What year should I provide tax documents for?
Before April 15th, you should provide tax documents for the year before last. After April 15th, you should provide tax documents for last year.
For example, if submitting an application for the 2026-2027 school year:
-
From April 15, 2025, to April 14, 2026, upload your 2024 tax documents.
-
On or after April 15, 2026, upload your 2025 tax documents.
What paystub should I provide?
Provide your most recent paystub.
What should I do if I upload the wrong document? Can I delete a document?
If you upload the wrong document by mistake, you cannot delete or remove it. Under Other Documents, you can upload the correct document with "Correct" in the file name to indicate this is the correct document that should be reviewed. If you need additional assistance, please contact the Parent Contact Center.
Can I rename a document I uploaded?
You cannot rename a document once it is uploaded. You can upload a document again under Other Documents with a different file name if needed.
What documents are required? Why must I submit my application before I can upload documents?
The documents required are determined once your application is submitted, so documents cannot be uploaded prior to submitting the application.
Once you've submitted your application, your required documents are listed on the Home page.
How long will it take for my application to be processed? When will I find out if I am receiving aid?
Once your application status updates to Documents Received, you will be notified via email within 10 business days if any additional documents are needed.
Each school determines when they make their financial aid decisions and when those decisions are communicated to families. Please contact your school for more information on their award timeline.
Do I need to upload documents if my school is using the IRS integration?
If your school is offering or requiring IRS income verification, you can check the Documents section of your Home page for required documents.
Up next: Check for IRS income verification requirements.