Classifications
The Classifications feature lets you access and modify your Classification code table settings.
From Control panel, select Classifications. All existing tables display alphabetically by Description along with the Classification Type. Double-click any record to view it, or select its menu  , View record.
Note: For the G/L Accounts table, if Branch Security is enabled, you may need to indicate which branch you wish to work with.
There are two Classification types for tables.
-
System: Have some specific purpose in the business logic.
-
Coding sheet: Included in the Coding sheet sections of the Organization, Request, and Contact data entry forms.
 Add new table
From the Classifications page, select Add new table. From here, you can add a new Classification or Sub classification, and edit any defaults, Coding fields, or Values.
The Values section lists all of the classification codes within that table. For tables with many values, you can use the Find in this list field.
To add a new value in Classification tables, select Add new table, then Add new and select a new classification. Select the desired title for the new value option in the Description field.
Select Save and close to finish adding the table.
Export Classification tables
You can export Classification table information to a printer-friendly view. The export contains table information such as Description, Code, ID, and whether or not it's active.
From the Classifications page, double-click a Classification table, then select Export. A printer-friendly file downloads to your computer.
Coding sheet configuration
From the Classifications page, select View, Coding sheet configuration. The Coding sheet configuration form lets you to reorder the coding sheets which appear on the Request, Organization, or Contact edit forms. For requests only, a drop-down menu at the top lets you choose whether to make the selected required coding sheet mandatory at time of creation or upon approval of a Request.
Note: A red asterisk next to a coding sheet means a required code selection.
Percentage coding
Percentage coding lets you assign percentages to code values selected from Request type code tables. The percentages are then used to calculate corresponding Request/Grant dollar amounts. These allocations can then be displayed in Views, ad hoc reports, Charts, and the Request record where they are assigned. They may be assigned in Online Applications.
The following standard Request coding tables are enabled for percentages:
-
Age Group
-
Ethnicity
-
Fund
-
Gender
-
Geographical Area Served
-
Population Served
-
Program Area
-
Type of Support
Percentage coding in Charts
The Charts dashboard part can reflect percentages when you choose to group on a classification table where percentages are tracked.
Open the chart’s configuration form and set the following selections.
-
Value charted: Sum, Average, Min, or Max (Count can't be used with percentages.)
-
Category: Request
-
Column: Grant amount or Request amount
-
Group by:
-
Category: Coding sheet
-
Column: Desired percentage-enabled table
-
Select Next, then specify the display properties for the chart. Select Save.
Percentage coding in Online Applications
There are requirements to enable percentage coding in Online Applications:
-
You must have the Online Applications module configured.
-
You must have Percentage tracking enabled for the desired coding sheet tables.
-
You must have percentage-enabled fields inserted in your applications forms by Customer Support .
Percentage coding is used in Online Applications to enable applicants the opportunity to enter percentages, but not the corresponding amounts.
The retrieval process brings in the percentages when creating or updating a Request, and calculate or recalculate the associated amounts.
Percentage coding in Requests
If at least one code table is enabled for percentage coding, the Coding section of a Request displays two additional columns. One column is for Percentage and the other for Amount. Only enabled code tables display values in these columns.
You can enter a value in either column and the system automatically calculates the associated value when your cursor leaves the field. An exclamation mark next to the primary amount means you are over or under 100% allocation.
Select the flag to mark the value as the Primary. Select X to remove the value from the record.
To select code values, select one of the displayed Code table classifications. If percentage coding is enabled, the coding sheet form has columns displayed for any percentage coding.
The following validation rules apply when saving and closing the Request:
-
The first code specified within a category is set to 100% with the full request/grant amount.
-
The second code selected is assigned 0% initially. The fields now become editable.
-
If only two codes are specified, changing one automatically recalculates the other.
-
If more than two are set, no automatic adjustments are made.
-
Percentages only support whole numbers.
-
If a category’s subtotal is not 100% of the Request/Grant amount, you can't Save and close.
Note: When a Request is approved or rolled back to Pending, and the Grant amount changes, the system automatically adjusts the amounts in the Coding section.
Amending a Grant prompts you to amend the allocations by opening a Grant amendment: Adjust percentage coding form. To proceed, percentages must be manually adjusted to account for the new Grant amount.
Percentage coding for the Applicant & Grantee Portal
As of 6/30/2025, Percentage coding for Classifications tables is live for the Applicant & Grantee Portal.
-
To utilize the Percentage coding feature, go to Control panel and select Classifications. Select the menu next to the Classification table and View record.
-
From the specific Classification page, ensure that Max. number of values is a value greater than 1.
-
Select the checkbox for Track percentages.
-
Save and Close.
Now that the Classification table is enabled for Percentage coding, you can add the Classification field to your form.
-
Navigate to Applications and select Manage forms.
-
From the Custom Forms list, locate the form that you wish to add your Percentage coding-enabled Classification table.
-
Select the menu at the far right and select Edit.
-
From the edit form page, within the Form Builder at the bottom right, enter the name of your Percentage coding-enabled Classification table in the 'Search for a form field' area.
-
Results appear within the form builder. Once you see your Percentage coding-enabled Classification field, drag and drop the field onto the body of the form.
-
From the Configuration window, select the dropdown next to Details and select Data.
-
The classifications appear listed. Mark the checkbox next to the fields you want to make available to your applicants and Save.
-
From the edit form page, select Save, then Save and close.
Once added, and once your form is published, when the applicant selects the dropdown on the Classification table and selects multiple values, they will see the option to input percentages:
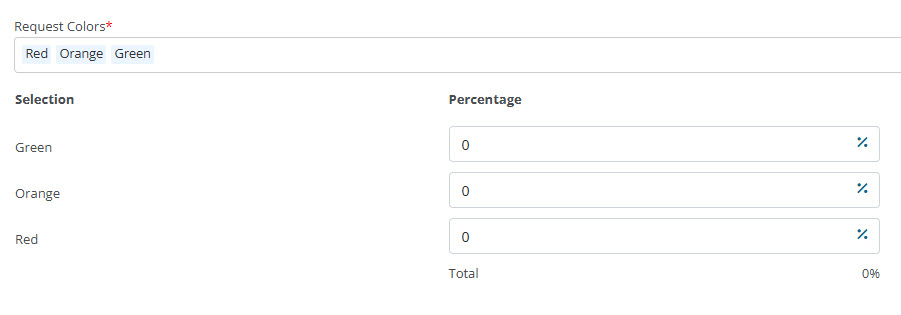
Note: If the applicant fails to add percentages that equal 100%, they will be met with an error not unlike the error for the same issue in the Legacy (IGAM) Grantee Portal.
