Create an Add Data Form (CLR)
This task walks through steps to create a new Add Data Form (CLR) Spec with the Add New Item wizard and to adjust the spec and class file for a specific table. The Table Spec that corresponds to this Add Data Form (SP) Spec is shown in the steps.
-
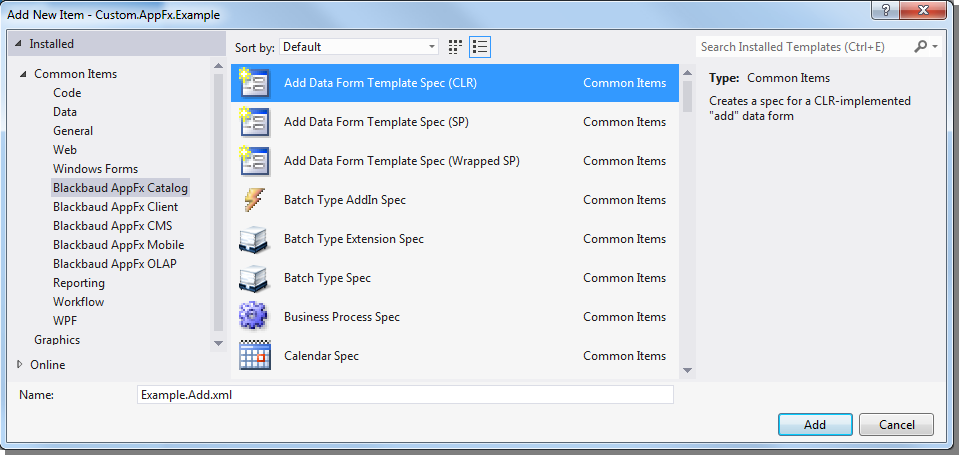
From an existing Blackbaud AppFx Catalog Project, right-click the project and select Add > New Item. The Add New Item screen appears.
-
Select Blackbaud AppFx Catalog > Add Data Form Template Spec (CLR).
-
From Name, enter a name such as Example.Add.xml or Example.Clr.Add.xml.
-
Click Add. The new spec appears in Solution Explorer and in the XML Editor.
In the spec that appears in the XML Editor...
-
Leave the first three attributes of AddDataFormTemplate as-is. The first two are namespace declarations for schema related to the spec type. The third is an ID for the feature, a GUID or uniqueidentifier generated by the Add New Item wizard. ID should be unique for every spec. The root element attributes for data forms are discussed in Root Element Attributes.
  xmlns="bb_appfx_adddataformtemplate"
  xmlns:common="bb_appfx_commontypes"
  ID="ef868a58-167b-407c-91c4-68da2d3f6991"
-
Adjust the next three attributes as necessary. The Add New Item wizard creates a Name and Description based on the filename entered in the Name field of the Add New Item screen. Author is inferred from a setting established when the Blackbaud Infinity SDK is installed.
Note: To avoid future conflicts in the event Blackbaud adds an Example record type, add (custom) to the end of Name, RecordType, and SecurityUIFolder. If the (custom) suffix is not satisfactory for display, the NameUIOverride attribute can be used in addition to adding (custom). The Table Spec that corresponds to this Add Data Form is described later in this task. The Name attribute for TableSpec is adjusted to Example (custom) in the Table Spec for the same reason.
Change these attributes:
  Name="Example Add Data Form"
  Description="A data form for adding example records"
  Author="Technical Training"
To:
  Name="Example Add Data Form (custom)"
  Description="A data form for adding example records"
  Author="Technical Training"
-
DataFormInstanceID is an additional ID. DataFormInstanceID is discussed in Root Element Attributes. But remember that most features refer to data forms by DataFormInstanceID and not ID.
DataFormInstanceID="c46afaa2-a2b6-4d29-ad4d-1e8cf94984bd"
-
The last three attributes can also be adjusted. Again, the wizard infers each based on the filename entered in the Name field of the Add New Item screen. But to avoid future conflicts in the event Blackbaud adds an Example record type, add the (custom) suffix.
Change these attributes:
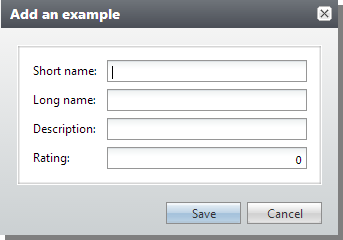
  RecordType="Example"
  common:SecurityUIFolder="Example"
  FormHeader="Add an example"
To:
  RecordType="Example (custom)"
  common:SecurityUIFolder="Example (custom)"
  FormHeader="Add an example"
-
Specify to explicitly grant permissions to the CLR code to insert data into the table. Otherwise the database will deny the save. Adjust CLRDataForm as follows:
<CLRDataForm AssemblyName="Custom.AppFx.Example" ClassName="Custom.AppFx.Example.ExampleAddDataForm"> <common:GrantInsertList> <common:GrantInsert>USR_EXAMPLE</common:GrantInsert> </common:GrantInsertList> </CLRDataForm> -
Within the Visual Basic class file created by the wizard for the form, a Save() function is declared and a Load() function has been commented out. This example will omit the Load() function. A walk-through for CLR Load() functions is included in the task for creating an Edit Data Form (CLR) and load implementations are discussed in Load Implementations. Save implementations are discussed in Save Implementations.
-
At this point, take some time to examine the Table Spec and table that relates to this Add Data Form. This Table Spec has few embellishments. The fields on the data form's stored procedure for the save implementation and the form fields on the Add Data Form will correspond to the fields on this Table Spec. Notice the Name attribute of TableSpec matches the RecordType for the Add Data Form.
<TableSpec
	xmlns="bb_appfx_table"
	xmlns:common="bb_appfx_commontypes"
	ID="4455ac1b-c6f0-4a56-b708-77942a823811"
	Name="Example (custom)"
	Description="Stores information about example records (custom)"
	Author="Technical Training"
	Tablename="USR_EXAMPLE"
	IsBuiltIn="false"
	>

  <Fields>
    <TextField Name="SHORTNAME" Length="10"/>
    <TextField Name="LONGNAME" Length="20"/>
    <MemoField Name="DESCRIPTION"/>
    <DecimalField Name="RATING" />
  </Fields>

</TableSpec>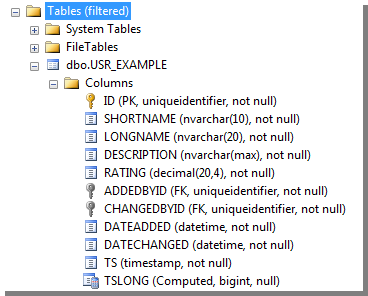
The spec created by the wizard is configured for three fields: FIELD1, FIELD2, and FIELD3. The data types for these should correspond to the data types established by the platform for SHORTNAME, LONGNAME, and DESCRIPTION when the example Table Spec is loaded. Therefore, in the Add Data Form Spec, FIELD1, FIELD2, and FIELD3 can be changed to SHORTNAME, LONGNAME, and DESCRIPTION. But for now, add those in to the CLR for the save implementation.
Note: The wizard for Add Data Form Spec (SP) creates stubbed-out Transact-SQL including mapping between the table fields, stored procedure parameters, and form fields. The wizard for Add Data Form Spec (CLR) stubs out the form fields, but leaves the mapping to you.
-
Initially, the class looks like this:
Imports Blackbaud.AppFx.Server

Public NotInheritable Class ExampleAddDataForm
    Inherits AppCatalog.AppAddDataForm

    'Add forms have an optional pre-load that can be overridden
    'Public Overrides Function Load() As Blackbaud.AppFx.Server.AppCatalog.AppAddDataFormLoadResult
    '    Return MyBase.Load()
    'End Function

    Public Overrides Function Save() As Blackbaud.AppFx.Server.AppCatalog.AppAddDataFormSaveResult

    End Function

End Class
Add public instances for the parameters and remove the commented-out Load() function:
Imports Blackbaud.AppFx.Server Public NotInheritable Class ExampleAddDataForm Inherits AppCatalog.AppAddDataForm Public SHORTNAME As String Public LONGNAME As String Public DESCRIPTION As String Public RATING As Decimal Public Overrides Function Save() As Blackbaud.AppFx.Server.AppCatalog.AppAddDataFormSaveResult End Function End Class -
The function should return Blackbaud.AppFx.Server.AppCatalog.AppAddDataFormSaveResult.
Public Overrides Function Save() As Blackbaud.AppFx.Server.AppCatalog.AppAddDataFormSaveResult Dim dataFormSaveResult As New AppCatalog.AppAddDataFormSaveResult Return dataFormSaveResult End Function -
Use SqlClient.SqlConnection to connect to the database and execute a command. CommandText is built as a String similar to the insert statement in the Add Data Form (SP) task example. But the parameters are added with the AddWithValue function. The public instances added earlier are used and the change agent and date are retrieved by a call to GetChangeAgentID and Today respectively.
Closing Connections
Sometimes your code requires an unmanaged resource, such as a SQL connection. If the SqlConnection goes out of scope, it won't be closed. Therefore, you must explicitly close the connection by calling Close or Dispose. You may also consider a Using block which guarantees the disposal of one or more such resources when your code is finished with them. For more information see http://msdn.microsoft.com/en-us/library/system.data.sqlclient.sqlconnection.close.aspx and http://msdn.microsoft.com/en-us/library/htd05whh.aspx.
For example, the following code would require the explicit closing of the connection:
Dim conn As SqlConnection = Me.RequestContext.OpenAppDBConnection
		‘code to perform work with the sql connection
conn.Close
Whereas utilizing a Using block guarantees the disposal of the SQLConnection:
using conn As SqlConnection = Me.RequestContext.OpenAppDBConnection
        ‘code to perform work with the sql connection
end using
Public Overrides Function Save() As Blackbaud.AppFx.Server.AppCatalog.AppAddDataFormSaveResult Dim dataFormSaveResult As New AppCatalog.AppAddDataFormSaveResult Try Using con As SqlClient.SqlConnection = Me.RequestContext.OpenAppDBConnection() Using command As SqlClient.SqlCommand = con.CreateCommand() command.CommandText = _ "insert into dbo.[USR_EXAMPLE] (" & _ "ID, SHORTNAME, LONGNAME, DESCRIPTION, RATING, ADDEDBYID, CHANGEDBYID, DATEADDED, DATECHANGED" & _ ") " & _ "values (" & _ "@ID,@SHORTNAME,@LONGNAME,@DESCRIPTION,@RATING,@CHANGEAGENTID,@CHANGEAGENTID,@CURRENTDATE,@CURRENTDATE" & _ ")" command.Parameters.AddWithValue("@ID", Guid.NewGuid()) command.Parameters.AddWithValue("@SHORTNAME", SHORTNAME) command.Parameters.AddWithValue("@LONGNAME", LONGNAME) command.Parameters.AddWithValue("@DESCRIPTION", DESCRIPTION) command.Parameters.AddWithValue("@RATING", RATING) Dim changeAgent As Nullable(Of Guid) = Me.RequestContext.GetChangeAgentID() command.Parameters.AddWithValue("@CHANGEAGENTID", changeAgent) command.Parameters.AddWithValue("@CURRENTDATE", Today) command.ExecuteNonQuery() command.Dispose() End Using End Using Catch ex As Exception Throw End Try Return dataFormSaveResult End Function -
Adjust FormMetaData as follows. These form fields map to the parameters in the save implementation. FormMetaData is discussed in Form Metadata.
<common:FormMetaData> <common:FormFields> <common:FormField FieldID="SHORTNAME" Caption="Short name" DataType="String" MaxLength="10" /> <common:FormField FieldID="LONGNAME" Caption="Long name" DataType="String" MaxLength="20" /> <common:FormField FieldID="DESCRIPTION" Caption="Description" DataType="String" /> <common:FormField FieldID="RATING" Caption="Rating" DataType="Decimal" MinValue="0" MaxValue="10" /> </common:FormFields> </common:FormMetaData> -
Save the spec, load it, and open it. The Table Spec must also be loaded. To access the data form, you can create a task to open the form. For development, you can use LoadSpec. For CLR forms, the assembly must also be copied to vroot\bin. For deployments, you can use the Catalog Browser.