Exercise: Create Custom Catalog Items to Use as Workflow Activities
The purpose of this exercise is to demonstrate how to create custom workflow activities using Infinity SDK catalog items (specs). We will load three data form specs, permission the specs to a system role, and then use the Infinity Workflow Visual Studio Extension to add custom features to the workflow designer toolbox. In this exercise, we will pull in three data forms from the lab answers to handle the following functions:
-
Persist workflow data to the Infinity database using a custom add data form. This data will be used in an upcoming workflow task "landing page."
-
Retrieve code table IDs from the database. These IDs will be used during the automation of the prospect plan.
-
Select a primary manager in preparation for adding a prospect plan for the approved major giving prospect.
Persist Workflow Instance Data to the Infinity Database
This data form will be used to create a workflow activity which will persist data from the workflow instance to the database in preparation for the workflow task landing page that we will create in a future exercise. We need a way to persist the Constituent ID, Revenue ID, Amount, Amount Threshold variable values back to the database from the workflow instance. This is where a custom add data form comes into the picture. After this data is persisted to the database, we will utilize this data within a future landing page for our workflow task. The landing page will need to know the constituent, the revenue transaction, the amount, and threshold data when explaining the workflow task to the Director of Special Giving. A custom task landing page can be constructed to display constituent and revenue information as well as provide a way to complete the workflow task. We will complete the landing page in the next exercise. See the section titled Workflow Inboxes for more information on workflow inboxes and task landing pages.
Retrieve Code Table IDs from the Database for the Automation of the Prospect Plan
We will utilize a custom view data form to ensure the retrieval of the primary key value of the "Major Giving" row from within the PROSPECTPLANTYPECODE table. This ID will be utilized by the workflow during the automation of the prospect plan.
Dynamically Select the Primary Manager for the Automation of the Prospect Plan
If the Director of Special Giving has approved the donor as a major giving prospect, then the workflow should create a major giving plan and assign a primary manager for the plan. The workflow activity created from this data form will be used by the workflow to automate the selection of a primary manager as part of the creation of the prospect plan for the approved major giving prospect. We will automate the prospect plan within the upcoming lab.
Instructions
Step 1 - Open or switch over to the Blackbaud.CustomFx.MajorGivingWorkflow.Catalog project within Visual Studio 2008.
Step 2 - Copy and load the custom Add Data Form Spec used to persist the data from the workflow instance to the Infinity database.
In this step, we load a custom add data form named Major Giving (Custom) Workflow Set Data Item Values.
-
If you are using a training image provided by your instructor, copy the following file from the Lab Answers directory: C:\Source Code\Lab Answers\Workflow\Blackbaud.CustomFx.MajorGiving\Blackbaud.CustomFx.MajorGivingWorkflow.Catalog into your Visual Studio 2008 catalog project.
-
MajorGiving.Workflow. SetDataItemValuesAdd.xml
-
-
Mark the spec as an embedded resource. Right-click the file within the solution, select Properties, and change the Build Action to Embedded Resource.
Step 3 - Review the MajorGiving.Workflow.SetDataItemValuesAdd.xml spec.
This spec saves the Major Giving (Custom) Workflow data, such as constituent ID and revenue ID, to the Infinity database for use on workflow inbox task landing page.
Note the Context XML element and the ContextRecordType attribute.
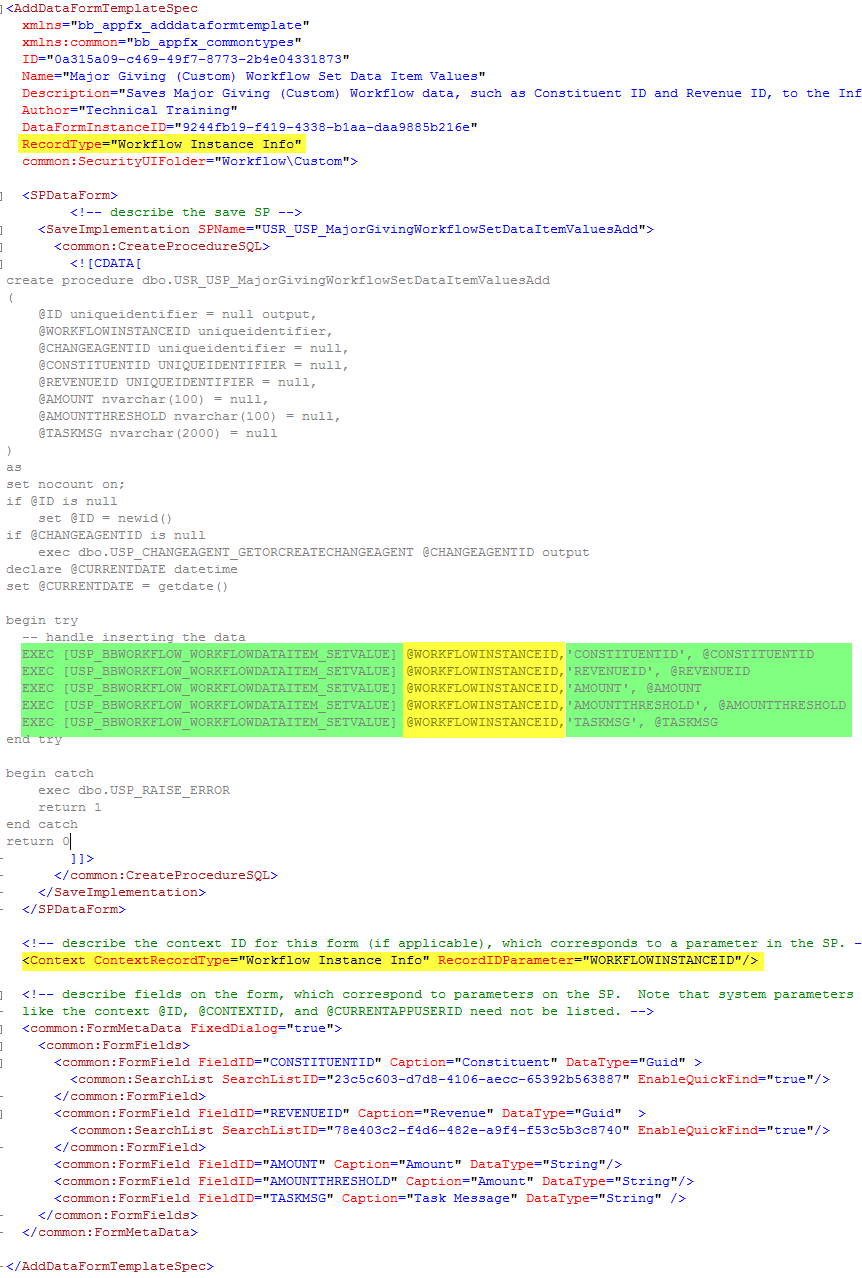
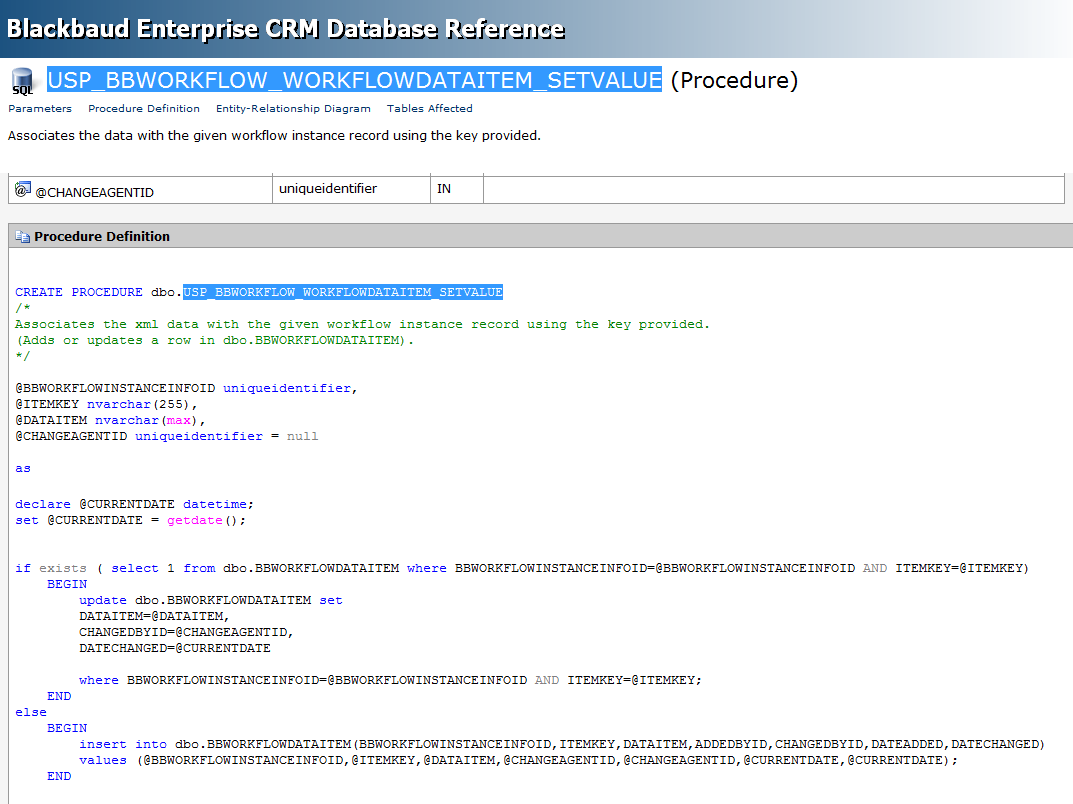
In the figure above, note the repeated calls to the USP_BBWORKFLOW_WORKFLOWDATAITEM_SETVALUE stored procedure used to persist the workflow instance data to the Infinity database. Review the stored procedure below to see how it adds or updates rows to the BBWORKFLOWDATAITEM table. The persisted data is tracked for the provided Blackbaud Workflow Instance Info ID (@BBWORKFLOWINSTANCEINFOID) parameter. The value of the @BBWORKFLOWINSTANCEINFOID parameter is provided to the stored procedure via the context record type of the add data form spec.
Step 4 - Copy and load the custom View Data Form Spec and SQL Function spec used to select the primary manager for the prospect plan.
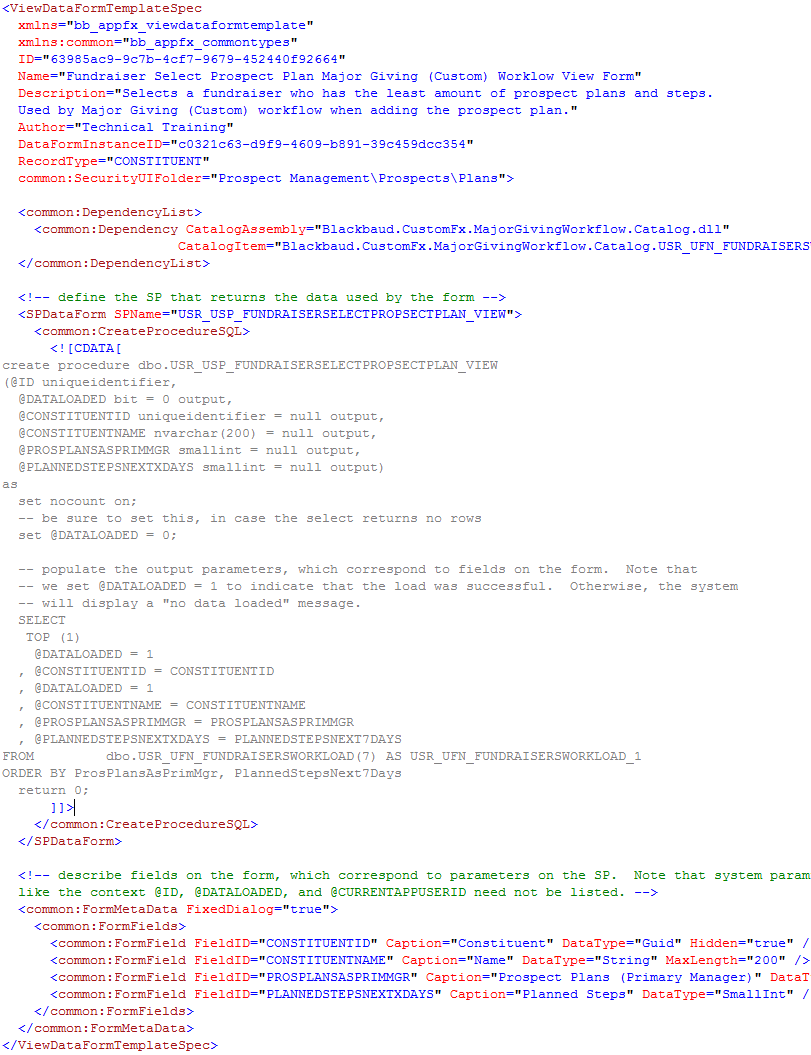
In this step, we load a custom view data form named Fundraiser Select Prospect Plan Major Giving (Custom) Workflow View Form.
-
Copy the following files from the Lab Answers directory: C:\Source Code\Lab Answers\Workflow\Blackbaud.CustomFx.MajorGiving\Blackbaud.CustomFx.MajorGivingWorkflow.Catalog into your Visual Studio 2008 catalog project.
-
USR_UFN_FUNDRAISERSWORKLOAD.xml
-
MajorGiving.Workflow.FundraiserSelectProspectPlanView.xml
-
-
Mark the specs as embedded resources. Right-click the files within the solution, select Properties, and change the Build Action to Embedded Resource.
-
Load the specs in the order listed above.
Step 5 - Review the View Data Form template spec.
The Fundraiser Select Prospect Plan Major Giving (Custom) Worklow View Form custom data form is used to select a fundraiser as the primary manager who has the least amount of prospect plans and steps. It utilizes the custom user defined function USR_UFN_FUNDRAISERSWORKLOAD to select the primary manager. The data form is used as the basis for a custom workflow activity to select the primary manager during the automation of the prospect plan.
Step 6 - Copy and load the custom View Data Form spec used to retrieve code table IDs used during the automation of the prospect plan.
In this step, we load a custom view data form named Major Giving Workflow Get Code Table IDs Values View Form (Custom).
-
Copy the following file from the Lab Answers directory: C:\Source Code\Lab Answers\Workflow\Blackbaud.CustomFx.MajorGiving\Blackbaud.CustomFx.MajorGivingWorkflow.Catalog into your Visual Studio 2008 catalog project.
-
MajorGiving.Workflow.GetCodeTableIDsView.xml
-
-
Mark the spec as an embedded resource.
-
Load the spec.
Step 7 - Review the View Data Form template spec.
This custom view data form inserts code table values if they do not already exist within the database and then retrieves the code table primary key value form the code table. We use the prospect plan type code ID value when we automate the prospect plan in the upcoming lab.
Step 8 - Grant permissions to the custom Add Data Form.
-
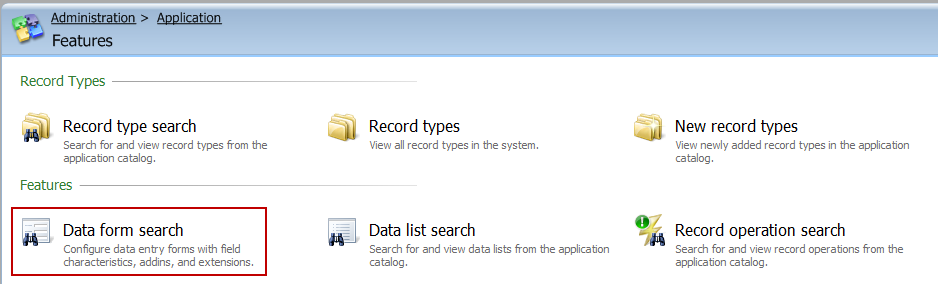
Navigate to the Administration functional area, click Application, and then on the Application page, click Features.
-
Click the Data form search task.
-
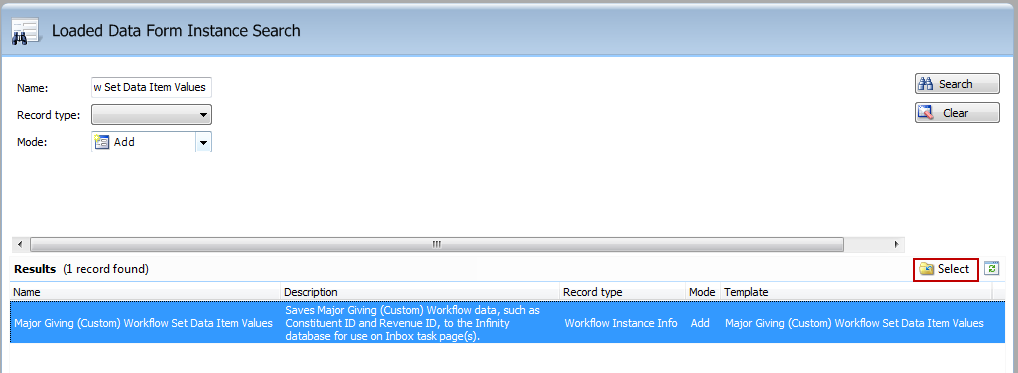
Search for the Major Giving (Custom) Workflow Set Data Item Values custom add data form created in the earlier step.
-
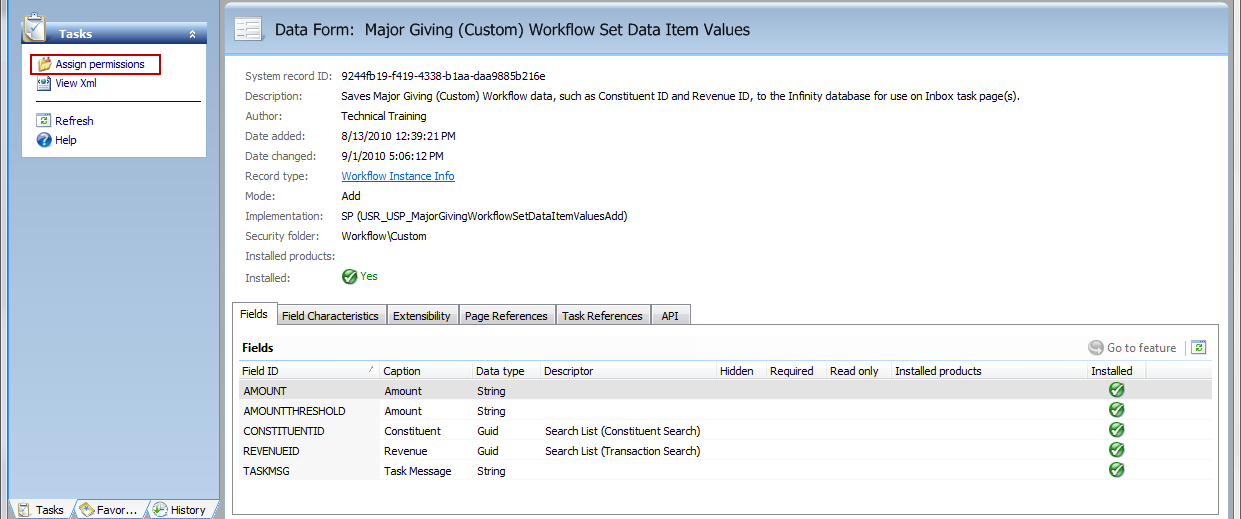
Click the Select action to view the metadata for this data form.
-
Select the Assign permissions action on the left side of the page to permission the data form into the appropriate system role.
-
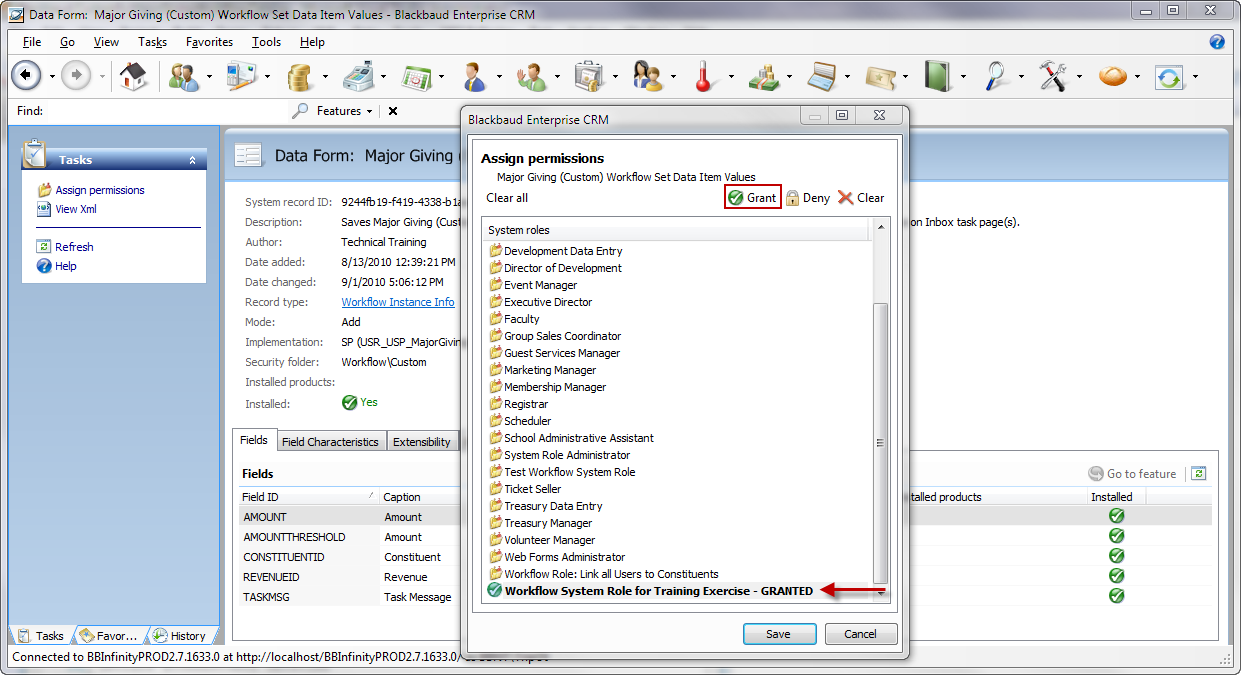
The Assign permissions screen appears. Select the system role named Workflow System Role for Training Exercise and click the Grant action.
-
Click Save to permission the data form to the system role.
Step 9 - Grant permissions for the other two custom View Data Forms.
Repeat the directions in the previous step to permission the Fundraiser Select Prospect Plan Major Giving (Custom) Workflow View Form and the Major Giving Workflow Get Code Table IDs Values View Form (Custom) to the Workflow System Role for Training Exercise System Role.
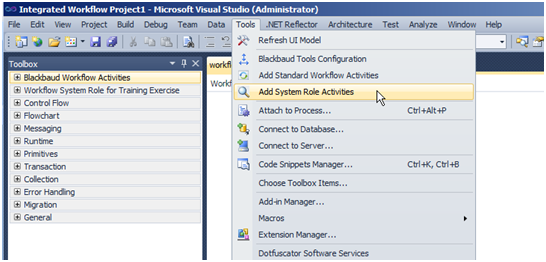
Step 10 - Add system role activities.
The pattern for including an Infinity feature as a workflow activity is use a system role for the workflow followed by adding features to the system role. The system role is the shopping bag into which you place your features, including the custom features you added in the previous Step.
- Within Visual Studio 2010, select Tools\Add System Role Activities.
- Search for and select the Workflow System Role for Training Exercise
The Tools\Add System Role Activities menu item is part of the Visual Studio 2010 Blackbaud Workflow Extension that helps add activities to your toolbox from the set of features granted to a system role.
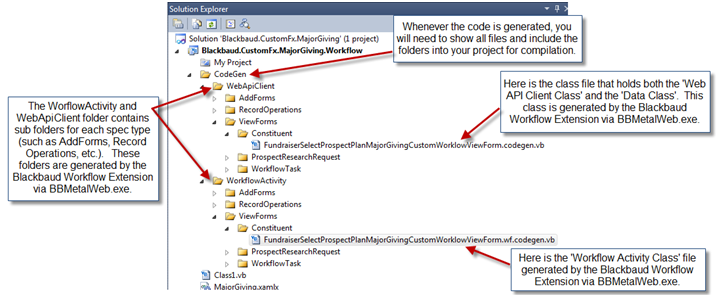
Step 11 - Show all files, include CodeGen files, and rebuild project
Now the interesting part is when this extension cannot determine the assembly/class or cannot find the assembly/class for a pre-built workflow activity. This is the case with user-defined data lists and custom features such as the three data forms that we loaded and granted permissions to the system role. In this scenario, the extension will shell out to BBMetalWeb.exe on your behalf and automatically to generate code that creates a workflow activity.
-
Select the workflow project within Visual Studio 2010.
-
Select Show All Files and Include the CodeGen Folder into the Visual Studio 2010 project.
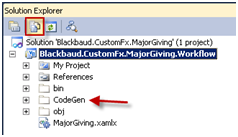
After the class files are generated for your custom feature, you need to include the folders that contain the new .NET class files into your project so they can be compiled with the workflow assembly. The class files generated by BBMetalWeb are organized into folders that are only visible when you select Show All Files within the Visual Studio 2010 Solution Explorer.
-
Right-click the newly created folders that contained the generated code and select Include in Project from the popup menu.