Location Chooser for Google Maps
A location chooser adds a Google Map to your site. Embedded Google Maps give people an easy way to find your event or location.
Note: To add the map, you need a version 3 or later Google Maps API key and be a registered Google user. Previous API keys must be upgraded to v3 or later. See instructions below.
The following directions show you how to link to Google's page that explains how to register with Google and to locate the API key.
-
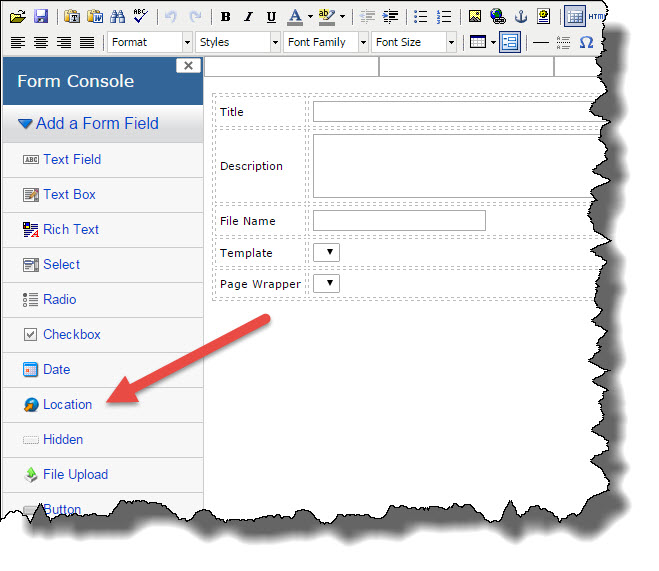
Open the Form Console by selecting
 (Form Console) in the Visual Editor toolbar for a Form.
If the icon is not selectable, right-select in the form, and choose Show Form Console.
-
In the form body, select your cursor where you want to embed the map.
-
In the Form Console, select Location.
-
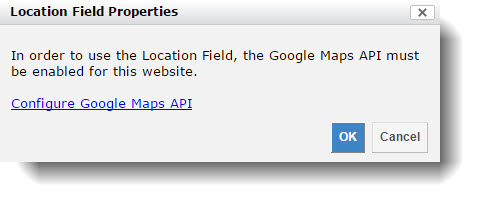
If you see a message to enable Google Maps API, generate new Google Maps API keys:
-
Select the Configure Google Maps API link.
-
Select the register an API Key link to get a key.
-
Sign in, or create an account with Google Developers.
-
Select a project, or create a new project.
-
Enable three Google Map APIs:
-
Google Maps JavaScript API
-
Static Maps API
-
Geocoding API
Tip: See the Google documentation for help with enabling APIs.
-
-
In the API Console's APIs & auth section on the left, select Credentials.
-
In the Key for browser applications section, copy the API key and return to CMS.
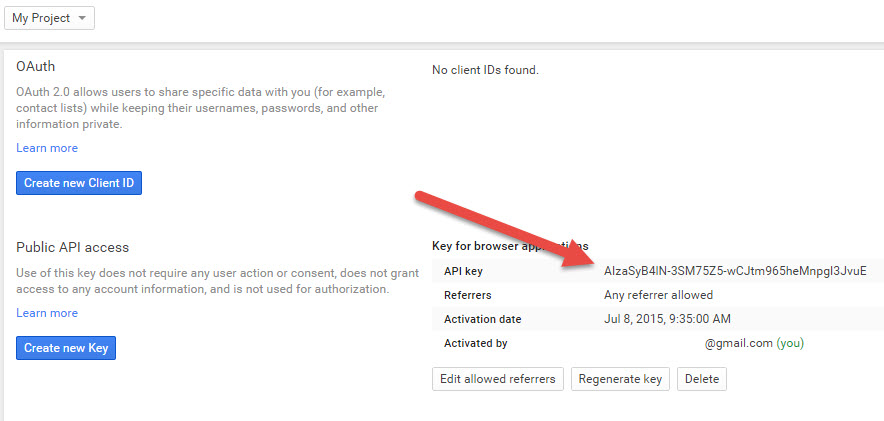
Tip: If a browser key is not listed, go to APIs & auth > Credentials, and in the Public API access section, select Create new Key. Select Browser key, and select Create.
-
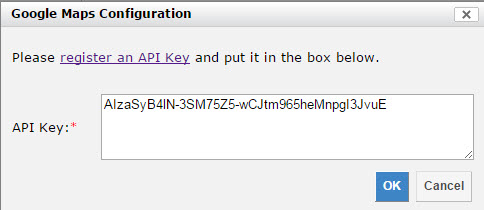
In the CMS Google Maps Configuration window, paste the key in the API Key field:
-
Select OK.
You can view this key in CMS in Reports&Tools > Host Configuration.
-
In the Form Console, select Location.
-
-
In the Location Field Properties window, complete the fields:
-
Properties
-
Label - (Optional) Enter a label for your map. This label will autopopulate the Name field in the proper formatting.
-
Name - If Label is filled out, select your cursor in the field to automatically populate the Name. Otherwise, type a name with no spaces.
-
Help Text - (Optional) Enter any help text that you want to display above the address search bar that displays above your embedded map.
-
Button Label - (Optional) Type text to display on the button next to the address search bar. When selected, this button searches for an address. For example, "Show Location."
-
-
Width - (Optional) Enter the width in pixels for the map. By default, this is 500 px.
-
Height - (Optional) Enter the height in pixels for the map. By default, this is 300 px.
-
Initial Map Center - (Optional) Enter the location to center the map. By default, the center is San Francisco.
-
Zoom Level - (Optional) Choose a zoom level. 1 is the zoomed out. 21 is zoomed in. By default, the zoom is 13.
-
Required field - (Optional) Select the check box to set location as a required field that page visitors must complete.
Map Layout
-
-
Select OK.
To remove an embedded map from a form, highlight the map, and press your keyboard Delete key. You will be asked to confirm whether you agree to delete the field associated with this map.