Manage Content Styles
This tutorial will show you how to apply css at multiple levels of Page Wrapper and PageBuilder to manage branding and consistency without limiting content functionality and customization.
Note: Access to the features and options shown in this tutorial is controlled by security groups and security categories. If you do need access that you do not have, contact your site administrator.
Note: There is no one, right way to plan and manage content. The purpose of this tutorial is to share where and how you can manage your branding and layouts. This tutorial includes examples of some of the options available in Luminate Online. There are many free, online resources to help you establish your own style guides and content management plan.
In the following example, we will:
-
Add global styles (colors, fonts, images, etc.) to the Page Wrapper Editor CustomStyle.css files
-
Add page-type styles (layouts, background colors, components, etc.) to a Page Wrapper
-
Create and display a reusable PageBuilder page
-
Add page-specific styles (header settings, byline settings, components, etc.) to a PageBuilder page
-
Add element-specific styles (strong, emphasized, aria labels, etc.) to content HTML
Plan content
Start with a plan so you know what styles should be applied to which content. This prevents duplicate work and placing the same css code in multiple places.
Some questions you may want to answer include:
-
Do I need different content for different audiences? (e.g., different chapters, regions, age groups, participant types, etc.)
-
What types of content do I have? (e.g., registration forms, donation forms, newsletters, photo albums, FAQs, testimonials, etc.)
-
Do I have some content or formats I use a template? (e.g., make copies of your newsletter or event announcements and just change the text)
-
Do I have content that I send at regular intervals? (e.g., annual campaigns, monthly newsletters, weekly updates)
Tip: The a plan is not a contract. Iteration is part of the design process. Remember that you add, delete, move, and change elements at any time.
For our example, we will create a organization branding css, a homepage Page Wrapper, newsletter Page Wrapper, FAQ Page Wrapper, and PageBuilder content.
-
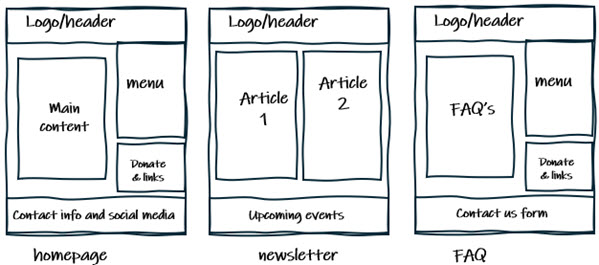
Start with a rough sketch of the pages you want to create. You can do this on paper or make a digital version in any program that let's you arrange shapes and text (e.g., Word, Docs, PowerPoint, Slides, etc).
-
Identify which components are repeated. These sketches show a header, menu, donate & links, and each example has some sort of footer. We probably also want consistent colors and a logo. These will be our CustomStyle.css styles.
-
Identify items that are specific to pages, but will be used each time the page is generated. We have main content, contact info and social media, articles, upcoming events, and FAQ's. These will be Page Wrapper styles.
Tip: As a general rule, it is a good idea to start with your global styles, and then add to or overwrite them at more specific levels when necessary.
Set Page Wrapper Editor CustomStyle.css
Note: Changes to the CustomStyle.css are automatically saved and applied. You can revert to a previous version by selecting a date from the Select backup from this date menu.
These will be your new default styles for all of your content. You may want consistent fonts, colors, images, indents, spacing, etc.
-
Select Setup, then Page Wrapper Editor.
-
Under Related Actions, select either Edit CustomStyle.css or Edit CustomWysiwygStyle.css.
-
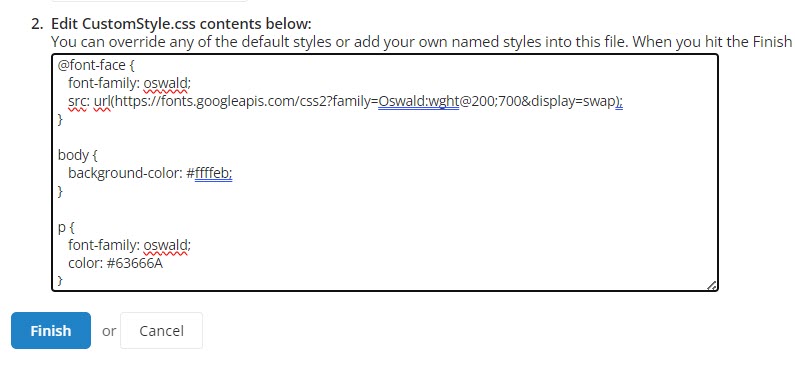
Copy and paste your css code into the Edit CustomStyle.css contents below field, and select Finish.
Example CustomStyle.css
/*Header*/
div.header {
width: 100vw;
height: 300px;
background-color: #00008b;
color: white;
font-size: 36pt;
font-weight: bold;
}
img.logo {
padding: 20px;
}
/*Footer*/
div.footer {
width: 100vw;
height: 250px;
background-color: #00008b;
color: white;
}
Set page type styles
Create a Page Wrapper for each type of page you wish to create (e.g., newsletter, registration, donation form, photo album, FAQ, etc.,).
Add page components in the Page Wrapper version content editor to create reusable layouts.The styles you listed in your CustomStyle.css will be automatically applied. If you have specific settings you want applied to specific page types (e.g. Newsletters should have a light green background, or photo album captions should be in a trebuchet font, etc.,), place that css in the Page Wrapper version meta data.
-
Find your Page Wrapper in the Page Wrapper List, and select Manage Versions.
-
Copy an existing version.
-
Select Edit for the new version copy.
-
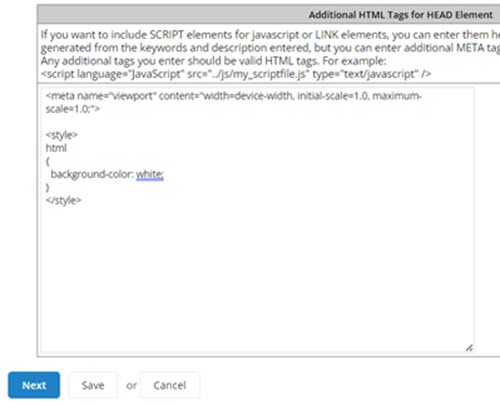
Select Meta Tags, find scroll to the Additional HTML Tags for HEAD Element field.
-
Copy and paste your CSS code into this field, and select Save.
Note: In this field, the CSS code must be placed between <style></style> tags.
Note: In this field, some special characters are not recognized as CSS code. Try the CSS code for special characters if your page is not displayed as expected. (e.g., double colon :: is \003A\003A)
Create a standard page layout
If you want this type of page to always have the same layout (e.g., two columns of text, or three 400x400px images, etc.,), add placeholder components to the Page Wrapper.
-
While still in the version edit view, select HTML Body from the side menu.
-
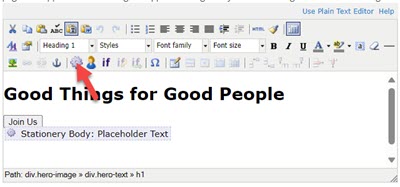
Select the components icon
 from the WYSIWYG tool bar.
 -
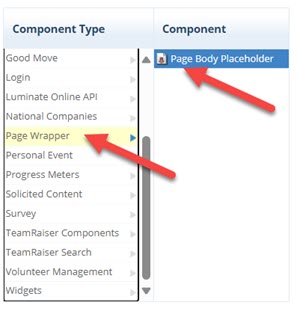
Select Page Wrapper, then Page Body Placeholder.
-
Select Use Plain Text Editor, and add element id's (e.g.,
<button id="donate1">) to placeholders that need unique css for size, color, float, and other styles.