-
Create the new Interest Category to which constituents will be added, if it does not already exist. Consider creating opt-in and opt-out groups for that Interest as well.
-
Look up the Interest ID for the new Interest Category (or for an existing Interest Category):
-
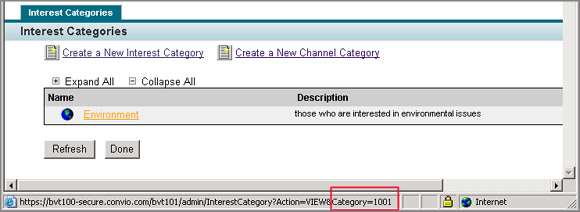
From the navigation bar, choose Constituent 360 and then click Interests from the drop-down list that displays.
-
Place your cursor on the Name of the Interest and observe the Interest Category ID in the Status bar at the bottom of the page as shown:
-
Record this Category ID.
-
-
Create a cross-reference for any external interest categories that you will be including in the upload file, as follows:
-
From the navigation bar, click Data Management and then select Import/Export from the drop-down list to open the Data Sync Operations list page.
-
Click the Cross-Reference Types tab.
-
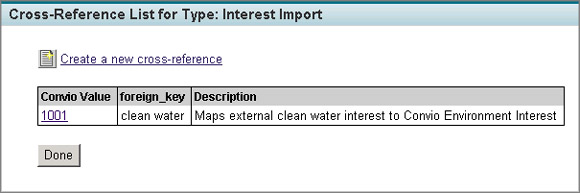
On the page that opens, click the Interest Import link to display the Cross-Reference List for Interest Imports page.
-
Click the Create a new cross-reference link.
-
On the New Cross-Reference page that opens, provide the following:
-
Convio Value - enter the Interest Category ID that you obtained in the previous section.
-
foreign_key - enter the foreign interest value (For example, #25 or clean water).
-
Description - enter a word or phrase to identify this new cross-reference.
-
-
Click the Save button. The screen refreshes and records your new cross-reference at the bottom of the page.
-
Click the Cancel button to return to the cross-reference list for Interests. Your new cross-reference should now be listed as shown:
-
-
Go on to construct the Segmentation Upload file, as follows:
-
Open a file in an application that will output a CSV file (for example, Microsoft EXCEL).
-
For the first column heading, enter PRIMARY_EMAIL or MEMBER_ID.
-
For the second column heading, enter EXT_CAT_ID.
-
For the third column heading, enter OPT_IN.
-
For each row, enter the:
-
Primary email address (or Member ID) of a contact that is already in the Luminate Online database.
-
Interest Category ID or external interest value of an interest to associate with that contact. (If entering an external value, make certain that it is cross-referenced to an Interest Category ID as discussed above.)
-
OPT-IN value as:
-
TRUE to add that interest to the contact’s profile, and to the corresponding opt-in group if that group exists.
-
FALSE to remove that interest from the contact’s profile if it is already flagged, and to add that contact to the corresponding interest opt-out group if that group exists.
Tip: If you are using Microsoft Excel, you may be able to use the Get External Data functions to import the information from other sources, such as a flat text file.
-
-
-
Save the file as a CSV file.
-