Content Blocks
The content blocks defined within a panel can hold text and images. You can enter suggested text for other authors to use or replace; or actually enter the content and lock the block to prevent them from adding more text and images, changing the information defined, deleting the block, or moving it to a new location within the panel. You can also define advanced properties for certain blocks to set a background color for the block or determine its margins and padding from other blocks within the panel.
Some blocks are predefined with elements (such as headings and signatures). Each element is defined as a text property that corresponds to the default style in the Stationery style sheet attached to the HTML-formatted version of the message (as shown in the following). For example, a body content element corresponds to the “P” style, which is the paragraph tag in HTML markup and a Sub Heading can correspond to the “H4” style, which is a third-level heading typically in bold or color to differentiate it from the paragraph of body content.

Unless the block is locked, you can choose to remove an element or change the text property style of the element to another style defined within the stationery style sheet.
For more information on creating Email Express templates, see Creating New Templates.
Most content blocks contain an area for you to enter text (like a caption, title, body content, and so on). Although the template provides the blocks for initially creating an HTML version of the message that follows the styles set in the stationery style sheet selected for the template, you can perform additional formatting on the content in the Style page using a formatting toolbar that displays in the block.
This toolbar contains buttons for you to:
Undo and Redo your last actions
Bold, Italicize. or Underline text
Change the element style in the stationery style sheet (from Paragraph to Heading 1)
Change the alignment of the element - left, right, center, or justified
Indent the text to the right to the next tab setting (or, 0.5 inches by default) or move it out to the left
Indent and prefix the text element as a bullet or numbered list
Create a hyperlink or remove one (you must select the text to make these buttons active)
Run spell check on the content
Toggle between visible or invisible guideline markup
The exception is the WYSIWYG block, which contains a more robust toolbar for making additional types of formatting and inserting personalization to add names or salutations, conditional statements to display the text in different ways, links, and images.
You should decide on the type of blocks you plan to use and how you will use them before selecting the layout and panels. Some blocks are designed to accommodate text and images in a wide panel or all the way across the panel, while others are designed to take up less space.
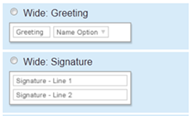
Blocks with text only that are available in Wide choices include the following. In these blocks:

Greeting - A personalization option that you can set to a word or phrase like Hello.
Name Option - Select to pick up the first or last name of the person receiving the email message and an alternate name to use (such as Friend) if the name is not known.
Signature - An H4 heading to set it off from the paragraphs.
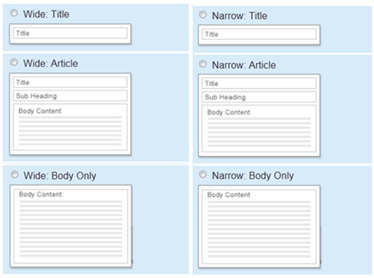
Blocks with text only that are available in both Narrow and Wide choices include the following. In these blocks:

Title - A heading that distinguishes this element from the Body Content by having a larger font size and color or bold than either the paragraph or sub heading.
Sub Heading - A lesser heading to provide an extra heading that distinguishes it from the Title and Body Content by having a larger font size than the font used in the paragraph or just color or bold.
Body Content - Set with the paragraph tag.
Blocks for text and images that are available in both Narrow and Wide choices include the following. In these blocks:

Title - A heading that distinguishes this element from the Body Content by having a larger font size and color or bold than either the paragraph or sub heading.
Body Content - Is set with a paragraph tag.
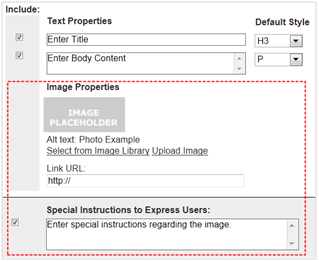
Image Properties - Allow you to select the image from your online Image Library, upload one from your personal computer or a shared network resource, or enter
You can enter special instructions to Email authors about using the image provided or replacing it with a new one, specifying the Alt text to display to recipients with assistive technologies, explaining the link, and so on.
Images can also be inserted with the Image Only and WYSIWYG blocks described later in this section.
Blocks for text and images that are available only in Wide blocks include the following. In these blocks:

Title - A heading that distinguishes this element from the Body Content by having a larger font size and color or bold than either the paragraph or sub heading.
Sub Heading - A lesser heading to provide an extra heading that distinguishes it from the Title and Body Content by having a larger font size than the font used in the paragraph or just color or bold.
Body Content - Is set with a paragraph tag.
Image Properties - Allow you to select the image from your online Image Library, upload one from your personal computer or a shared network resource, or enter
You can enter special instructions to Email authors about using the image provided or replacing it with a new one, specifying the Alt text to display to recipients with assistive technologies, explaining the link, and so on.
Caption is set with a span tag you can define in the actual content.
The WYSIWYG block is available for both Wide and Narrow blocks.

All text is entered and formatted within the editor pane. You can use the formatting tool bar to override the stationery style sheet for text formatting plus:
Insert conditional statements that define who can see the block
Insert personalization
Insert images
For details, refer to the WYSIWYG Guide.
Note: The WYSIWYG block is always locked on the author side.
Blocks for images only that are available in both Wide and narrow blocks include the following. In these blocks:

Each image can be selected from the Image Library, uploaded from your personal computer or a shared network resource as well as from a URL.
You can enter special instructions about using the image provided or replacing it with a new one, specifying the Alt text to display to recipients with assistive technologies, explaining the link, and so on.
Caption is set with a span tag you can define in the actual content.