Participant Center 3 Feature Details
Participant Center 3 isn't just responsive; it offers a complete redesign for you and your participants.
This section describes Participant Center 3's functionality and includes the API methods used for each feature. Participant Center 3's functionality often depends on the TeamRaiser event configuration and participant registration status.
See also the FAQs: Participant Center 3.
Note: Starting on March 26, 2020, new and upgraded Participant Centers use version 3.x. We recommend creating a new Participant Center 3. If you want to upgrade an existing Participant Center, be sure to make a copy and upgrade from the copy.
You can only access Participant Center 3 for one TeamRaiser event at a time, although you can use one instance of the participant center for multiple TeamRaiser events.
Login
When Luminate Online detects that a participant is not currently logged in, a login modal displays containing User Name and Password fields.
This form uses the login method to authenticate the user. The routing functionality may also call the getLoginUrl method to retrieve an authentication token for the user as required.
Easy Login, and Session Refresh or Timeout Setting
You can configure your site to allow participants to log in to their Participant Center with a cookie login to make it easy to log in.
Set the Site Option, F2F_PARTICIPANT_CENTER_COOKIE_LOGIN to "TRUE" to allow Participant Center 3 to periodically refresh the session by calling the loginTest method after a period of inactivity.
Otherwise, if this is not set, a modal window displays after a period of inactivity to notify the participant that their session expires soon, including an estimate for the number of minutes remaining before their session expires. If the participant doesn't click Continue Working, the participant is logged out and returns to the TeamRaiser event greeting page.
Header
When Participant Center 3 renders in a page of its own and is not embedded in a web page), a welcome bar displays at the top of the page that contains the following elements:
Event greeting page link that opens in a new window
Participant's team page link (when the participant is on a team) that opens in a new window
Locale selector that reloads the page to display contents in the selected locale
Help documentation link that opens in a new window
A Log Out link that returns the user to the event greeting page in the logged-out state in the current window

Under the welcome bar, Participant Center Page Wrapper content displays. This optional content is defined by administrators for each Participant Center. To create this content, see Edit the Participant Center Page Wrapper.
Note: Content added by administrators is not automatically responsive by default. For example, an administrator can add a large image that does not re-size automatically for smaller screens. However, administrators can use Bootstrap 3.3.7 classes (such as img-responsive for a responsive image) to create responsive HTML for the welcome bar.
However, when Participant Center 3 renders on a PageBuilder page using the S409 S-Tag, neither the Page Wrapper nor the welcome bar display.
MultiLocale Translations
All user-facing text is translated into the appropriate language based on the "locale" set in the user's session.
Supported locales are based off the locales configured for the Luminate Online site (using the listSupportedLocales method), and may include any of the following languages:
en_US
en_GB
en_AU
en_CA
fr_CA
es_US
The Message Catalog provides the translations using the getMessageBundle method. Additionally, the current locale is included as a parameter in most other API calls to ensure that the API response provides text in the appropriate language.
Loading Indicator
While processing an API call, a "Loading, please wait..." indicator displays. The message is translated appropriately for the current locale.
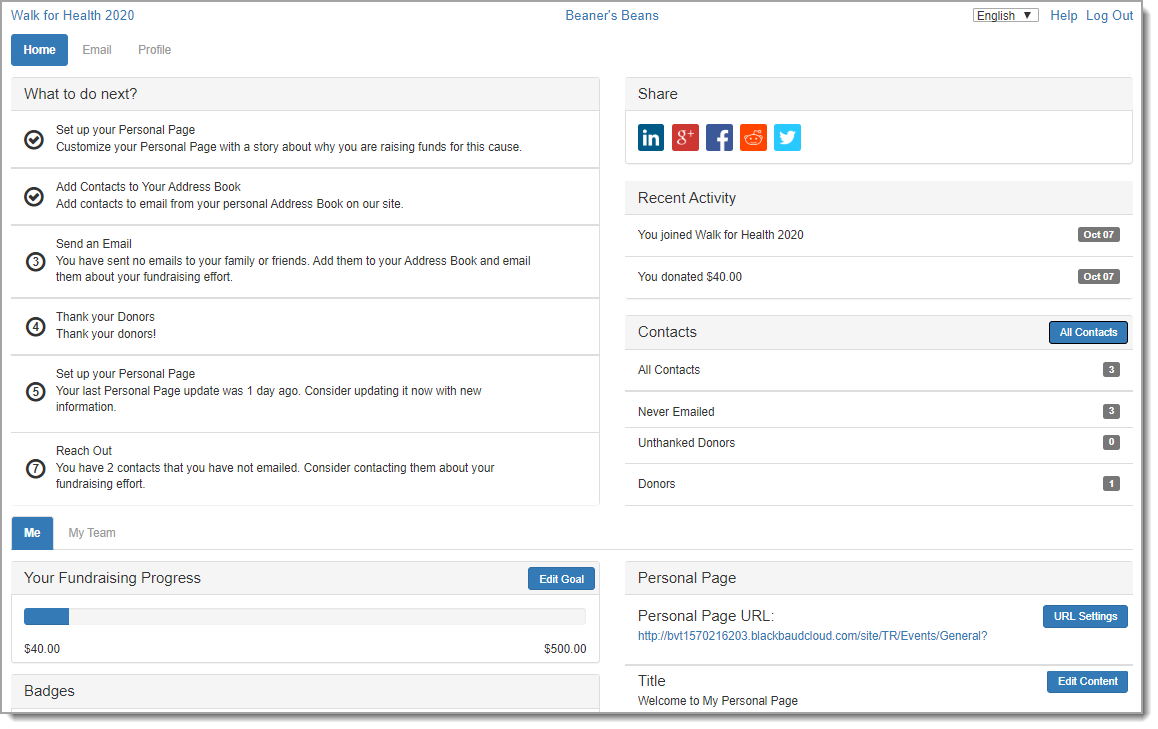
Home
The Home screen provides most of the information the participant needs to see at-a-glance about their performance and recent activity in the current event.
Email Opt-In Warning
If a user did not opt in to receive email from the site, the first message that displays on the Home screen is an alert warning them about this issue, with a link to the Profile view to correct the problem.
Home Content
When configuring a TeamRaiser event, on the "Customize Pages" step, you can add content to the "Home" page, which displays prominently in Participant Center 3.
The getOrganizationMessage method retrieves the content from the current TeamRaiser and renders it at the top of the Home screen.
Admin News Feeds
Administrators can create "news feeds" to display timely information to participants in Participant Center 3.
When this functionality is enabled for the TeamRaiser event, Participant Center 3 uses the getNewsFeeds method to retrieve and display these news feeds when the Home screen loads.
By default, only one "news feed" item displays at a time, with pagination displaying at the bottom of the panel when multiple "news feed" items are available.
What to Do Next Suggestions
Luminate Online's API method, getTeamraiserSuggestion, examines a logged-in participant's progress in the TeamRaiser event and provides suggested actions the participant can take to improve fundraising progress.
The API call uses the show_all_suggestions=true parameter to retrieve the list of suggestions that display in numerical order.
Click on a suggestion to perform an action within Participant Center 3 related to that suggestion. You can edit the wording of suggestion messages through the Message Catalog on your site.
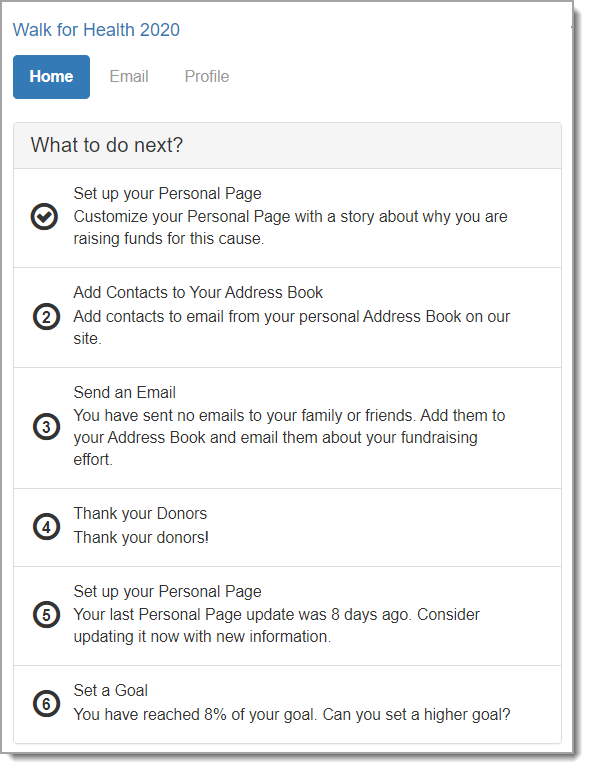
Possible suggestions, along with the corresponding messages and actions, are:
Set up your Personal Page
Message: Customize your Personal Page with a story about why you are raising funds for this cause.
Alternate message: Your last Personal Page update was {0} days ago. Consider updating it now with new information.
Action: Open the participant's Personal Page in a new window for editing.
Add Contacts to your Address Book
Message: Add contacts to email from your personal Address Book on our site.
Action: Change to the Contacts view of the Participant Center.
Send an Email
Message: You have sent no emails to your family or friends. Add them to your Address Book and email them about your fundraising effort.
Alternate message: Your last email was sent {0} days ago. Email more friends and family about your fundraising efforts.
Action: Change to the Compose Email view of the Participant Center.
Send a Followup
Message: Follow up with {0} contacts.
Action: Change to the Compose Email view of the Participant Center with the contacts in the "needs follow-up" group populated in the Recipients field.
Thank your Donors
Message: You have {0} unthanked donations. Thank your donors!
Action: Change to the Compose Email view of the Participant Center with the contacts in the "unthanked donors" group populated in the Recipients field.
Send an Email
Message: You have {0} contacts that you have not emailed. Consider contacting them about your fundraising effort.
Action: Change to the Compose Email view of the Participant Center with the contacts in the "never emailed" group populated in the Recipients field.
Set a Goal
Message: You have reached {0}% of your goal. Can you set a higher goal?
Action: Open the Edit Participant Goal dialog to allow the participant to set a personal goal.
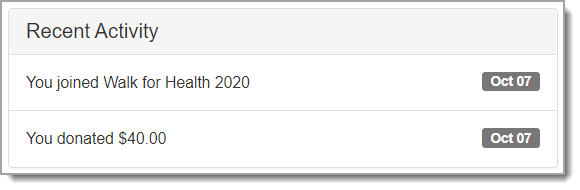
Recent Activity
The Recent Activity section is populated by a call to the getRecentActivity method when the Home screen loads. This displays recent actions by or on behalf of the participant in a paginated format that displays 5 actions per page, ordered by most recent to least recent. The date of each action displays to the right of the action.
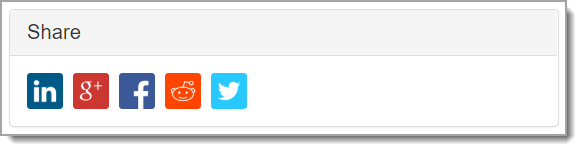
Share
The Share section uses Luminate Online's built-in Akamai Identity Cloud (formerly Janrain) functionality to provide the user with the ability to share their personal page URL.
This panel displays only when Social Login and Social Sharing are successfully enabled on your site.
After a successful share, the Constituent API logSocialShare method records this interaction.
Facebook Fundraising
Participants can connect their TeamRaiser event to a Facebook Fundraiser to fundraise through both their personal page and Facebook.
When the Participant Center loads, the getTeamraiserConfig method checks to see whether the TeamRaiser is configured to allow Facebook Fundraising and hides this panel if it is not allowed in TeamRaiser. If Facebook Fundraising is allowed, a call is made to the getRegistration method to see whether the participant has already created a linked Facebook Fundraiser. If that link is not established, or if the participant deleted their Facebook Fundraiser as determined by a call to the confirmOrUnlinkFacebookFundraiser method, the participant is shown a panel encouraging them to create a linked Facebook Fundraiser.
Following the link in that panel allows the participant to log in to Facebook, grant permission to manage fundraisers, and create a Facebook Fundraiser using the createAndLinkFacebookFundraiser method.
If the participant already has a Facebook Fundraiser linked to their event participation, the participant sees a link to their Facebook Fundraiser along with a Copy button to copy that URL to their clipboard for easy sharing.
Contacts Summary
Participants see a summary of their contacts displayed in default categories with the number of contacts in each category displayed.
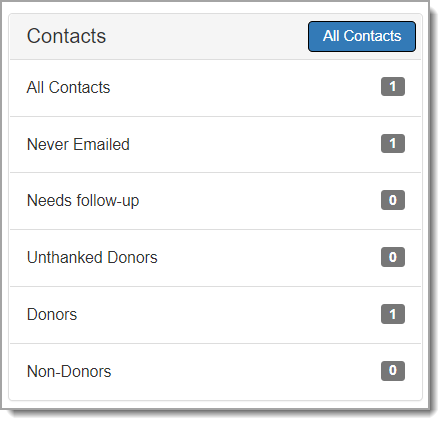
Click to All Contacts to open the Email Contacts view.
Contact data is gathered using calls to the getTeamraiserAddressBookContacts method using the "tr_ab_filter" parameter for each specific type of contact.

Personal Progress
Under the Home information are tabs for Me, My Team, and My Company.
The Me tab is always available and provides information about a participant's personal progress.
The My Team tab displays only when the participant is on a team, and the My Company tab displays only visible if the participant's team is associated with a company.
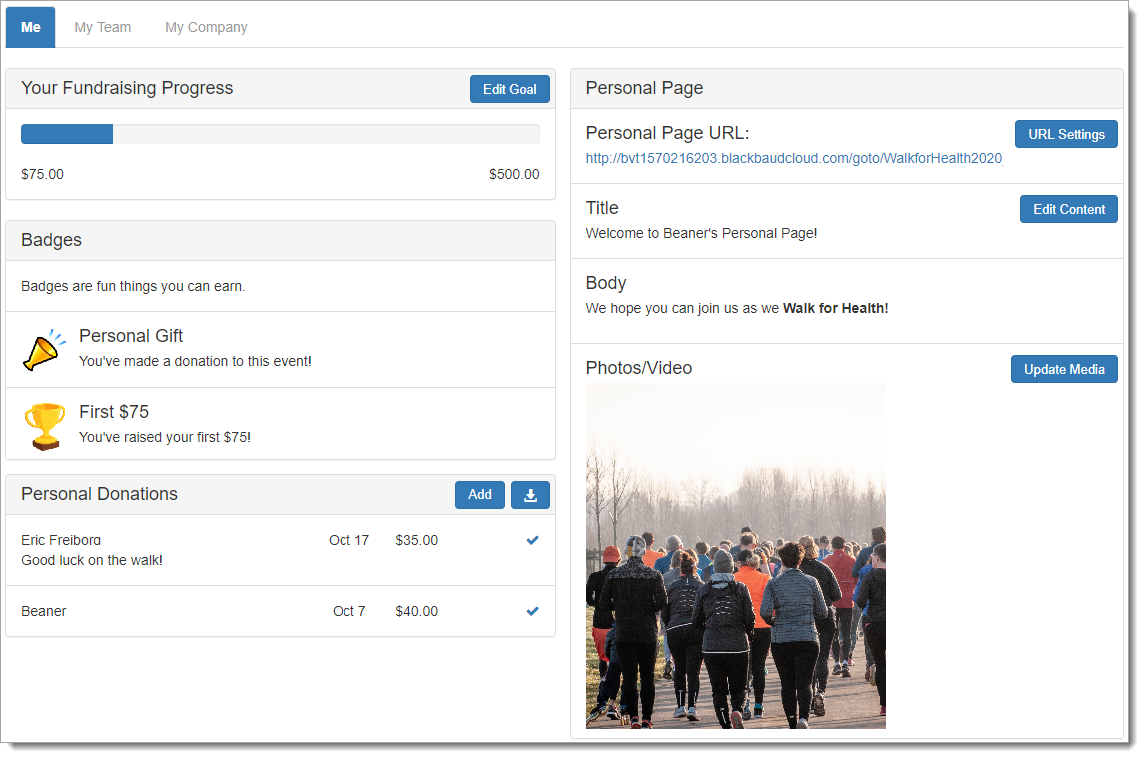
Fundraising Progress Bar
The progress bar shows the amount raised by the participant, the participant-entered goal for their personal progress in the event and a graphic for the percentage of the goal achieved.
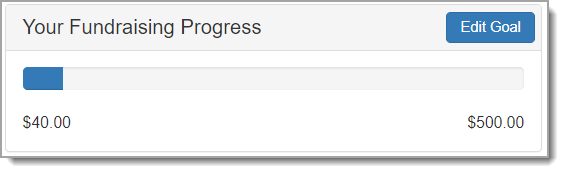
This information is retrieved using the getParticipantProgress method.
Edit Goal
The Edit Goal button in the Fundraising Progress Bar section enables a participant to update their fundraising goal.
This field requires a numeric value and is submitted using the updateRegistration method.
Badges
Administrators can configure fundraising milestones with badges to award participants for fundraising progress. When configured, image, name, and description for each achieved badge displays in this section for the participant once the milestone is achieved.
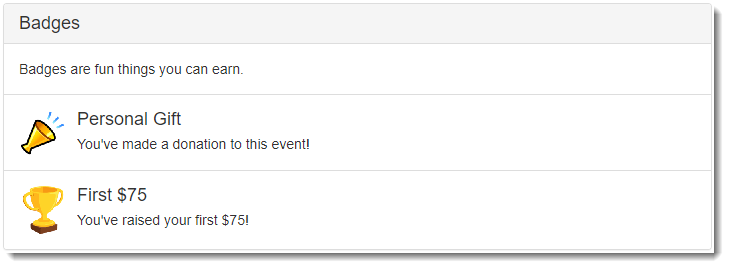
The Badges section uses the getParticipants method, limited to the current participant in the current event, to retrieve details about the milestones that the participant achieved and the corresponding badge information associated with them.
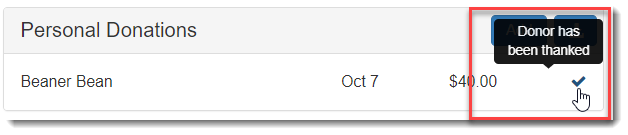
Personal Donations
Personal Donations displays donations made on behalf of the participant, including the name (or recognition name, if the donor chose to identify themselves with such) and the amount of each donation.
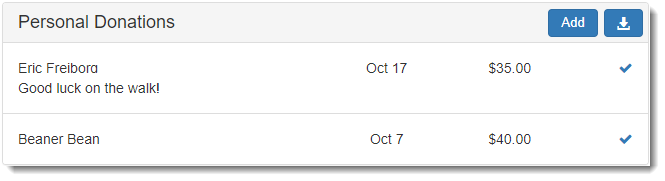
This section displays 5 gifts per page, using pagination at the bottom of the panel if the participant has received more than 5 gifts, and sorts by donation date from newest to oldest. An Add button allows a participant to add an offline gift, and aDownload button allows a participant to download a CSV files of gifts. Acknowledge icons indicate whether each donation was acknowledged with a follow-up email.
This information is retrieved using the getGifts method.
Download Participant Gifts
If a participant has at least one gift, a Download icon displays in the Personal Donations section. Click Download to download a CSV file of gifts for the participant.
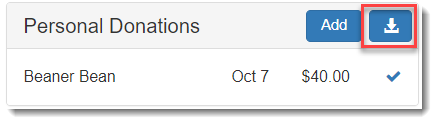
Note: This CSV file is generated by built-in functionality in Luminate Online and cannot be customized.
Add Offline Gift
Clicking the Add button opens a modal window that allows a participant to enter an offline gift.
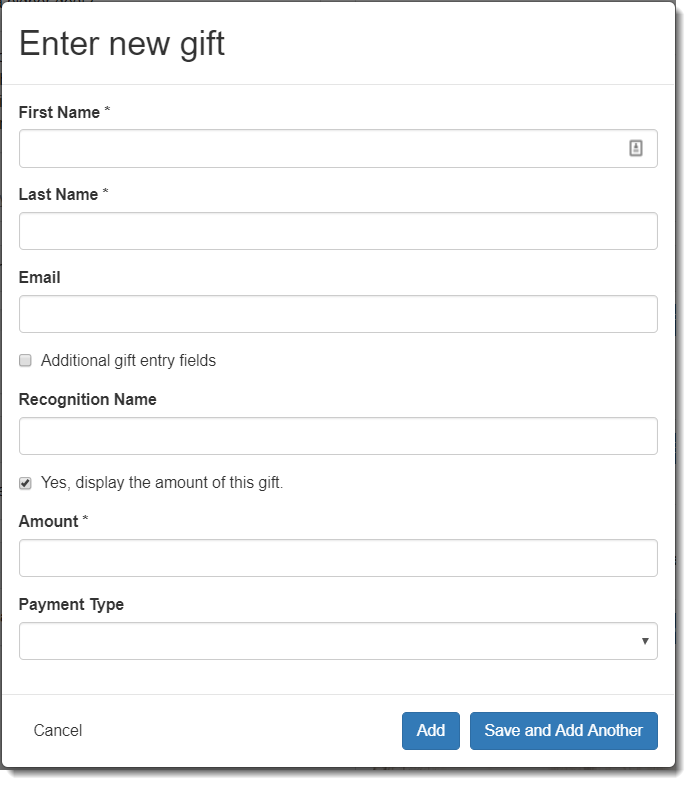
Payment Types available for participants are determined by the TeamRaiser configuration and can include Cash, Check, Credit Card, and Pay Later options.
The Check payment type includes an optional field for the check number, and the Credit Card payment type requires additional fields for the credit card number, expiration date, and CVV.
This page uses Angular Formly to display the form based upon the field definitions found in the corresponding controller. If the participant can make a donation on behalf of their team (such as a donation recorded by a Team Captain), a checkbox displays to allow them to record the gift as a team donation. Additionally, if Gift Categories are configured on the TeamRaiser (according to a call to the getGiftCategories method when this view loads), the Gift Categories display in the form.
When the participant fills out the required fields and clicks the Add or Save and Add Another button, the addGift method is called to store that information. Appropriate success or error messages display at the top of the view based on the response. These success or error messages are visible for 5 seconds, then disappear.
On a success using the Add button, the view returns to the Home screen. A success using the Save and Add Another button clears the form.
Acknowledge Gift
To the right of each gift, icons indicate whether the participant thanked the donor for their donation.
Delete Gift
To the right of each offline unconfirmed gift is a trash icon that allows the participant to delete the gift. Clicking the trash icon opens a "Delete Gift" modal to confirm the requested action, which submits through a call to the deleteGift method.
Personal Page
In this section, the participant can view and modify the editable content of their Personal Page, if the TeamRaiser is configured to allow a participant to edit their personal page according to the TeamRaiser configuration.
This information is retrieved using a series of TeamRaiser API methods, including getPersonalPageInfo for the content, getPersonalMediaLayout to determine if the participant is displaying photos or a video, getPersonalPhotos to retrieve data for the participant's photos, getPersonalVideoUrl to retrieve the video URL the participant has specified, and getShortcut to get the shortcut URL for the participant's personal page.

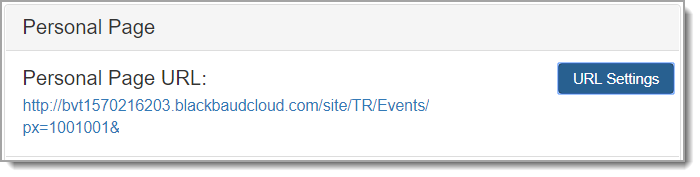
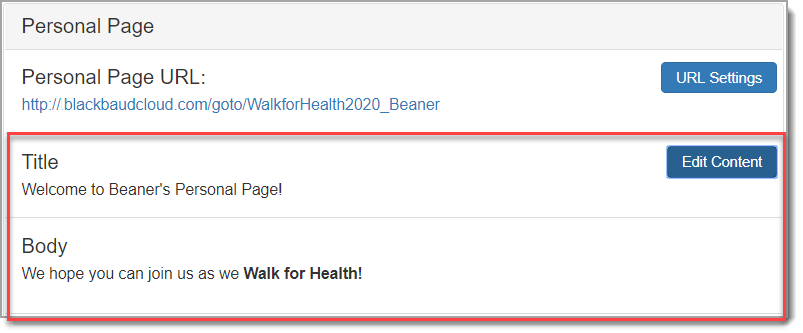
Personal Page URL
The first area of the Personal Page section displays the URL for the participant's personal page.
The participant can click URL Settings to edit their URL by creating a URL Shortcut. URL Settings opens a modal describing that functionality and enter the custom URL text in the field.
The modal submits through the updateShortcut method and displays success or error messages inline in the modal.

Personal Page Content
Also in the Personal Page section, the Title and Body content on the Personal Page displays.
The participant can click Edit Content to edit this content. In the edit screen, the Body content displays in a rich text editor, rendered using the textAngular plugin. The available rich text formatting options display in the toolbar at the top of the editor.
The modal submits through the updatePersonalPageInfo method, and displays success or error messages.

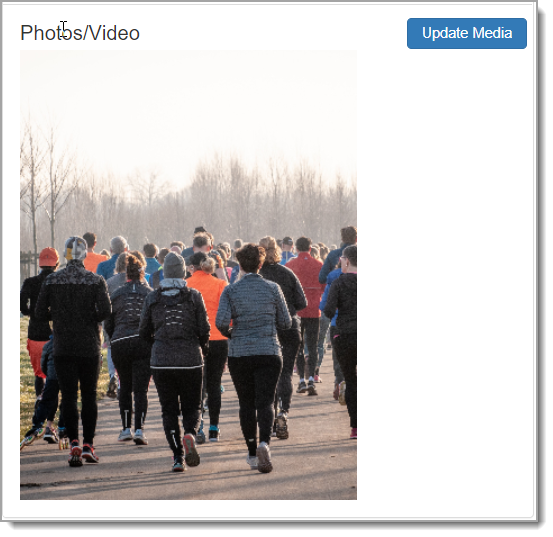
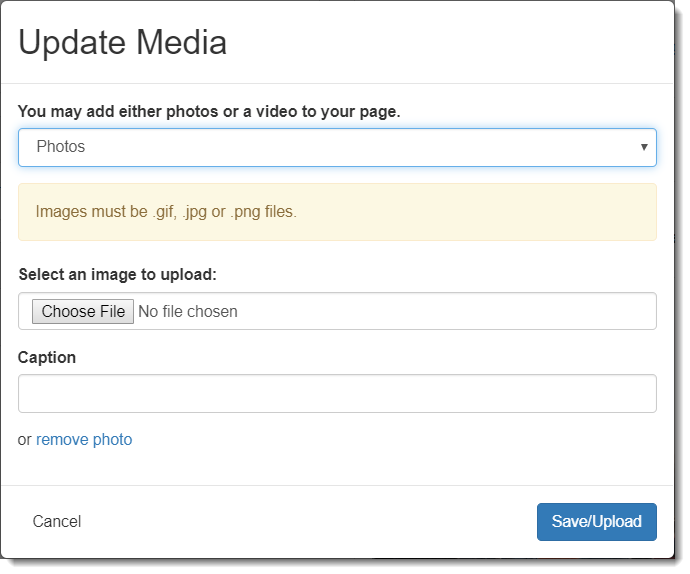
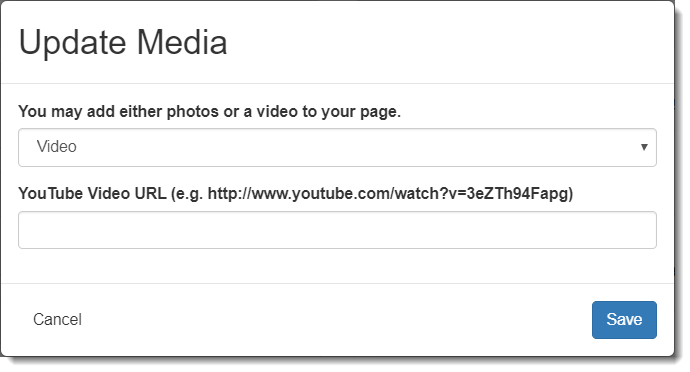
Personal Page Media
Personal Page layouts can display either a YouTube video or up to two photos.
Tip: Not all layouts support two photos, but administrators can indicate whether a second photo on the Personal Page is supported through an Advanced Option configured in the TeamRaiser event settings.
The Photos/Video section in the Personal Page area displays the video or photos that are currently configured for the participant's Personal Page.
The participant can click Update Media to open a modal to allow a participant to modify this selection.
The participant can choose to include either a photo or video. The selection determines what displays in the rest of the modal.
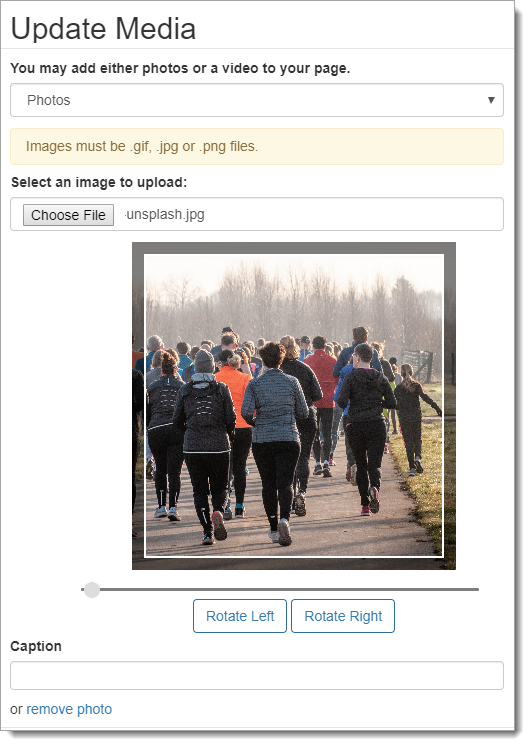
If the participant selects Photos, the modal displays one or two sets of file upload inputs with corresponding captions, depending on the TeamRaiser configuration to allow a second photo on the Personal Page. Any changes to the photo or captions submit through the uploadPersonalPhoto method. If a photo has already been uploaded for either the first or second photos of the Personal Page, a "remove photo" link displays for the corresponding photo to allow a participant to remove that photo from their Personal Page rather than uploading a replacement photo. Clicking that link calls the removePersonalPhoto method.
If the participant selects Video, a single input displays for the YouTube Video URL. Submitting that form calls the updatePersonalVideoUrl method. If the top selector changes from its previous setting when the form is submitted, the updatePersonalMediaLayout method updates that selection information. Success or error messages for all of these API calls display in the modal.
When a participant uploads a photo, a photo preview displays with controls to zoom or rotate the photo, as provided by the Croppie library.
The photo preview's inner area is 300 px width by 400 px height to match photo dimensions on the page. Uploaded photos automatically zoom to fit the boundary outline on the preview by the closest dimension (height or width).
Team Progress
Team members and captains can check My Team to review team progress.
Individual participants do not see the My Team tab.
Team Captain Message
When enabled in the TeamRaiser configuration, a Team Captain can click Edit in the header of the panel to change the message that displays to team members.
The getCaptainsMessage method retrieves and displays the current message from the team captain. When the Team Captain saves an updated message, the updateCaptainsMessage method stores the information.
Edit Team Name
Team Captains can click the Team Name button to change their team name.
The updateTeamInformation method modifies the team name. Success and error messages display in the modal.
Fundraising Progress Bar
Similar to the personal fundraising progress bar, the Fundraising Progress Bar displays the amount raised by the team and the team's fundraising goal.
The Edit Goal button allows updates to the team goal using the updateTeamInformation method.
Team Badges
Team badges are similar to personal badges, except the information that displays is retrieved using the getTeamsByInfo method and is restricted to the participant's team in the current event.
Team Donations
The Team Donations section displays donations made on behalf of the team, as opposed to donations made on behalf of team members.
The getTeamGifts method retrieves the appropriate information for the current team. If the participant is allowed to add "team gifts" according to the TeamRaiser configuration, the Add button displays which allows team gifts to be added.
Download Team Gifts
If a team has at least one gift, a Download icon displays in the header of the Team Donations panel. Clicking this icon downloads a CSV file of gifts made on behalf of the team.
Note: This CSV file generates from Luminate Online and cannot be customized.
Acknowledge Gift
If a participant is a team captain, to the right of each gift is one or more icons indicating whether the participant has thanked the donor for their donation.
A "filled thumbs up" icon displays for acknowledged gifts
A pair of icons displays for gifts that still need acknowledgement
An "empty thumbs up" icon opens an "Acknowledge Gift" modal, allowing the participant to note that the donation was thanked offline (in person, through social media, etc). Submitting the Acknowledge Gift modal calls the acknowledgeGift method
An "envelope" icon navigates to the Email Compose Wizard view, with the donor automatically set as the recipient contact of the email
Delete Gift
If the participant is a team captain, a trash icon displays on the right of each offline unconfirmed gift that allows the participant to delete the gift. Clicking the trash icon opens a "Delete Gift" modal to confirm the requested action, which submits through a call to the deleteGift method.
Team Page
In this section, a participant can view and modify the editable content of their Team Page, if the participant is a team captain who is allowed to edit their team page according to the TeamRaiser configuration.
This information is retrieved using a series of TeamRaiser API methods, including getTeamPageInfo for the content, getTeamPhoto to retrieve data for the team's photo, and getTeamShortcut to get the shortcut URL for the team page.
Team Page URL
The first area in this section displays the URL for the team page, and if the participant is a team captain, a button to update the URL shortcut for the team page.
The URL Shortcut modal submits through the updateTeamShortcut method, and displays success or error messages inline in the modal.
Team Page Content
The second area of the Team Page section displays the Body content that the team captain can edit on their Team Page. This content is modifiable using the corresponding button, which opens a modal describing that functionality.
The Body content in the modal displays in a rich text editor, rendered using the textAngular plugin, where the rich text formatting options available for Team Page body content display in the toolbar at the top of the editor. The modal submits through the updateTeamPageInfo method, and displays success or error messages inline in that modal.
Team Page Photo
A Team Page can display a single photo with an optional caption, and the currently configured photo and caption displays in the final area of the Team Page section, with an Update Photo button that opens a modal to allow a team captain to change their photo selection. Uploading a photo displays a preview as described for Photo Manipulation.
Changes in the modal to the photo or caption submit through the uploadTeamPhoto method. If a photo was already uploaded for the Team Page, a remove photo link displays to allow the team captain to remove that photo from their Team Page rather than uploading a replacement photo. Clicking the link calls the removeTeamPhoto method. Success or error messages for each of these API calls display inline in the modal.
Team Roster
The Team Roster displays team members for the current team, paginated to display 5 members at a time. Each name links to the team member's personal page.
This information is retrieved using the getParticipants method and is restricted to the current team. Only publicly available team members display - "anonymous" participants do not display in this list.
If the current user is a team captain, the Team Name button displays in the panel header to allow the user to edit their team name.
If the TeamRaiser is configured to allow team passwords, and the current user is a team captain, the Team Password button displays in the same vicinity to allow the team captain to set or modify their team's password.
Edit Team Password
The Team Password button opens a modal to allow the team captain to change their team password. This displays as a "password" input, so the user does not see the characters they are typing in, and the existing team password is not prefilled.
Submitting the form uses the updateTeamInformation method to modify the team password. Success and error messages display inline in the modal.
Manage Team Captains
The team captain can use the Manage Captains button to modify the "captain" status of the other team members. The current team captains display at the top, followed by a paginated list of selectable team members, and selected team captains. The current participant cannot change their own team captain status, so the checkbox by their name in the team roster displays as selected and unmodifiable.
Clicking the "Save" button calls the setTeamCaptains method to set the team captains to the ones selected.
Success and error messages are displayed inline within the modal.
Download Team Roster
A Download icon displays in the header of the Team Roster panel. Clicking this icon downloads a CSV file with information about the team members (including the team captain).
Note: This CSV file is generated by built-in functionality from the Luminate Online system, and as such cannot be customized as part of the Responsive Participant Center build - this link goes to the same place as the corresponding link in the standard Participant Center.
Company Progress
If the participant is associated with a Company, the "My Company" tab displays to display information about that company.
Fundraising Progress Bar
This operates identically to the personal fundraising progress bar, except it displays information for the amount raised by the team as a whole and the team's fundraising goal. There is no "Edit Goal" button here, as we have no APIs available to update a company's fundraising goal.
Company Teams
This panel displays the teams associated with the participant's company, using the getTeamsByInfo method, restricted by the company id. Each team name links to that team's page, and if there are more than 5 teams associated with this company, the list paginates and displays in alphabetical order.
Company Page
In this section, the participant can view and modify the editable content of their Company Page, if the participant is identified as the Company Coordinator for their company. This information is retrieved using a series of TeamRaiser API methods, including getCompanyPageInfo for the content, getCompanyPhoto to retrieve data for the company's photo, and getCompanyShortcut to get the shortcut URL for the company page.
Company Page URL
The first area of this section displays the URL for the company page, with a corresponding button to update the URL shortcut for the company page. The URL Shortcut modal submits through the updateCompanyShortcut method, and displays success or error messages inline in the modal.
Company Page Content
The second and third areas of the Company Page section display the Title and Body content that the company coordinator can edit on their Company Page. This content can be modified using the corresponding button, which opens a modal describing that functionality.
The Body content in the modal is displayed in a rich text editor, rendered using the textAngular plugin, where the rich text formatting options available for Company Page body content are displayed in the toolbar at the top of the editor.
The modal submits through the updateCompanyPageInfo method, and displays success or error messages inline in that modal.
Company Page Photo
A Company Page can display a single photo with an optional caption, and the currently configured photo and caption displays in the final area of the Company Page section, with a corresponding "Update Photo" button that opens a modal to allow a company coordinator to change their photo selection. Uploading a photo displays a preview as described for Photo Manipulation.
Any changes within the modal to the photo or caption submit through the uploadCompanyPhoto method. If a photo has already been uploaded for the Company Page, a "remove photo" link displays to allow the company coordinator to remove that photo from their Company Page rather than uploading a replacement photo. Clicking that link calls the removeCompanyPhoto method.
Success or error messages for each of these API calls are displayed inline in the modal.
Company Coordinator Center
If the current participant is the Company Coordinator for their company, this button opens the Company Coordinator Center for that company in a new browser tab or window.
One of the more important parts of the Participant Center is the ability for participants to send emails to their friends and family, often using prepared messages configured by administrators for the event, and using prepared stationery provided by the site.
This section contains a left sidebar to provide access to the Drafts, Sent Mail, and Contacts, along with the number of each. This information is gathered by use of the getDrafts method, the getSentMessages method, a call to the getTeamraiserAddressBookContacts method for each of the default contact filters, and a call to the getAddressBookGroups method to retrieve the participant's custom contact groups.
This view allows a participant to compose and send an email message, with a straightforward design reminiscent of Gmail's email composition interface. This includes a Recipients input, a drop-down where the participant can select from one of the Suggested Messages configured for the event by administrators, a Subject input, a checkbox to allow the participant to include a Personalized Greeting, a rich text editor for the body of the message, and a set of thumbnail images for the various Stationeryoptions configured for the event by administrators.
The rich text editor is rendered using the textAngular plugin, where the rich text formatting options available in Participant Center emails are displayed in the toolbar at the top of this editor.
As the participant types in the subject or body fields, every 3 seconds the current email will be saved as a "Draft" using the addDraft and updateDraft methods, which will appear in the "Drafts" section of the Participant Center.
The Recipients text area allows the participant to specify one or more recipient email addresses. The desired format for this field is FirstName LastName <email@email.com>, to specify a contact's first and last name in addition to their email address, or simply email@email.com for an email-only contact. Multiple contacts should be separated by commas. If the participant arrived on this screen using one of the links on the Contacts views, this field may be pre-populated with selected contacts or a group of contacts.
When the email is successfully sent, the recipients will be compared to the participant's current contacts, and new contacts may be added if a specified name and email address does not match any existing contacts - this matching process also updates the "number of emails sent" and "recent sent date" information on the Contact Statistics view for each recipient contact.
The participant can select one of several suggested messages that have been configured by administrators for this TeamRaiser, as determined by a call to the getSuggestedMessages method. Selecting one of these options will fill in the Subject and Body inputs below with the appropriate information retrieved from the getSuggestedMessage method.
Option Groups
When an administrator configures a suggested message, they select one of four distinct message types, and to aid participants in selecting an appropriate suggested message, the available options are displayed within appropriate "option groups" in the Suggested Messages select element. The suggested messages created by administrators are augmented by ones created by the participant using the Save as Template functionality. A message option group is only displayed if there is at least one option available within its type, and the labels for the five different message option groups are defined in the Message Catalog on the site.
If the TeamRaiser allows personalized subject lines, the Subject input is followed by a checkbox to allow the participant to personalize the first line of body content with the contact's first name. Checking this box may result in an increased delay in the API response when the email is sent, especially when many contacts are included in the recipient list, because the resulting change to the body content for each recipient results in a separate email logged for each recipient, rather than one email sent to multiple recipients. To the right of the "Include personalized greeting" input, a "What's this?" link will open the default help file explaining this functionality in a new window.
If administrators have configured the TeamRaiser event with one or more stationery options for participants, these options are displayed after the message body content area. Each option shows the thumbnail image for the stationery followed by the stationery name, with the selected stationery outlined. When the email is previewed using the Preview and Send button, it will display with the message body content inside the selected stationery.
On the bottom right of the page, participants are presented with a button to "Save as Template". Clicking that button will store the current message subject and body content as a custom template, with the message subject as the message name, using the addDraft method with the save_template parameter. This will appear and be automatically selected within the Suggested Messages dropdown. If the participant returns to the Compose Email screen at a later time, selecting a stored custom template will populate the message subject and body content.
When a participant has selected a custom template in the Suggested Messages dropdown, the "Save as Template" button is replaced with a pair of buttons to "Delete" or "Update Template". As expected, the "Update Template" button will perform the same functionality as the "Save as Template" button, but including the current template's message_id to replace the contents of the current saved template with the contents of the message editor through the updateDraft method. Clicking the "Delete Template" button will delete the current template using the deleteDraft method, refresh the Suggested Messages options, and clear the subject and message body fields.
The "Preview & Send" button will call the previewMessage method to get an accurate preview of the email, which then opens a modal to display the preview to the participant.
Clicking the "Send" button on this modal calls the sendTafMessage method to send the email, and changes the "Send" button to a disabled "Sending..." button until a response is received for this API call.
A successful response will close the modal, reset the email compose form, delete the corresponding "draft" message, and display a success message to the participant at the top of that form.
Drafts
This view displays a list of draft messages saved by the participant, as determined by the getDrafts method. Messages are displayed with the subject line as a link, as well as a right-aligned trash icon to delete the message. Clicking the subject of a message opens "Compose" view with the draft message prepopulated. Clicking the trash icon opens a modal to confirm deletion of the draft, and clicking the "Delete" button calls the deleteDraft method to delete the draft.
Sent
This view displays a list of messages sent by the participant from the Participant Center for the current event, as determined by the getSentMessages method. Messages are displayed with the subject line as a link, as well as a right-aligned trash icon to delete the message. Clicking the subject of a message calls the getSentMessages method to retrieve full details about the specific message, and opens the message in a "Preview" modal with a "Copy" button to create a new message from the sent message. Clicking the trash icon opens a modal to confirm deletion of the draft, and clicking the "Delete" button calls the deleteSentMessage method to delete the saved message.
This view displays the contacts stored in the participant's Address Book on the site. This may include contacts from previous events, information for donors to the participant, and (depending on the event configuration) team members or team donors. This information is retrieved using the getTeamraiserAddressBookContacts method.
This list can be filtered into groups based on the six default groups provided by the site:
All Contacts: All the contacts in the participant's Address Book.
Never Emailed: Contacts that have not been emailed from the Participant Center in the current event.
Needs Follow-Up: Contacts that have been emailed from the Participant Center in the current event, but who have not made a donation on the participant's behalf after receiving that email.
Unthanked Donors: Contacts who have made a donation on the participant's behalf but have not been sent a "Thank You" email afterwards.
Donors: Contacts who have made a donation on the participant's behalf in the current event.
Non-Donors: Contacts who have not made a donation on the participant's behalf in the current event.
If the TeamRaiser event is associated with a previous year's TeamRaiser event, and the participant also participated in the previous year's event, the following filter becomes available:
Past Donors: Contacts that donated on behalf of the participant in the previous year's event.
Past Donors Who Have Not Donated This Time: Contacts that donated on behalf of the participant in the previous year's event but have not yet donated on behalf of the participant in the current event.
If the participant is a member of a team, the following filters are also available:
Teammates: Contacts that are members of the participant's team in the current event.
Non-Teammates: Contacts that are not members of the participant's team in the current event.
If the TeamRaiser event is associated with a previous year's TeamRaiser event, and the participant also participated in the previous year's event, and the participant is a member of a team in the current event, the following filters become available:
Past Teammates: Contacts that were on the same team as the participant in the previous year's event.
Past Teammates Not Registered for This Event: Contacts that were on the same team as the participant in the previous year's event, but who have not registered for the current event.
Additionally, contact groups that have been added by the participant to their site-wide Address Book can be selected as filters in the left sidebar.
Contacts List
The header of this list displays the name of the current filter, with a checkbox to the left if there are any contacts displayed. Checking that checkbox will select all the contacts displayed on the screen, while unchecking it will deselect all the contacts displayed on the screen. A search input on the right side of the header allows the participant to limit the contacts in this group to ones matching the search input text, based on the contact's name and/or email address.
When filtering on a custom contact group created by the participant with the Add to Group functionality, a trash icon appears to the search input in the list header. Clicking this icon opens a "Delete Group" modal, which allows the participant to delete that group. Note that the contacts in that group are not deleted, only the group itself. This option is not available for the built-in filters, only for participant-created groups. Clicking the "Delete" button in the "Delete Group" modal calls the deleteAddressBookGroups method with the specified group ID. A successful result will close the modal and update the list of groups and contact counts in the sidebar, redirecting the page to display the "All Contacts" filter, while an error result will close the modal and display the error message at the top of the Contacts list.
The list is displayed in alphabetical order and is paginated to display 10 contacts per page by default. If there are more than 10 contacts available to display with the current filter settings, a "Contacts/Page" selector shows in the lower right of the list, which allows the participant to select the number of contacts to display in each page. Changing the number of contacts displayed per page resets the pagination to the first page of results.
Each contact in the list has a checkbox on the left side to select or deselect the contact, the contact's name and email address as a link to View Contact, and a trash icon to delete the contact.
Clicking any contact opens a modal window that displays a summary of the name, email address, and physical address information stored for the contact, a link to Edit Information, and a series of statistics about the participant's interaction with the contact in the course of the current event. The modal footer contains a "Cancel" button to close the modal window. The statistic information is retrieved based on the response from the getTeamraiserAddressBookContacts method, and is displayed in two rows of data as follows:
Current Gift: Total amount (monetary) of donations made by the contact on behalf of the participant
Previous Gift: Total amount (monetary) of donations made by the contact on behalf of the participant in the previous event - only available if the event is tied to a previous event, and the participant also participated in the previous event
Acknowledged: Displays "Yes" if the participant has acknowledged the gifts made by the contact, "No" if the participant has not acknowledged the gifts made by the contact, or "N/A" if the contact has not made any gifts on behalf of the participant
Messages sent: Displays the number of emails sent to the contact by the participant in the current event, followed by the date of the most recent email sent to the contact by the participant
Opened: Displays the number of those emails opened by the contact, followed by the date the contact most recently opened one of those emails
Page Visits: Displays the number of those emails where the contact clicked a link in the email to the participant's personal page, followed by the most recent date when the contact clicked such a link
Clicking the "Edit Information" link in the View Contact modal hides the summary and statistic information to display a form with all the fields associated with a contact, prefilled with the contact's information from the getTeamraiserAddressBookContacts method. A "Cancel" link in the upper right of this form returns to the View Contact display. The fields displayed include the first and last name, email address, and mailing address (including Street 1, Street 2, City, State, Zip, and Country). Submitting the form calls the updateTeamraiserAddressBookContact method, where an error response is displayed inline in the modal, and a success response closes the modal, displays a success message above the contacts list, and refreshes the contact list.
Clicking the trash icon opens the "Delete Contact" modal, which displays a short confirmation message to verify the participant really does wish to delete the contact. Clicking the 'Delete' button on this modal will close the modal and call the deleteTeamraiserAddressBookContacts method to delete the specified contact, where success or error responses are displayed at the top of the contacts list and the contacts list is refreshed after a successful response.
Contact Actions
At the top of the Contactsview are six buttons that provide actions the participant can take with their contacts. The first button is labeled "Email All" when viewing the "All Contacts" group, or "Email Group" when viewing any other group, and clicking this button transitions to the Compose Email view with all of the contacts in the current group populated in the Recipients field. This button is followed by an "Email Selected" button that does the same thing, but only populates the Recipients field with selected contacts. Next is a "Delete Selected" button that opens the same modal window as the Delete Contact functionality, but displaying the names and email addresses of all currently selected contacts, and clicking the "Delete" button in this modal will delete all the selected contacts in a single call to the deleteTeamraiserAddressBookContacts method. The fourth button is an Add to Group button that adds all currently selected contacts to an existing custom contact group or a newly created contact group. The right side of the Contact Actions bar contains two buttons to help the participant add new contacts to their address book, an Add Contact button and an Import Contacts button.
Clicking the "Add to Group" button opens a modal that offers options of adding the selected contacts to an existing custom group (if any have been defined by the participant) or to a newly-defined custom group. The list of existing groups is retrieved by a call to the getAddressBookGroups method prior to displaying the modal. If the participant enters a name for a new group, the group is created and the selected contacts are added to it by a call to the addAddressBookGroup method. If the participant selects an existing group and does not add text to the new group name input, the selected contacts are added to the existing group by a call to the addContactsToGroup method. In either case, a successful result will close the modal and update the list of groups and contact counts in the sidebar, while an error result will close the modal and display the error message at the top of the Contacts list.
Clicking the "Add Contacts" button brings up a modal with the three fields used to add a single contact - first name, last name, and email address, where only the last of those fields is required. Submitting this form calls the addAddressBookContact method, where an error response is displayed inline in the modal, and a success response closes the modal, displays a success message above the contacts list, and refreshes the contact list.
Clicking the "Import Contacts" button brings up a modal with options to import contacts from Gmail, Yahoo, or a CSV file. This is a multi-step process which may include opening a new window to request authorization to retrieve the participant's contacts from the specified service, or to upload and process a CSV file of contacts. If the participant chooses to import contacts from Gmail or Yahoo, this uses the API method startOnlineAddressBookImport to contact the specified email provider to get the current authentication URL for that provider, followed by the addressBookImportOAuthCallback method to pass the OAuth credentials to that provider. This initiates a download of information, during which the getAddressBookImportJobStatus method is called regularly to see if the download is complete, followed by the getAddressBookImportContacts method to retrieve the list of downloaded contacts. If the participant chooses to import contacts from a CSV file, the API method parseCsvContacts is used to evaluate the data provided in the CSV file and provide a similar list of downloaded contacts. Once the list of contacts is obtained from either of these paths, the importAddressBookContacts method is used to add these contacts to the participant's address book. This also provides information on potential duplicates or errors that may occur when importing contacts. The popup windows displayed for importing contacts use luminateExtend to process the API calls, since they open and process outside of the normal Angular system - as such, the luminateExtend library is loaded and initialized when the page loads.
Remove from Group
When viewing a custom group (one created using the Add to Group feature described above), a button appears in the Contact Actions section to allow a participant to remove one or more contacts from the current group. This button is disabled when no contacts are selected, but after selecting one or more contacts, the button can be clicked to open a confirmation modal, which lists the contacts that the participant has selected to remove from the group. Upon confirming this action, the removeContactFromGroup method is called for each unique contact_id in the currently selected contacts, and the modal closes when all contacts have been processed. If no errors occur during these API calls, a success message is displayed at the top of the contact list, otherwise error messages are displayed for each contact that could not be removed from the current group.
Profile
This section allows participants to update information for their profile with the organization, including their name and address information, username and password, responses to questions asked during registration, and other event-specific options.
View/Update Profile
When a participant registers for a TeamRaiser event, they provide several personal details, such as their name, address, email, and so forth. This section allows the participant to update that information, using the Constituent APIs.
By default, the following fields are included in the profile:
Username
Name (Title, First, Middle, Last, Suffix, Professional Suffix)
Email Address
Email Opt-in
Home Address (Street1, Street2, Street3, City, State, Zip, Country)
Postal Mail Opt-in
Home Phone
Birth Date
Gender
Employer
Occupation
This view begins by calling the constituent listUserFields method to gather metadata about the fields in question (labels, options, etc) as well as the constituent getUser method to retrieve the user's current values for those fields. This information is used to dynamically generate the form with Angular Formly. When the user submits the form, the constituent update method is called to update the user's data, and success or error messages are displayed at the top of the form, fading after 5 seconds.
Change Password
This modal allows a user to change their password, using the changePassword method. The fields displayed are all required by the API method, including retyping the password a second time. Success or error messages are displayed inline in the modal, fading after 5 seconds, and a success will also close the modal when the message fades.
Survey Questions
This section allows participants to edit their responses to the "Additional Questions" configured for their participation type, if the TeamRaiser is configured to allow participants to change this information. The list of questions and current responses is retrieved using the getSurveyResponses method, and uses Angular Formly to dynamically generate the form based upon that response. When the participant submits changes to their responses, the updateSurveyResponses method is called, and success or error messages are displayed inline at the top of this view.
Event Options
This subsection of the profile deals with event-specific options that are obscure enough to not be included on the Home screen.
Privacy
This section allows the participant to determine if they want their personal page to be publicly visible and displayed in search results, or private and accessible only via a direct URL to their personal page. This option is initialized based on the "privatePage" setting from the getRegistration method, and submitting changes with the Save button creates a call to the updatePersonalPagePrivacy method. Success or error responses are displayed in alerts within the panel, then fade after 5 seconds.
Display Name
If the participant's participation type allows for "display name" or "anonymous" registration options, this section allows the participant to change their display name setting. The current setting is gathered from the getRegistration method, and submitting changes with the Save button creates a call to the updateRegistration method with the new preference. Success or error responses are displayed in alerts within the panel, then fade after 5 seconds.
Company Association
If the TeamRaiser is configured to allow individual participants to be associated with companies and the current participant is not a member of a team, or if the TeamRaiser is configured to allow teams to be associated with companies and the current participant is a team captain, this section displays the current company name (if any) with an Edit button. Clicking the Edit button opens a modal to change the current company association (for the individual participant or the team, depending on the participant's team membership status). The company options available are retrieved by the getCompanyList method, and if the TeamRaiser is configured to allow participants to enter their own company names (rather than simply selecting from a list), an additional input is displayed for a new company name. Submitting the modal will call the updateRegistration method for individual participants, or the updateTeamInformation method for team captains. Success or error responses are displayed in alerts within the panel, then fade after 5 seconds.
Team Management
If "Team self-management" is enabled in the TeamRaiser, the Team Management section allows an individual participant to join a team, or a team member to leave their current team.
Note: Because team captains cannot leave their team, even when they are the sole member of the team, this section does not display to team captains.
The options available for the participant are based on their current team membership status, as defined by the getRegistration method, but also includes the option to keep current team membership status, so participants do not feel like they are being forced to change anything in this panel.
Join Team
Individual participants in this section can search for and join a specific team.
The search functionality uses the getTeamsByInfo method, searching by a combination of the team name, team company, and/or team captain's name.
When searching by the team captain's name, a minimum of 3 characters are required between the first and last name.
Search results are displayed 5 at a time using pagination and include the team name, captain name, company name (if any) and a Join Team button. When the user clicks Join Team, if the team requires a password, a modal displays requesting the password for that team. If the team does not require a password, it attempts to join the team using the joinTeam method.
The Team Password modal closes on submission regardless of success or failure. Success or error responses display to the participant at the top of the Team Management panel, fading after 5 seconds.
The getRegistration method is called immediately after a success response to update the participant's registration information.
Leave Team
Team members who are not team captains may leave their team to participate as an individual.
Selecting this option displays a confirmation pane with explanation text, and clicking the Continue button makes the call to the leaveTeam method. Success or error responses are displayed to the participant at the top of the Team Management panel, fading after 5 seconds. The getRegistration method is called immediately after a success response to update the participant's registration information.