Picklist Groups
Picklist Groups allow users to select multiple options from a Picklist and assign a numeric value - either a number or percentage - to each selected option. This field type can be used to collect more precise data, adding a level of granularity that aids in reporting.
Tip: For examples of use cases and when to use Picklist Groups instead of Field Groups, see the FAQs.
Create new Picklist Group fields
-
Navigate to the Grant Manager Portal by going to yourcausegrants.com or your client URL. Sign in with your Blackbaud ID (BBID) or Single Sign-On (SSO) credentials.
-
After signing in, select Program Setup in the side navigation and then Custom Forms. Select the Form Fields tab.
-
Select the Manage form fields button and then Add new.
-
In Add New Form Field, enter the field details as outlined below.
 Add field name and default label
-
Enter the field name.
-
Optional - Enter the default label. This is automatically used as the label when the field's added to a new form.
Tip: If Default label is left blank, the field name is used instead. Update this at any time by configuring the component in the form.
Enter field description (Optional)
-
Optional - Enter a brief description. This is only used for reference and does not appear in the form.
Set field type to Picklist group
-
Select Picklist group as the Type.
Specify how data will be collected - number or percentage
-
In How will data be collected?, select one of the following options:
-
Number - Applicants must enter their responses in number format. Responses are not required to total a specific value.
-
Percentage - Applicants must enter their responses in percent format. Responses must add up to 100%.
-
Select the custom data table
-
Choose the custom data table - either a custom data table or standard product data table - to use for this field.
Update key (Optional)
-
Optional - The system automatically created a unique key based on the field name. To customize it, edit the value in the Key field or select Generate unique key to reset it to the field name.
Tip: The key's used to connect fields to an API. It also helps to distinguish between fields with similar names when managing fields in bulk, configuring custom data tables, creating reports, and more.
Specify audience - Applicant or Grant Manager
-
The audience determines which forms the field can be used on - Applicant or Grant Manager forms. Specify which audience this field applies to by selecting one of the following options.
-
Applicant - This field can be added to both Applicant and Grant Manager forms. On Grant Manager forms, it'll be read-only.
-
Grant Manager - This field can only be added to Grant Manager forms.
Tip: Should you select Field will store one answer per application? By default, Grant Manager fields are multi-response to accommodate multiple reviewers. Select this option to enforce storing one response only. If enabled, multiple users can complete the field but only the latest response will be stored.
-
Select category (Optional)
-
Optional - Assign the field to a category.
Tip: Categories can be used for filtering and organizing the field on forms and reports. If no category is selected, the field is automatically saved under the Other category.
Note: To create a new category, select the Add new category link below the Category dropdown.
Mask responses (Optional)
-
Optional - Select the Field masking option to only allow Grant Manager users with the Grant Applications - Can View Masked Data or Grant Applications - All permission to view responses.
Warning: Masked responses are hidden from all areas of the application, including forms, reporting, email previews, and document templates. For more information, see How do I protect sensitive data in forms?.
Control how responses copy (Optional)
-
If you want to prevent responses from copying into a new application, enable Do not copy responses when copying applications.
Tip: When enabled, the field displays without a response in the copied application.
-
-
Select Save to create the new field.
Preview the field
After creating the new field and adding it to a form using the Quick Add tool, Form Builder toolbox, or Import tool, it's recommended to configure its form component settings. This ensures it's set up properly before collecting responses. You can then preview the form to see how the field will appear to users, as shown below.
| Data | Description | Example |
|---|---|---|
| Number | Users can input a numeric value for each option. Options are not required to add up to a specific value. |
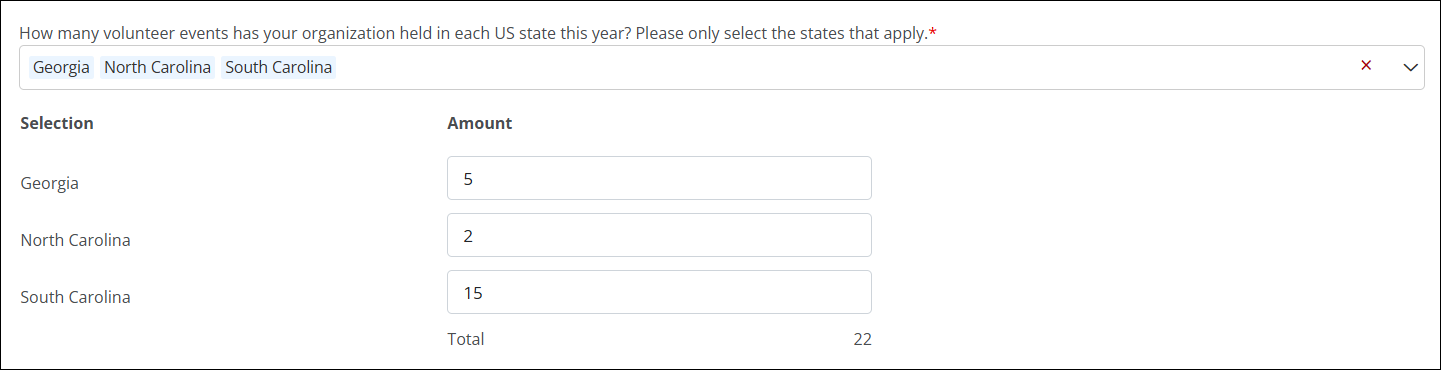
|
| Percentage | Users can input a percentage for each value. Options must total 100%. |
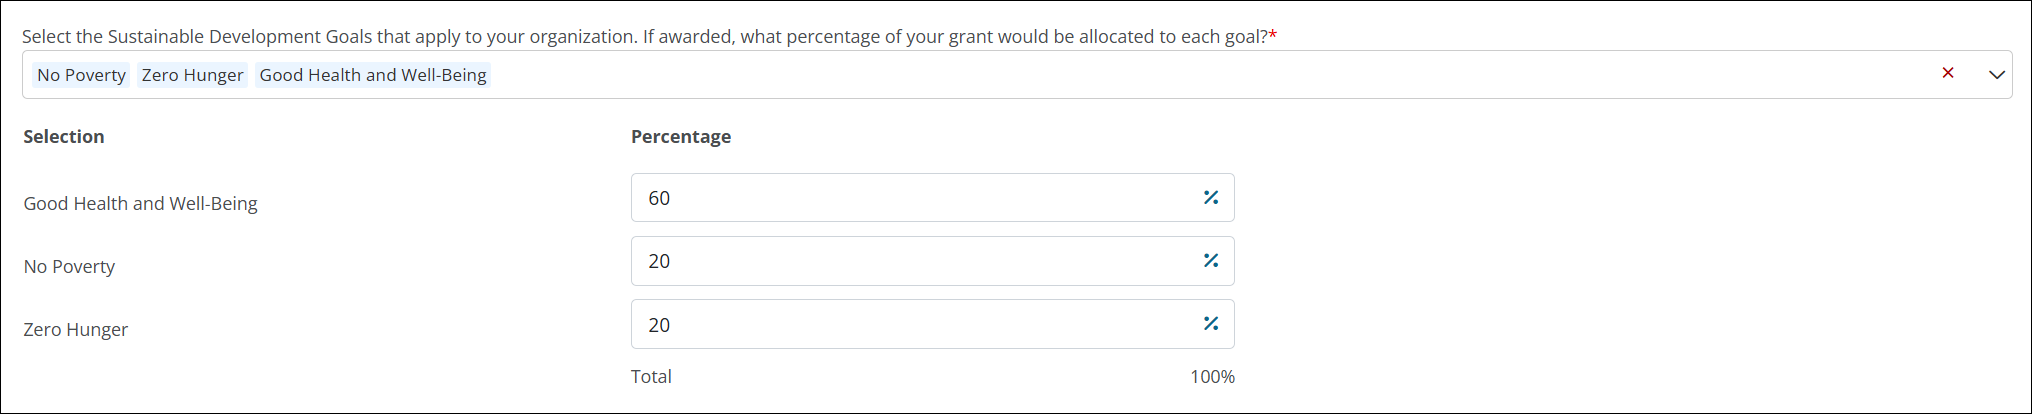
|
Frequently asked questions (FAQs)
Use cases
What is an example for when I should use the Picklist Group field type?
A grant application asks applicants to identify which community programs they will support and how much of their budget will go to each.
-
Youth Education – 40%
-
Food Assistance – 35%
-
Mental Health Services – 25%
The Picklist Group field captures both the selected programs and the percentage allocation, ensuring the total equals 100%.
Why would I use a Picklist Group instead of a Field Group? How is it different?
Picklist Groups and Field Groups both allow for structured data collection, but they serve different purposes and offer different capabilities.
-
Streamline configuration and setup - Picklist Groups can be more efficient than Field Groups since they function like traditional Picklist fields, pulling all options from a single custom data table. On the other hand, Field Groups require you to create a separate reference field for each option you want to present to the user.
-
Hide options - Picklist Groups allow you to configure the options shown in specific forms, essentially hiding options you don't want visible to users. Meanwhile, Field Groups display every option by default with no filtering or selection process.
Recommendations based on your needs
We recommend you use a Picklist Group when you need:
-
A single field that allows users to define values for multiple options from a Picklist
-
Dynamic option management via a custom data table
-
Form-specific customization (e.g., hiding options)
-
No need for sum total validation on number values
Note: Although options assigned a percentage must total 100%, you cannot define a required total for options represented by a number.
-
Workflow automation and conditional logic based on selected options
We recommend you use a Field Group when you need:
-
A group of individual fields that're manually selected, grouped, and need to be consistent across forms
-
Built-in validation for both percentage totals and sum totals of numbers
-
No need for workflow automation or dynamic filtering
Feature breakdown
| Feature | Picklist Group | Field Group |
|---|---|---|
| Select options from a Picklist | Yes | No (manual field selection) |
| Assign numeric values | Yes (percent or number) | Yes (number, percent, or Yes/No) |
| Validation for 100% total | Yes | Yes |
| Validation for sum total | No | Yes (configurable at the field-level) |
| Workflow automation | Yes (on selected options only) | No |
| Conditional logic | Yes (on selected options only) | Yes (at group level) |
| Option-level visibility control | Yes (per form) | No |
| PDF display | Yes (shows options and values) | Yes (shows grouped fields and values) |
Field configuration
Can I change the data collection type (i.e., number to percentage, percentage to number)?
Yes, you can change the data collection type as long as there are no field responses.
Can I hide certain options from the Picklist Group on the form?
Yes, you can configure the field on the form to only show specific options. In the Form Builder, hover over the field and select Edit component to open the Configuration modal. In the Data tab, deselect or uncheck any options you want to hide.
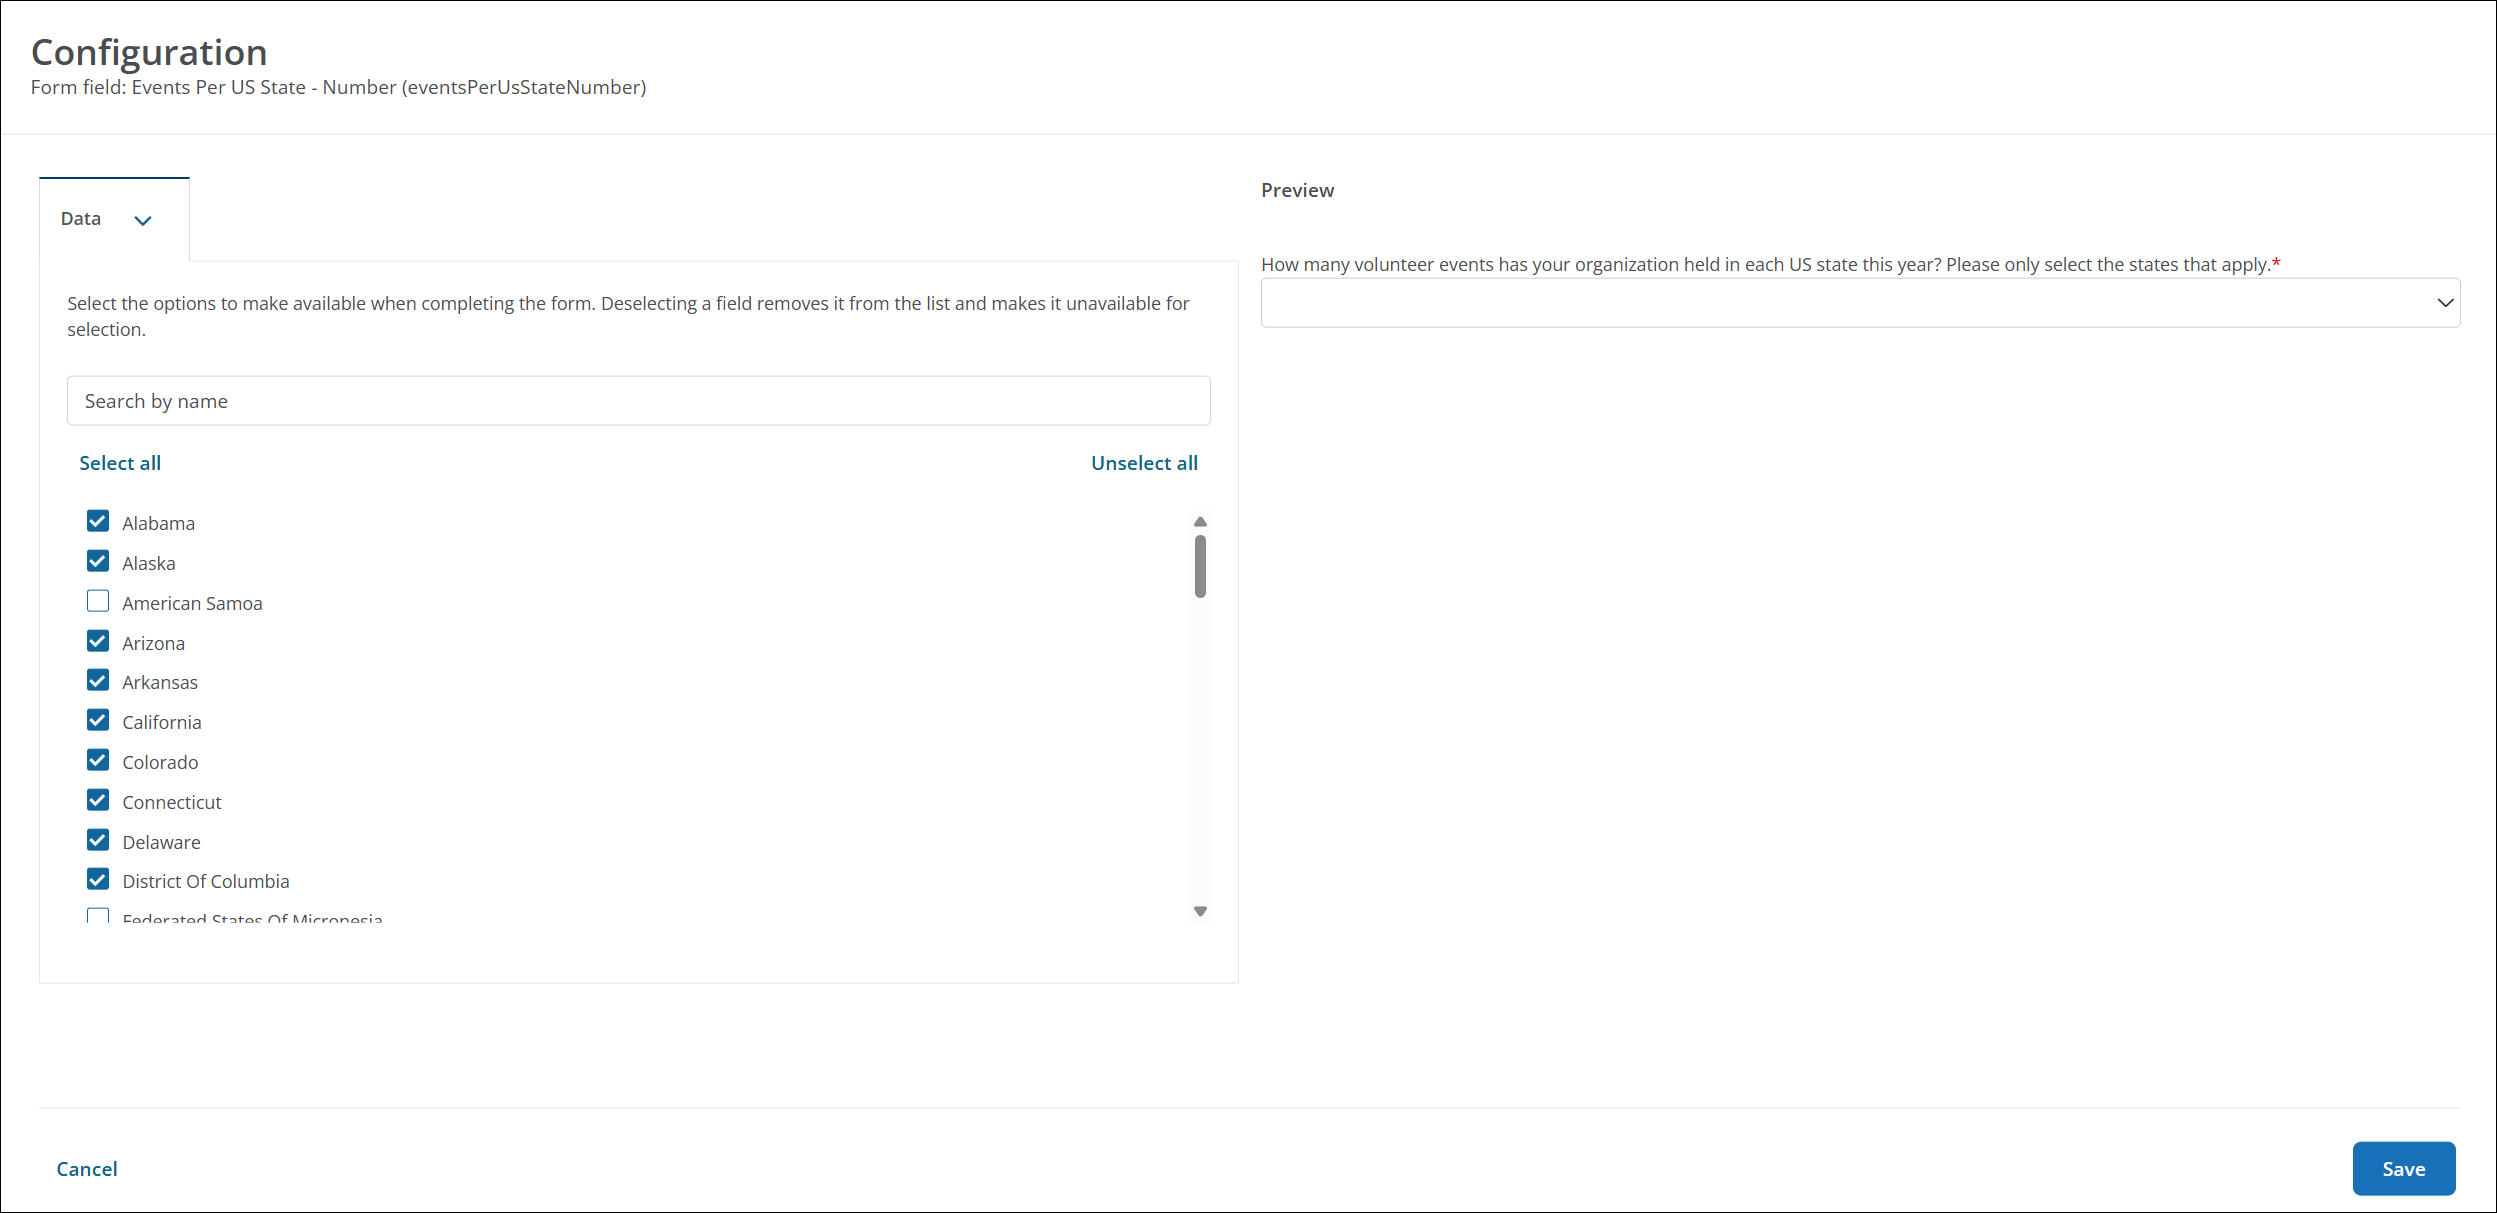
Note: This only impacts the current form. Hidden options are not visible or selectable by users.
How do I convert a Picklist to a Picklist Group?
An existing Picklist field can be converted to a Picklist Group as long as it meets the following requirements:
-
It supports multiple values.
-
There are no field responses.
If this is available, you'll see the Convert to picklist group option when you select the ellipsis icon next to the field in the Program Setup > Custom Forms > Form Fields tab. From here, you can follow the steps to specify the data collection type as number or percentage and finalize conversion.

Can I import or export Picklist Group fields?
Yes, you can import new Picklist Group fields to create them in bulk. For more information, see Import Fields in Bulk.
Note: When configuring your forms during implementation, Picklist Group fields are included in the program and form imports from the UAT to Production environments. However, historical response imports are not supported.
Can the Selection, Amount, and Percentage labels be customized?
No, these labels are standard and cannot be changed.
Do Table fields support Picklist Groups?
No, Picklist Groups cannot be added to Table fields.
Can Picklist Groups be encrypted?
No, additional encryption is not available for Picklist Groups.
Do Picklist Groups allow for calculations and totals?
No, calculations and totals are not currently supported.
Note: By default, values entered as percentages are required to add up to 100%.
Can Picklist Groups be merged?
No, merging these fields is not supported.
Field responses
What are the input rules for completing a Picklist Group field?
-
All selected options must have a value.
-
Values can be 0 or greater.
-
Values can have up to two decimal places (e.g., 0.75).
-
Required fields must be completed before submitting the form.
Reporting
How do Picklist Group responses appear in reporting?
Available reports
Similar to Picklist fields, Picklist Groups can be pulled into the following report types:
-
Application / Nomination
-
Award
-
Custom forms
-
In kind amount requested
-
In kind amount awarded
-
In kind items paid
-
Payment
Tip: When building the report, select the form to report on in the Custom forms section.
Response format
Field responses appear in comma-delimited values where the selected option is followed by the value in parentheses.
Examples:
-
Numbers - Selection 1 (10.5), Selection 2 (40), Selection 3 (49.5)
-
Percentages - Selection 1 (10%), Selection 2 (40%), Selection 3 (50%)
Note: Reports can be filtered by the options selected, but not the values assigned.
How are Picklist Group responses shown in application and form downloads?
When downloading applications and forms to PDF, Picklist Group responses are displayed with their selected options and corresponding numeric values.
Can I filter applications by Picklist Group values?
No, filtering is only supported for the selected options - not on the numeric values assigned to them.
Workflow automation
Can Picklist Group responses be used in workflow automation?
Yes, but with limitations:
-
You can create rules based on the selected options.
-
You cannot created rules based on the numeric values.