Add SFTP Connections
Custom data feeds like Ad Hoc reports and Accounts Payable exports can be delivered using SFTP sites.
Note: Add Blackbaud IP addresses to your allow list so that files can be sent to your SFTP server. For more information, see Inclusion and exclusion lists - IP addresses in the CSRconnect Help.
-
Navigate to the Grant Manager Portal by going to yourcausegrants.com or your client URL. Sign in with your Blackbaud ID (BBID) or Single Sign-On (SSO) credentials.
-
After signing in, select Settings in the side navigation and then SFTP Connections.
-
In SFTP Connections, select Add connection.
-
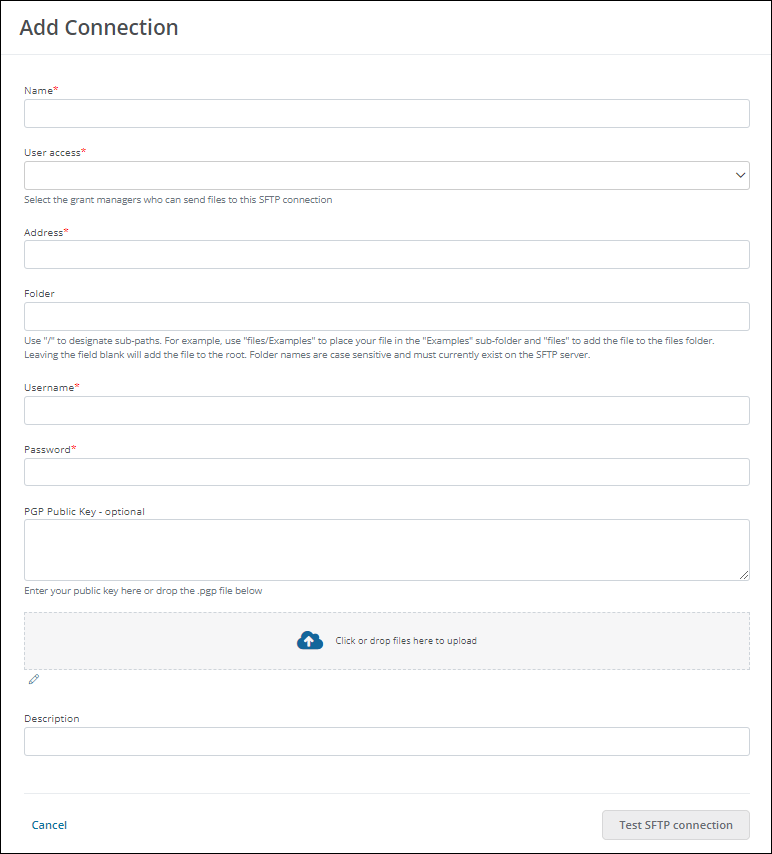
In the Add Connection screen...
-
Enter a name for the connection.
-
Select who can access it.
Note: Users with access to the connection can send scheduled data feeds to the SFTP server and view a history of non-expired feeds.
-
Specify the address of the host or server.
-
Optional - Specify the folder on your SFTP server in which GrantsConnect will place the file. If the Folder field is left blank, the file will be sent to the root folder on the server.
Tip: Designate sub-paths by using / between the folder and sub-folder. For example, reports places the file in the reports folder while reports/Weekly places it in the Weekly sub-folder.
Note: Folder names are case sensitive and must already exist on the server.
-
Specify the username and password for the host or server.
-
Optional - Provide a PGP public key for GrantsConnect to use to encrypt the contents of the file prior to sending it to the SFTP server. Enter it in the PGP Public Key field or upload the .pgp file in the File field.
Note: The PGP private/public key pair must be generated by your organization. By creating this yourself and only providing the public key to GrantsConnect, you can ensure that only your team can decrypt encrypted files sent to the server. For questions about generating a PGP key pair, consult your organization's IT department.
Tip: The data feed process won't work if the key is configured incorrectly. See the FAQ for the required format.
-
Optional - Enter a description.

-
-
Select Test SFTP connection to run a test. This ensures all information is valid and the system can connect to the server.
-
Correct any errors that occur and retest.
-
Select Save in the confirmation screen after establishing a successful connection.
Note: The Confirm Connection screen shows the connection details as well as the fingerprint.
Frequently asked questions (FAQs)
 What can an SFTP connection be used for?
It's used in GrantsConnect for...
-
Ad Hoc reporting - Schedule an Ad Hoc report to send to an individual or group via SFTP connection on a daily, weekly, or monthly basis.
-
Accounts Payable - Configure Accounts Payable to automatically send payment files to a connection when a batch of payments is sent to processing.
 How should the PGP public key be configured?
An example of the proper configuration is shown below.
-----BEGIN PGP PUBLIC KEY BLOCK-----
(token goes here)
-----END PGP PUBLIC KEY BLOCK-----
Warning: Only the token should be included in the block. Do not include any other information, like version or comment.