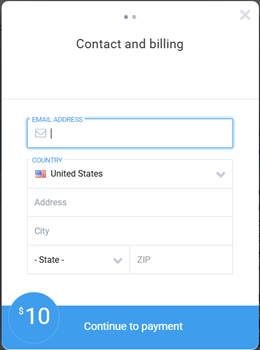
Note: Required donor information includes: email, first name, last name, zip code, and country.
| Classic Blackbaud Checkout | New checkout |
|---|---|
|
|
|
Use the S1300 Tag version of Classic Blackbaud Checkout
To keep using an existing S1300 Tag donation form with the Classic Blackbaud Checkout, make sure the donation form is linked to a campaign that utilizes a non-"Checkout" Blackbaud Merchant Services gateway in the "Legacy" account setup.
First, verify your Legacy merchant account is set up correctly
Before the March 25.2 release
There are no changes to this guidance; it simply clarifies that this configuration remains valid until the 25.2 release.
Go to Setup, Payment Capabilities, and Edit or Create Account for your Merchant Account.
In the Account Details steps, do not select a gateway in the Blackbaud Merchant Services Checkout Account step.
In the Legacy options section, for Legacy Blackbaud Checkout Account, select a Blackbaud Merchant Services gateway that is not configured for the new checkout, then Save.

Following the Luminate Online 25.2 release in March, you will need to have two gateways configured for your merchant account used by the S1300 Tag Classic Blackbaud Checkout version.
Go to Setup, Product Configuration, and select Edit or Create Account for your merchant account.
In the Account Details steps, for Blackbaud Merchant Services Checkout Account, either accept the checkout-enabled gateway set by the Auto-Compliance Script, or chose a different checkout-enabled gateway.
Tip: From May 1 to May 16, 2025, the Auto-Compliance Script will automatically add a checkout-enabled gateway to all merchant accounts. This new gateway was created by duplicating your existing gateway and updating it to be PCI-v4 compliant. The gateway name remains similar to the original, but is checkout-enabled and has "Checkout" appended to its name.
In the Legacy options section, for Legacy Blackbaud Checkout Account, select a Blackbaud Merchant Services gateway that is not configured for the new checkout, then Save.
Note: If this gateway is not configured, the new checkout modal is used.

Next, reference a donation form in a campaign with the Legacy merchant account
Make sure that the donation form that you reference in the S1300 implementation is associated with a campaign that uses a non-checkout merchant account such as in the image above.
Find the ID of the donation form used for your current S1300 Tag Legacy Blackbaud Checkout.
Locate the PageBuilder page that uses the S1300 Tag by going to Content, PageBuilder, and selecting Edit Content of the correct page.
Select the pencil icon to Edit the HTML Content.
Locate the donation form ID that is referenced, such as
<convio:session name="1300" param="1016"></convio:session>where 1016 is the donation form ID.Verify that the donation form is associated with a campaign set up with a merchant account that is configured for the Legacy gateway configuration.
Go to Fundraising, Donation Management, and select the All Donation Forms tab.
Search for the donation form by ID, then select Copy. You will see the associated campaign listed in the Donation Campaign step.
Tip: If you need to move the donation form to a different campaign, see Can you move a donation form to another campaign?
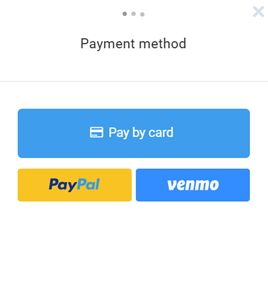
When your existing configuration is confirmed to use a campaign set up with a non-checkout merchant account, your S1300 Tag donation form experience will remain unchanged. Since the Classic Blackbaud Checkout now uses a transaction token, this method complies with PCI v4.
Name, email address, country, and zip code are collected in the modal.
Note: Offline gifts are not supported in the previous configuration. To accept offline gifts, reference a donation form that is associated with a campaign using the new "Checkout" merchant account.
Use the S1300 Tag version of new checkout
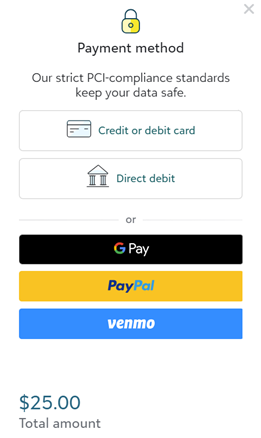
When a donation form used with the S1300 Tag is in a campaign that is configured to use a "Checkout" gateway in the merchant account, the new checkout payment modals display to donors.
To offer an S1300 Tag donation form with the new checkout, ensure that your referenced donation form is associated with a campaign that uses a "Checkout" Blackbaud Merchant Services gateway in the Blackbaud Merchant Services Checkout Account step.
First, verify your new checkout merchant account is set up correctly
Go to Setup, Payment Capabilities, and Edit or Create Account for your Merchant Account.
In the Account Details steps, select a "Checkout" gateway in the Blackbaud Merchant Services Checkout Account step.

Next, reference a donation form in a campaign with the new checkout merchant account
Make sure that the donation form that you reference in the S1300 implementation is associated with a campaign that uses a checkout merchant account such as in the image above.
Find the ID of the donation form used for your S1300 Tag donation form.
Locate the PageBuilder page that uses the S1300 Tag by going to Content, PageBuilder, and selecting Edit Content of the correct page.
Select the pencil icon to Edit the HTML Content.
Locate the donation form ID that is referenced, such as
<convio:session name="1300" param="1016"></convio:session>where 1016 is the donation form ID.Verify that the donation form is associated with a campaign set up with a merchant account that is configured for the new checkout gateway configuration.
Go to Fundraising, Donation Management, and select the All Donation Forms tab.
Search for the donation form by ID, then select Copy. You will see the associated campaign listed in the Donation Campaign step.
Tip: If you need to move the donation form to a different campaign, see Can you move a donation form to another campaign?
When your existing configuration is confirmed to use a campaign set up with a checkout merchant account, your S1300 Tag donation form experience will launch the new checkout modals when the process payment button is selected.
Note, however, that when donors open your S1300 Tag donation form configured as above, they now see new required fields before selecting the donation amount.

Check your published PageBuilder page on a personal computer and mobile device to ensure that it displays properly.
You can use the Preview function in PageBuilder, but Page Wrapper CSS customizations will not display.