Enable Google Tag Manager
Tip: You must have a Google Analytics (GA) account, property and data stream set up to generate the measurement ID required forGoogle Tag Manager (GTM) enablement. See Enable Gtag.js if you need instructions.
Warning: Implement either gtag.js or GTM. Do not use both on the same website. Doing so results in duplicate recording of events.
 Generate GTM installation code snippets
-
Open GTM. If you are not already signed in to Google, you will be prompted to sign in.
-
When GTM opens, if you do not already have one, select Create Account and
 complete the Add a New Account form.
 -
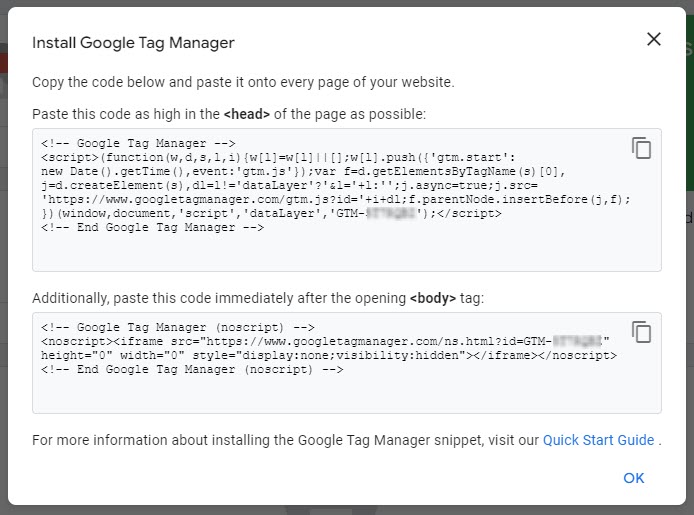
GTM will provide code snippets and instructions in the
 Install Google Tag Manager window that pops up automatically when you complete account creation. Keep this window open while adding the snippets to your PageBuilder code. You can always return to this window by selecting the GTM ID at the top of your GTM Home.
 Add GTM to Luminate Online Page Wrappers.
-
First disable the automatic gtag.js feature.
Warning: Having both a direct gtag.js and GTM on the same page may result in duplicate event recording.
-
In the navigation bar, select Setup and Page Wrapper Editor.
Note: You cannot edit published Page Wrappers. You cannot unpublish default Page Wrappers.
If the Page Wrapper is published, go to Manage Versions and select Unpublish.
If the Page Wrapper is a default wrapper, go to Edit Attributes, Set default for security category, and unselect Set this Page Wrapper as default for the security category. -
Find the wrapper in the list and select Manage Versions.
-
Select Edit.
-
Select Meta Tags from the menu on the left.
-
In the Additional HTML Tags for the HEAD Element, paste in the first code snippet from the Install Google Tag Manager window in your other browser tab..
-
Select Save.
-
Select HTML Body from the menu on the left.
-
At the very top of 1. Edit the HTML content for this Page Wrapper below, paste in the second code snippet from the Install Google Tag Manager window in your other browser tab.
-
Select Save.
-
From the menu on the left, select Publish Page Wrapper.
-
Select Publish Page Wrapper and Finish.
-
From the navigation bar, select Content and PageBuilder.
-
Find your page of interest in the Page List and select Edit Attributes.
-
Scroll down to Page Wrapper and select the Page Wrapper to which you just added the GTM install codes.
-
Select Save.
-
Select Approve & Publish from the menu on the left.
-
Select Publish and Finish.
 Configure Tag in GTM
-
In GTM, close the window with the code snippets.
-
Select Tags and New.
-
Select Choose a tag type to begin setup...
-
Select Google Analytics: GA4 Configuration.
-
Copy your GA Property measurement ID from the Data Streams details in your GA Admin panel, and paste it into the Measurement ID box in the GTM Tag Configuration box.
Tip: You must have a Google Analytics (GA) account, property and data stream set up to generate the measurement ID required for Google Tag Manager (GTM) enablement. See How do I create a Google Analytics account? and Configure a Data stream if you need instructions.
-
Select Choose a trigger to make this tag fire.... from the Triggering box.
-
Select the plus sign in the top, right corner to add a new trigger.
-
Select Choose a trigger type to begin setup from the Trigger Configuration box.
-
Select Page View, All Page Views, and Save.
-
Name your Trigger and select Save.
 Verify Connectivity
-
Open your website and the page inspector.
-
Select the Network view of the inspector (to the left or below Elements and Console in most inspectors) and refresh the page. You should see event names with your measurement ID and ones that include
gtm. -
Open your GA Realtime reports. You should see the user number increasing as you refresh your page.
 You can now immediately see changes in page visits, online sales, and much more. Browse Advanced Features and Use Cases to get ideas for optimizing your analytics.

