What's Recent
To help you cultivate relationships and improve fundraising efforts, Raiser's Edge NXT introduces new and enhanced features on a frequent basis. In case you need to catch up on what you missed or just want a refresher, here's a recap of what was recently released.
5 December 2023
From the web view, you can now access Online Giving to create optimized donation forms and access your (standard) forms. Optimized forms encourage donors to complete transactions because of a new streamlined design that captures payments before collecting contact information. They also require minimal setup and include the same fee coverage options as standard forms.
Optimized forms:
-
Use a branding card you customize with images and your mission statement.
-
Are visually appealing, intuitive, and engaging.
-
Automatically adjust to increase higher than average gift amounts based on donor data analysis.
-
Display anywhere on your website without creating new web pages.
To access optimized forms, navigate to Online Giving from the solution menu  . From Online Giving, you can also:
-
Manage users, roles, and settings for optimized and standard donation forms.
-
Set up a Blackbaud Merchant Services account, if necessary.
Note: As part of this transition, all your existing donation form users, roles, and settings migrated to Online Giving. However, you can continue to manage them from Raiser’s Edge NXT.
For more information, see Online Giving.
To help you better query your data, we addressed multiple requests submitted through the idea bank and improved action lists.
From Lists, Actions and Fundraising, Work, Actions, you can now:
-
Use custom fields as columns and filters.
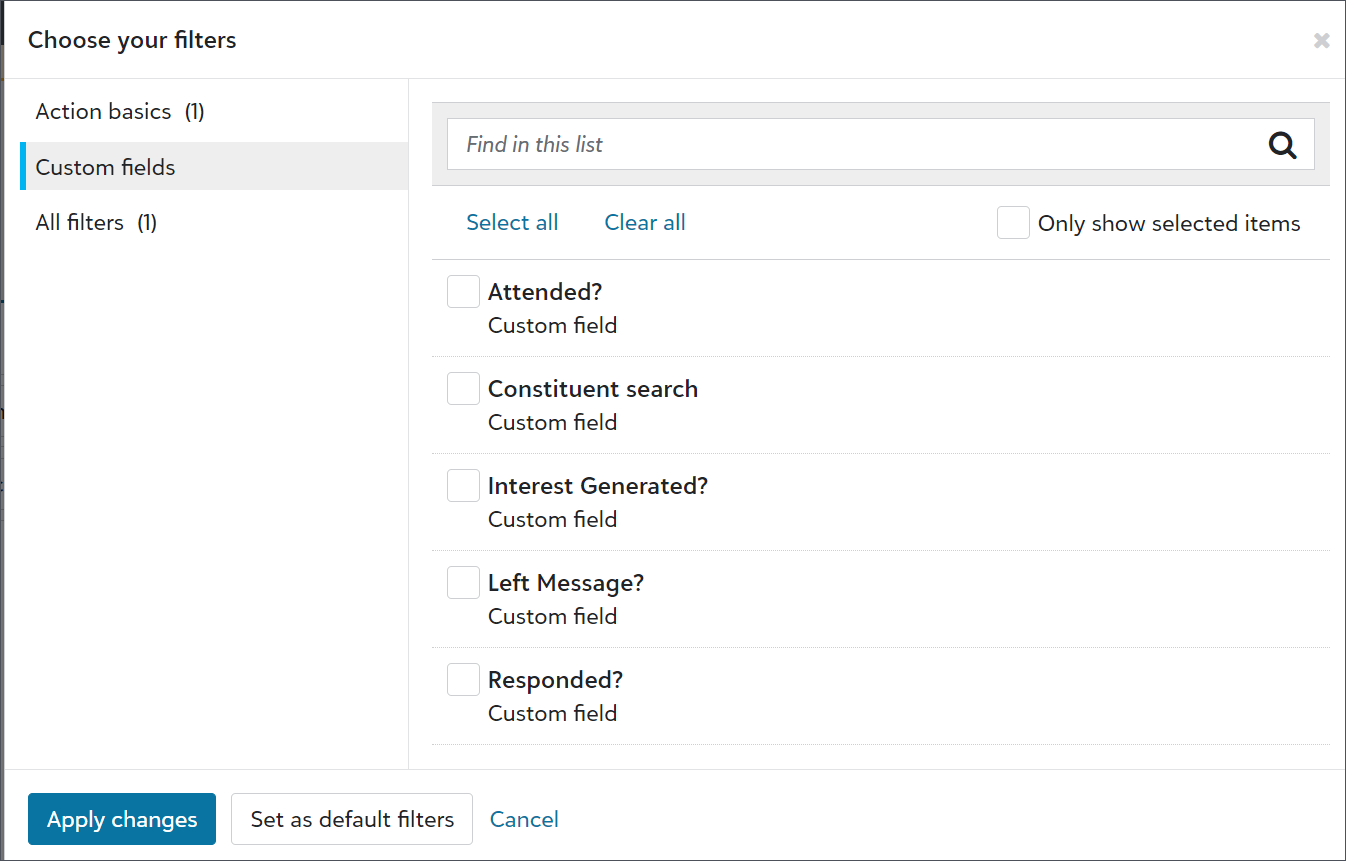
-
Use Location, Priority, and System record ID as columns and filters. You can also use Constituent status as a filter.
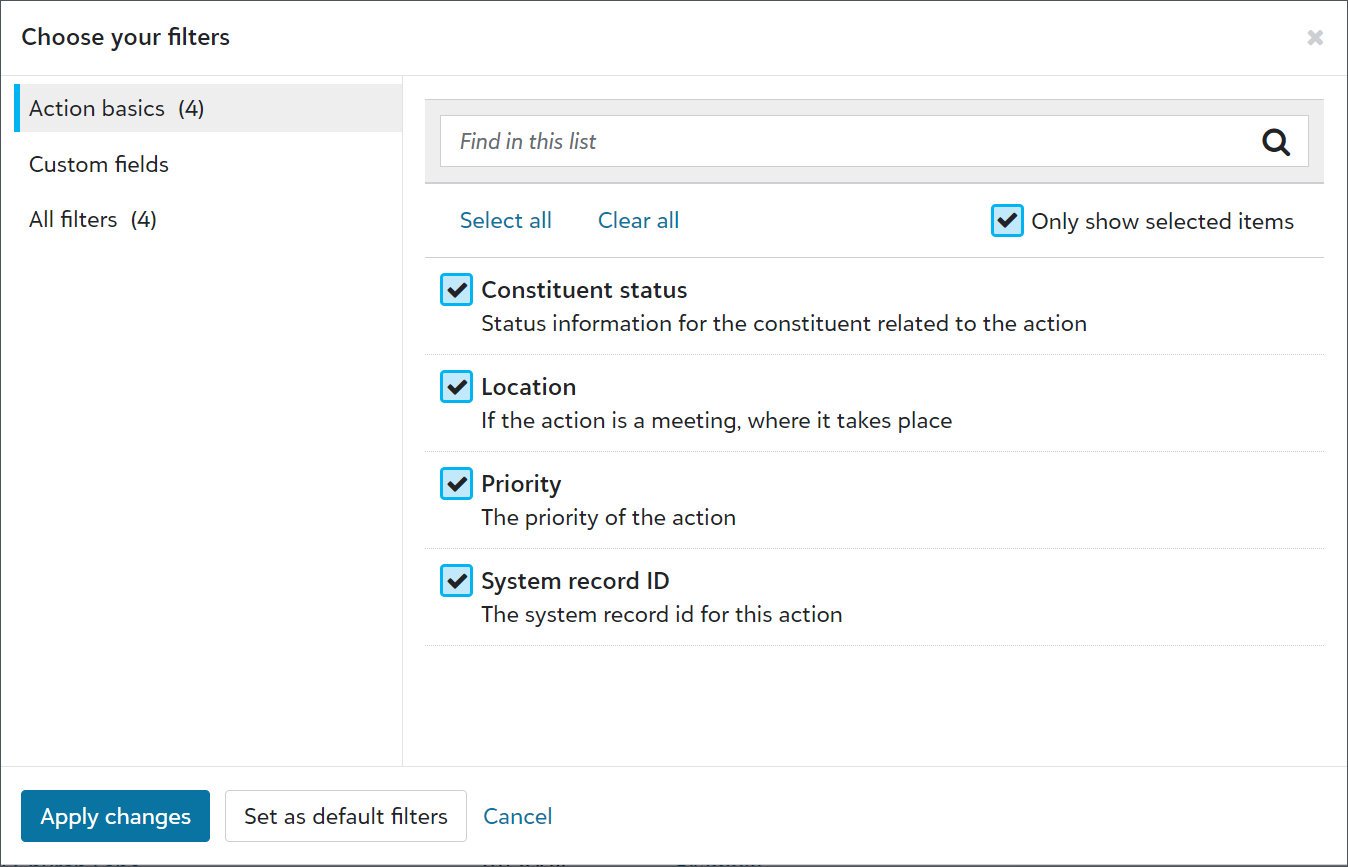
-
Sort lists by multiple columns and select the sort order for each column.
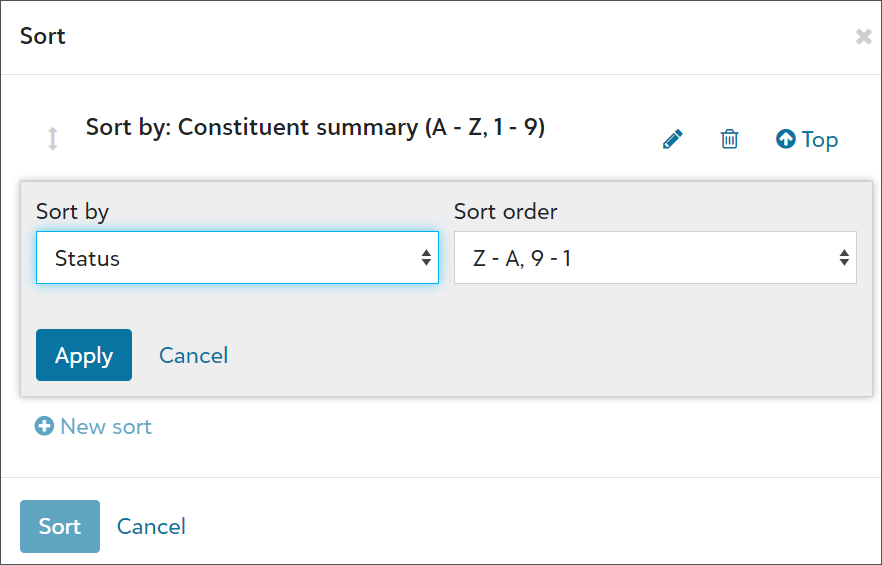
-
Include System record ID in exports.

-
Further refine list filters with the new All of these values, Any of these values, None of these values, No value, and Any value operators.
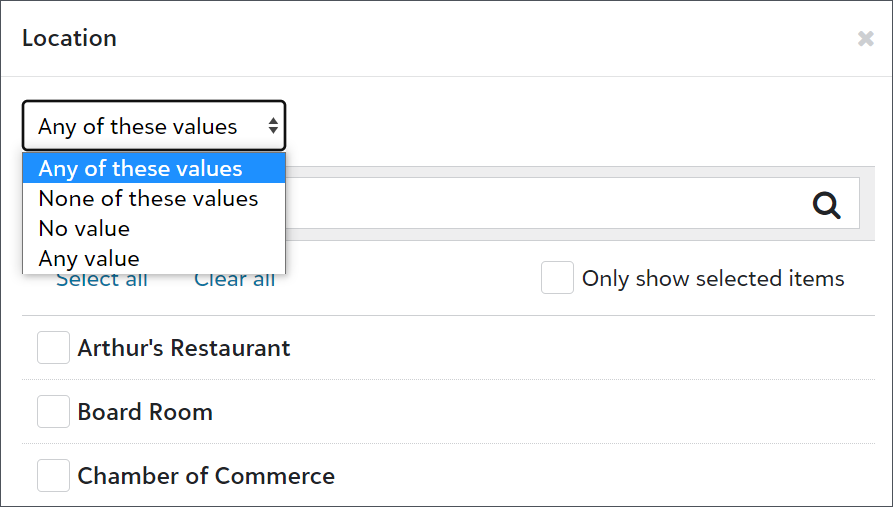
Now, you can permanently dismiss candidates from the Untapped candidates list. This allows you to focus on finding new prospects to qualify and assign to fundraisers, rather than re-evaluating prospects repeatedly. Use this option for candidates who should not be assigned to a fundraiser. For example, this option makes sense for prospects in permanent stewardship who have indicated they are no longer willing to give.
Permanently dismissed candidates are placed in the Disqualified prospects list, so if their circumstances change, you can still access their information and qualify and assign them.
For details, see Disqualified prospects.
To improve how you manage Gift Aid tax details, you can now edit them for individual gifts.
To edit the tax details for a specific gift, from the gift record, under Gift Aid, select Edit. You can change the qualification status, apply gift aid rules, and manually enter a Claim number, as required.
For more information, see Gift aid.
To capture contact information for constituents around the globe, we now offer more support for international phone numbers and addresses on event registrant forms.
For more information, see Registrant Details.
14 November 2023
To give you more flexibility, you can now crop a hero image when you add it to a branding card in Online Giving. From Online Giving, select Optimized branding cards under Related Links. Create a new branding card or edit an existing one. Select Crop under the hero image.
For more information, see Branding Cards Tutorial.
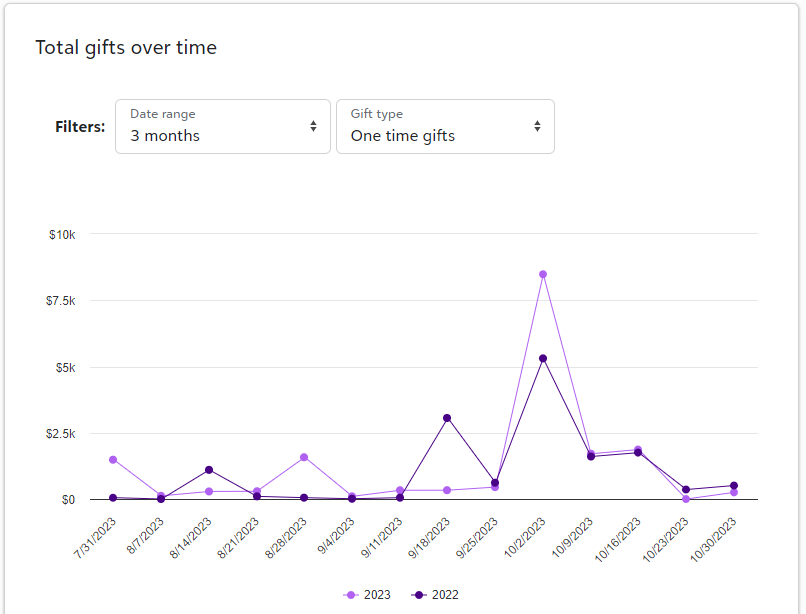
From Blackbaud Apps, Online Giving, under Total gifts over time, you can now see the total gifts received from all donation forms. You can filter by date range and gift type. For more information, see Donation Forms.
7 November 2023
We’ve moved the ability to manage table values, clean up table entries, and add new donor category tables from Tables under Configuration in the database view to the web view. To manage tables in the web view, navigate to Control panel, Tables.
For more information, see Tables.
Some messages your organization sends are blocked, such as when a recipient unsubscribes from content or marks content as spam. To learn about why email addresses may be blocked, see Suppression Criteria.
If a recipient wants to receive email after they’ve been blocked, you can email the recipient to confirm their preference. From Marketing, Email, select Email options . Select Opt-in and enter the email address of the recipient. The recipient must select the link in the confirmation email to receive content from your organization.
The State of California recently enacted legislation, California Assembly Bill 488 (CA AB488), which regulates online charitable fundraising in the state. Beginning January 1, 2024, Blackbaud will be prohibited from assisting organizations not in “good standing” in California with making charitable solicitations to and receiving funds from California residents. As a result, Blackbaud has made the following changes:
-
Beginning in November 2023, Blackbaud will notify charitable organizations that we believe may not be in “good standing” in California based on government data. To help you navigate the regulations and check your status, see California Assembly Bill 488: Impact to Charitable Organizations.
-
Beginning January 1, 2024, donations made through Blackbaud solutions by California residents to organizations that are not in “good standing” will no longer be accepted. To suppress California residents from upcoming email solicitations or view failed transactions due to California Assembly Bill 488, see California Assembly Bill 488.
Note: Any U.S. registered charitable organization that operates or solicits donations in California is subject to this law.
To help you take full advantage of Raiser's Edge NXT this giving season, visit our new online resource and prepare now for Giving Tuesday.
31 October 2023
Based on feedback, you can now find which records use table entries before you remove the entries by copying a list of identifiers associated with the field, such as constituent and gift IDs. Previously, you would copy from a list of system record IDs.
From Control panel, Tables, open the table with the entry to remove. Next, select View uses from the menu next to the entry's name in the table entries list. If any records include the entry, a list of identifiers appears. In the database view, from Query, you can use the identifiers to search for and update the records as necessary.
For more information, see Tables.
Hyperlink parameters let you choose the designations to associate with a donation form through the form's URL without adding them to the form's configuration. For example, when there are too many designations to add to a single form, add hyperlinks for each designation on a webpage or email. Then, donors can choose which fundraising initiative to give toward before directing them to the form. Adding a designation to the URL only requires the designation's system record ID. However, you can optionally add a name for the designation that will appear on the form.
From Tools, Donation forms, create or edit a form. Under Get started, Designations, find the designation and make note of its system record ID. Next, close the form. From Share form, select Launch form from its URL and copy the URL. Add to the end of the URL &desid=ID, replace ID with the designation's system record ID. For more information, see Hyperlink Parameters.
Due to the continued instability and frequent changes within social media platforms, we have disabled the ability to post to Twitter or Facebook pages and accounts from Marketing, Social. For more information, see Social Posting Frequently-Asked Questions.
17 October 2023
To make it easier for you to send communication for tribute gifts, donation notifications sent to staff members now include tribute information. For more information, see Get Started With Donation Forms.
12 October 2023
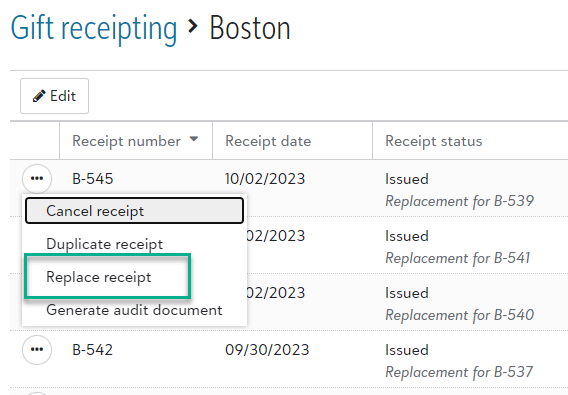
You can use the new replace option to generate a receipt for a donor with updated gift information and a new receipt number. To track the history of both the original and replaced receipts, go to the receipt series. The Receipt status displays cancelled for the original receipt, and on the new receipt it displays which receipt it replaced.
To replace a receipt, from Gift receipting,
-
Under Receipt series, select an existing receipt series. On an any receipt that isn't cancelled, select
 , and Replace receipt.
 -
Or under Failed gift receipts, select a donor name. Then select Resolve failure, Replace receipt.
From Replace receipt, choose to send the new receipt as an email or PDF. You can update the email template and receipt series or keep the defaults. For more information, see Gift Receipting.
26 September 2023
When a donor chooses to notify someone about their tribute gift in donation forms, the honoree's name no longer populates the recipient name fields. However, donors can still choose to select the honoree as the recipient. For more information, see Donation Forms.
19 September 2023
To help admins better manage users, we improved user lists. We also updated the navigation under Control panel to include new pages for Users, Roles, and History. Previously, admins accessed these pages from Control panel, Security.
Tip: To view the default user list, select Control panel,Users, Build a new list, Show all records.
From Control panel, Users, admins can now:
-
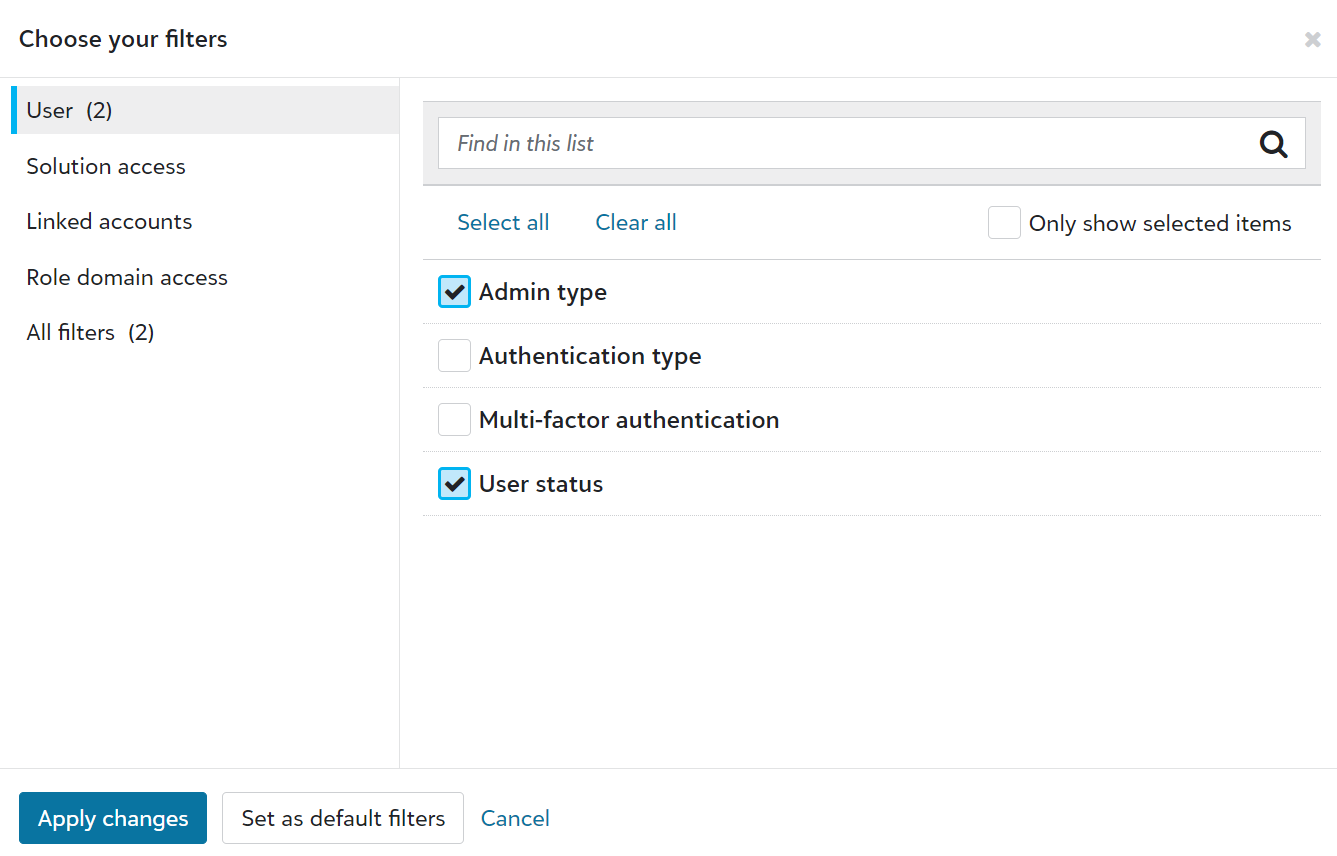
Use solution access, linked accounts, roles, admin types, authentication types, and multi-factor authentication statuses as columns and filters.
-
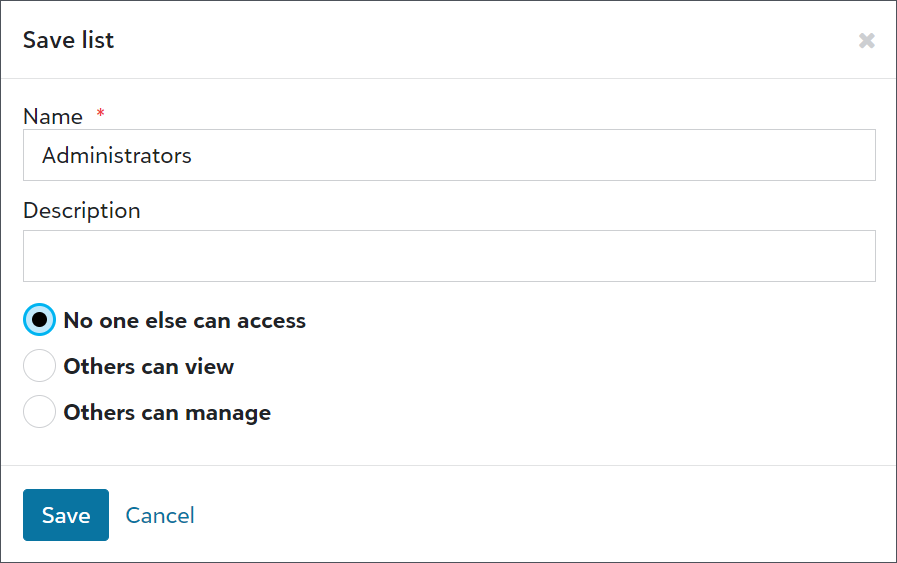
Save lists to easily reference user information.
-
Export user lists for compliance reviews or to analyze data alongside third-party data, such as from Human Resources or your organization’s Identity and Access Management (IAM) group.

-
Share user lists with other admins.
To identify which host participants purchased different types of tickets, such as golf foursomes or parking passes, you can now filter the participant list by fee.
From Events, open an event record. Under Participants, select Work with participants and then select Filter , Fees under Fees and payments. Next, select Fees and choose whether to include participants who purchased any fees, specific fees, or no fees.
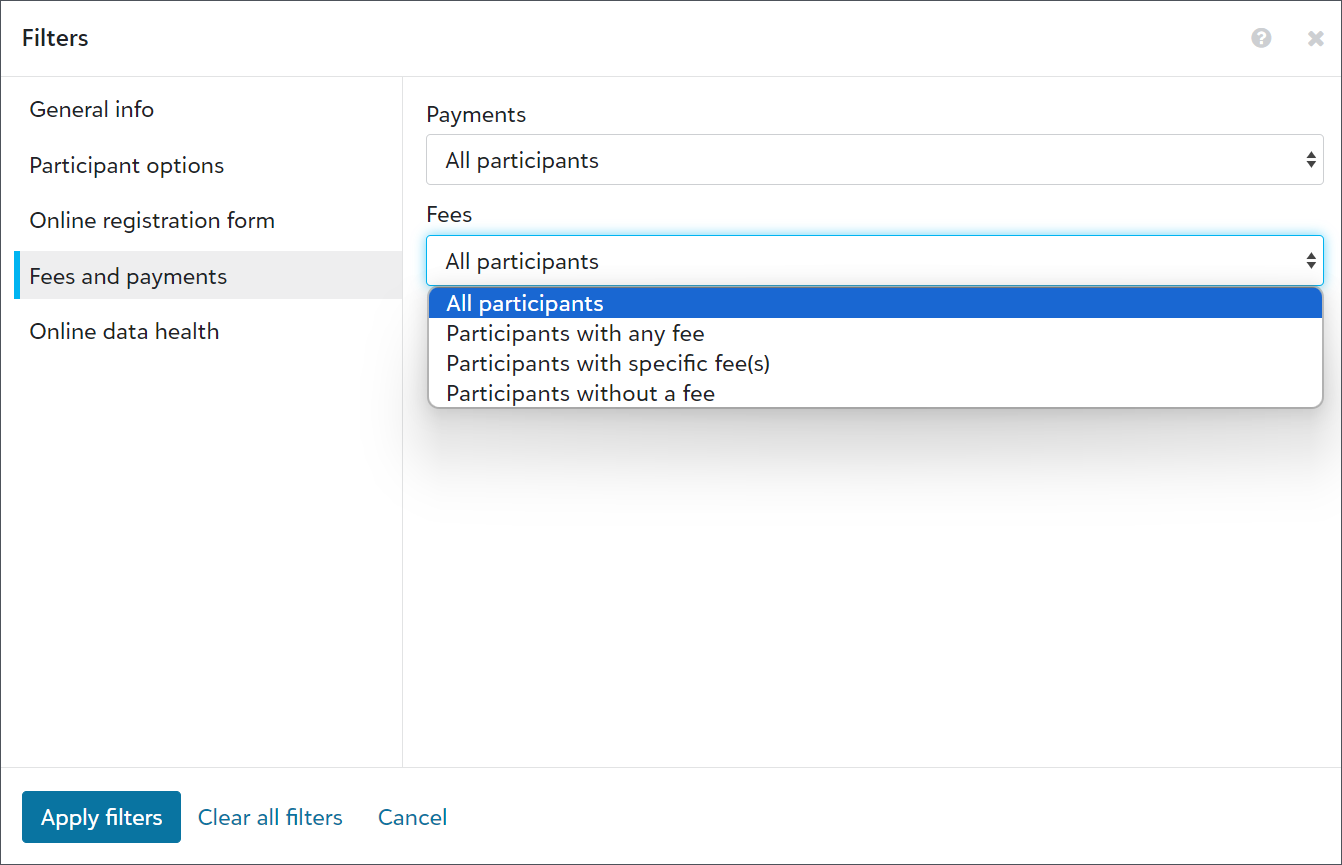
Note: Previously, you could only filter fees by participants who paid or had open balances, and the results were displayed in the Registration fees column. To prevent confusion, the Registration fees column and filter now display as Payments.
To view or export fees, and the number each host participant purchased, select Columns , Fees from the participant list.
Note: Exports include columns for all fees, regardless of whether participants purchased them. They also display amount and quantity columns to help you determine how many people signed up and how much they paid.

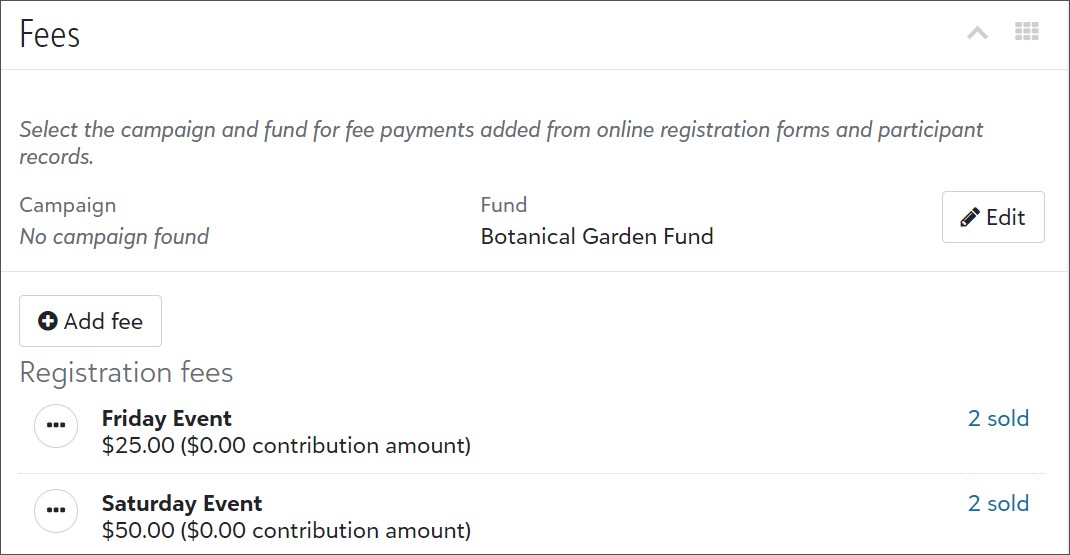
Also, from an event record, under Fees, you can select the number sold for each fee to view a pre-filtered list of participants who purchased tickets.
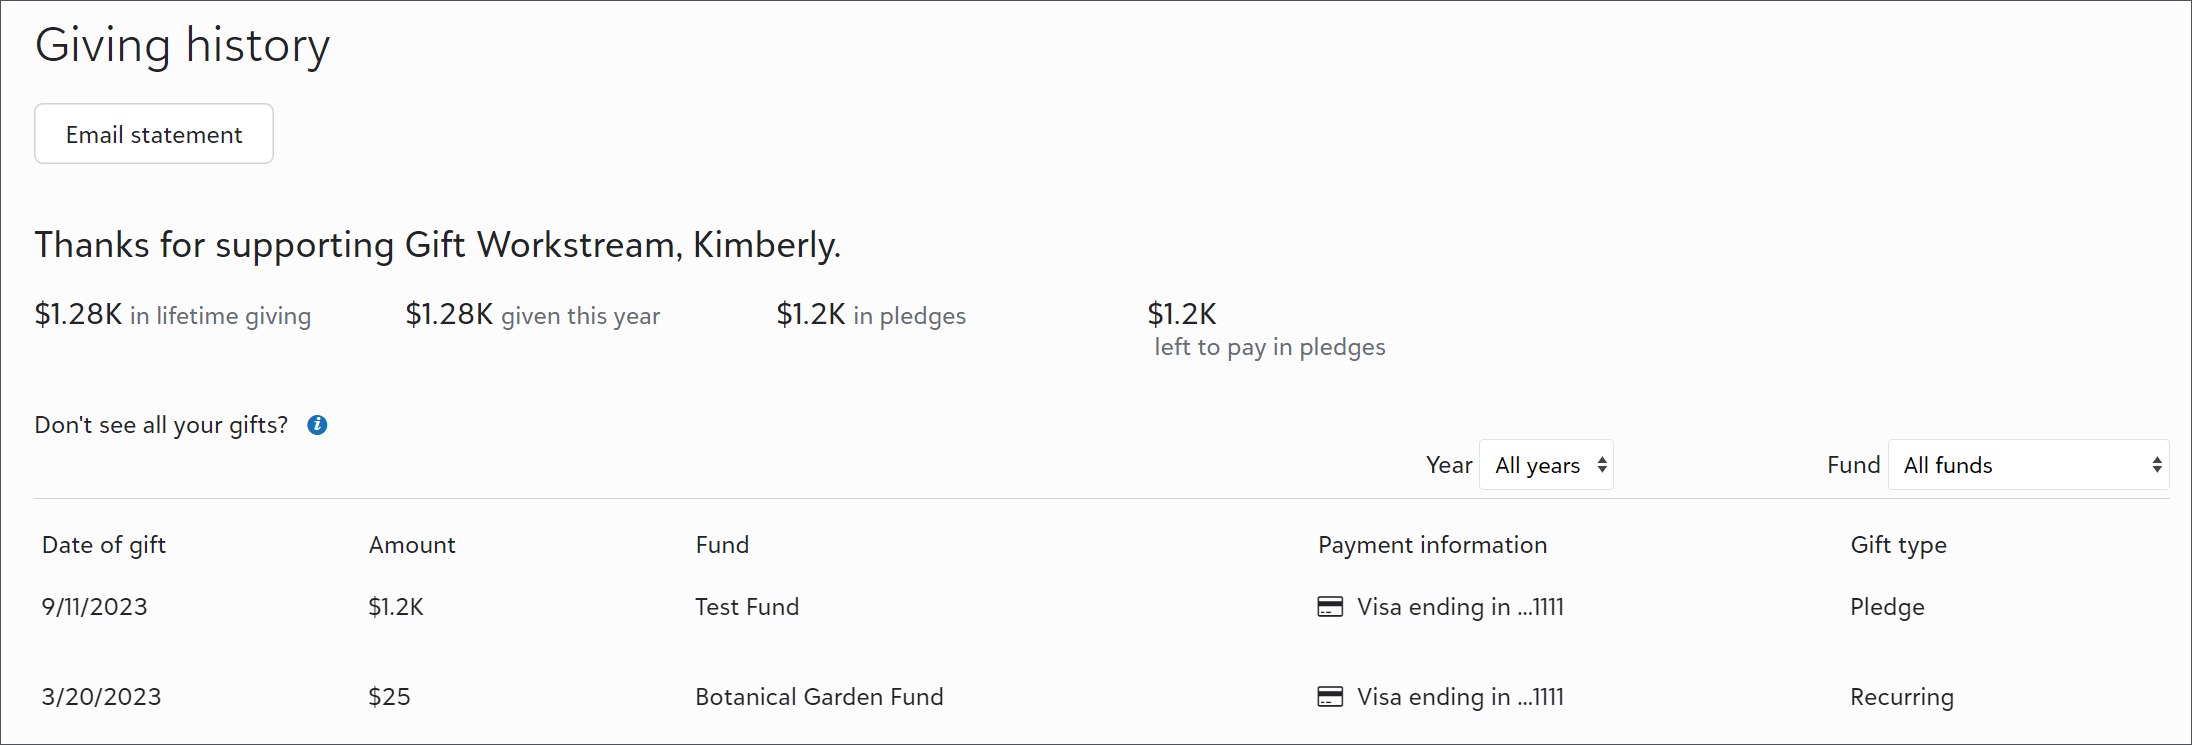
Now, portal users can view how much they pledged and how much they have left to pay toward their pledges on the Giving history page in the portal. They can also now use the list to view their pledge information. Previously, they could only view pledge payments from the list.
For more information, see Portal Giving History.
5 September 2023
To remove a guest from a registration group so they can host their own separate group, you can now change a guest to a host participant. For example, if a constituent is signed up as a guest, but later decides to sign up to bring their own guests, you can change their registration status and add guests to their record.
From an event record, under Participants, select Work with participants. From the list, find the guest and select Change to host from the participant’s menu  . Then from their participant record, select Add guest under Party information.
Note: You can only change a guest to a host if the guest has a constituent record. If a guest is a named guest and not a constituent, you must first select Change to constituent from the participant’s menu  and then select Change to host.
If a constituent is signed up as a guest and later uses a registration form to sign up to bring their own guests, the registration form changes their existing participant record to a named guest and creates a new host participant record for their new registration. For more information, see Guest Matching.
Tip: To resolve situations where a participant is a constituent and a named guest for an event, you can sort the participant list by name and then follow up with the hosts to learn how they want to apply the extra registrations, such as toward other participants or as donations.
In response to customer feedback, Raiser’s Edge NXT registration forms no longer display the number of registrations included with registration fees by default. To continue to show registrants how many registrations a fee includes, update its description when you configure the form. For more information, see Registration Options.
29 August 2023
Now you can use a donation form as the source of a website component, and display the progress of a fundraising goal or a key metric for donations received through the form. When you set a donation form as the source of a website component, the total amount updates shortly after the donation is processed in the form, making it quicker than when the gift list is the source of the website component.
Donor cover fees are included in the website component's total amount. Changes made to the donation after the initial transaction, such as a refund, are not reflected in the total amount. For more information, see Fee Coverage.
For recurring gifts, only the first gift is included in the total amount.
To set a donation form as the source of a website component, from Tools, Donation form designer, select Website components under Related Links. Edit an existing website component or select New to create a new one. Under Source, select Donation form, and select an existing donation form. For more information, see Website Components.
Note: These updates are currently only available for some organizations. In the coming weeks, we'll let you know when they're available for everyone.
To help admins better manage users, we improved user lists. We also updated the navigation under Control panel to include new pages for Users, Roles, and History. Previously, admins accessed these pages from Control panel, Security.
Tip: To view the default user list, select Control panel,Users, Build a new list, Show all records.
From Control panel, Users, admins can now:
-
Use solution access, linked accounts, roles, admin types, authentication types, and multi-factor authentication statuses as columns and filters.

-
Save lists to easily reference user information.

-
Export user lists for compliance reviews or to analyze data alongside third-party data, such as from Human Resources or your organization’s Identity and Access Management (IAM) group.

-
Share user lists with other admins.

Previously, duplicate detection only used a proprietary algorithm to determine the likelihood that records were duplicates. Raiser's Edge NXT now augments this process with artificial intelligence — specifically, machine learning — to further refine the proprietary algorithm, improving the insights based on which records customers mark as duplicates through the web view.
For information about how to compare possible duplicates and decide whether to merge them, see Possible Duplicates.
22 August 2023
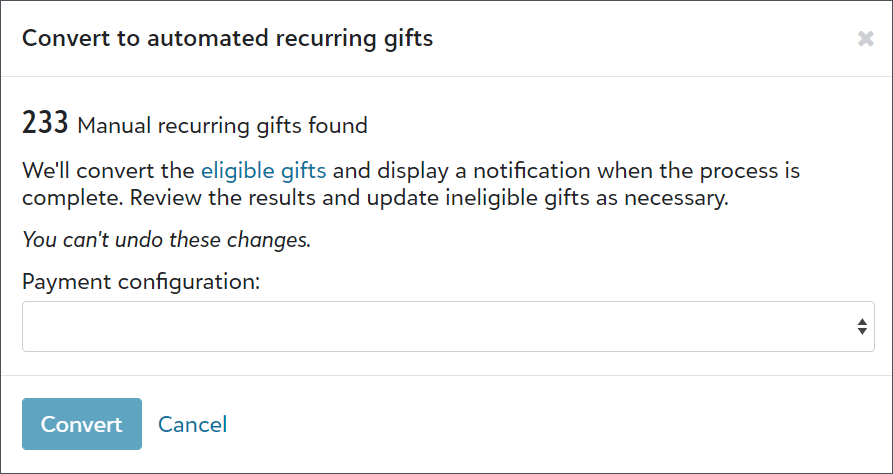
To help you easily change your manual recurring gift process in the database view to automated processing in the web view, you can now bulk convert recurring gifts. Previously, you individually identified the gifts and converted them from their gift records in the web view.
From Control panel, Settings, select Gift management. Under Automate manual recurring gifts, select Get started to identify all the manual recurring gifts in your database. Next, select Convert to convert the eligible gifts. When the process is complete, Raiser's Edge NXT displays a notification in your top-level navigation ![]() so you can review the results.
so you can review the results.
For details about which gifts are eligible for conversion, see Automate Manual Recurring Gifts.
15 August 2023
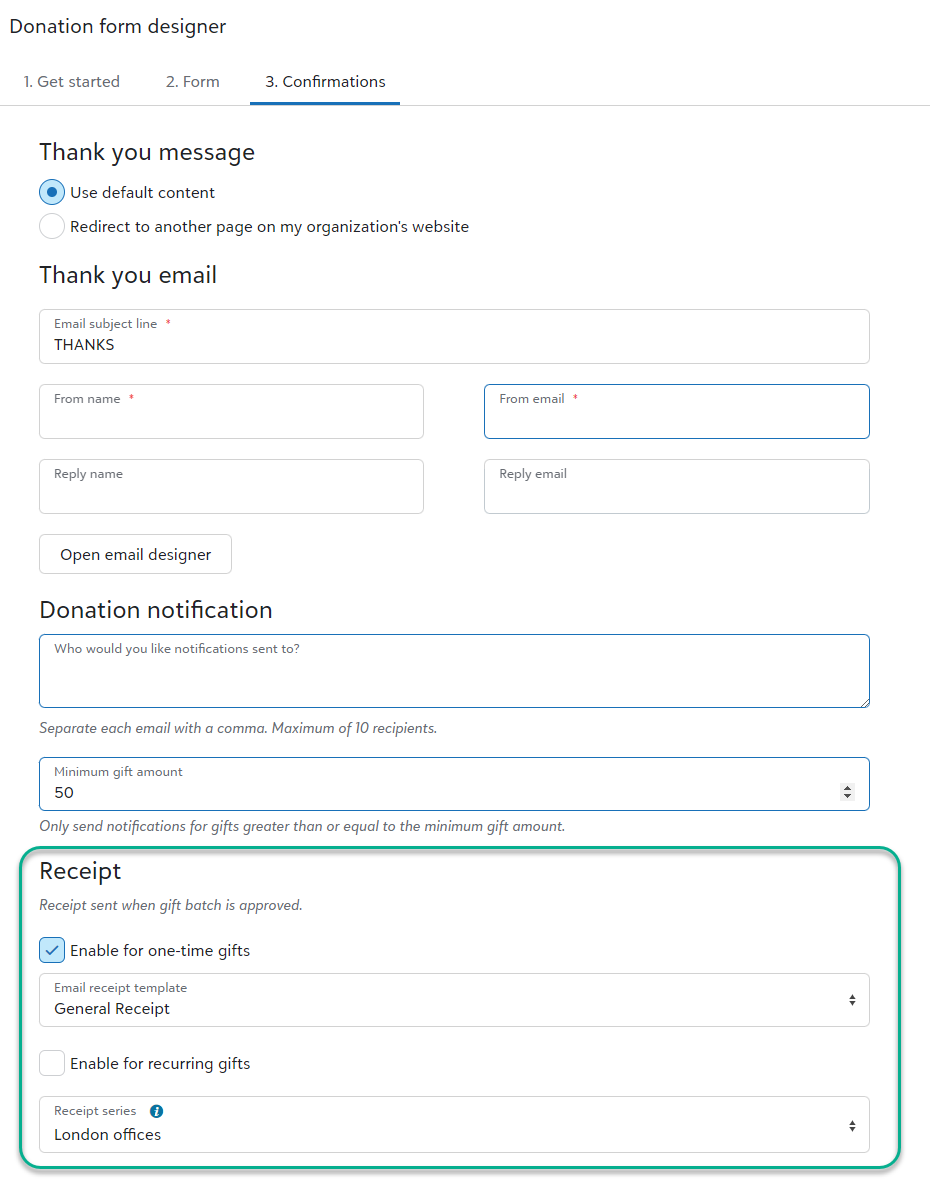
As part of ongoing improvements to the receipting process, you can now set up your donation forms to send receipts to donors. After you approve donation batches from Gift management, Raiser's Edge NXT generates the receipts and emails them to donors.
Receipts for gifts that come in through donation forms include the same receipting functionality as gifts entered in the web view. For example, you can track receipt history, cancel and duplicate receipts, and set up receipt series. For an overview of all the gift receipting capabilities, see Gift Receipting.
To send receipts from donation forms, navigate to Tools, Donation form designer, and add or edit a donation form. Under Confirmations, choose to send receipts for one-time gifts, recurring gifts, or both. Then select an email receipt template for each gift type. Next, select a receipt series to apply a numbering system and prefix to the receipts. For more information, see Donation Forms
8 August 2023
Credit Card Updater from Blackbaud Merchant Services helps you increase authorization rates and avoid disruptions in recurring giving. Now, recent enhancements make it even easier to keep your supporters' credit card information updated and accurate.
-
Credit Card Updater now automatically updates stored card info for all organizations who process payments through Blackbaud Merchant Services. Previously, the service was only available to organizations with subscriptions.
-
Credit Card Updater is now available for all currencies! Previously, it was only available to accounts that process in the US and Canadian dollars.
-
All stored cards are now eligible for updates. Previously, you needed to manually register and deregister cards from the database view.
-
Credit Card Updater now updates card information in real time. Previously, it updated cards on a monthly basis.
Note: Reporting enhancements are coming soon! Existing reports will continue to be available mid-month. Also, failed card updates temporarily won't appear in reports.
For more information, see Credit Card Updater.
To help speed table cleanup, you can now identify which records use table entries before you remove the entries.
From Control panel, Tables, open the table with the entry to remove. Next, select View uses from the menu  next to the entry's name in the table entries list. If any records include the entry, a list of system IDs for each record type appears. In the database view, from Query, you can use the system IDs to search for and update the records as necessary.
For more information, see Tables.
If your role has the All portfolios permissions, you can now view all prospects assigned to fundraisers from the All assigned prospects list.
For details, see Prospects.
25 July 2023
You can now add stock/property gifts when you add single gifts in the web view. Previously, you could only add them in the database view. These gifts can be stock certificates, land, or estates which your organization may choose to keep or sell.
To add a stock/property gift, you can choose whether to add the gift from the constituent's record, from Fundraising, Gift management, or Home, Add gift. For more information, see Gifts.
11 July 2023
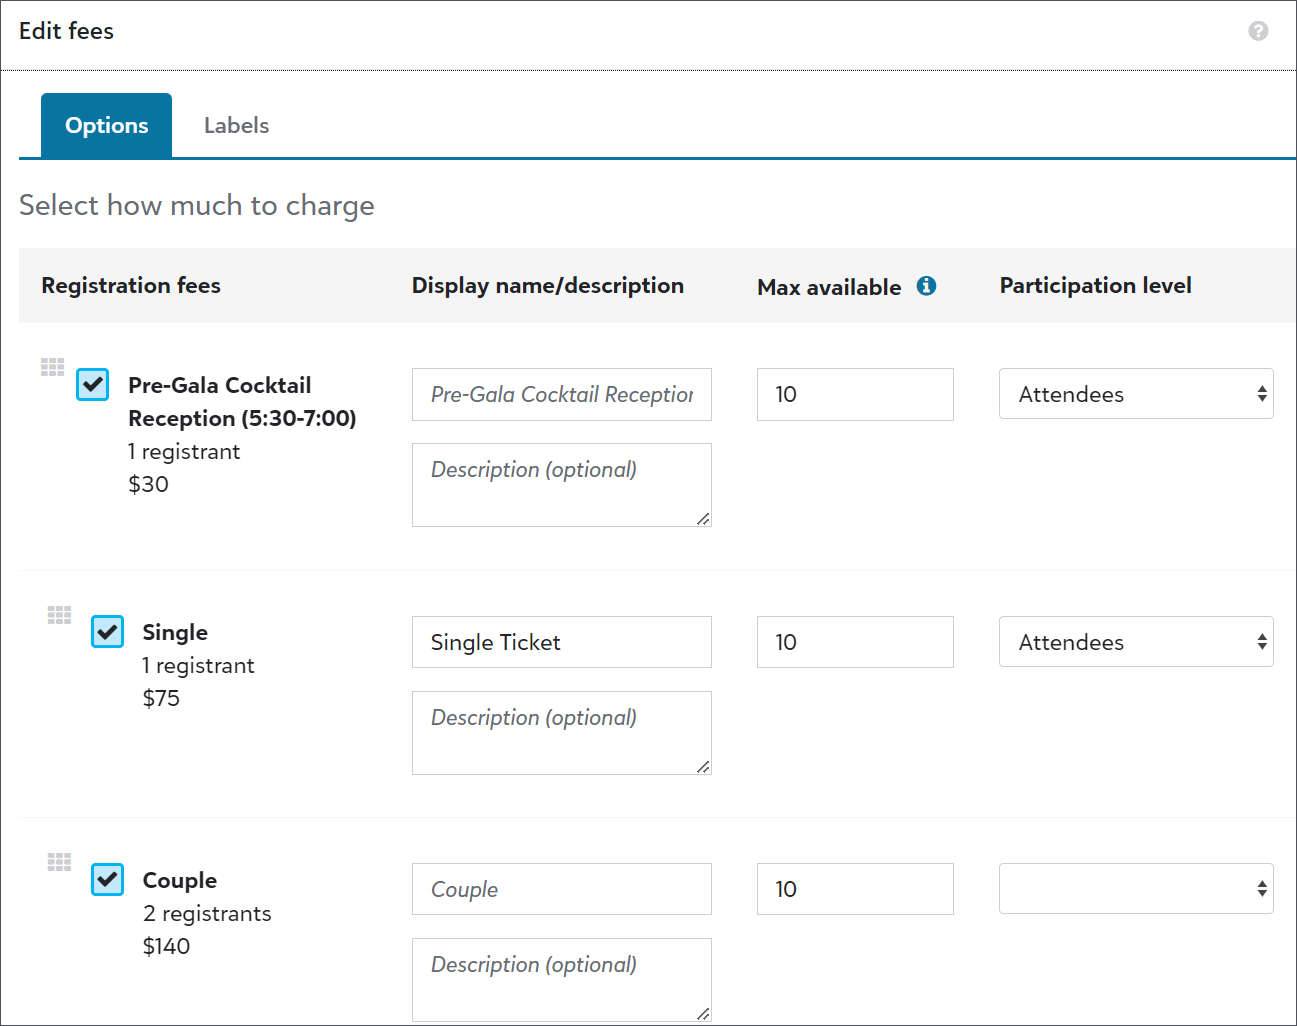
From Events in web view, you can now collect multiple names for tickets so groups of people can register together, such as for golf tournaments or galas. To configure tickets, add fees to your event, enter the number of registrations each includes, and then add the fees to your registration forms.
If necessary, you can also add other types of fees for add-ons, such as parking passes. Add-on fees appear separately from registration fees on forms and no longer require registrants to repeat their contact information when they select them.
As you configure registration forms, you can now associate participation levels with registration fees to automatically apply the levels to people when they register. Participation levels are event fields your organization configures to show how participants are involved in events, such as attendees, sponsors, staff, or vendors.
Note: You can also associate participation levels with organizations if you enable organization registrations.
For more information, see Configure Events for Groups.
Blackbaud Checkout now accepts direct debits for recurring USD transactions made through donation forms configured for donors or Blackbaud to pay processing fees.
Tip: Enable direct debit on your form to start accepting ACH transactions with fee coverage. For more information about accepted payment methods, see Fee Coverage.
In response to customer feedback, we updated donation
Note: If you previously selected a fund and prefer to stop splitting gifts, clear the fund from Control panel, Settings, Gift management, Donor cover designation. Otherwise, Raiser's Edge NXT will continue to use the selected fund for fee coverage amounts.
Tip: For information on how the fees are calculated, see this Knowledgebase article.
27 June 2023
To help your organization comply with upcoming privacy laws and standards, the donor portal and donation
Note: Universal opt-out signals are only enabled or not enabled for a user and don’t include additional specifications or configurations.
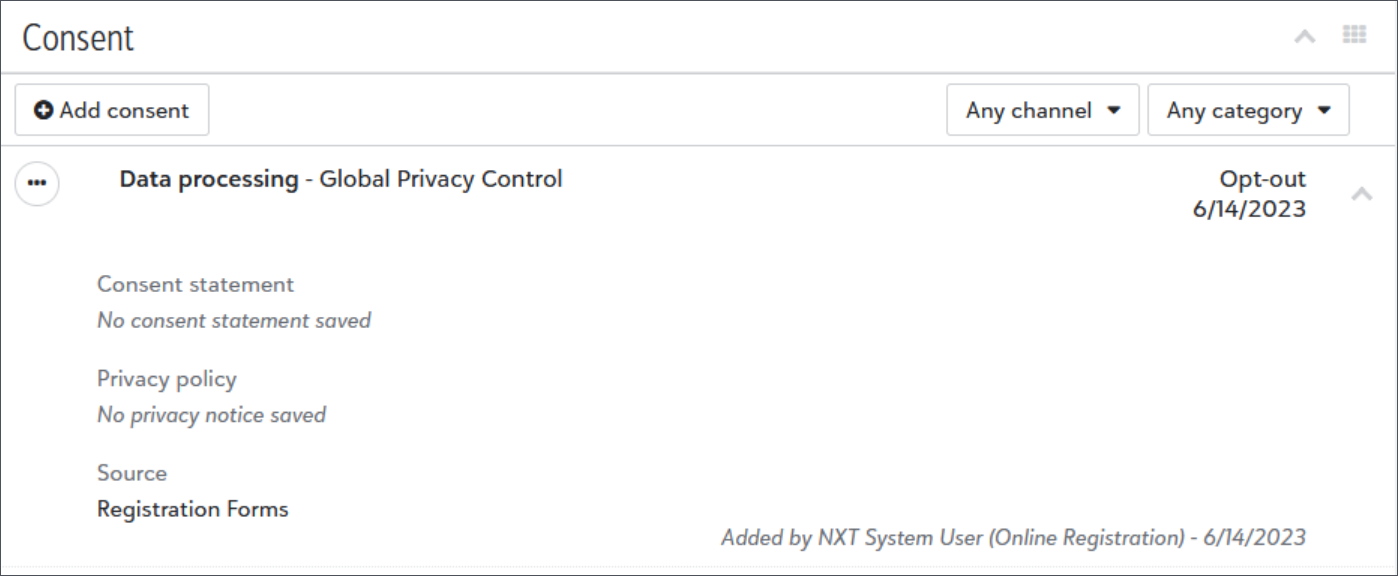
OnceRaiser's Edge NXT receives a signal, it adds an opt-out on the constituent's record under Consent with the Data processing channel and Global Privacy Control category. In the database view, configure business rules for the Global Privacy Control category from Configuration, Business Rules, Consent options to also update the constituent's record with the appropriate solicit codes. For more information, see Recognize and Respect Universal Opt-out Signals.
Note: Raiser's Edge NXT creates the Global Privacy Control category if you don’t have one configured from Control panel, Tables, Consent Categories.
13 June 2023
Receipt series is new tool to organize your receipts and view historical receipt data in one place. You can group your receipts together into a series by giving them a prefix and a numbering system. Under Fundraising, Gift receipting, Receipt series, a default receipt series is provided with a starting receipt number. Select Edit on its  menu to change its name, prefix, and starting receipt number.
Note: The first receipt number in the default receipt series is 1000000.
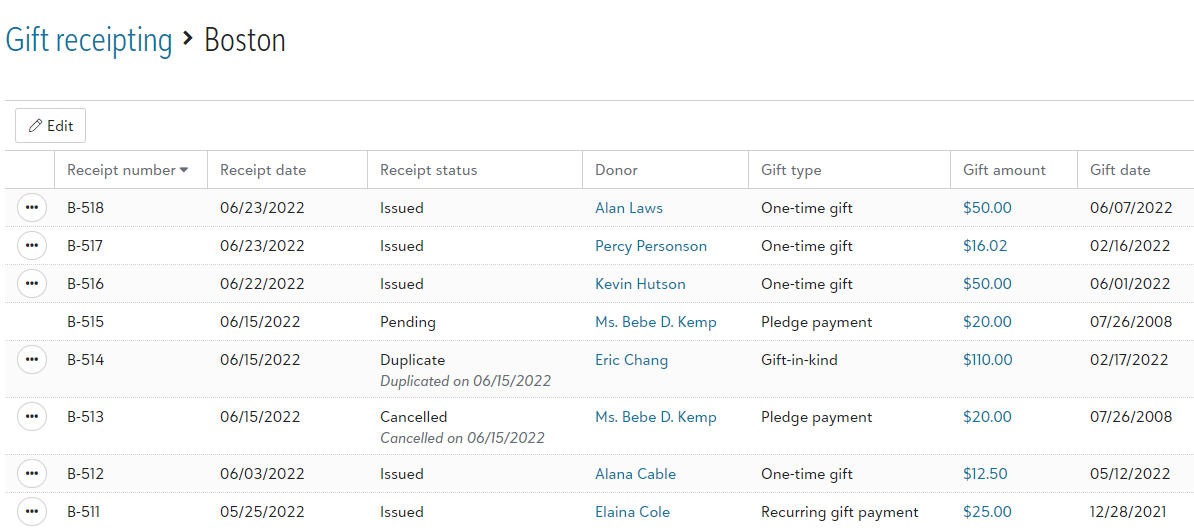
After you've generated receipts in the series, you access the receipt series to see all the receipts listed chronologically by the receipt date.
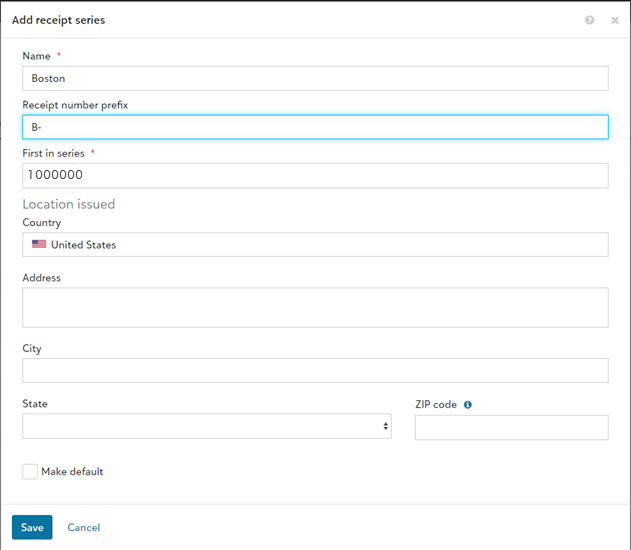
Tip: If your organization has multiple offices or locations, you can use receipt series to track where each of your receipts were issued from. For example, if you have offices in New York and Los Angeles, you can create separate receipt series that use the prefixes NY- and LA-. You can even set a different starting receipt number for each location. To create additional receipt series, under Fundraising, Gift receipting, Receipt series, select New.
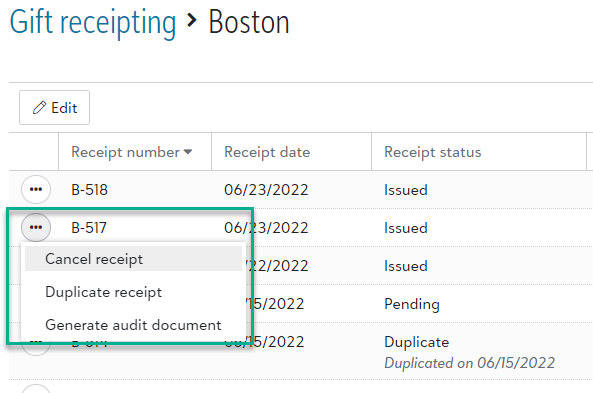
When viewing the list of receipts in a receipt series, select a receipt's  menu to
-
Cancel receipt to void the receipt and remove the receipt number from the receipt series.
Tip: Canceled receipts are marked Not receipted and can be receipted again.
-
Duplicate receipt to send the receipt again with the same receipt number and date.
-
Generate audit document to create a PDF copy of the receipt for your organization's auditor.
For more information, see Receipt Series.
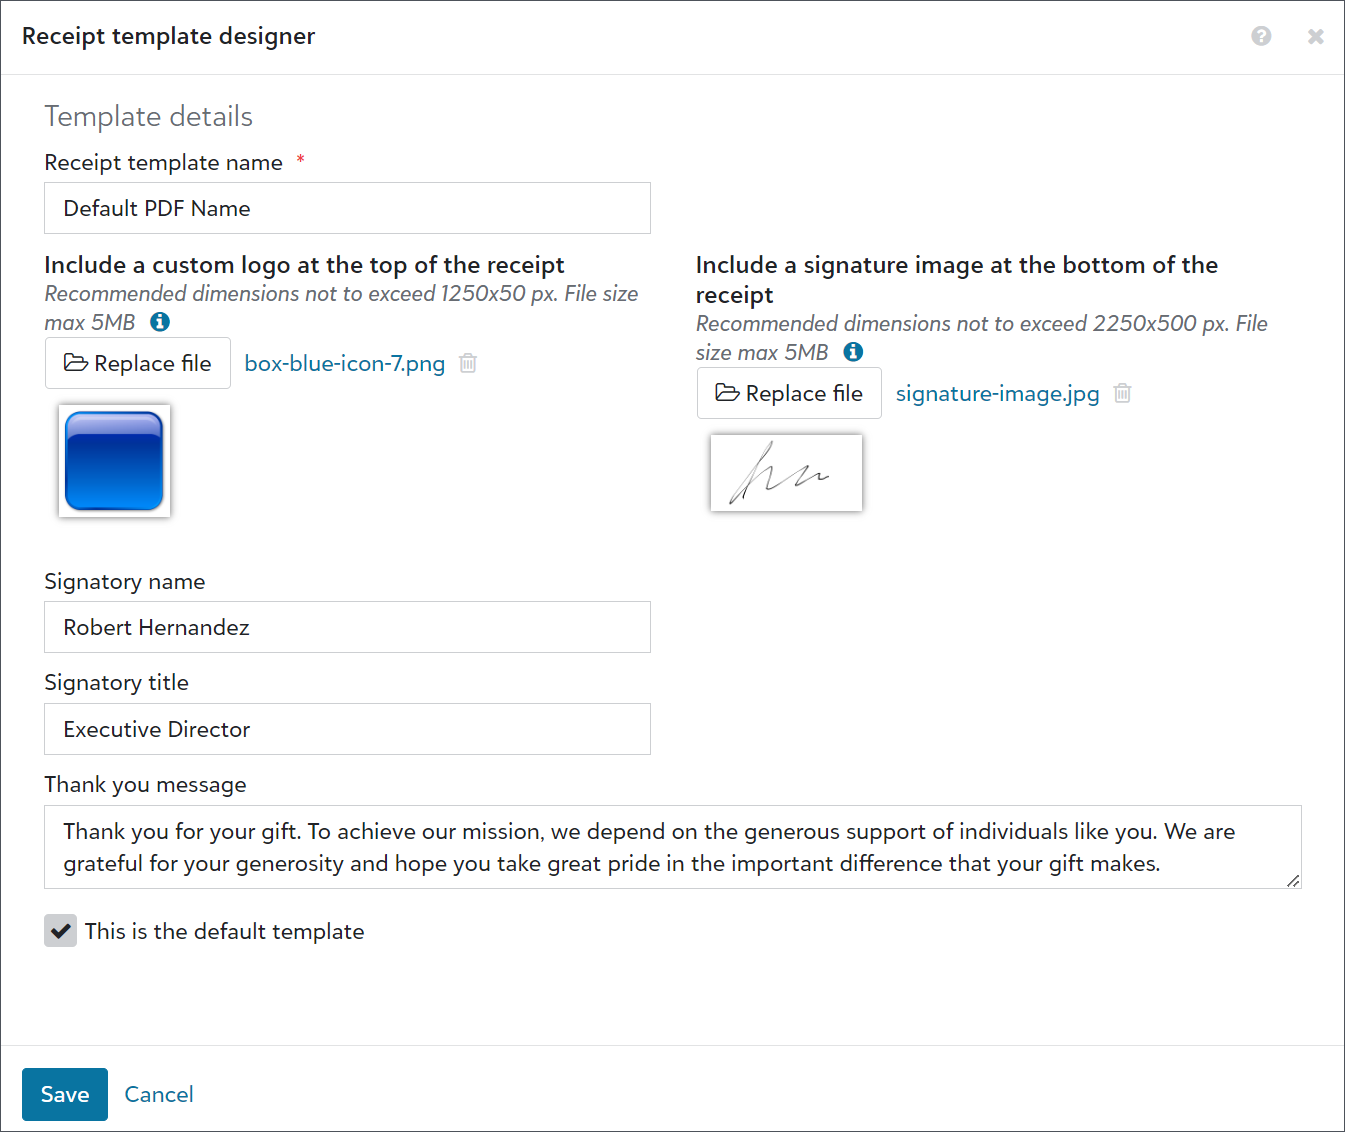
You can now use PDF receipt templates to enhance your PDF receipts with your organization's logo, a signature, and a personalized Thank you message. From Fundraising, Gift Receipting, select PDF receipt templates. On the Default PDF's  menu, select Edit.
Enter a name to help you identify the PDF template internally. Enter a custom logo, signature image, signatory name, and signatory title. In the Thank you message field, modify the default text to match your organization's messaging.
For more information, see PDF Receipt Templates.
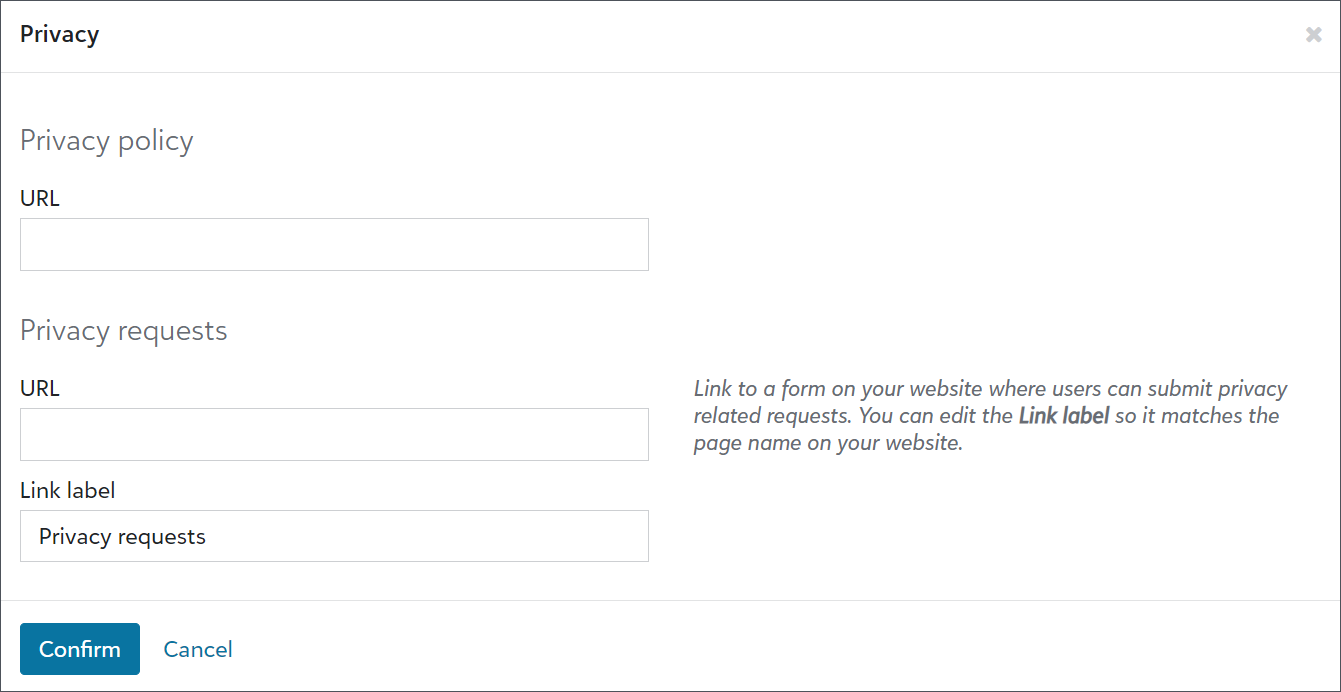
To help your organization comply with various privacy requirements, a new link option is available for the bottom of portal pages. From Tools, Settings, Portal settings, you can now link to a form hosted on your website where users can submit privacy related requests, such as to delete their accounts from your database.
Under Branding and customization, select Edit privacy links. In the URL field under Privacy requests, enter the link to your organization’s form. Then, in the Link text field, enter text to match the link name with the form’s page name on your website.
Note: These updates are currently only available for some organizations. In the coming weeks, we'll let you know when they're available for everyone.
To help admins better manage users, we improved action lists. We also updated the navigation under Control panel to include new pages for Users, Roles, and History. Previously, admins accessed these pages from Control panel, Security.
Tip: To view the default user list, select Control panel,Users, Build a new list, Show all records.
From Control panel, Users, admins can now:
-
Use solution access, linked accounts, roles, admin types, authentication types, and multi-factor authentication statuses as columns and filters.

-
Save lists to easily reference user information.

-
Export user lists for compliance reviews or to analyze data alongside third-party data, such as from Human Resources or your organization’s Identity and Access Management (IAM) group.

-
Share user lists with other admins.

30 May 2023
To help you raise more and build trust during a recurring gift upsell, the highest amount button in the prompt respects font and color changes made to the Payment button in the Form designer. From Tools, Donation form designer, create or edit form with recurring gift upsell. Under Form, select Payment button under Style in the Form designer.
For more information, see Recurring Gift Upsell.
Now, when donors give recurring gifts through donation forms, you can let them select an end date before processing the payment. From Tools, Donation form designer, create or edit a form. Under Form, select Click to edit on the gift amounts. Under Recurring, select Enable recurring gift end date.
For more information, see Donation Form Gift Options.
To increase revenue for your mission, Blackbaud Checkout now presents a fee cover option to those who pay for their recurring gifts by credit card through a donor cover or Complete Cover-enabled donation form. Future recurring gift payments include the covered amount.
To enable a fee cover on donation forms, from Tools, Donation form designer, create or edit a form. Under Get started, Payment processing, select a payment configuration in the Process payments with field. Next, select how you would like to cover fees for the form under Fee coverage. For more information, see Donation Forms.
To cancel the covered amount from future recurring gift payments, go to the recurring gift record and select Amend gift amount. Unmark the fee coverage option from future payments. For more information, see Recurring Gift Amendments.

16 May 2023
Now, when the lowest amount offered on the upsell prompt for a donation form is less than the minimum amount for recurring gifts, it defaults to monthly gift amounts based on the minimum. Previously, the prompt wouldn't appear to donors when the lowest amount was below the minimum recurring gift amount.
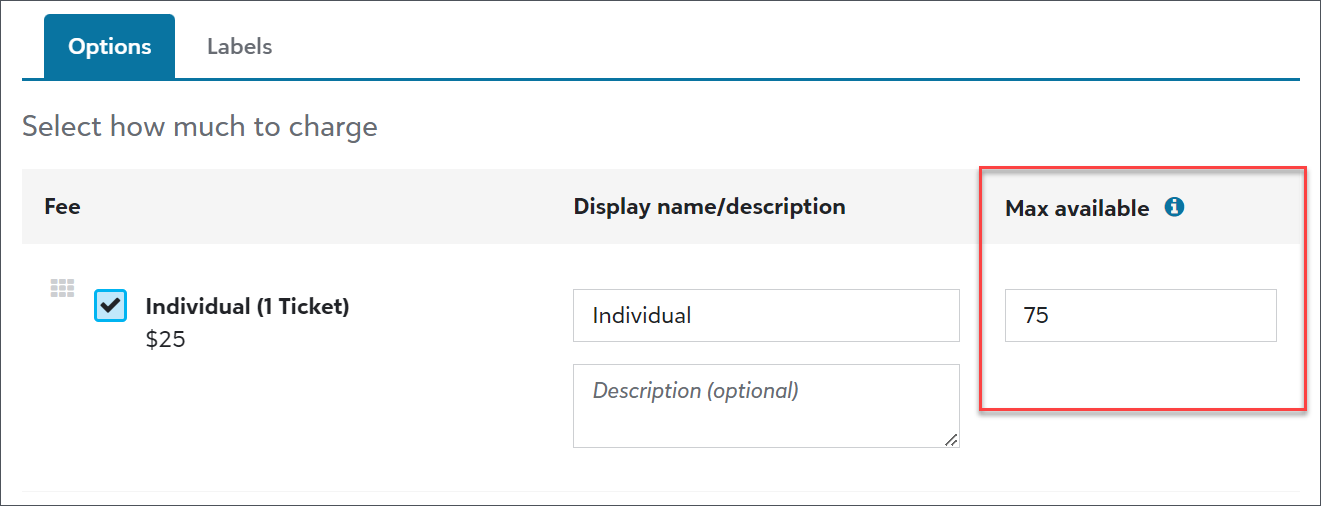
You can now enable registrants to purchase as many fees as they want when you include a fee on a registration form. Previously, the limit was 10.
From an event record, under Online registration forms, add or edit a form. Under Form, select Click to edit under Choose registration options. In the Max available column, enter any whole number as the limit.
25 April 2023
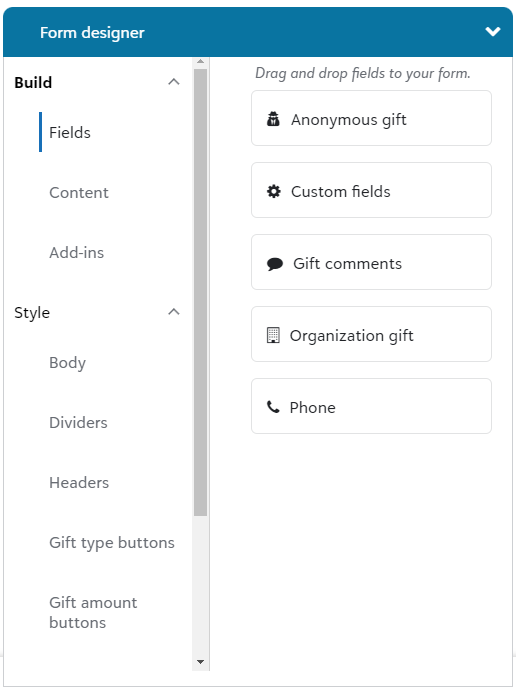
Now, you can add gift custom fields to your donation forms. Previously, you could only add constituent custom fields. We also made an enhancement to the location of custom fields in Form designer. To add custom fields to a form, from Tools, Donation form designer, create or edit a donation form. Under Form, move Custom fields from Fields in Form designer to a location on the form. For more information, see Fields.
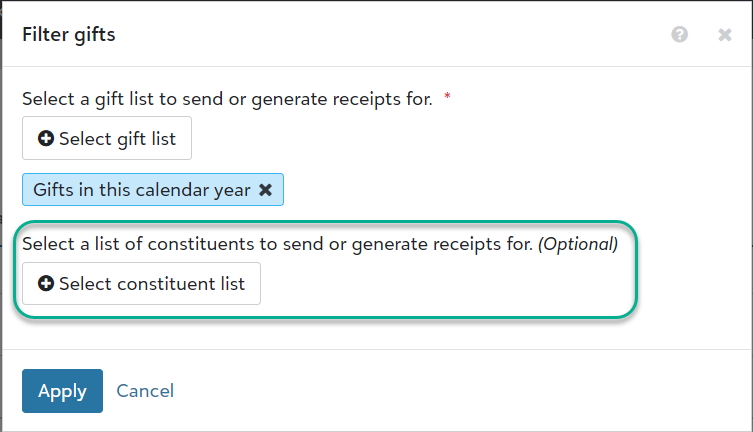
Now you can use a constituent list to narrow down your receipt recipients. From Fundraising, Gift receipting, select Filter. Under Filter gifts, select the list of constituents you want to send receipts to.
You can use this filter to fulfill donors' receipt preferences. For example, create a constituent list of donors whose records are marked as Requests no email, select this list in Filter gifts, and then generate PDF receipts to print and mail to those donors. For more information, see Gift Receipting Filters
Previously when your organization's tax ID was missing, you'd receive an error after generating receipts and giving statements. Now you receive an alert on Fundraising, Gift receipting and Giving statements, and you're prevented from generating receipts and giving statements until you enter your tax ID under Settings.
For consistency with online donations, Raiser’s Edge NXT event registrations now appear as Needs acknowledgement when you view them in batches from Fundraising, Gift management. Previously, they were marked as Acknowledged.
18 April 2023
Donors with Apply Pay enabled devices can now use Apple Pay through Blackbaud Checkout for one-time gifts on embedded donation forms. Previously, they could only use Apple Pay on standalone forms.
To display Apple Pay as an option, you must complete a verification process on your website. For more information, see KB 201611.
Note: To display Apple Pay on donation forms already embedded on a web page, copy the form's HTML and embed the code again.
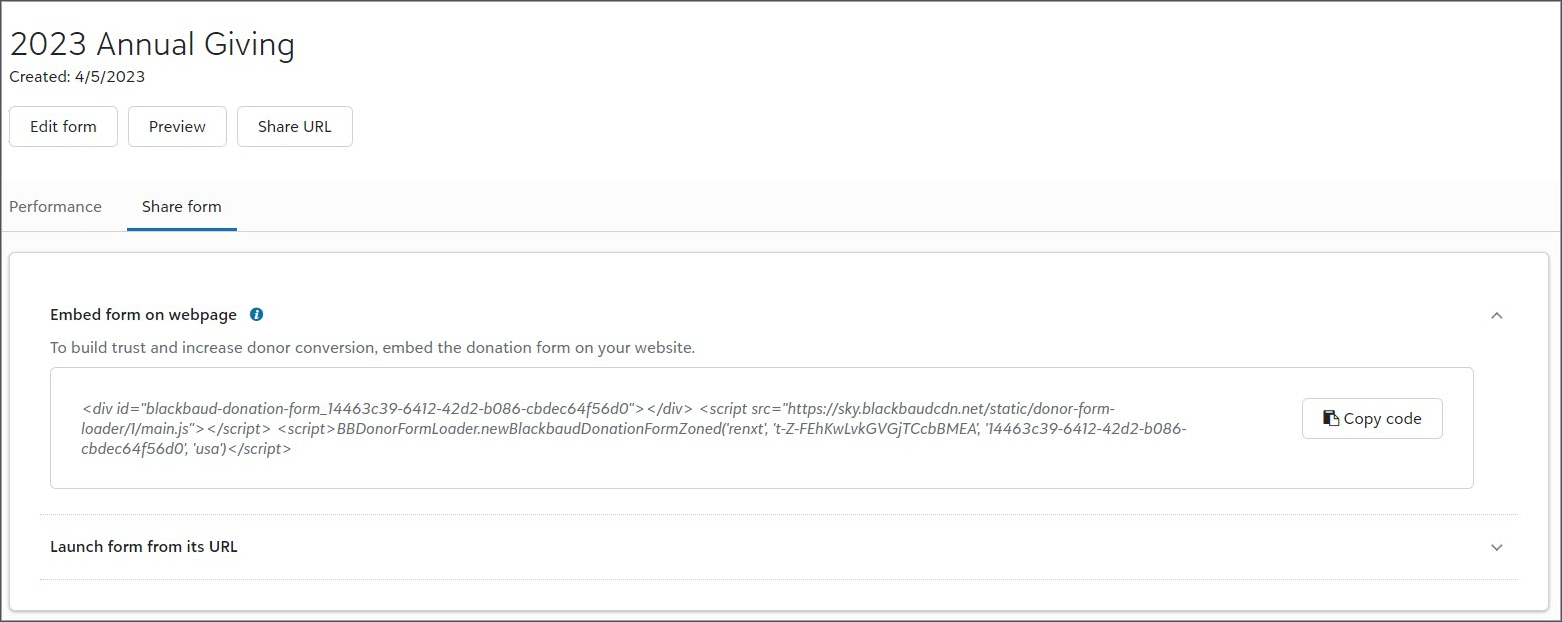
Now when you access a donation form, either from All donation forms under Related Links or from Recently Accessed, you can copy the HTML code, the URL, and download the QR code under Share form. Previously, these actions were under Publish in the donation form designer. For more information, see Donation Forms.
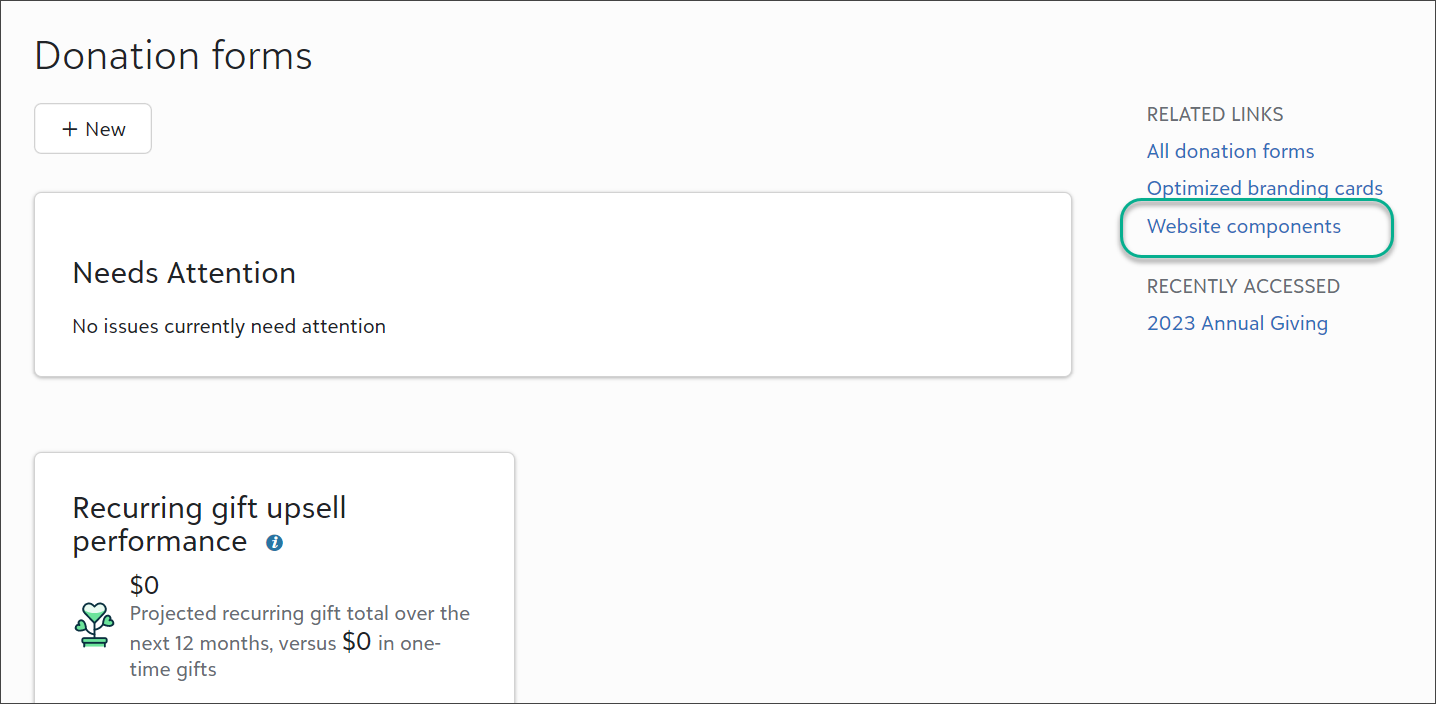
To organize your fundraising tools together, we moved Website components to Donation forms designer, Related links. Don't worry, all your existing website components are safe. For more information, see Website Components.
11 April 2023
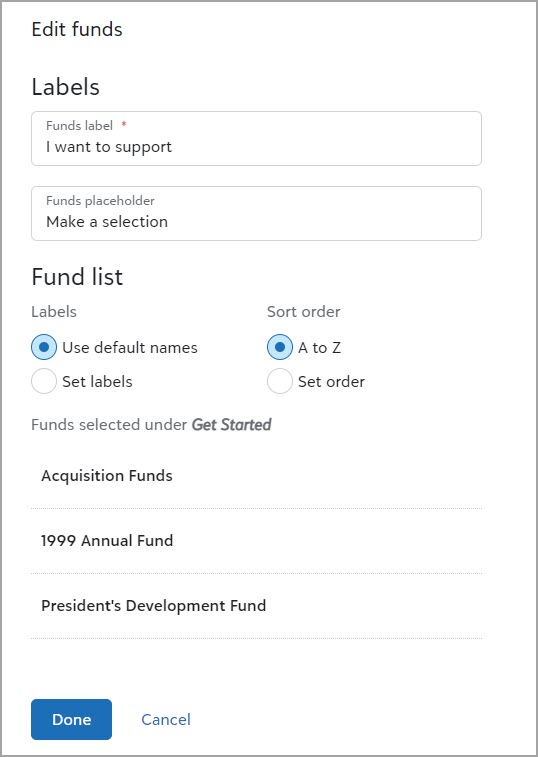
For organizations that use naming conventions for their fund names, such as GO2023 for the 2023 general operating fund, you can now label the funds with donor-friendly names on donation forms. You can also sort the funds alphabetically or set your own order by moving them where you would like.
From Tools, Donation form designer, edit or create a form. Under Get started, select more than one fund. Next, under Form, select Click to edit on the fund field on the form and make your selections.
For more information, see Donation Form Designations.
You can now manage tables from Control panel, Tables. From the web view, you can view the list of tables in your database and define new donor category tables. For each table, you can add, edit, delete, and change the order of entries.
Note: To define a donor category table, select New donor table above the list of tables. To define an attribute table, navigate to Configuration, Attributes in the database view and add an attribute with a table data type.
The web view also includes improvements to help you work with tables more efficiently. You can now:
-
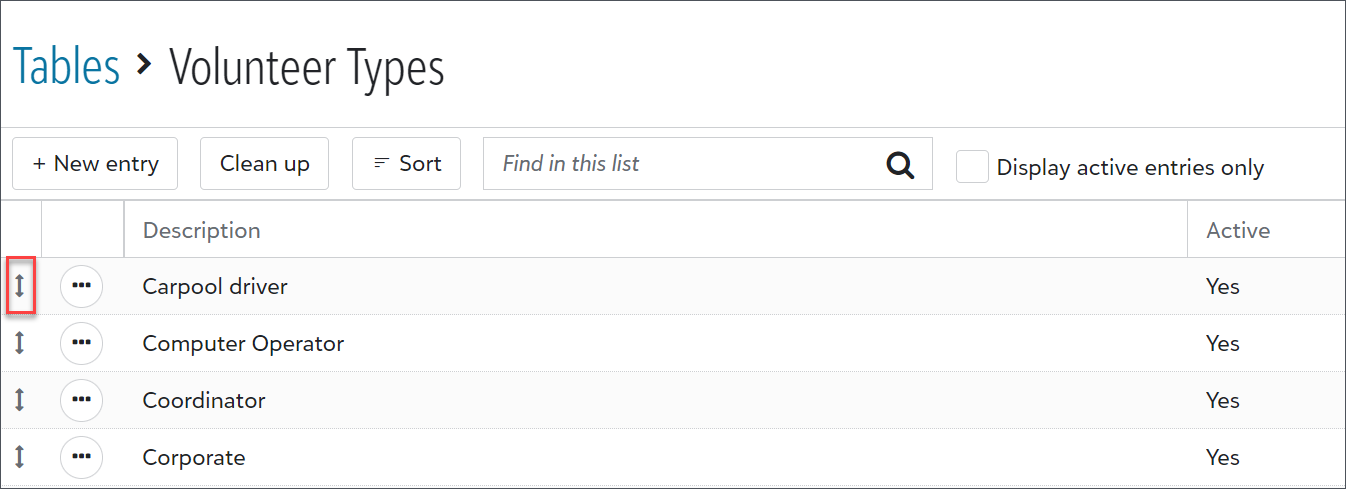
Use drag and drop options for table entries to change their order or tab to the drag icon on your keyboard and press the up or down arrows to move entries within the list. In the database view, you can only use a menu to move entries.
-
Continue working during table entry cleanup. In the database view, you must pause your work while a cleanup is in progress.
For more information, see Tables.
You can now filter the Low likelihood and Undergiving lists by fundraiser. Use the filter to see which candidates are assigned to a specific fundraiser and to gain insight into each fundraiser's portfolio quality.
Note: The Fundraisers filter is only available to authorized users. For more information, see Prospect insights role tasks and Permissions.
4 April 2023
The table field type is now available in constituent custom fields for donation forms. To add custom fields to a form, from Tools, Donation form designer, create or edit a donation form. Under Form, move Constituent custom fields from Donor information in Form designer to a location on the form.
If the custom field enables donors to select multiple responses because Allow 1 per Record isn't set for the field in the database view, responses display as checkboxes.
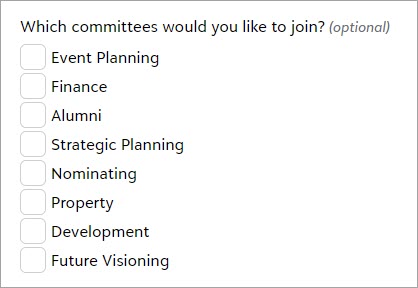
If the custom field is set to only allow one per record in the database view, responses display as a single-select dropdown.

For more information, see Donation Form Donor and Gift Information.
Note: To configure and add new custom fields in the database view, from Configuration, select Attributes. After you configure an attribute or custom field, you can add it to donation forms. If a field is set to only allow one per record, any existing data in the field is overwritten. For more information, see Custom Fields.
As a part of our ongoing optimization efforts, we have temporarily disabled Click to Pay while we improve the user experience.
28 March 2023
With the new Prospects assigned to non-active fundraisers list, you can quickly identify prospects with a high major giving likelihood who are not assigned to an active fundraiser. Using the list, you can easily review fundraiser assignments and re-assign prospects to active fundraisers and renew cultivation of the prospects. If any of your prospects meet the criteria for the new list, you can view them from Fundraising, Prospect insights, under Needs attention.
14 March 2023
To track gifts made in response to a specific fundraising initiative, you can add a campaign to a donation form. After the donor submits the form, the campaign appears on the gift record in Gift management. From Tools, Donation form designer, edit or create a form. In Get started, under Hidden fields, enter the campaign name in the Campaign field.
For more information, see Donation Forms.
You can now focus your efforts with the Untapped candidates list by using the Spouse assignment filter to filter candidates by whether they have a spouse who is already assigned to a fundraiser.
7 March 2023
Blackbaud Checkout now accepts direct debits for one-time USD transactions made through forms configured for donors or Blackbaud to pay processing fees.
Tip: Enable direct debit on your form to start accepting ACH transactions with fee coverage. For more information about accepted payment methods, see Blackbaud Payment Processing Fees.
To meet accessibility guidelines, you can now add alternative text to images in donation forms. From Tools, Donation form designer, edit or create a form. Under Form, move the image field from Content in the Form designer to the donation form. Select an image and enter the alternative text.
For more information, see Donation Forms.
28 February 2023
To send notifications to those in your organization who need to know when a donor gives a gift of a minimum value, you can now set a minimum gift amount.
From Tools, Donation form designer, edit or create a form. Under Confirmations, Donation notification, enter email addresses for those you want to send the notification to. Under Minimum gift amount, enter a minimum value to activate sending the notifications.
Additionally, in response to customer feedback, notifications now include relevant personal information you can use to thank donors. Previously, notifications didn't include this information.
For more information, see Donation Forms.
Building on recent changes to help personalize information about your organization, a new setting is available from Control panel, Settings.
From General information, you can now edit the address that displays on gift receipts and giving statements.
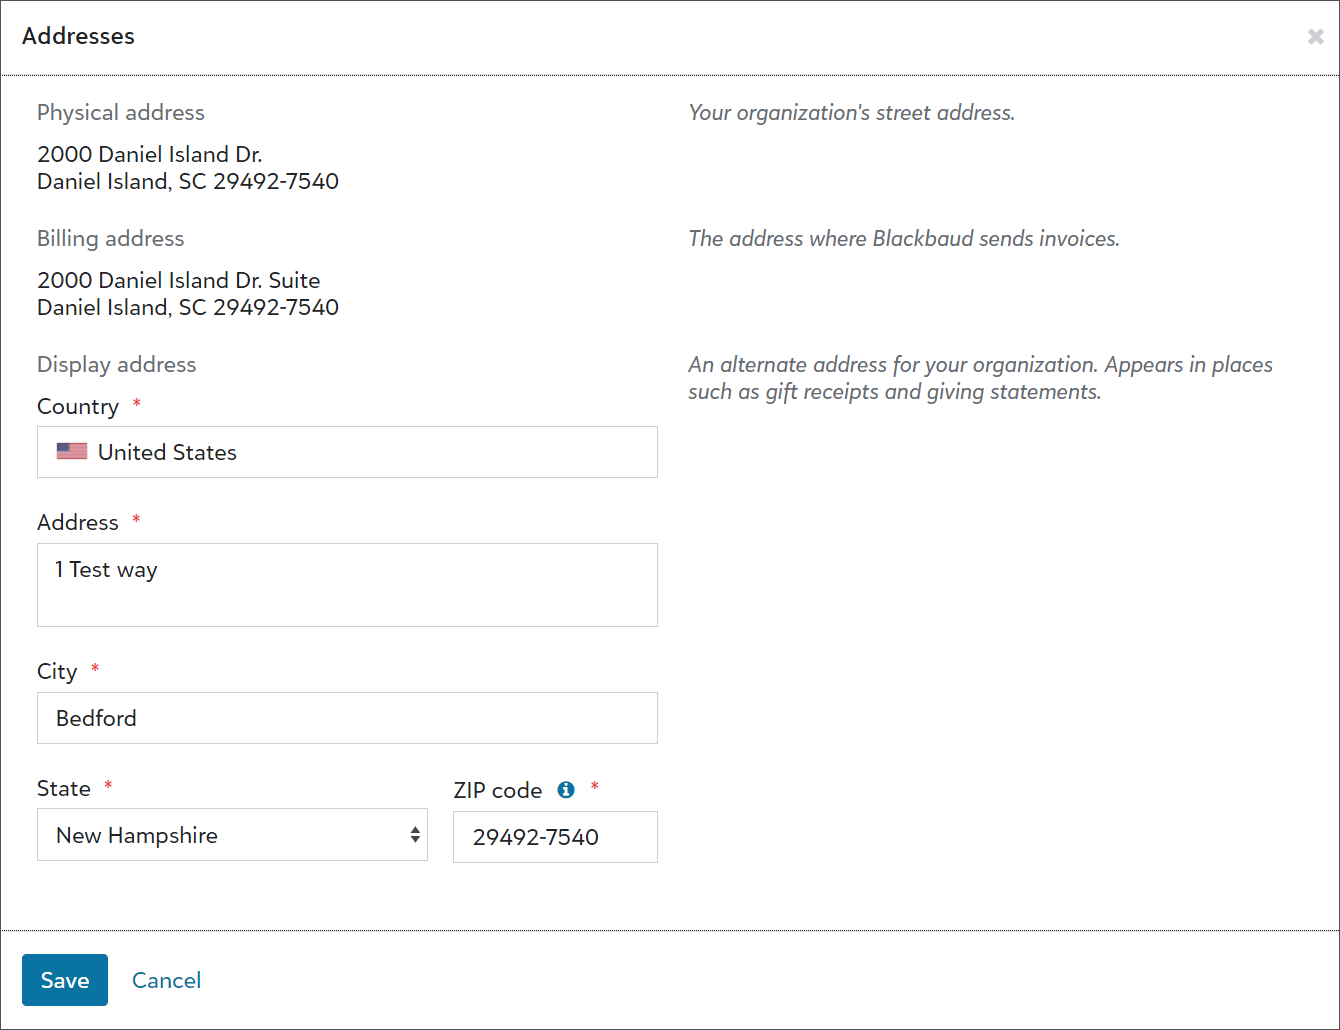
Tip: To change your organization’s physical or billing address, go to the top-level navigation in web view, select your initials, and then open your Blackbaud account. From the Blackbaud welcome page, select Organizations.
Note: Admins automatically have access to manage general information. To provide access to other users, navigate to Control panel, Security. Under Roles, Settings roles, add or edit a role. Next, select Show permissions for General information tasks and include General information.
14 February 2023
You can now use Raiser’s Edge NXT to customize and manage an online portal to help constituents stay connected with your organization.
With the portal, constituents can:
-
Give one-time or scheduled gifts using a debit or credit card, or bank account draft.
-
Manage recurring gifts such as to change payment amounts, or to skip, hold, or end payments.
-
Save payment methods — or use ApplePay or Click to Pay — to avoid entering their payment information each time they give.
-
View their lifetime history of giving, including cash or checks given offline.
-
Email giving statements to themselves for the last calendar year or the year-to-date.
-
Update their name and contact information to keep your organization’s records up-to-date.
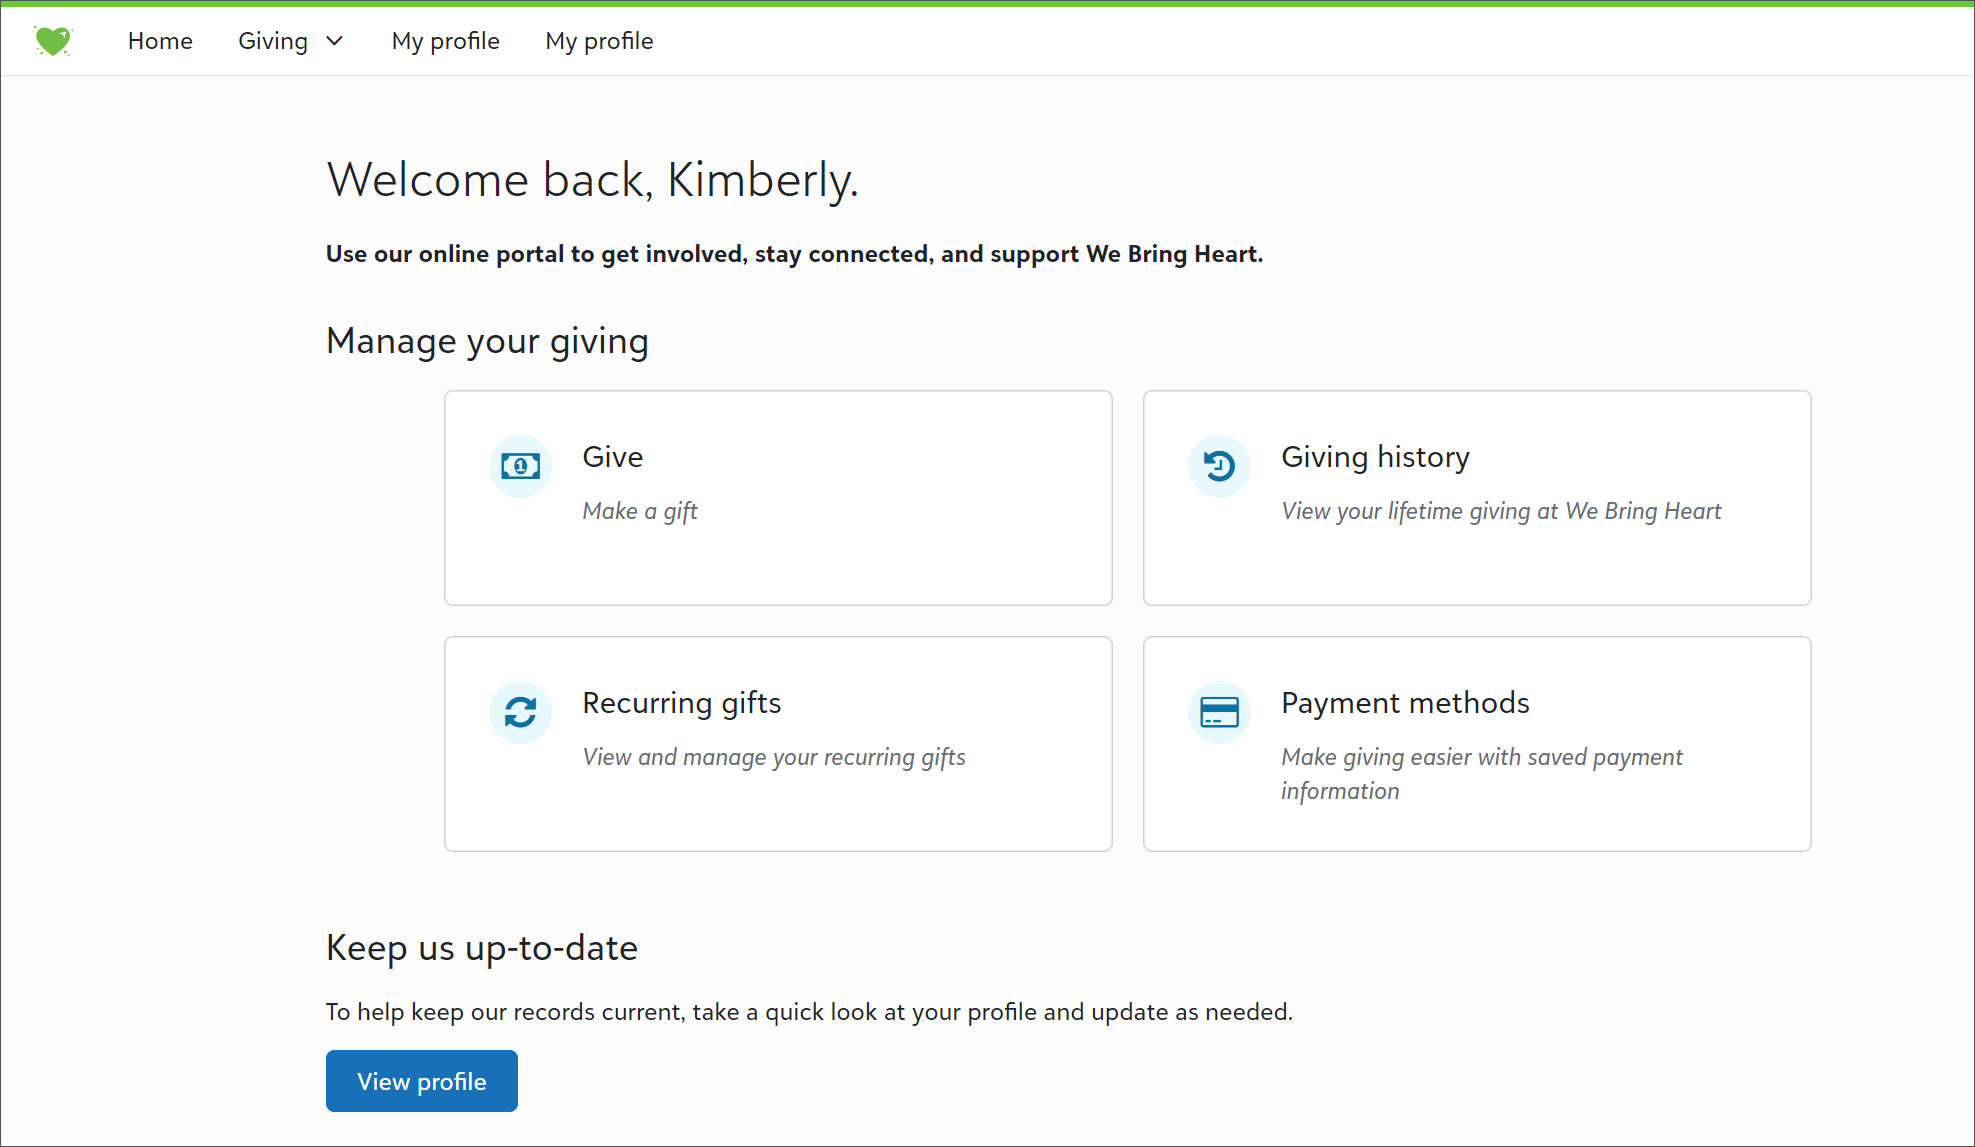
Before constituents can use the portal, an admin must configure settings in Raiser’s Edge NXT, such as giving options, custom branding, and support contact information. After you roll out the portal to your supporters, admins can manage user account access and troubleshoot sign-up issues. They can also manage updates to name and contact information submitted by users.
For more information about how to set up the portal and app and roll them out to your supporters, see Get Started With the Portal.
Patch 31 begins releasing this week, and includes behind the scenes performance and Queue stability improvements and bug fixes. It also introduces new consent categories to enhance consent options for users and their constituents. For more information, see this Knowledgebase article.
31 January 2023
To give donors a mobile-friendly way to donate to your organization, download the QR code for a donation form. You can add it to your print materials, such as posters and brochures. From Tools, Donation form designer, edit or create a form. Under Publish, select Download QR code. For more information, see Donation Forms.
With recurring gift upsell, a monthly recurring gift prompt displays to donors who select a one-time gift option. Now, when donors use the prompt to switch to a recurring gift, you can view the projected gift total for all successful recurring gift upsells over the next 12 months from Tools, Donation form designer.
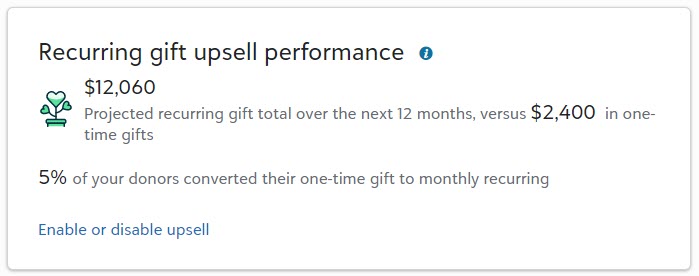
To enable recurring gift upsell on all forms with one-time gifts and Blackbaud Merchant Services, from Tools, Donation form designer, select Enable on all eligible forms under Encourage donors to keep giving.

To enable it on a single form, create or edit a form. Under Get started, Fundraising opportunities, select Enable recurring gift upsell for one-time gifts. For more information, see Recurring Gift Upsell.
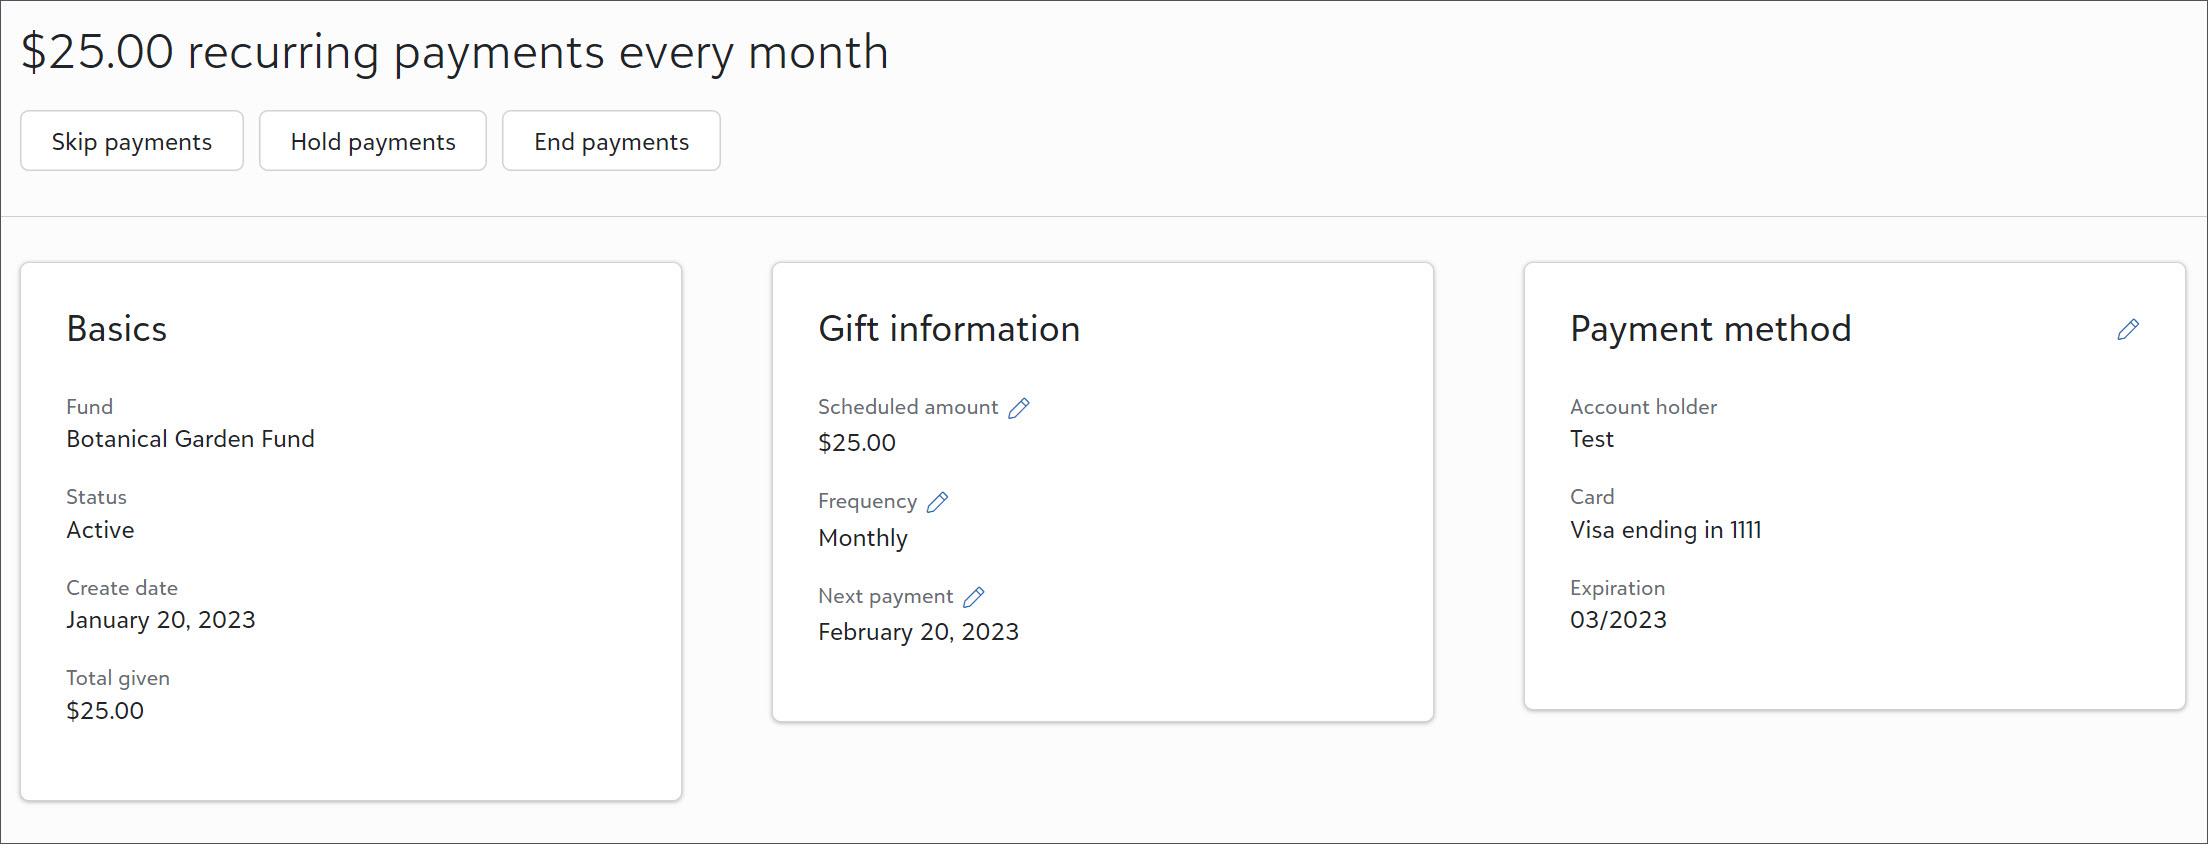
New options are available on the Recurring gifts page in the online portal for donors to manage their recurring gifts. When a portal user selects Recurring gifts, then selects a recurring gift from the list, they can now:
-
Edit the Scheduled amount field under Gift information to change the gift amount and fund.
-
Edit the Frequency and Next payment fields to change their payment schedule.
-
Select Skip to pause their payments for a specific period of time.
-
Select Hold to pause their giving until they return to the portal and resume payments.
Note: Also, when a donor selects End payments or Hold, they now have the option to skip payments instead of ending or pausing their gift.
Previously, donors could only view their recurring gifts and stop their future payments.
To turn on recurring giving in the portal, go to Tools, Settings, Feature configuration and select Enable feature under Recurring gifts. Next, select a donation form.
Note: The form you select also determines the fields and options available if you also enable giving in the portal.
Tip: If you previously enabled recurring gifts, but didn’t enable giving in the portal, you must now select a donation form to allow donors to manage their recurring gifts. From Tools, Settings, Feature configuration, select Edit settings under Recurring gifts and select a form.
To help your organization comply with various privacy requirements, donors can now delete their portal accounts. From the My profile page in the portal, when a donor selects Delete account, they unlink their BBID from their constituent record which removes their access to the portal and all saved payment methods.
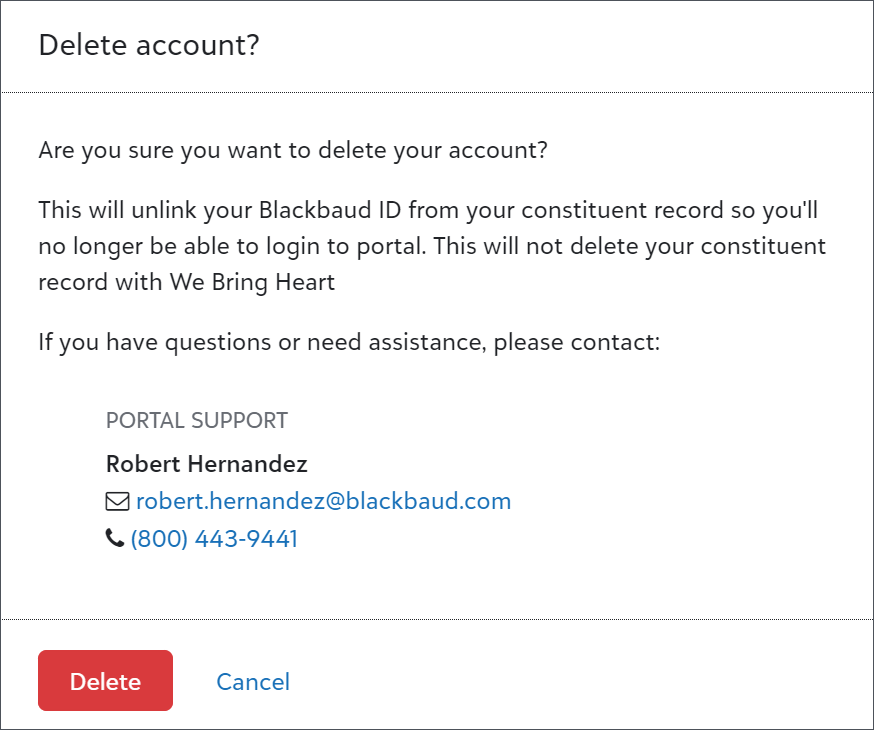
Note: Although donors can remove their own portal record, they must still contact your organization to remove their constituent record from your database. Also, if they don’t end payments before they remove their access, their recurring gifts remain active.
To help personalize information about your organization, new settings are available from Control panel, Settings.
From General information, admins can:
-
Manage which name to use for your organization so that supporters recognize it in the portal, email messages, and forms. Otherwise, Raiser's Edge NXT uses the legal name that was provided at the time of purchase.
-
If your organization references more than one tax ID, such as for gift receipts in parts of the organization that were merged or acquired, admins can enter a tax identifier to use as an alternate to the primary tax ID.
Tip: Blackbaud uses your organization’s primary tax ID to verify your non-profit status. To change it, contact Support.
Note: Admins automatically have access to manage general information. To provide access to other users, navigate to Control panel, Security. Under Roles, Settings roles, add or edit a role. Next, select Show permissions for General information tasks and include General information.
17 January 2023
Your donors can now email their giving statements to themselves in the portal. When they log into the portal, they can select Giving history, Email statement, and then choose to email themselves a statement for the last calendar year or the year-to-date.
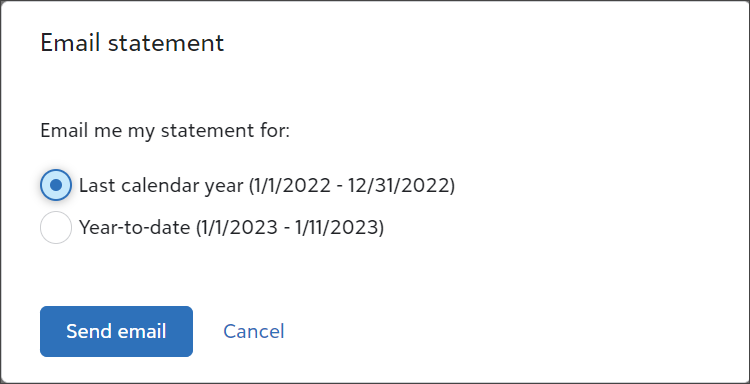
Note: If the giving statement email is not delivered, you can still email the donor their giving statement in the web view under Fundraising, Giving statements.