Standard Donation Forms
Standard Donation Forms are customizable forms you create to help raise money for your organization.
Create form
From Online Giving, select New donation form, Standard Form. Under Get started enter a name for the form.
Designations
Donations are assigned to a specific designation that represents their financial purpose. To let donors choose from multiple designations, you can add more than one to a form in the Designations field and make a default selection in the Default designation field.
Split gift amount between multiple designations
To let donors split their gift between more than one designation, select Enable donors to split gifts between designations.
Tip: When you add multiple designations, you can rearrange them and add donor-friendly labels. Under Form, select Click to edit on the designation field on the form. Under Designation list, choose whether to use the default names or set new labels and change the order. When you choose select Set order, you are able to drag the designations to the order you want. To learn how to pass designations without adding them to the form, see Fundraising Parameter Hyperlinks.
Change designations labels and order
If you add multiple designations to a form, you can change the designations label and names. Under Form, select the designations on the form.
-
To change the field label, change the text in the Designation label field.
-
To change the designation names, under Designations list, select Set labels. Change the text under Display name for each designation.
Note: You can also change the sort order, whether you want to manually set the order with the Set order option or sort alphabetically.
To learn more about designations, see:
-
Designations in Blackbaud CRM
-
Designations in Altru
Gift types
Every form must have at least one type of gift to accept. One-time and recurring gifts are enabled by default. You can configure the gift types under Form.
Campaign and appeal
To track fundraising initiatives, under Hidden fields, add a campaign and an appeal to the form. After the donor submits the form, this information appears in the contribution record.
Set payment processing and fee coverage
Standard Donation Forms connect to payment configurations in your Blackbaud Merchant Services account. Select the payment configuration under Process payments with.
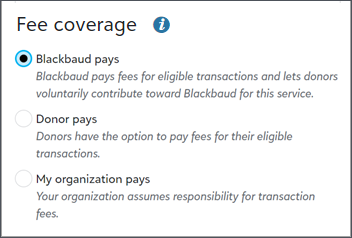
Fee coverage
|
To bring more revenue to your mission, configure the form so your donors or Blackbaud covers the online transaction fees. Under Fee coverage, select how your organization will cover fees for donations given through this form. For more information, see Fee Coverage. |

|
Enable recurring gift upsell
|
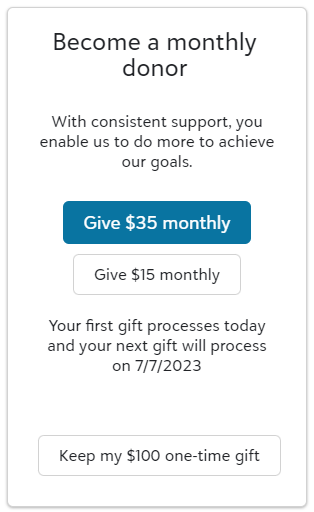
To encourage donors who give a one-time gift to give monthly, enable Recurring Gift Upsell. It displays as a prompt when donors choose a one-time gift. Under Fundraising opportunities, select Recurring gift upsell. |

|
Enable Intelligent Ask
Intelligent Ask helps increase the average gift amount for your organization by presenting personalized one-time gift amounts to anonymous donors. Blackbaud's data model adjusts the one-time gifts amounts you configure on a form to display the amounts a donor is most likely to give. It uses a combination of data such as the device and browser accessing the form to determine those amounts per donor.
To turn it on, select Intelligent Ask, under Fundraising opportunities.
Edit gift types, form fields, and style
To gather more information from donors and change the look and feel of the form, you can add, configure, remove, and style fields, such as headers and gift options, under Form.
Gift amounts, layout, and configuration
To change the layout of the gift amounts and configure recurring gifts, under Form, select Click to edit from the gift amounts. To learn how to configure gift types, see Gift Options.
Branding

To help donors trust your form, it's a good idea to include your logo and mission statement. This is helpful when you are unable to embed the form on a webpage. For more information, review examples.
 Add logo
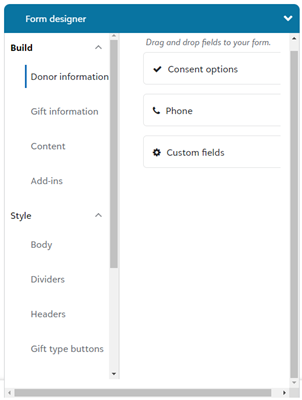
To add a logo to your form, select Content in the Form designer. Next, select and drag Image to a location on the form. Then choose the image.
Tip: Images should be less than 2 MB.
 Mission statement
To add a mission statement, select Content in the Form designer. Next, select and drag Text only to a location on the form. Then add the mission statement.
 Edit style
To match colors and fonts to your organization's branding, select Style in the Form designer. Next, select each form section and update styles as necessary.
Additional Fields
When editing your form, you can collect more information from donors. Select and drag different fields from the Form designer to the form. These include letting donors:
-
Make anonymous gifts.
-
Enter gift comments.
-
Give gifts from their businesses.
-
Give in honor or memory of someone.
-
Choose the communications they want to receive.
For more information, see Fields.
 Configure fields
To make changes to a field or button, such as changing the gift amounts, select Click to edit on the field on the form.
Note: Address is not configurable, but you can remove it from the form.
Enable matching gifts
To learn how to enable matching gifts on your form, review the 360MatchPro add-in on Blackbaud Marketplace.
Review and edit confirmations
Under Confirmations, you can configure what happens after donors make their donation.
Thank you message
After a donor submits the form, this page and its content appear. Its intent is to thank donors for their donations and confirm that their donations were successful. If you choose to use the default content selection, it contains the donor's name and their gift amount. If you choose to redirect donors to a webpage on your organization's website, you can include calls to action.
Thank you email
After a donor submits the form, the email is sent to confirm their donation with transaction details. The email contains a default message and personalization. You can edit the subject line, the message, and reply-to and from names and email addresses.
Warning: This email is not a receipt. To issue receipts use
To edit the email message:
-
From Confirmations, select Open email designer.
-
Hover over the message, and select Edit.
-
In the text editor, make any changes you need.
-
To make personalized changes, select Merge, Donation Forms, and choose the fields you want to add.
-
Select Apply.
Tip: If you update the content of the email, you can re-insert merge fields, such as transaction details, from Merge, Donation Forms in the text field.
To learn how to design your email, see Thank You Email.
Send staff notifications
To notify staff when donors submit gifts through the form, enter up to 10 email addresses under Confirmations, Donation notification. In addition, if you don't want to notify staff for every donation made through the form, you can set the minimum gift amount. For example, set the amount to $100, and notifications will only be sent for donations equal to or greater than $100.