What's Recent
In case you need to catch up on what you missed or just want a refresher, here's a recap of Altru's recently released features.
October 2025
 Web form performance improvements
Building on recent enhancements, to provide your patrons with quicker response times and fewer 404 errors, this release includes additional web form performance improvements. Also, caching for calendar date navigation is now in place for all program and event forms.
Updates to TinyMCE HTML editor
This release upgrades Tiny MCE to version 7.5. This improves usability and security for the HTML editor throughout Altru.
Online Giving and Blackbaud Donation Forms
Automatically close donation forms when a campaign ends
To help you gracefully manage donation forms for fundraising campaigns that end, now you can close a form. Closing a form lets you:
-
Set a date and time for the form to stop accepting gifts.
-
Show donors a custom message where you can include links to other forms or webpages.
-
Avoid broken links or QR codes.
-
Continue to view the form's statistics.
For more information, see Close a Donation Form.
Track donation forms with Google Tag Manager
To give you more control in how you manage and track your organization's advertising efforts, donation forms now support Google Tag Manager. To learn more about how to use Google Tag Manager with donation forms, see Track Donation Forms with Google Analytics or Google Tag Manager.
Automatically assign a revenue category to recurring gifts
To save time when posting to the general ledger, you can assign a revenue category from your CRM for recurring gift plans and their payments received through Online Giving. To learn how to set this preference, see Assign a Revenue Category.
Offer donors more designations to choose from on an Optimized Donation Form
To give donors more choices on how your organization uses their gifts, you can add up to 30 designations on an Optimized Donation Form. For more information, see Add Designations to Donation Forms.
Extend Optimized Donation Forms with SKY add-in integrations
Add functionality to your Optimized Donation Forms with SKY add-in integrations from developers and Blackbaud partners. After you connect an add-in to your environment, the add-in appears under Optional fields when you create or edit an Optimized Donation Form. For more information, see SKY Add-ins for Donation Forms.
Improved checkout experience for Standard Donation Forms
To improve the donor giving experience with no scheduled payments downtime, a new dynamic, secure, and PCI v4-compliant checkout is now available for Standard Donation Forms. It lets donors use:
-
Google Pay and Apple Pay for their one-time and recurring gifts.
-
PayPal and Venmo on fee coverage-enabled forms.
Note: For transactions less than $3,000, donor cover displays to donors using PayPal and Venmo on Complete Cover-enabled forms.
With this new experience, for both new and existing Standard Forms, you select the payment configuration and fee coverage options on the new Payment and fees tab. Also, you can now test Standard Forms in the same way as Optimized Forms.
For more information, see Standard Donation Forms Improved Checkout.
Add designation, appeal, and campaign to donation form URLs
Now, you can add parameters such as a designation, appeal, or campaign to a donation form's URL from the form's Publish tab. Under URL parameters, select Build hyperlink with parameters. To learn how to build the URLs, see Add Parameters to URLs in the UI.
July 2025
Web form performance improvements
To provide your patrons with quicker response times and fewer 404 errors, this release includes web form performance improvements and caching for calendar date navigation in pre-registered events.
Updates to TinyMCE HTML editor
This release upgrades Tiny MCE to version 6.8.5. This improves usability and security for the HTML editor throughout Altru.
Online Giving and Blackbaud Donation Forms
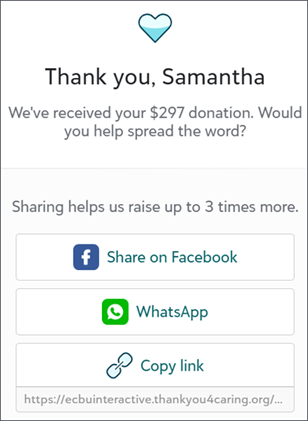
Raise awareness with social sharing on embedded Standard Donation Forms
Donors can now spread the news of their support with others when they give through an embedded Standard Donation Form that has social sharing. To enable social sharing, from Online Giving, create or edit a Standard Donation Form. Next, from Confirmations, select Display social sharing options under Social sharing.
Note: Social sharing is only available when using the default content for the form's Thank you message.
For more information, see Social Sharing on Donation Forms.
Encourage recurring support on Optimized Donation Forms
To encourage reliable recurring support, you can now make monthly giving the first choice donors see on your Optimized Donation Forms. From Online Giving, Overview, create or edit an Optimized Form. Under Donation, select Default to monthly gift.
For more information, see Default to monthly gift in the Optimized Donation Forms tutorial.
Specify recurring gift processing dates for Standard Donation Forms
To help you manage your organization's business processes, you can specify the dates donors choose to process their recurring gifts on Standard Donation Forms. When you create or edit a Standard Form with recurring gifts, under Form, select Clicked to edit over the gift amounts. Under Recurring, configure how and when to process the gifts. For more information, see Configure gift types.
Constituent changes sync to recurring gift plans in Online Giving
To help maintain consistent records in Online Giving, updates made to a constituent's contact information in Altru now automatically sync to their recurring gift plan when the scheduled payment processes. These updates in Altru may include:
-
Changing the constituent associated with the plan
-
Updating the constituent's contact details
-
Merging constituent records
To learn how Online Giving connects to Altru, see Get Started with Online Giving for Blackbaud Altru.
Pass parameters through webpage URLs for Blackbaud Donation Forms
Now, you can pass a designation and an appeal through the webpage URL where a Standard Donation Form is embedded or an Optimized Donation Form launches from. Previously, you could only pass these parameters through a form's Blackbaud-hosted URL and an Optimized Form's hyperlink and button. For more information, see Add Parameters to Webpage URLs.
March 2025
Credit Card Updater now automatically enabled
To ensure accurate reporting between your Altru and Blackbaud Merchant Services accounts, Credit Card Updater is now automatically enabled in Altru. Previously, you had to manually enable it to see the updated results in Altru.
Also, all stored cards are now eligible for updates. Previously, Altru ran a business process to register and deregister cards with the Credit Card Updater service.
For more information, see Credit Card Updater.
Note: Credit Card Updater automatically runs for all Blackbaud Merchant Services accounts and is included in your standard rate!
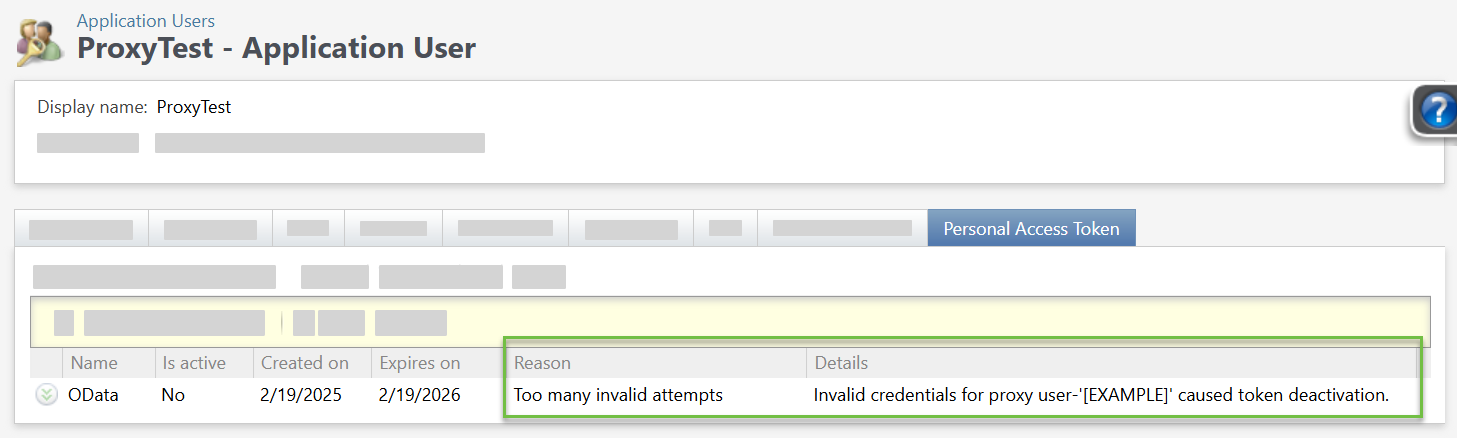
View details about revoked or inactive personal access tokens
Now when you view a proxy user's record, from the Personal Access Token (PAT) tab, you can see details about why a PAT was revoked or made inactive. For example, you can see if Altru automatically marked the PAT inactive due to five or more invalid login attempts.
From Administration, Application users, select a proxy user from the list. Then, select the Personal Access Token tab. Under Reason and Details, view why a PAT was revoked or made inactive.
Improvements to the web form user experience
We made the following improvements to the password reset and user registration web form pages:
-
Based on updated guidance from the National Institute of Standards and Technology (NIST), web form passwords now remain valid for 9,999 days. Previously, patrons were prompted to reset their passwords every 365 days.
-
When a user requests a password reset, the page now instructs them to check their email for instructions or register to create an account. Previously, the page only instructed patrons to check their email, which didn't account for instances where a user may not yet have registered.
-
After a user registers or signs in, the message that displays is now tailored to each use case. The user sees “Thank you for registering…” if they registered for a new account or “You are now logged in…” if they logged in with an existing account. Previously, all users would see “Thank you for registering…” which led to confusion.
-
Other general improvements to the sign-in workflow.
New system role for Omatic integrations
To better support the Altru and Omatic Cloud Data Integration, under Administration, System roles, we added an Omatic Role system role. This role provides access to various tasks and features necessary to facilitate the integration. Previously, you needed to request the role from Blackbaud Support.
Web form component upgrades
As part of ongoing enhancements to web forms, we removed JQuery Migrate, which was no longer needed. We also upgraded the Bootstrap datepicker component to version 1.9.0.
Warning: These changes may affect customizations such as those made by CSS or JavaScript. We recommend that you plan to review and test your web forms after the upgrade to ensure forms work as expected.
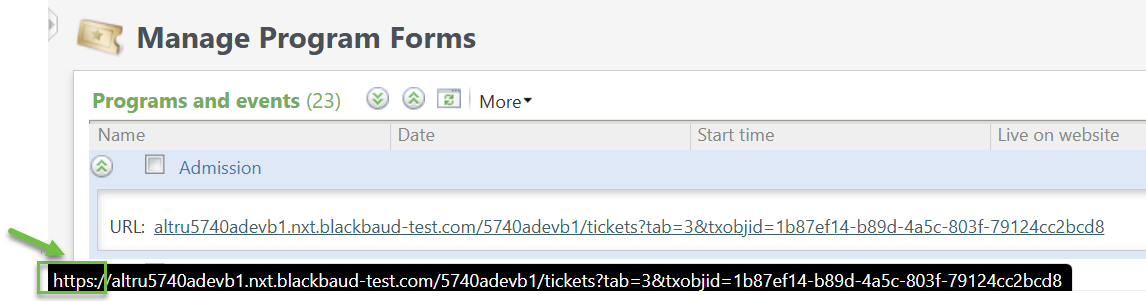
Quicker load times for web form links
To improve the time it takes to open a link from Web, Manage web forms, we updated all URLs from http:// to https://. Previously, there was a slight delay when selecting a web form URL as Altru redirected to the secure version of the page.
Microsoft Report Viewer version upgrade
To improve performance of reports, we upgraded the version of Microsoft Report Viewer used.
Unsupported payment gateways removed from merchant account setup page
Now when you add a new merchant account from Revenue, Blackbaud Payment Service merchant accounts, Altru only shows available gateways such as Blackbaud Merchant Services. Previously, unsupported gateways appeared in the list.
Online Giving and Blackbaud Donation Forms
Add social sharing options for Optimized Donation Forms
To encourage donors to share their support of your organization with their friends, you can enable social sharing for Optimized Donation Forms. Social sharing options will appear to donors when the form launches from a hyperlink or button using the Optimized Loader Script on your website.
From Online Giving, Overview, create or edit an Optimized Donation Form. Next, from Confirmations, select Display social sharing options under Social sharing.
To learn about social sharing and how to use the Optimized Loader Script, see Enable social sharing and Publish an Optimized Donation Form.
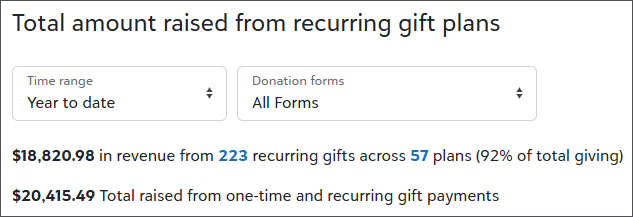
View total amount raised from recurring gift plans in Online Giving
To show the impact of your recurring gift plans, view the Total raised from plans from Contributions. The chart displays the amount raised across all recurring gift plans and the amount raised from all types of payments. For more information, see Contributions.
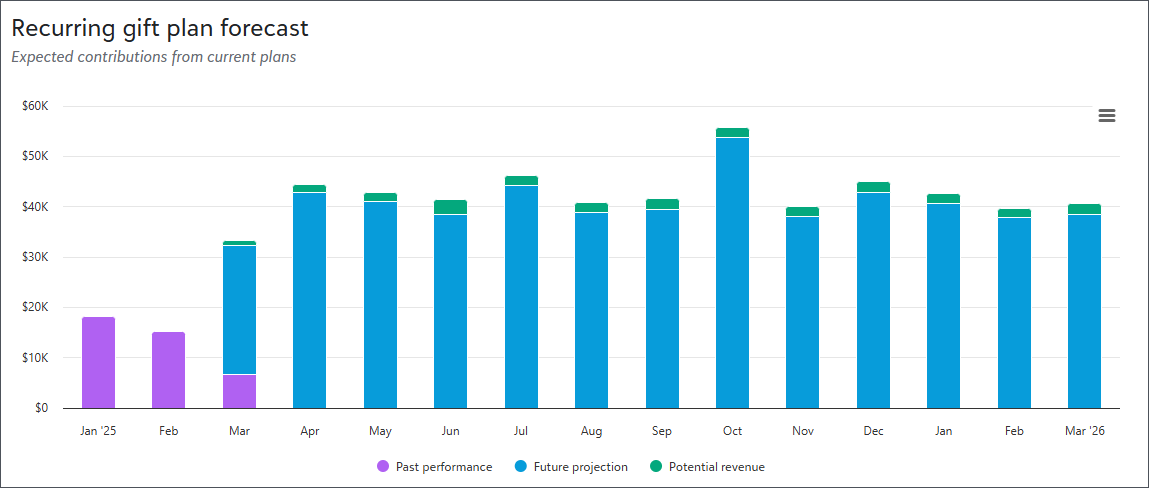
View projected recurring gift revenue in Online Giving
To show the impact of your organization's recurring gift plans, you can view the Recurring gift plan forecast chart in Contributions. It displays past performance, future projections, and potential revenue across active plans and includes a recommended set of action when plans meet specific criteria, such as contacting donors when their plans are paused past 90 days. For more information, see Recurring Gift Plan Forecast.
Terminate recurring gift plans with an end date in Online Giving
To ensure accurate reporting in Altru, if you try to skip the last payment of a recurring gift plan before its end date, you now have the option to terminate the plan. To learn how to skip payments, see Pause, Resume, or End Recurring Gift Payments.
February 2025
Online Giving and Blackbaud Donation Forms
Add the total amount and number of offline gifts to a goal meter in Online Giving
Now you can add gifts received via cash or check to a goal meter in website components to reflect the total amount received for a giving event.
From a goal meter in website components, under Source, enter the total number and amount received for offline gifts. For more information, see Goal Meter.
Manage recurring gift plans ending in 90 days in Online Giving
To help you manage recurring gift plans, now you can view plans ending in 90 days, enabling you to contact donors for an extension. To view plans that meet this criteria, from Contributions, select the prompt Contact donors with recurring gift plans that end in 90 days under Needs Attention.
To learn how to update these plans, see Recurring Gift Plans Ending in 90 Days.
November 2024
Online Giving and Blackbaud Donation Forms
Display subsequent recurring gifts on the Total gifts over time chart in Online Giving
Previously, the Total gifts over time chart only displayed the first gift in a recurring gift. Now it displays all subsequent gifts in a recurring gift to more accurately display your received funds.
From Online Giving, under Total gifts over time, select Gift type, Recurring gifts. For more information, see Performance for All Forms.
Improved recurring gift plan management in Online Giving
To help you manage recurring gift plans in Contributions, from Recurring gift plans, select a plan. To place payments on hold indefinitely or to skip up to ten payments, select Pause plan. You can also edit the next payment date in the plan under Gift summary. For more information, see Recurring Gifts.
Pass credit card information from Online Giving to Altru
To improve your reconciliation process and verify a donor's card information when they ask for a refund, the following fields now automatically populate on gift records in Altru:
-
Name on card
-
Credit card (last four digits)
-
Expires on
-
Authorization code
October 2024
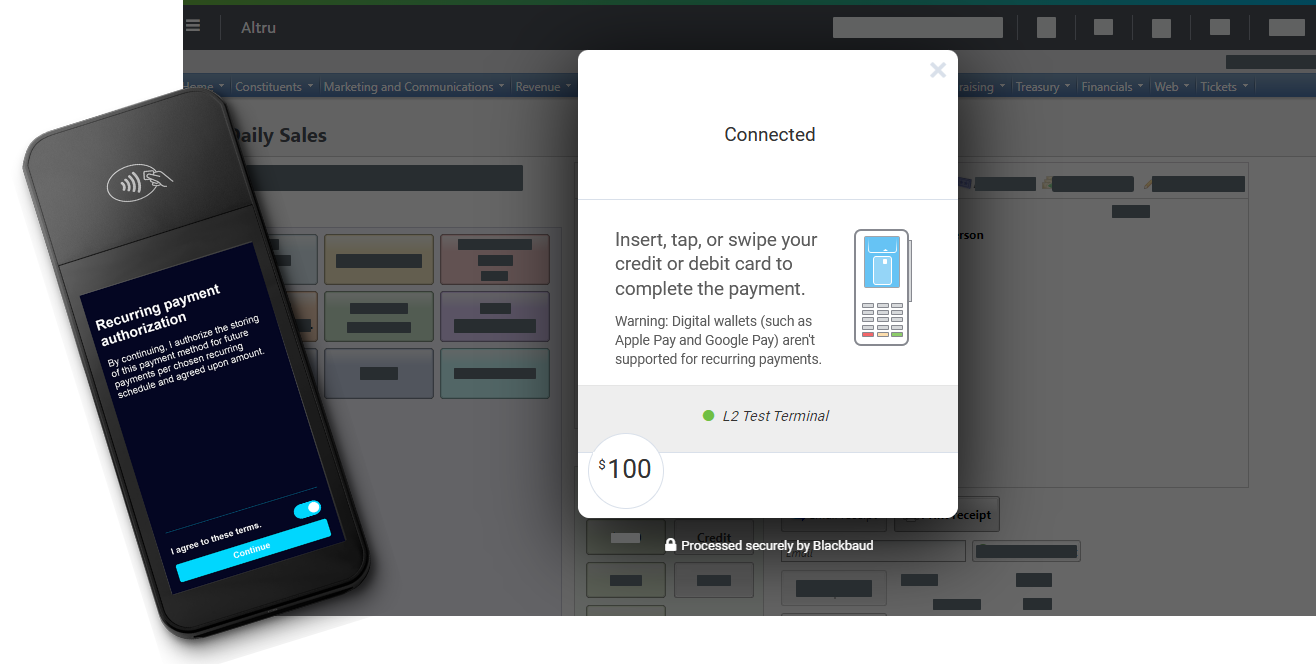
Accept recurring payments through Payment Terminal™ devices
To provide your supporters with more ways to pay, Blackbaud’s Payment Terminal solution now supports recurring payments paid by credit and debit card. Previously, only one-time payments were supported.
Warning: Currently, Payment Terminal doesn’t support recurring payments paid by digital wallets (such as Apple Pay and Google Pay). One-time payments are still supported.
To pay for a recurring transaction, such as an auto-renewing membership, payers must authorize your organization to store their payment method by agreeing to terms shown on the Payment Terminal device. You should also communicate to the payer the terms and conditions for recurring payments. For example, you should set up and send an appeal communication to auto-renewing members.
Payment Terminal is available to organizations who process payments through Blackbaud Merchant Services. With Payment Terminal, you can:
-
Accept contactless payments via cards with embedded chips and “tap to pay” technologies.
-
Process payments three times faster than with a magnetic swipe device.
-
Protect constituents and your organization from credit card fraud with EMV-certified card readers that offer end-to-end encryption.
-
Conveniently reconcile Payment Terminal transactions with others processed through your Blackbaud Merchant Services account.
Visit Payment Terminal resources to get started!
Web form component upgrades
As part of ongoing security enhancements, we upgraded web forms to use jQuery Migrate version 3.5.2 and Bootstrap version 5.3.3.
Warning: These changes may affect customizations such as those made by CSS or JavaScript. We recommend that you plan to review and test your web forms after the upgrade to ensure forms work as expected.
Enhancements to non-interactive "proxy" users
For those of you who integrate with Altru through Blackbaud's Infinity Web Services APIs, we made the following changes to proxy user authentication:
-
To improve performance when authenticating through proxy users, we implemented caching and added changes to reduce overhead calls.
-
Proxy users can now access the WSDL by specifying the database name in the URL.
-
We now support proxy user authentication for the following endpoints:
-
~/ODataQuery.ashx
-
~/AppFxWebService.asmx
-
~/vpp/bizops
-
~/util/DataList.ashx
-
~/rssfeed.ashx
-
~/kpidashboard.aspx
-
~/ping/dynamic.aspx
-
~/KpiEndpoint.ashx
-
~/diagnostics/processStats.ashx
-
~/diagnostics/processStats.asmx
-
~/ping/static.htm
-
~/olap
-
~/util
-
~/dashboards/GetFlashDashData.ashx
-
~/Upload/FileUpload.ashx
-
~/Upload/CreditCardFileUpload.ashx
-
~/Download
-
~/catalog.ashx
-
~/ShellFind.ashx
-
~/KpiDashboardLanding.aspx
-
~/HeartbeatManager.ashx
-
~/formimage.ashx
-
~/AdHocQuery.ashx
-
~/webui
-
~/uimodel
-
~/additional_services
-
Enhancements to the Help experience
To improve how you interact with and consume help resources, we’ve made accessibility enhancements and updated the look and feel of Help:
-
The contrast of the help icon and sub-headers in the help window now meet web accessibility requirements.
-
Feedback form inputs are now labeled for screen readers.
-
Icons feature a more targeted approach and contrast between notes and tips.
-
Nested subheadings improve scanning and better help you understand the hierarchy of content.
Reminder: API and OData connections now require authentication via proxy users
To provide a more secure and streamlined authentication experience for custom integrations, starting October 31, 2024, OData and SOAP API connections require a non-interactive “proxy” user and personal access token (PAT) to authenticate. After this date, you won't be able to authenticate these types of connections with your Blackbaud ID.
Note: This change doesn't impact SKY API connections or traditional Altru application users.
To avoid interruption in custom applications, reports, or other integrations, if you currently use Blackbaud ID to authenticate with OData or SOAP API connections, follow these steps before October 31:
-
Update your connection to use the proxy user and PAT (instead of your Blackbaud ID).
Note: For integrations built by a Blackbaud Partner, reach out to them for assistance updating the connection.
For more information, visit the Altru Community.
Reminder: Deprecation of non-responsive web form layouts
To ensure an optimal user experience for online patrons, as of the 5.32 release, Altru no longer supports non-responsive web form layouts. Only responsive layouts are available and supported.
Responsive layouts ensure your forms automatically adjust and adapt their layout and content based on the size and orientation of the patron's device or browser window. For more information, see Design Web Pages.
Note: This change only impacts a small number of organizations, as most organizations already have responsive layouts in place. If your organization was previously using a non-responsive layout, you received an email from Blackbaud in early September. If you haven't already changed to a responsive layout, your design automatically defaults to the corresponding responsive design that matches your previous layout.
Online Giving and Blackbaud Donation Forms
Add a goal meter to an Optimized Donation Form
To encourage donors to help you meet your fundraising goals, you can now add a goal meter to a branding card for an Optimized Form.
When you create or edit a branding card in Online Giving, under Desktop, select Include goal meter and set its color. Next, set the fundraising goal in the form that uses the branding card. For more information, see Branding Cards and Optimized Donation Forms in Online Giving Help.

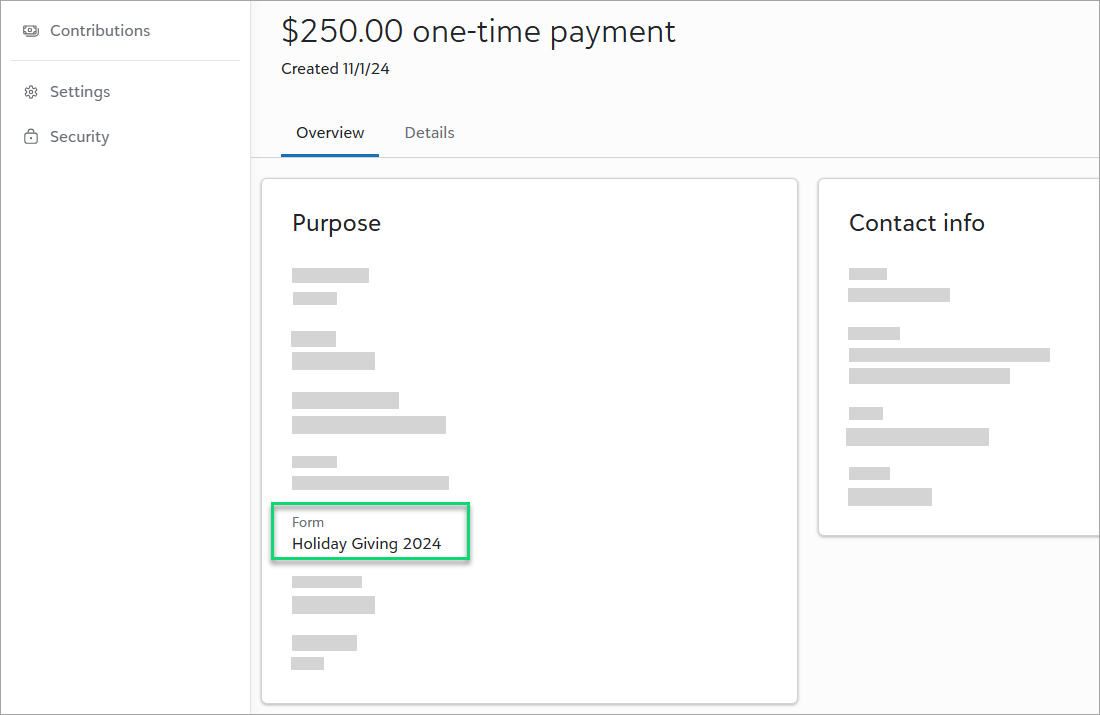
View the donation form name on a contribution record in Online Giving
To track where a gift originates, the donation form name now displays under Purpose on the contribution record. In Contributions, select the gift from All payments under Related links.
Tip: To view the form name on the payments list, under Related links, select All payments. From Columns, select Form and apply the changes.
Display subsequent recurring gifts on the Total gifts over time chart in Online Giving
Previously, the Total gifts over time chart only displayed the first gift in a recurring gift. Now it displays all subsequent gifts in a recurring gift to more accurately display your received funds.
From Online Giving, under Total gifts over time, select Gift type, Recurring gifts. For more information, see Performance for All Forms.
Improved recurring gift plan management in Online Giving
To help you manage recurring gift plans in Contributions, from Recurring gift plans, select a plan. To place payments on hold indefinitely or to skip up to ten payments, select Pause plan. You can also edit the next payment date in the plan under Gift summary. For more information, see Recurring Gifts.
Pass credit card information from Online Giving to Altru
To improve your reconciliation process and verify a donor's card information when they ask for a refund, the following fields now automatically populate on gift records in Altru:
-
Name on card
-
Credit card (last four digits)
-
Expires on
-
Authorization code
September 2024
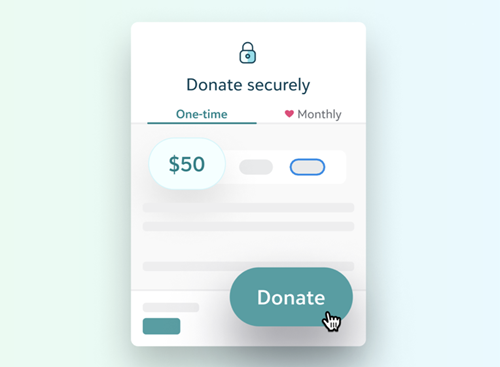
Raise more with Blackbaud Donation Forms in Online Giving
With Online Giving, you can improve your fundraising efforts using Optimized and Standard Donation Forms.
-
Optimized Forms require minimal set up and encourage donors to complete transactions because of a streamlined design that captures payments before collecting contact information. To make data-driven decisions to optimize donor experiences and help you raise more, we conduct A/B testing.
-
Standard Forms give you the most control and use a drag-and-drop designer to help you create a customized form.
After you connect your Altru solution to Online Giving, gifts from donation forms flow to Contributions in Online Giving and Revenue in Altru. From Contributions, you can:
-
View one-time and recurring gift payments.
-
Retry failed recurring gift payments.
-
Pause, resume, or end a recurring gift plan.
To learn more about these capabilities, see Welcome to Online Giving!
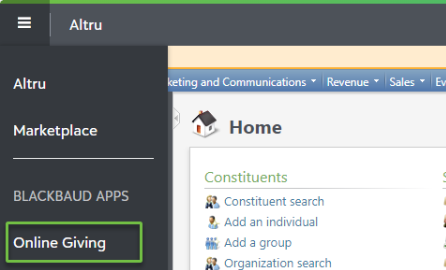
Tip: Organization admins! Access Online Giving from your solution menu.  To learn how to make a user an Online Giving solution admin, see Online Giving Security.
June 2024
Authenticate OData connections via proxy users
To streamline OData connections, you can now use a proxy user to connect to your Altru database. Previously, proxy users were only supported for SOAP API endpoints.
As a reminder, Altru supports proxy users for the following:
-
~/ODataQuery.ashx
-
~/AppFxWebService.asmx
-
~/vpp/bizops
-
~/util/DataList.ashx
For more information, see Non-Interactive Proxy Users.
Performance improvements
To provide your patrons with quicker response times when purchasing tickets online, this release includes performance improvements for program web forms. Also, to improve back-office sales functions and operations, a new business process now runs nightly to remove stale, pending sales orders that may cause slowness in other areas of Altru.
Updates to TinyMCE HTML editor
This release upgrades Tiny MCE to version 6.8.2. This improves usability and security for the HTML editor throughout Altru.
Updates to JQuery UI for web forms
As part of ongoing security enhancements, we upgraded web forms to use version 1.13.2 of JQuery UI.
March 2024
View credit card reference tokens in ad-hoc queries
To help you identify recurring payments that fail due to missing reference tokens, you can now query on credit card tokens in ad-hoc queries. This enhancement is especially helpful for those of you who process payments through Blackbaud Payment Terminal™.
To protect sensitive payment info for recurring gifts and memberships, the Blackbaud Payment Service securely stores card details in its vault and replaces them with reference tokens in Altru. Payments that are missing reference tokens will fail to process.
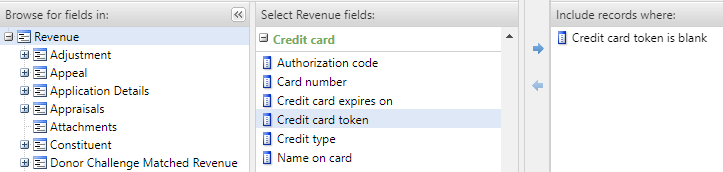
To identify revenue records that are missing credit card tokens:
-
From Analysis, Information Library, add or edit an ad-hoc query.
-
Under Browse for fields in, select Revenue.
-
Under Select fields, expand the Credit card node and select Credit card token.
-
Add the field to your query criteria or results as needed.
For example, if recurring memberships were incorrectly purchased through a Payment Terminal device, create a query to identify and resolve them. For more information, see How can I find recurring memberships that were processed by an Altru Payment Terminal? or How do I identify recurring memberships that do not have a credit card token? in Knowledgebase.
January 2024
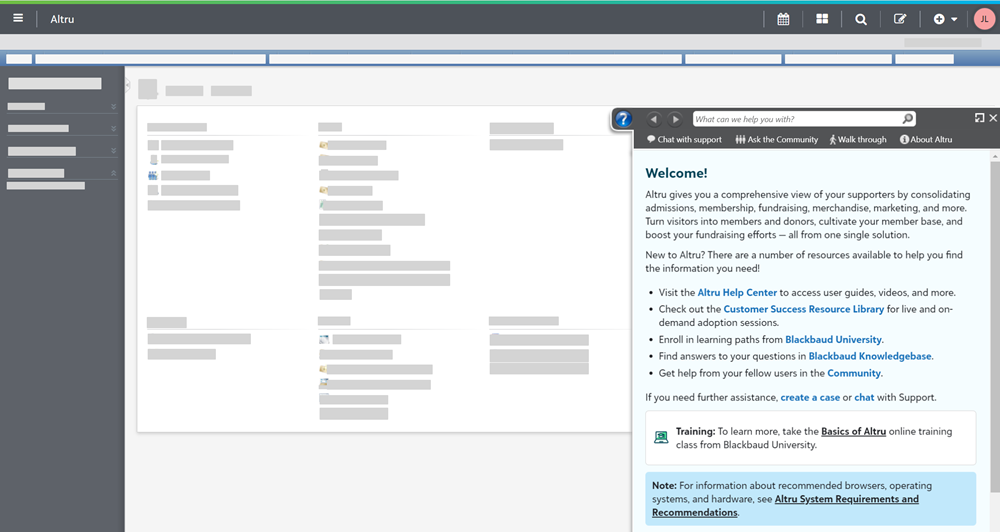
Enhancements to help resources
We recently introduced the following enhancements to the Altru Help Center, your central location for help resources:
-
The ability to search and quickly navigate to relevant topics.
-
A featured highlights section for timely resources and upcoming events.
-
Updated help topics that feature a streamlined display and easier navigation from the left side.

Also, the Help Center is now easily accessible from Altru:
-
To access the help center homepage from Altru, open the help panel and select Search the Help Center from the bottom of any topic.
-
To open a topic with a full-page view in a new browser window, from a help topic in Altru, select Open in browser.
-
To access the Help Center when you're working outside of Altru, bookmark this URL.

June 2023
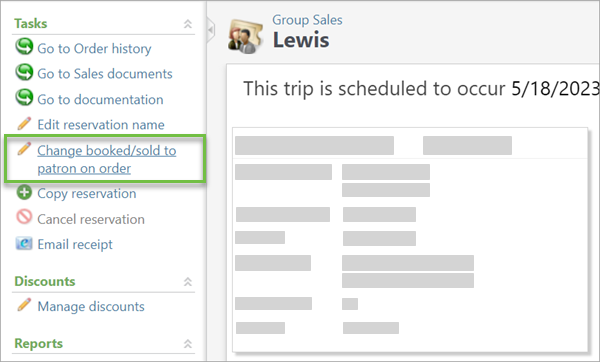
Change the patron on a group sales order
To give you more flexibility when managing group reservations, you can now change the patron on a group sales order.
-
From a group sales record, under Tasks, select Change booked/sold to patron on order.
-
Search for and select the new patron.
-
Choose whether to also change the contact or itinerary leader.
-
When finished, select Save.
After you save, the sales order and all associated revenue are linked to the new patron.
Respect individual and universal opt-out signals
To help your organization comply with data privacy laws, it's now easier to:
-
Record and respect individual opt-out signals.
-
Recognize and respect universal opt-out signals.
Record and respect individual opt outs
Pursuant to new US state laws, an individual has the right to opt out of the processing of their personal data for purposes of targeted advertising or the sale of personal data. Now when you add or edit an individual's record in Altru, you can indicate whether they opt out of sales or targeted ads.
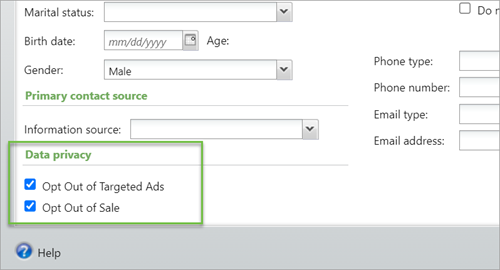
Tip: These fields also appear in the Constituent Update Batch and in import processes (when the Constituent Update Batch template is selected).
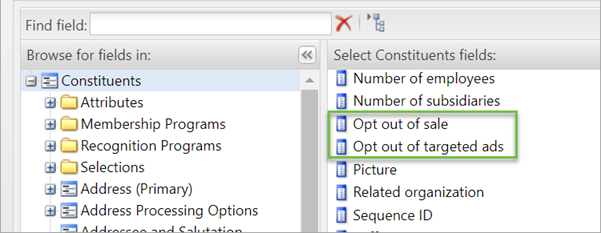
To ensure you can easily respect these preferences, they appear on the individual's constituent record (under the Personal Info tab) and in ad-hoc queries (under the Constituent node).
Recognize and respect universal opt outs
Altru web forms now automatically recognize and record universal opt-out signals like the Global Privacy Control (GPC).
Note: Once an enabled GPC is recorded for a constituent it cannot be changed. Consult your legal counsel to find out how your organization should respond to enabled GPC signals.
How it works
Universal opt-out signals are sent from individual browser accounts when an add-on or plugin, like the GPC, is enabled. The signal is included in header data with every HTTP call made from that browser account. The signal is either enabled or not enabled — there is no specification or configuration beyond that.
When an Altru web form detects a universal opt-out signal from the constituent, it automatically updates their record to indicate they have opted out of sales and targeted ads.
[add screenshot]
Also, the Global Privacy Control (GPC) field now appears under the constituent node in ad-hoc queries.

Note: While privacy laws and best practices are ever-changing, Blackbaud's goal is to provide you with solutions you can use to manage your data with privacy in mind. For more information about privacy laws and compliance, visit Blackbaud's Privacy Resource Center.
Connect custom applications with SKY API®
To extend the functionality of Altru and do more with your constituents and fundraising efforts, Altru now supports the use of SKY API endpoints. SKY APIs are modern, open, industry-standard application programming interfaces (APIs) that can be used to develop robust applications and extensions.
Your organization can use applications created by Blackbaud, providers in the Blackbaud Marketplace, someone at your organization, or other approved external developers.
Browse and connect to apps
The Blackbaud Marketplace features applications by Blackbaud and Blackbaud partners that enable you to extend the functionality of your Blackbaud solutions. Visit the Marketplace to:
-
Search for offerings that are compatible with your Blackbaud solutions.
-
Directly request follow-up from trusted providers.
-
Find new technology that works with the Blackbaud solutions you use every day.
From the Marketplace, you can view details about each application added, including the application publisher. You can also filter the list of apps by Blackbaud solution. To use an application, from its details page, select Connect.
Note: Only environment admins in Blackbaud environments can connect applications. To learn how to become an environment admin, see the Permissions to connect applications in the Marketplace Help.
Build a new app
Want to develop an application using SKY API? See the SKY API Getting Started page for a step-by-step guide.
For more information, visit SKY API for Blackbaud Altru resources and the SKY Developer Community.
Note: Currently, Altru does not support SKY Add-ins or the Microsoft Power Platform.
Web form password reset enhancements
To further improve the experience for web form users, now when a user sets or resets their password, the form:
-
Indicates whether the password meets the requirements.
-
Indicates whether the Password and Confirm password values match.
-
Lets users temporarily reveal their password to see what characters they enter.
March 2023
Apply appeals to online donations
To better track your solicitation efforts, you can now apply appeals to donations made through online sales. The latest release lets you:
-
Configure donation forms to automatically add appeals to donations.
-
Display multiple appeals on a donation form to let your donors choose.
-
Create custom donation form URLs to use in digital marketing efforts.
-
Manually add appeals to existing online donations.
Configure donation forms
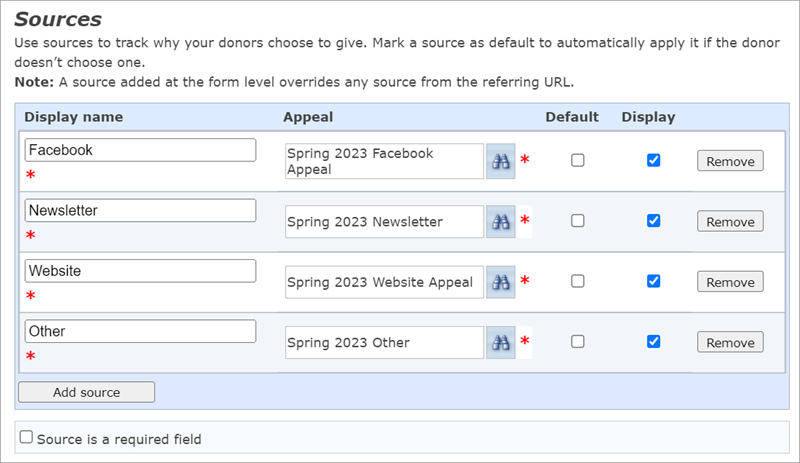
From a donation form's settings, you can now use sources to link donations to specified appeals. Add and display multiple sources to let your donors choose, or add a single, default source to automatically apply the same appeal to all donations given through the form.
-
From Web, Manage donation forms, expand a form's row.
-
Select Options.
-
Under Sources, select Add source.
-
Enter a display name and choose which appeal to add to donations.
Tip: If you plan to display the source on your donation form, use patron-friendly language.
-
Select whether the source is the form's default. If a donor gives through your form and doesn't choose a source, the form automatically adds the default appeal to the donation.
-
Select whether to display the source on your donation form.
-
To require donors to choose a source, select Source is a required field.
Note: If you choose this setting, at least one source must be set to display.
-
Continue adding sources as necessary. When finished, select Save.
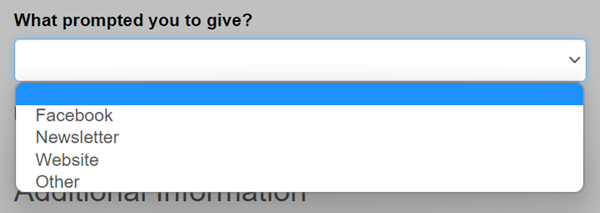
On the donation form, sources you set to display appear in a new field, "What prompted you to give?"
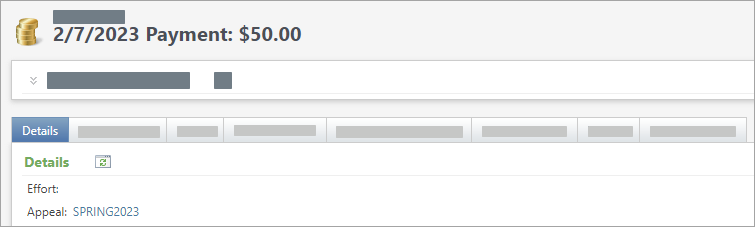
When donors give, the appeal displays under the donation's payment record details.
Track donations through custom URLs
Now when you share your Altru donation form online — such as through a website, social media post, or email — you can include a custom URL to automatically add an appeal to donations you receive.
To create the URL, first configure the donation form's sources as outlined above. Then, add a source tag to the form's URL:
-
From Web, Manage donation forms, expand a form's row.
-
Copy the donation form URL (such as https://1234.blackbaudhosting.com/1234/OnlineGiving).
-
At the end of the URL, add ?source= followed by the appeal name (such as ?source=SPRING2023EMAIL).
Tip: If your appeal name contains spaces, replace each space with %20 — for example, GIVING TUESDAY becomes ?source=GIVING%20TUESDAY.
Examples:
|
Original URL |
Appeal |
Custom URL |
|
https://1234.blackbaudhosting.com/1234/OnlineGiving |
SPRING2023EMAIL |
https://1234.blackbaudhosting.com/1234/OnlineGiving?source=SPRING2023EMAIL |
|
https://1234.blackbaudhosting.com/1234/OnlineGiving |
SPRING2023FACEBOOK |
https://1234.blackbaudhosting.com/1234/OnlineGiving?source=SPRING2023FACEBOOK |
|
https://1234.blackbaudhosting.com/1234/OnlineGiving |
Giving Tuesday |
https://1234.blackbaudhosting.com/1234/OnlineGiving?source=Giving%20Tuesday |
When donors give through your custom URL, Altru automatically adds the appeal to their donations.
Tip: Always test your custom URL before sharing it with supporters.
Note: A source added at the donation form level overrides any source from the referring URL. If you plan to track donations via a referring URL, we recommend you don't mark any sources as default.
Add an appeal from a donation record
From its payment record, you can manually add an appeal to an existing donation made through online sales.
-
From Revenue, Transaction search, use search criteria to find the donation.
-
From the search results, select the payment to open its record.
-
Under Tasks, select Manage appeal.
-
Select an appeal, then Save.
The appeal displays under the donation's payment record details.
Reminders and best practices
-
To automatically add the same appeal to all donations given through a form, configure only one source and mark it as default.

-
To use a source tag to create a custom URL, the source must first be configured from the donation form's settings.
-
If you plan to use custom URLs, don't mark any sources as default. A source added at the form level overrides any source from the referring URL.
-
Always test a custom URL before sharing it with your supporters.
-
When you configure sources, keep in mind your organization's appeal structure and how donations will appear in your appeal reports.
-
In Altru, the appeal displays under the donation's payment record details.
For more information about appeals, see Appeals.
For more information about donation forms, see Donation Forms.
Enhancements to unresolved online sales orders
In this release, we made the following enhancements to unresolved online sales orders:
-
To help prevent unresolved orders that occur because of failed payments, the checkout form now warns users if they attempt to leave the page while a payment is in progress.
-
To help you quickly resolve unresolved orders, you can now subscribe to email alerts and receive notice as soon as they happen.
Payment form warning
Unresolved online sales orders can occur if the checkout form fails to complete a payment. For example, if a website user accidentally closes the page while a payment is in progress, the form may not have captured all required info.
To help prevent these instances, users now receive a warning if they attempt to leave the page.

Note: The form displays the default prompt for the user's web browser. The exact message may vary.
Email alerts for unresolved online sales orders
Email alerts help you track activity on your web forms. Now, you can choose to receive notice when an unresolved online sales order occurs.
To subscribe to email alerts, from Web or Sales, under Configuration, select Email alerts for online sales. Enter your email address, select Unresolved online sales orders, then Save.

When an unresolved order occurs, you receive an email with the subject line: Altru Alert - New online sales order: Unresolved.
For more information, see Unresolved Online Sales Orders.
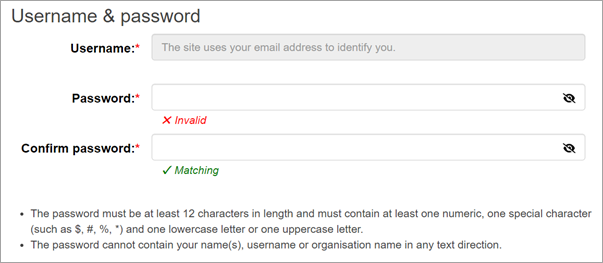
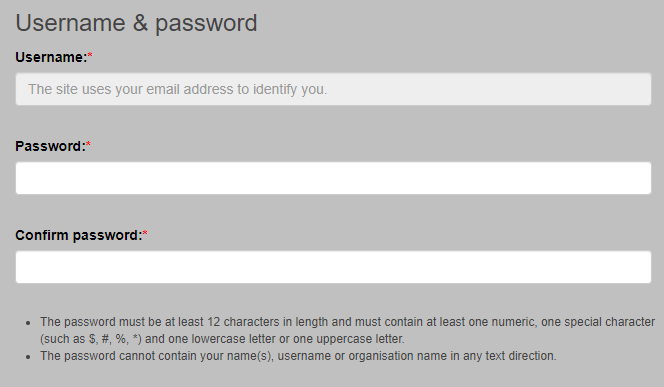
View password requirements on web forms
To make it easier for web form users to create or reset their passwords, web forms now display password requirements. Previously, forms only displayed requirements after a user entered an invalid password.
Passwords must be at least 12 characters long and include at least one number, one special character, and one lowercase or uppercase letter. Passwords cannot contain a user's name, username (email address), or organization name.
API authentication updates
For those of you who use custom applications that integrate with Altru, this release includes an important security update. As part of this update, all API requests must now include an Altru database name.
Recommended actions:
-
Partners and developers — We recommend you review existing integrations and customizations to verify that an Altru database name is included in your requests. To see a code sample that includes a database name, see the Authentication and Authorization developer guide on our Altru API for Partners resource site.
-
Altru customers with custom apps and integrations — It’s possible that no action is needed. However, if your API integration no longer connects after the upgrade, notify your integration partner and reference this update.
For more information about the change, visit Knowledgebase.
Your organization can use applications created by Blackbaud, providers in the Blackbaud Marketplace, someone at your organization, or other approved external developers.
October 2022
Email tickets from daily sales
To save time and resources, you can now email tickets from daily sales. Previously, this option was only available for online and advance Sales.
Enable eTickets for daily sales
Note: To enable eTickets, you must have at least one delivery method — such as eTicket — configured to email tickets upon completion of order. If you sells tickets through web forms, it's likely this is already configured. Otherwise, you can add a new delivery method. For more information, see Delivery Methods.
-
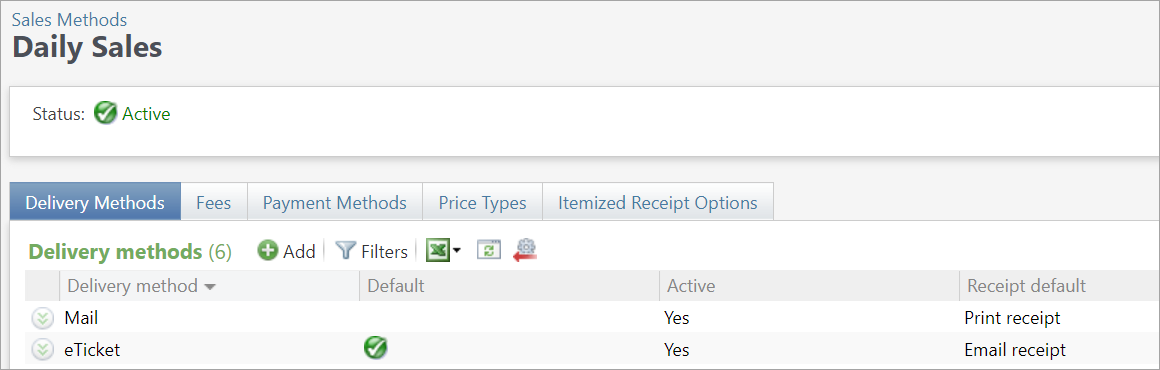
From Tickets, select Sales methods, then select Daily Sales.
-
Under Delivery methods, select Add.
-
Select the eTicket delivery method (or any delivery method configured to email tickets). If your organization plans to send a majority of tickets via email, you can set it as the default.
-
Choose a receipt default, then Save.
Email tickets from a daily sales order
Similar to advance sales, the delivery method now appears on the daily sales order screen.

Note: This won't appear on patrons' receipts.
Recipient information automatically defaults to the patron's primary email address. To add or select a different address, select the delivery method, then select Edit. For anonymous orders (those without a patron), you must add recipient information.
When you complete the sale, an email is sent to the patron with a link to the eTickets page. Settings for the email and eTickets page are shared between daily, advance, and online sales. To manage page settings, from Web, select eTickets. For more information, see Design eTickets Page.
Simplified password reset experience for web form users
The sign in form now displays fields to enter and confirm a user's new password. Previously, users had to select Forgot your password? and follow prompts to reset via email.
Ad-hoc query enhancements
This release includes two enhancements to ad hoc queries:
-
To speed up data entry, you can now paste a list of values when you use One of or Not one of criteria in query. Previously, you needed to paste values one at a time.
Tip: Paste list appears for text and number fields when you select One of or Not one of criteria. For example, you can copy and paste a list of Lookup IDs from a column in a .csv file.
-
You can now filter on remaining program event capacity or view it in your query output. From Analysis, Information library, add or edit a program query. From the editor, select Program Events, then select Remaining capacity. To query on remaining capacity, add it to Include records where. To view remaining capacity in your query output, add it to Results to display.
Authenticate non-interactive accounts via proxy users
To provide an easier, more secure way for non-interactive users to authenticate, you can now create proxy users to integrate your Altru database with other systems — such as a custom application or automated processing task. Proxy users differ from traditional Altru users in that they require programmatic access to your database, but don't need to sign in and perform tasks within the Altru application itself.
In this release, you can now create proxy users for non-interactive accounts. Proxy users:
-
only need to authenticate every 365 days.
-
authenticate via personal access tokens (PATs) instead of passwords.
-
don't require an email address.
-
inherit the same system roles as the linked Blackbaud ID.
For more information, see Non-Interactive Proxy Users.
Performance improvements for program web forms
To provide your patrons with quicker response times when purchasing tickets online, web forms now cache data for page loads, program event calendars, and time selectors. As part of these improvements, Altru now limits scheduling program events to no more than 365 days in the future.
July 2022
Enable multi-factor authentication for web forms
For additional security, you can now enable multi-factor authentication (MFA) for web form users.
MFA is an authentication method that provides an extra layer of security during the sign in process. It requires a user provide a unique security code in addition to their email and password.
How it works
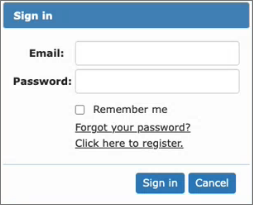
-
To sign in to your web forms, a user enters their email and password and selects Sign in.
-
Next, the user is asked to verify their identify. To receive a security code, they select Send Code.
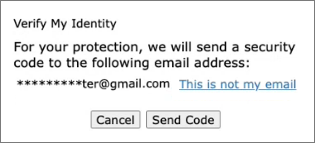
Note: If necessary, the user can select This is not my email to update their email address during this step. This option is only available during the initial sign in — to change the email address at a later date, they must contact your organization.
-
The user receives the security code through email and enters the code on the sign in screen.

-
The user selects Verify and the sign in process is complete.
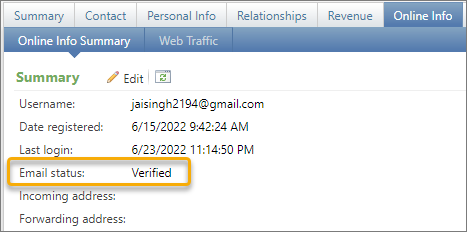
After a user signs in with multi-factor authentication, on their constituent record under Online Info, their email status shows as verified.
Enable MFA
Warning: After you enable MFA, it can't be disabled.
After the upgrade, MFA is disabled by default. To enable it, from Web, select User registration settings under Configuration. Under Multifactor authentication setup, select Enable MFA.
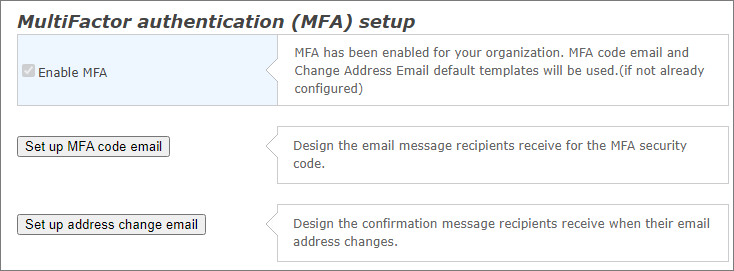
You should customize the default content for email messages that are sent related to MFA:
-
MFA code email — the message a user receives that contains their unique MFA security code. To customize, select Set up MFA code email.
-
Address change email — the confirmation message a user receives when they change the email address for their account. To customize, select Set up address change email.
For example, add your organization's from address and from name so users can easily recognize the sender. You should also add contact info to each message so users know how to reach you for assistance.
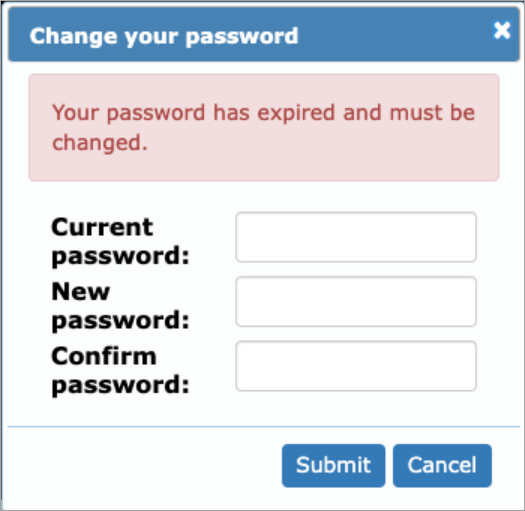
Stronger password requirements for web form users
To increase security for web forms users, web forms now require stronger passwords and automatically expire after 365 days. The new password policy requires passwords to be at least 12 characters in length with a combination of at least one number, one special character, and one lowercase or uppercase letter.
February 2022
Menu enhancements
This release includes an upgraded menu that is more consistent with other Blackbaud solutions and resources.
July 2021
EMV-certified Payment Terminal™ — now Generally Available!
Blackbaud's EMV-Certified Payment Terminal solution is now available in Altru to all organizations who process payments through Blackbaud Merchant Services. With Payment Terminal, you can:
-
Accept contactless payments via credit cards with embedded chips, as well as “tap to pay” technologies like Apple Pay® and Google Pay™.
-
Process payments three times faster than with a magnetic swipe device.
-
Protect constituents and your organization from credit card fraud with EMV-certified card readers that offer end-to-end encryption.
-
Conveniently reconcile Payment Terminal transactions with any other transactions made via Blackbaud Merchant Services.
Visit Payment Terminal resources to get started today!
February 2021
Cleanup of ad-hoc query export output
To ensure quality performance for your instance of Blackbaud Altru, we automatically removed output files that were previously generated by ad-hoc query export processes.
Note: While old output files have been deleted, your export processes remain unchanged.
To prevent unneeded output files from accumulating again, we recommend you periodically remove these. Your organization can set up a global change process that automatically runs and deletes business process output on a regular basis.
To create a global change process that deletes business process output:
-
From Administration, Global changes, select Add.
-
Under Business Process, select Business process output delete.
-
Enter a name and set parameters as needed.
-
When finished, select OK.
To create a job schedule that runs the process automatically:
-
From the global change record, under Tasks, select Create job schedule.
-
Enter a job name.
-
Under Schedule type, choose how often the process should run. If needed, set additional details such as a certain day or time.
-
When finished, select Save.
For more information, see Delete business process outputs globally.
For more information on best practices to keep your database clean, check out our webinars available on demand: 10 Tips for Altru Database Cleanup Part 1 and 10 Tips for Altru Database Cleanup Part 2.